User's Guide
Page 10
... Your Operating System 144 Using Microsoft® Windows® System Restore 145 Using the Operating System Media 146 15 Adding and Replacing Parts 149 Before You Begin 149 Recommended Tools 149 Turning Off Your Computer 149 Before Working Inside Your Computer 150 Hinge Cover ...152 Keyboard 153 Internal Card With Bluetooth® Wireless Technology 154 Coin-Cell Battery 156 Memory 157 Wireless Local Area Network (WLAN) Card 163 Mobile Broadband Card 166 Subscriber Identity Module (SIM) Card 169 Hard ...
... Your Operating System 144 Using Microsoft® Windows® System Restore 145 Using the Operating System Media 146 15 Adding and Replacing Parts 149 Before You Begin 149 Recommended Tools 149 Turning Off Your Computer 149 Before Working Inside Your Computer 150 Hinge Cover ...152 Keyboard 153 Internal Card With Bluetooth® Wireless Technology 154 Coin-Cell Battery 156 Memory 157 Wireless Local Area Network (WLAN) Card 163 Mobile Broadband Card 166 Subscriber Identity Module (SIM) Card 169 Hard ...
User's Guide
Page 114
... page 101). Run the System Set tests in the Dell Diagnostics (see "Coin-Cell Battery" on page 135). A chip on the system board may be malfunctioning. DA Y C L O CK L O S T P O W E R - Then immediately exit the program. The reserve battery that supports the system configuration settings may require replacement (see "Dell Diagnostics" on the hard drive. Correct the settings for...
... page 101). Run the System Set tests in the Dell Diagnostics (see "Coin-Cell Battery" on page 135). A chip on the system board may be malfunctioning. DA Y C L O CK L O S T P O W E R - Then immediately exit the program. The reserve battery that supports the system configuration settings may require replacement (see "Dell Diagnostics" on the hard drive. Correct the settings for...
User's Guide
Page 156
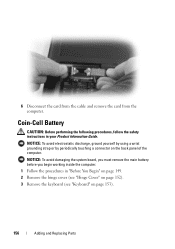
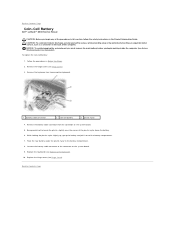
6 Disconnect the card from the cable and remove the card from the computer. Coin-Cell Battery CAUTION: Before performing the following procedures, follow the safety instructions in "Before You Begin" on page 149. 2 Remove the hinge cover (see "Hinge Cover" on...). 3 Remove the keyboard (see "Keyboard" on the back panel of the computer. NOTICE: To avoid damaging the system board, you must remove the main battery before you begin working inside the computer. 1 Follow the procedures in your Product Information Guide. NOTICE: To avoid electrostatic discharge, ground yourself by using a wrist...
6 Disconnect the card from the cable and remove the card from the computer. Coin-Cell Battery CAUTION: Before performing the following procedures, follow the safety instructions in "Before You Begin" on page 149. 2 Remove the hinge cover (see "Hinge Cover" on...). 3 Remove the keyboard (see "Keyboard" on the back panel of the computer. NOTICE: To avoid damaging the system board, you must remove the main battery before you begin working inside the computer. 1 Follow the procedures in your Product Information Guide. NOTICE: To avoid electrostatic discharge, ground yourself by using a wrist...
User's Guide
Page 157
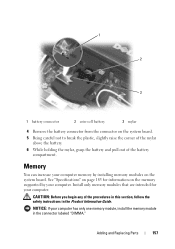
... the memory supported by installing memory modules on the system board. CAUTION: Before you begin any of the battery compartment. NOTICE: If your computer. Adding and Replacing Parts 157 1 2 3 1 battery connector 2 coin-cell battery 3 mylar 4 Remove the battery connector from the connector on the system board. 5 Being careful not to break the plastic, slightly raise the...
... the memory supported by installing memory modules on the system board. CAUTION: Before you begin any of the battery compartment. NOTICE: If your computer. Adding and Replacing Parts 157 1 2 3 1 battery connector 2 coin-cell battery 3 mylar 4 Remove the battery connector from the connector on the system board. 5 Being careful not to break the plastic, slightly raise the...
Service Manual
Page 8
... careful not to break the plastic, slightly raise the corner of the battery compartment. 7. Replace the hinge cover (see Removing the Keyboard). 1 battery cable connector 2 coin-cell battery 3 plastic mylar 4. Connect the battery cable connector to Contents Page Back to Contents Page Coin-Cell Battery Dell™ Latitude™ D630 Service Manual CAUTION: Before you begin any of the procedures in...
... careful not to break the plastic, slightly raise the corner of the battery compartment. 7. Replace the hinge cover (see Removing the Keyboard). 1 battery cable connector 2 coin-cell battery 3 plastic mylar 4. Connect the battery cable connector to Contents Page Back to Contents Page Coin-Cell Battery Dell™ Latitude™ D630 Service Manual CAUTION: Before you begin any of the procedures in...
Service Manual
Page 10
...that the cam lock is in the fully open position before you reconnect the coin-cell battery (see Coin-Cell Battery) before seating the processor. Align the pin-1 corner of the processor so that you replace the keyboard. 6. Tighten the ZIF socket by turning the cam screw clockwise to secure... the processor to Contents Page Replace the media bay device (see Palm Rest). When the ...
...that the cam lock is in the fully open position before you reconnect the coin-cell battery (see Coin-Cell Battery) before seating the processor. Align the pin-1 corner of the processor so that you replace the keyboard. 6. Tighten the ZIF socket by turning the cam screw clockwise to secure... the processor to Contents Page Replace the media bay device (see Palm Rest). When the ...
Service Manual
Page 32
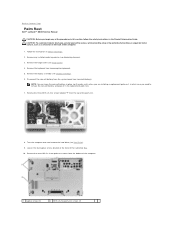
... unpainted metal surface, such as a connector on the palm rest) unless you are installing a replacement palm rest, in which case you begin any installed media bay device (see Coin-Cell Battery). Loosen the two captive screws located at the front of the procedures in this section, follow ... over and remove the hard drive (see Display Assembly). 6. Back to Contents Page Palm Rest Dell™ Latitude™ D630 Service Manual CAUTION: Before you need to remove the coin-cell battery and place it in the replacement palm rest. 7. Remove any of the hard drive bay. 10. Disconnect the coin...
... unpainted metal surface, such as a connector on the palm rest) unless you are installing a replacement palm rest, in which case you begin any installed media bay device (see Coin-Cell Battery). Loosen the two captive screws located at the front of the procedures in this section, follow ... over and remove the hard drive (see Display Assembly). 6. Back to Contents Page Palm Rest Dell™ Latitude™ D630 Service Manual CAUTION: Before you need to remove the coin-cell battery and place it in the replacement palm rest. 7. Remove any of the hard drive bay. 10. Disconnect the coin...
Service Manual
Page 42
... bay device (see Coin-Cell Battery) before you reconnect the coin-cell battery (see Media Bay Devices). 8. Replace the battery. Place the assembly on the thermal-cooling assembly. 4. Back to the appropriate chips. 2. NOTE: If necessary, ensure that all thermal-cooling pads adhere to both the thermal-cooling assembly and to Contents Page Replace the keyboard (see...
... bay device (see Coin-Cell Battery) before you reconnect the coin-cell battery (see Media Bay Devices). 8. Replace the battery. Place the assembly on the thermal-cooling assembly. 4. Back to the appropriate chips. 2. NOTE: If necessary, ensure that all thermal-cooling pads adhere to both the thermal-cooling assembly and to Contents Page Replace the keyboard (see...


