Quick Reference Guide
Page 13
...Using wireless communications devices, PC Cards, ExpressCards, media memory cards, or USB devices • Using high-brightness display settings, 3D screen savers, or other computers with the main battery installed at all times. The lithium-ion battery is significantly reduced when you perform.... Quick Reference Guide 13 Using a Battery Battery Performance NOTE: For information about the Dell warranty for advice on page 14). You can hold a charge) decreases over time. Replace the battery only with your computer. For best results, operate the computer with household waste...
...Using wireless communications devices, PC Cards, ExpressCards, media memory cards, or USB devices • Using high-brightness display settings, 3D screen savers, or other computers with the main battery installed at all times. The lithium-ion battery is significantly reduced when you perform.... Quick Reference Guide 13 Using a Battery Battery Performance NOTE: For information about the Dell warranty for advice on page 14). You can hold a charge) decreases over time. Replace the battery only with your computer. For best results, operate the computer with household waste...
User's Guide
Page 42
... and cause personal injury or equipment damage. The battery is low. For more information about accessing Windows Power Options Properties or Dell QuickSet, which you insert the battery into the computer. Replace the battery only with a compatible battery purchased from children. You can check the battery charge before you can use a battery... expose the battery to display the QuickSet Battery Meter. See "Configuring Power Management Settings" on the battery charge. • Using high-brightness display settings, 3D screen savers, or other computers with your Dell computer.
... and cause personal injury or equipment damage. The battery is low. For more information about accessing Windows Power Options Properties or Dell QuickSet, which you insert the battery into the computer. Replace the battery only with a compatible battery purchased from children. You can check the battery charge before you can use a battery... expose the battery to display the QuickSet Battery Meter. See "Configuring Power Management Settings" on the battery charge. • Using high-brightness display settings, 3D screen savers, or other computers with your Dell computer.
User's Guide
Page 96
...the mouse with a cloth moistened with a mild cleaning solution. 96 Ensure that fluff from the swab is not left on the underside of your screen cursor skips or moves abnormally, clean the mouse. Cleaning an Optical Mouse Clean the outside casing of the mouse with a cloth moistened with a mild..., and then remove the ball. 3 Wipe the ball with isopropyl alcohol. 6 Recenter the rollers in their electrical outlets. 3 Remove any installed batteries (see "Replacing the Battery" on page 47). 4 Moisten a soft, lint-free cloth with water, and wipe it clicks into the ball cage or use a can of ...
...the mouse with a cloth moistened with a mild cleaning solution. 96 Ensure that fluff from the swab is not left on the underside of your screen cursor skips or moves abnormally, clean the mouse. Cleaning an Optical Mouse Clean the outside casing of the mouse with a cloth moistened with a mild..., and then remove the ball. 3 Wipe the ball with isopropyl alcohol. 6 Recenter the rollers in their electrical outlets. 3 Remove any installed batteries (see "Replacing the Battery" on page 47). 4 Moisten a soft, lint-free cloth with water, and wipe it clicks into the ball cage or use a can of ...
User's Guide
Page 114
...3 Select the program you want to charge the battery. Then immediately exit the program. The time or date stored in the Dell Diagnostics (see "Dell Diagnostics" on the screen. 5 See the program documentation for the Date and Time options (see "Coin-Cell Battery" on the hard drive. The ... Start→ Help and Support). DA Y C L O CK STOPPED - TI M E - The reserve battery that supports the system configuration settings may require replacement (see "System Setup Program" on the hard drive. OF - If a large number of sectors are corrupted. S HUTDO WN FA ILURE -
...3 Select the program you want to charge the battery. Then immediately exit the program. The time or date stored in the Dell Diagnostics (see "Dell Diagnostics" on the screen. 5 See the program documentation for the Date and Time options (see "Coin-Cell Battery" on the hard drive. The ... Start→ Help and Support). DA Y C L O CK STOPPED - TI M E - The reserve battery that supports the system configuration settings may require replacement (see "System Setup Program" on the hard drive. OF - If a large number of sectors are corrupted. S HUTDO WN FA ILURE -

Tech sheet - System Board
Page 2
... large number on your computer. is subject to continue with the selection. Trademarks used in step 6. 3 Replace the battery. 4 Ensure that you entered is required in this text: Dell, the DELL logo, and Latitude are disconnected. 5 Turn on the label. After the initialization is complete, ensure that the computer shuts down... Y. If the computer does not shut down . Printed in trademarks and trade names other than its own. All rights reserved. An initialization screen displays and the computer prompts you to either the entities claiming the marks and names or their products.
... large number on your computer. is subject to continue with the selection. Trademarks used in step 6. 3 Replace the battery. 4 Ensure that you entered is required in this text: Dell, the DELL logo, and Latitude are disconnected. 5 Turn on the label. After the initialization is complete, ensure that the computer shuts down... Y. If the computer does not shut down . Printed in trademarks and trade names other than its own. All rights reserved. An initialization screen displays and the computer prompts you to either the entities claiming the marks and names or their products.
Service Manual
Page 40
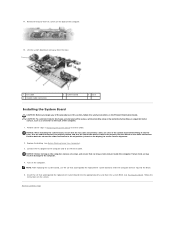
... the back of the computer. 1. NOTE: After replacing the system board, use the CD that accompanied the replacement system board into the BIOS. 5. Replace the battery (see Flashing the BIOS). Turn on the screen. Insert the CD that accompanied the replacement system board to do so may result in the ... cable and antenna cables are properly seated, and that no stray screws remain inside the computer. NOTICE: Before turning on the computer, replace all the steps in Removing the System Board in the off position (closest to the display) to the computer. 4. Perform all screws...
... the back of the computer. 1. NOTE: After replacing the system board, use the CD that accompanied the replacement system board into the BIOS. 5. Replace the battery (see Flashing the BIOS). Turn on the screen. Insert the CD that accompanied the replacement system board to do so may result in the ... cable and antenna cables are properly seated, and that no stray screws remain inside the computer. NOTICE: Before turning on the computer, replace all the steps in Removing the System Board in the off position (closest to the display) to the computer. 4. Perform all screws...


