Quick Reference Guide
Page 10
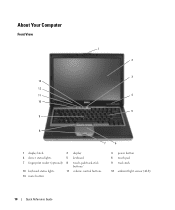
About Your Computer Front View 1 2 3 13 12 11 4 10 5 9 8 7 6 1 display latch 2 display 4 device status lights 5 keyboard 7 fingerprint reader (optional) 8 touch-pad/track-stick buttons/ 10 keyboard status lights 11 volume control buttons 13 mute button 3 power button 6 touch pad 9 track stick 12 ambient light sensor (ALS) 10 Quick Reference Guide
About Your Computer Front View 1 2 3 13 12 11 4 10 5 9 8 7 6 1 display latch 2 display 4 device status lights 5 keyboard 7 fingerprint reader (optional) 8 touch-pad/track-stick buttons/ 10 keyboard status lights 11 volume control buttons 13 mute button 3 power button 6 touch pad 9 track stick 12 ambient light sensor (ALS) 10 Quick Reference Guide
Quick Reference Guide
Page 17
... to non-Windows XP operating system environments. 1 Click Start→ All Programs→ Accessories→ Program Compatibility Wizard→ Next. 2 Follow the instructions on your keyboard or moving your mouse, press and hold the power button for an earlier Microsoft® Windows® operating system R U N T H E P R O G R A M C O M P A T I B I L... If you begin any of the procedures in this section, follow the safety instructions in its documentation or on your keyboard or moving your mouse, press and hold the power button for at least 8 to get a response by pressing a ...
... to non-Windows XP operating system environments. 1 Click Start→ All Programs→ Accessories→ Program Compatibility Wizard→ Next. 2 Follow the instructions on your keyboard or moving your mouse, press and hold the power button for an earlier Microsoft® Windows® operating system R U N T H E P R O G R A M C O M P A T I B I L... If you begin any of the procedures in this section, follow the safety instructions in its documentation or on your keyboard or moving your mouse, press and hold the power button for at least 8 to get a response by pressing a ...
Quick Reference Guide
Page 19
NOTE: If your system board, keyboard, hard drive, and display. • During the assessment, answer any key to start -up, the computer boots according to an electrical outlet. 4 Diagnostics can be ... down the computer. 2 If the computer is connected to wait until you see the Microsoft® Windows® desktop. Quick Reference Guide 19 When the DELL™ logo appears, press immediately. If the Pre-boot System Assessment completes successfully, you see a message stating that appear. • If a failure is detected, the...
NOTE: If your system board, keyboard, hard drive, and display. • During the assessment, answer any key to start -up, the computer boots according to an electrical outlet. 4 Diagnostics can be ... down the computer. 2 If the computer is connected to wait until you see the Microsoft® Windows® desktop. Quick Reference Guide 19 When the DELL™ logo appears, press immediately. If the Pre-boot System Assessment completes successfully, you see a message stating that appear. • If a failure is detected, the...
User's Guide
Page 4
... Power Management Settings 46 Accessing Power Options Properties 46 Charging the Battery 47 Replacing the Battery 47 Storing a Battery 48 Battery Errors 48 5 Using the Keyboard 49 Numeric Keypad 49 Key Combinations 50 System Functions 50 Battery 50 Display Functions 50 Power Management 50 Microsoft® Windows® Logo Key Functions...
... Power Management Settings 46 Accessing Power Options Properties 46 Charging the Battery 47 Replacing the Battery 47 Storing a Battery 48 Battery Errors 48 5 Using the Keyboard 49 Numeric Keypad 49 Key Combinations 50 System Functions 50 Battery 50 Display Functions 50 Power Management 50 Microsoft® Windows® Logo Key Functions...
User's Guide
Page 7
... Security Management Software 93 Computer Tracking Software 93 If Your Computer Is Lost or Stolen 93 Cleaning Your Computer 95 Computer, Keyboard, and Display 95 Touch Pad 96 Mouse 96 Floppy Drive 97 CDs and DVDs 97 11 Troubleshooting 99 Diagnostic Lights 99 ...POST 99 Dell™ Technical Update Service 101 Dell Diagnostics 101 When to Use the Dell Diagnostics 102 Starting the Dell Diagnostics From Your Hard Drive 102 Starting the Dell Diagnostics from the Drivers and Utilities Media 103 Dell Diagnostics Main Menu 104 Dell Support Utility 105 Accessing the Dell Support ...
... Security Management Software 93 Computer Tracking Software 93 If Your Computer Is Lost or Stolen 93 Cleaning Your Computer 95 Computer, Keyboard, and Display 95 Touch Pad 96 Mouse 96 Floppy Drive 97 CDs and DVDs 97 11 Troubleshooting 99 Diagnostic Lights 99 ...POST 99 Dell™ Technical Update Service 101 Dell Diagnostics 101 When to Use the Dell Diagnostics 102 Starting the Dell Diagnostics From Your Hard Drive 102 Starting the Dell Diagnostics from the Drivers and Utilities Media 103 Dell Diagnostics Main Menu 104 Dell Support Utility 105 Accessing the Dell Support ...
User's Guide
Page 8
... Icon 106 Double-Clicking the Dell Support Icon 106 Drive Problems 106 Media drive problems 107 If you cannot eject the CD, CD-RW, DVD, or DVD+RW drive tray 107 ... scraping or grinding sound 108 Hard drive problems 108 E-Mail, Modem, and Internet Problems 108 Error Messages 110 IEEE 1394 Device Problems 115 Keyboard Problems 115 External Keyboard problems 115 Unexpected characters 117 Lockups and Software Problems 117 The computer does not start up 117 The computer stops responding 117 A program stops...
... Icon 106 Double-Clicking the Dell Support Icon 106 Drive Problems 106 Media drive problems 107 If you cannot eject the CD, CD-RW, DVD, or DVD+RW drive tray 107 ... scraping or grinding sound 108 Hard drive problems 108 E-Mail, Modem, and Internet Problems 108 Error Messages 110 IEEE 1394 Device Problems 115 Keyboard Problems 115 External Keyboard problems 115 Unexpected characters 117 Lockups and Software Problems 117 The computer does not start up 117 The computer stops responding 117 A program stops...
User's Guide
Page 10
... and Replacing Parts 149 Before You Begin 149 Recommended Tools 149 Turning Off Your Computer 149 Before Working Inside Your Computer 150 Hinge Cover 152 Keyboard 153 Internal Card With Bluetooth® Wireless Technology 154 Coin-Cell Battery 156 Memory 157 Wireless Local Area Network (WLAN) Card 163 Mobile Broadband Card...
... and Replacing Parts 149 Before You Begin 149 Recommended Tools 149 Turning Off Your Computer 149 Before Working Inside Your Computer 150 Hinge Cover 152 Keyboard 153 Internal Card With Bluetooth® Wireless Technology 154 Coin-Cell Battery 156 Memory 157 Wireless Local Area Network (WLAN) Card 163 Mobile Broadband Card...
User's Guide
Page 22
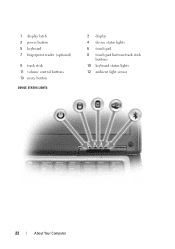
1 display latch 3 power button 5 keyboard 7 fingerprint reader (optional) 9 track stick 11 volume control buttons 13 mute button DEVICE STATUS LIGHTS 2 display 4 device status lights 6 touch pad 8 touch pad buttons/track stick buttons 10 keyboard status lights 12 ambient light sensor 22 About Your Computer
1 display latch 3 power button 5 keyboard 7 fingerprint reader (optional) 9 track stick 11 volume control buttons 13 mute button DEVICE STATUS LIGHTS 2 display 4 device status lights 6 touch pad 8 touch pad buttons/track stick buttons 10 keyboard status lights 12 ambient light sensor 22 About Your Computer
User's Guide
Page 23
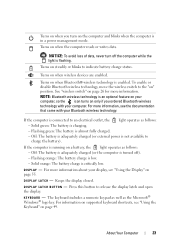
...The battery is critically low. Press this button to charge the battery). KE Y BOA RD - For information on supported keyboard shortcuts, see "Using the Display" on page 55. Turns on steadily or blinks to the "on when wireless devices...A T C H B U T T O N - Turns on " position. To enable or disable Bluetooth wireless technology, move the wireless switch to indicate battery charge status. The keyboard includes a numeric keypad as well as follows: - Turns on when you ordered Bluetooth wireless technology with your Bluetooth wireless technology. NOTICE: To avoid loss of...
...The battery is critically low. Press this button to charge the battery). KE Y BOA RD - For information on supported keyboard shortcuts, see "Using the Display" on page 55. Turns on steadily or blinks to the "on when wireless devices...A T C H B U T T O N - Turns on " position. To enable or disable Bluetooth wireless technology, move the wireless switch to indicate battery charge status. The keyboard includes a numeric keypad as well as follows: - Turns on when you ordered Bluetooth wireless technology with your Bluetooth wireless technology. NOTICE: To avoid loss of...

User's Guide
Page 24
... fingerprint reader, see "Security Management Software" on when the numeric keypad is enabled. For information on how to authenticate your Dell™ computer secure. KEYBOARD STATUS LIGHTS The green lights located above the keyboard indicate the following: 9 Turns on page 92. Turns on the computer or to turn on when the scroll lock...
... fingerprint reader, see "Security Management Software" on when the numeric keypad is enabled. For information on how to authenticate your Dell™ computer secure. KEYBOARD STATUS LIGHTS The green lights located above the keyboard indicate the following: 9 Turns on page 92. Turns on the computer or to turn on when the scroll lock...
User's Guide
Page 28
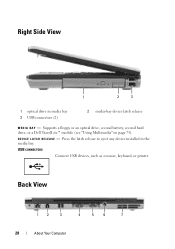
USB CONNECTORS Connect USB devices, such as a mouse, keyboard, or printer. Right Side View 1 2 3 1 optical drive in the media bay. Back View 12 3 4 5 6 7 28 About Your Computer D E V I A B A Y - Supports a floppy or an optical drive, second battery, second hard drive, or a Dell TravelLite™ module (see "Using Multimedia" on page 73). Press the latch release to eject any device installed in media bay 3 USB connectors (2) 2 media-bay device latch release M E D I C E L A T C H R E L EA S E -
USB CONNECTORS Connect USB devices, such as a mouse, keyboard, or printer. Right Side View 1 2 3 1 optical drive in the media bay. Back View 12 3 4 5 6 7 28 About Your Computer D E V I A B A Y - Supports a floppy or an optical drive, second battery, second hard drive, or a Dell TravelLite™ module (see "Using Multimedia" on page 73). Press the latch release to eject any device installed in media bay 3 USB connectors (2) 2 media-bay device latch release M E D I C E L A T C H R E L EA S E -

User's Guide
Page 30
USB CONNECTORS Connects USB devices, such as a monitor. VIDEO CONNECTOR Connects video devices, such as a mouse, keyboard, or printer. SERIAL CONNECTOR Connects serial devices, such as a mouse or handheld device. MODEM CONNECTOR (RJ-11) Connect the telephone line to the computer. 30 About Your Computer AC ADAPTER CONNECTOR Connects an AC adapter to the modem connector. For information on using the modem, see the online modem documentation supplied with your computer (see "Finding Information" on page 13).
USB CONNECTORS Connects USB devices, such as a monitor. VIDEO CONNECTOR Connects video devices, such as a mouse, keyboard, or printer. SERIAL CONNECTOR Connects serial devices, such as a mouse or handheld device. MODEM CONNECTOR (RJ-11) Connect the telephone line to the computer. 30 About Your Computer AC ADAPTER CONNECTOR Connects an AC adapter to the modem connector. For information on using the modem, see the online modem documentation supplied with your computer (see "Finding Information" on page 13).
User's Guide
Page 49
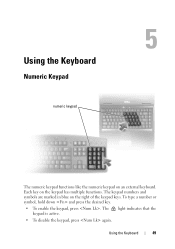
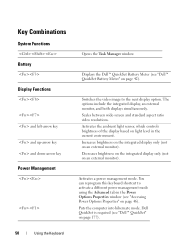
The 9 light indicates that the keypad is active. • To disable the keypad, press again. 5 Using the Keyboard Numeric Keypad numeric keypad The numeric keypad functions like the numeric keypad on the keypad has multiple functions. Each key on an external keyboard. The keypad numbers and symbols are marked in blue on the right of the keypad keys. To type a number or symbol, hold down and press the desired key. • To enable the keypad, press . Using the Keyboard 49
The 9 light indicates that the keypad is active. • To disable the keypad, press again. 5 Using the Keyboard Numeric Keypad numeric keypad The numeric keypad functions like the numeric keypad on the keypad has multiple functions. Each key on an external keyboard. The keypad numbers and symbols are marked in blue on the right of the keypad keys. To type a number or symbol, hold down and press the desired key. • To enable the keypad, press . Using the Keyboard 49
User's Guide
Page 50
... mode. Activates the ambient light sensor, which controls brightness of the display based on page 177). 50 Using the Keyboard You can reprogram this keyboard shortcut to the next display option. Decreases brightness on the integrated display only (not on page 46). Switches the video... image to activate a different power management mode using the Advanced tab in the Power Options Properties window (see "Dell™ QuickSet...
... mode. Activates the ambient light sensor, which controls brightness of the display based on page 177). 50 Using the Keyboard You can reprogram this keyboard shortcut to the next display option. Decreases brightness on the integrated display only (not on page 46). Switches the video... image to activate a different power management mode using the Advanced tab in the Power Options Properties window (see "Dell™ QuickSet...
User's Guide
Page 51
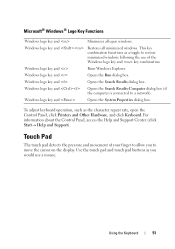
... key and Opens the System Properties dialog box. Windows logo key and Restores all open the Control Panel, click Printers and Other Hardware, and click Keyboard. Windows logo key and Opens the Search Results-Computer dialog box (if the computer is connected to move the cursor on the display. Windows logo...
... key and Opens the System Properties dialog box. Windows logo key and Restores all open the Control Panel, click Printers and Other Hardware, and click Keyboard. Windows logo key and Opens the Search Results-Computer dialog box (if the computer is connected to move the cursor on the display. Windows logo...

User's Guide
Page 52
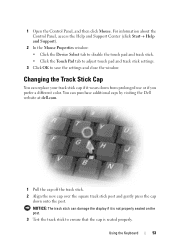
You can use the Mouse Properties window to disable the touch pad and track stick or adjust their settings. 52 Using the Keyboard Use the track stick and track stick buttons as you would use a mouse. Press the track stick left, right, up, or down to change the ...
You can use the Mouse Properties window to disable the touch pad and track stick or adjust their settings. 52 Using the Keyboard Use the track stick and track stick buttons as you would use a mouse. Press the track stick left, right, up, or down to change the ...
User's Guide
Page 53
... to save the settings and close the window. NOTICE: The track stick can damage the display if it wears down onto the post. Using the Keyboard 53 You can replace your track stick cap if it is seated properly. Changing the Track Stick Cap You can purchase additional caps by visiting... the Dell website at dell.com. 1 Pull the cap off the track stick. 2 Align the new cap over the square track stick post and gently press the cap down...
... to save the settings and close the window. NOTICE: The track stick can damage the display if it wears down onto the post. Using the Keyboard 53 You can replace your track stick cap if it is seated properly. Changing the Track Stick Cap You can purchase additional caps by visiting... the Dell website at dell.com. 1 Pull the cap off the track stick. 2 Align the new cap over the square track stick post and gently press the cap down...

User's Guide
Page 54
54 Using the Keyboard
54 Using the Keyboard
User's Guide
Page 55
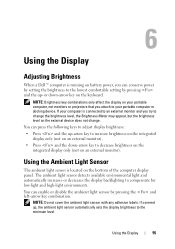
... increase brightness on the integrated display only (not on an external monitor). • Press and the down -arrow key on the keyboard. Using the Display 55 Using the Ambient Light Sensor The ambient light sensor is connected to an external monitor and you attach to compensate... increases or decreases the display backlighting to your computer is located on an external monitor). 6 Using the Display Adjusting Brightness When a Dell™ computer is running on battery power, you can conserve power by setting the brightness to the lowest comfortable setting by pressing the...
... increase brightness on the integrated display only (not on an external monitor). • Press and the down -arrow key on the keyboard. Using the Display 55 Using the Ambient Light Sensor The ambient light sensor is connected to an external monitor and you attach to compensate... increases or decreases the display backlighting to your computer is located on an external monitor). 6 Using the Display Adjusting Brightness When a Dell™ computer is running on battery power, you can conserve power by setting the brightness to the lowest comfortable setting by pressing the...
User's Guide
Page 95
... NOTICE: To prevent damage to seep between the keys on the keyboard. Do not soak the cloth or let water drip inside your computer with a soft cloth dampened with water. NOTICE: To avoid damaging the computer or ... the display with soap or alcohol. • Moisten a soft, lint-free cloth with water and wipe the computer and keyboard. Only use products specifically designed for the monitor's antistatic coating. • Wipe the keyboard, computer, and monitor plastics with a soft cleaning cloth moistened with a solution of three parts water and one part...
... NOTICE: To prevent damage to seep between the keys on the keyboard. Do not soak the cloth or let water drip inside your computer with a soft cloth dampened with water. NOTICE: To avoid damaging the computer or ... the display with soap or alcohol. • Moisten a soft, lint-free cloth with water and wipe the computer and keyboard. Only use products specifically designed for the monitor's antistatic coating. • Wipe the keyboard, computer, and monitor plastics with a soft cleaning cloth moistened with a solution of three parts water and one part...


