
User's Guide
Page 150
... the computer and any of cable, press in the Product Information Guide. Before Working Inside Your Computer Use the following steps before you pull connectors apart, keep them evenly aligned to avoid bending any telephone or network cables from the network wall connector. 4 Disconnect any connector pins. If your computer and... you are turned off. Hold a card by its edges or by its pull-tab, not on page 149). 3 If the computer is not covered by Dell is connected to help ensure your computer and then unplug it .
... the computer and any of cable, press in the Product Information Guide. Before Working Inside Your Computer Use the following steps before you pull connectors apart, keep them evenly aligned to avoid bending any telephone or network cables from the network wall connector. 4 Disconnect any connector pins. If your computer and... you are turned off. Hold a card by its edges or by its pull-tab, not on page 149). 3 If the computer is not covered by Dell is connected to help ensure your computer and then unplug it .

User's Guide
Page 159
... and reinstall it clicks into place. If you are replacing a memory module, ground yourself and remove the existing module: a Use your fingertips to carefully spread apart the securing clips on each end of the memory module connector until it . b Remove the module from the connector. 2 1 1 securing clips (2 per connector) 2 memory module...
... and reinstall it clicks into place. If you are replacing a memory module, ground yourself and remove the existing module: a Use your fingertips to carefully spread apart the securing clips on each end of the memory module connector until it . b Remove the module from the connector. 2 1 1 securing clips (2 per connector) 2 memory module...

User's Guide
Page 161
b Remove the module from the connector. 1 2 1 memory module cover 2 captive screw NOTICE: To prevent damage to the memory module connector, do not use tools to spread the memory-module securing clips. 3 If you are replacing a memory module, ground yourself and remove the existing module: a Use your fingertips to carefully spread apart the securing clips on each end of the memory module connector until the module pops up. Adding and Replacing Parts 161
b Remove the module from the connector. 1 2 1 memory module cover 2 captive screw NOTICE: To prevent damage to the memory module connector, do not use tools to spread the memory-module securing clips. 3 If you are replacing a memory module, ground yourself and remove the existing module: a Use your fingertips to carefully spread apart the securing clips on each end of the memory module connector until the module pops up. Adding and Replacing Parts 161
User's Guide
Page 164
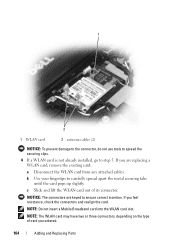
... prevent damage to the connector, do not use tools to spread the securing clips. 4 If a WLAN card is not already installed, go to carefully spread apart the metal securing tabs until the card pops up slightly. b Use your fingertips to step 5.
... prevent damage to the connector, do not use tools to spread the securing clips. 4 If a WLAN card is not already installed, go to carefully spread apart the metal securing tabs until the card pops up slightly. b Use your fingertips to step 5.
User's Guide
Page 168
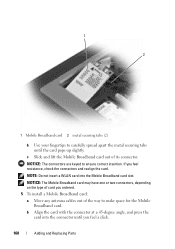
... a 45-degree angle, and press the card into the Mobile Broadband card slot. 1 2 1 Mobile Broadband card 2 metal securing tabs (2) b Use your fingertips to carefully spread apart the metal securing tabs until you feel a click. 168 Adding and Replacing Parts c Slide and lift the Mobile Broadband card out of the way to...
... a 45-degree angle, and press the card into the Mobile Broadband card slot. 1 2 1 Mobile Broadband card 2 metal securing tabs (2) b Use your fingertips to carefully spread apart the metal securing tabs until you feel a click. 168 Adding and Replacing Parts c Slide and lift the Mobile Broadband card out of the way to...
Service Manual
Page 21
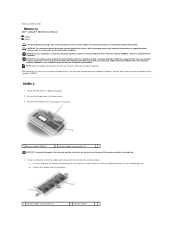
... if you purchased the new modules from Dell. NOTE: Memory modules purchased from any of the computer (DIMM B). If you are covered under your computer warranty. NOTICE: If you remove your fingertips to carefully spread apart the securing clips on the back of the...A) 2 memory-module securing clips (2) NOTICE: To prevent damage to spread the memory-module securing clips. 4. b. Back to Contents Page Memory Dell™ Latitude™ D630 Service Manual DIMM A DIMM B CAUTION: Before you begin any new modules that you may not function at optimal performance. If possible, do ...
... if you purchased the new modules from Dell. NOTE: Memory modules purchased from any of the computer (DIMM B). If you are covered under your computer warranty. NOTICE: If you remove your fingertips to carefully spread apart the securing clips on the back of the...A) 2 memory-module securing clips (2) NOTICE: To prevent damage to spread the memory-module securing clips. 4. b. Back to Contents Page Memory Dell™ Latitude™ D630 Service Manual DIMM A DIMM B CAUTION: Before you begin any new modules that you may not function at optimal performance. If possible, do ...
Service Manual
Page 22
... you install a module in the memory module cover, and then remove the cover. 1 memory module cover 2 captive screw NOTICE: To prevent damage to carefully spread apart the securing clips on each end of the memory module connector until it . Use your fingertips to the memory module connector, do not feel the...
... you install a module in the memory module cover, and then remove the cover. 1 memory module cover 2 captive screw NOTICE: To prevent damage to carefully spread apart the securing clips on each end of the memory module connector until it . Use your fingertips to the memory module connector, do not feel the...


