Quick Reference Guide
Page 17
... Compatibility Wizard configures a program so that is designed for at least 8 to 10 seconds until the computer turns off . Quick Reference Guide 17 If you are unable to non-Windows XP operating system environments. 1 Click Start→ All Programs→ Accessories→... Compatibility Wizard→ Next. 2 Follow the instructions on your keyboard or moving your mouse, press and hold the power button for an earlier Microsoft® Windows® operating system R U N T H E P R O G R A M C O M P A T I B I L I O N - The computer does not start up ENSURE THAT THE AC ...
... Compatibility Wizard configures a program so that is designed for at least 8 to 10 seconds until the computer turns off . Quick Reference Guide 17 If you are unable to non-Windows XP operating system environments. 1 Click Start→ All Programs→ Accessories→... Compatibility Wizard→ Next. 2 Follow the instructions on your keyboard or moving your mouse, press and hold the power button for an earlier Microsoft® Windows® operating system R U N T H E P R O G R A M C O M P A T I B I L I O N - The computer does not start up ENSURE THAT THE AC ...
Quick Reference Guide
Page 24
problems (continued) software, 17-18 spyware, 18 Product Information Guide, 5 Q QuickSet Help, 8 R regulatory information, 5 S safety instructions, 5 Service Tag, 6 software problems, 17-18 spyware, 18 support website, 7 system views back, 12 bottom, 12 front, 10 left side, 11 right side, 11 T troubleshooting Dell Diagnostics, 18 Help and Support Center, 7 lockups and software problems, 17 U User's Guide, 6 W warranty information, 5 Windows XP Help and Support Center, 7 Program Compatibility Wizard, 17 reinstalling, 8 wizards Program Compatibility Wizard, 17 24 Index
problems (continued) software, 17-18 spyware, 18 Product Information Guide, 5 Q QuickSet Help, 8 R regulatory information, 5 S safety instructions, 5 Service Tag, 6 software problems, 17-18 spyware, 18 support website, 7 system views back, 12 bottom, 12 front, 10 left side, 11 right side, 11 T troubleshooting Dell Diagnostics, 18 Help and Support Center, 7 lockups and software problems, 17 U User's Guide, 6 W warranty information, 5 Windows XP Help and Support Center, 7 Program Compatibility Wizard, 17 reinstalling, 8 wizards Program Compatibility Wizard, 17 24 Index
User's Guide
Page 6
... to Copy Media 75 Using Blank Media 76 Helpful Tips 77 Adjusting the Volume 78 Adjusting the Picture 79 Microsoft® Windows® XP Operating System 79 Microsoft Windows Vista® Operating System 79 9 Using Cards 81 Card Types 81 PC Cards 81 ExpressCards 81 Smart Cards 81 Card ...Blanks 82 Extended Cards 82 Installing a PC Card or ExpressCard 82 PC Card 82 ExpressCards 83 Removing a Card or Blank 84 10 Securing Your Computer ...
... to Copy Media 75 Using Blank Media 76 Helpful Tips 77 Adjusting the Volume 78 Adjusting the Picture 79 Microsoft® Windows® XP Operating System 79 Microsoft Windows Vista® Operating System 79 9 Using Cards 81 Card Types 81 PC Cards 81 ExpressCards 81 Smart Cards 81 Card ...Blanks 82 Extended Cards 82 Installing a PC Card or ExpressCard 82 PC Card 82 ExpressCards 83 Removing a Card or Blank 84 10 Securing Your Computer ...
User's Guide
Page 10
Using the Hardware Troubleshooter Tool 144 Microsoft Windows XP 144 Microsoft Windows Vista 144 Restoring Your Operating System 144 Using Microsoft® Windows® System Restore 145 Using the Operating System Media 146 15 Adding and Replacing Parts 149 Before You Begin 149 Recommended Tools 149 Turning Off ... Broadband Card 166 Subscriber Identity Module (SIM) Card 169 Hard Drive 170 Media Bay 173 Removing Media Bay Devices 173 FCM (Flash Cache Module 174 10
Using the Hardware Troubleshooter Tool 144 Microsoft Windows XP 144 Microsoft Windows Vista 144 Restoring Your Operating System 144 Using Microsoft® Windows® System Restore 145 Using the Operating System Media 146 15 Adding and Replacing Parts 149 Before You Begin 149 Recommended Tools 149 Turning Off ... Broadband Card 166 Subscriber Identity Module (SIM) Card 169 Hard Drive 170 Media Bay 173 Removing Media Bay Devices 173 FCM (Flash Cache Module 174 10

User's Guide
Page 58
...Windows desktop onto this monitor check box, and then click Apply. 6 Change Screen resolution to the appropriate sizes for both screens independently and drag objects from one screen to the other, effectively doubling the amount of your desktop. 9 If prompted, click Yes to keep the settings. 10... to the closest supported values. For more information, see your operating system documentation. 5 Click the monitor 2 icon, click the Extend my Windows desktop onto this monitor option, and then click Apply. If necessary, press to bring the screen image back to change, or under or pick...
...Windows desktop onto this monitor check box, and then click Apply. 6 Change Screen resolution to the appropriate sizes for both screens independently and drag objects from one screen to the other, effectively doubling the amount of your desktop. 9 If prompted, click Yes to keep the settings. 10... to the closest supported values. For more information, see your operating system documentation. 5 Click the monitor 2 icon, click the Extend my Windows desktop onto this monitor option, and then click Apply. If necessary, press to bring the screen image back to change, or under or pick...

User's Guide
Page 109
... THE TELEPHONE JACK. Click the Start button, point to the telephone wall jack. If all commands receive responses, the modem is 3 m (10 ft) or more in length, try a shorter one. With the Outlook Express e-mail program open, click File. Troubleshooting 109 If you are using a...; Disconnect the telephone line from the modem and connect it and connect to identify and resolve modem problems. VERIFY THAT THE MODEM IS COMMUNICATING WITH WINDOWS - 1 Click the Start button and click Control Panel. 2 Click Printers and Other Hardware. 3 Click Phone and Modem Options. 4 Click the Modems tab. 5 ...
... THE TELEPHONE JACK. Click the Start button, point to the telephone wall jack. If all commands receive responses, the modem is 3 m (10 ft) or more in length, try a shorter one. With the Outlook Express e-mail program open, click File. Troubleshooting 109 If you are using a...; Disconnect the telephone line from the modem and connect it and connect to identify and resolve modem problems. VERIFY THAT THE MODEM IS COMMUNICATING WITH WINDOWS - 1 Click the Start button and click Control Panel. 2 Click Printers and Other Hardware. 3 Click Phone and Modem Options. 4 Click the Modems tab. 5 ...

User's Guide
Page 118
... computer might be infected with the program. • If necessary, uninstall and then reinstall the program. See the software documentation for an earlier Microsoft® Windows® operating system R U N T H E P R O G R A M CO M P A T I B I L I T Y W I Z A R D - Use an anti-virus program that includes anti-spyware.... Then restart your 118 Troubleshooting The Program Compatibility Wizard configures a program so it runs in an environment similar to 10 seconds until the computer turns off. A program is designed for information. • Ensure that the program is compatible...
... computer might be infected with the program. • If necessary, uninstall and then reinstall the program. See the software documentation for an earlier Microsoft® Windows® operating system R U N T H E P R O G R A M CO M P A T I B I L I T Y W I Z A R D - Use an anti-virus program that includes anti-spyware.... Then restart your 118 Troubleshooting The Program Compatibility Wizard configures a program so it runs in an environment similar to 10 seconds until the computer turns off. A program is designed for information. • Ensure that the program is compatible...
Service Manual
Page 17
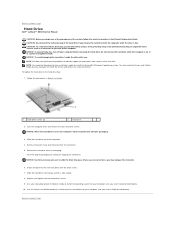
...removing the hard drive. You also need the Operating System installation media to install the Microsoft® Windows® operating system. Back to Contents Page Hard Drive Dell™ Latitude™ D630 Service Manual CAUTION: Before you may damage the connector. 6. Remove the bezel screw and the ... from its packaging. NOTE: You need the Drivers and Utilities media for information). 10. NOTICE: When the hard drive is fully seated. 8. Remove the new drive from sources other than Dell. Save the original packaging for storing or shipping the hard drive. Attach the bezel...
...removing the hard drive. You also need the Operating System installation media to install the Microsoft® Windows® operating system. Back to Contents Page Hard Drive Dell™ Latitude™ D630 Service Manual CAUTION: Before you may damage the connector. 6. Remove the bezel screw and the ... from its packaging. NOTE: You need the Drivers and Utilities media for information). 10. NOTICE: When the hard drive is fully seated. 8. Remove the new drive from sources other than Dell. Save the original packaging for storing or shipping the hard drive. Attach the bezel...


