
Quick Start Guide (PDF)
Page 1
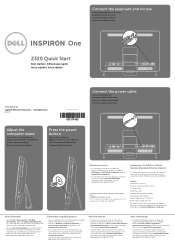
... el teclado y el mouse Conecte o teclado e o mouse One 2320 Quick Start Snel starten | Démarrage rapide Inicio rápido | Início rápido Uniquely Dell support.dell.com/manuals | www.dell.com 2011 - 07 Printed in China 0GX7TPA00 Adjust the computer ...Dell Help Documentation (Documentación de ayuda Dell) o vaya a support.dell.com/manuals. • Para ponerse en contacto con Dell con respecto a ventas, ayuda técnica o asuntos relacionados con el servicio al cliente, vaya a dell.com/ContactDell. Paseo de la Reforma 2620 - Dell™, the DELL logo, and Inspiron...
... el teclado y el mouse Conecte o teclado e o mouse One 2320 Quick Start Snel starten | Démarrage rapide Inicio rápido | Início rápido Uniquely Dell support.dell.com/manuals | www.dell.com 2011 - 07 Printed in China 0GX7TPA00 Adjust the computer ...Dell Help Documentation (Documentación de ayuda Dell) o vaya a support.dell.com/manuals. • Para ponerse en contacto con Dell con respecto a ventas, ayuda técnica o asuntos relacionados con el servicio al cliente, vaya a dell.com/ContactDell. Paseo de la Reforma 2620 - Dell™, the DELL logo, and Inspiron...
Owners Manual
Page 3
Contents 1 Before You Begin 11 Recommended Tools 11 Turning Off Your Computer 11 Safety Instructions 11 2 Technical Overview 15 Inside View of Your Inspiron One 15 System Board Components 17 3 Back Cover 19 Removing the Back Cover 19 Replacing the Back Cover 21 4 Hard Drive 23 Removing the Hard Drive 23 Replacing the Hard Drive 25 5 Optical Drive 27 Removing the Optical Drive 27 Contents 3
Contents 1 Before You Begin 11 Recommended Tools 11 Turning Off Your Computer 11 Safety Instructions 11 2 Technical Overview 15 Inside View of Your Inspiron One 15 System Board Components 17 3 Back Cover 19 Removing the Back Cover 19 Replacing the Back Cover 21 4 Hard Drive 23 Removing the Hard Drive 23 Replacing the Hard Drive 25 5 Optical Drive 27 Removing the Optical Drive 27 Contents 3
Owners Manual
Page 7
21 Processor 83 Removing the Processor 83 Replacing the Processor 84 22 Antenna-In Connector 89 Removing the Antenna-In Connector 89 Replacing the Antenna-In Connector 90 23 Antenna Module 93 Removing the Antenna Module 93 Replacing the Antenna Module 94 24 Power-Button Board 97 Removing the Power-Button Board 97 Replacing the Antenna-In Connector 98 25 Speakers 101 Removing the Speakers 101 Replacing the Speakers 102 26 Touch-Screen Control Board (Optional) 105 Removing the Touch-Screen Control Board 105 Contents 7
21 Processor 83 Removing the Processor 83 Replacing the Processor 84 22 Antenna-In Connector 89 Removing the Antenna-In Connector 89 Replacing the Antenna-In Connector 90 23 Antenna Module 93 Removing the Antenna Module 93 Replacing the Antenna Module 94 24 Power-Button Board 97 Removing the Power-Button Board 97 Replacing the Antenna-In Connector 98 25 Speakers 101 Removing the Speakers 101 Replacing the Speakers 102 26 Touch-Screen Control Board (Optional) 105 Removing the Touch-Screen Control Board 105 Contents 7
Owners Manual
Page 18
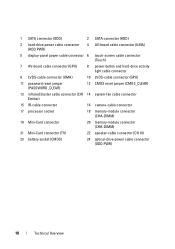
...-module connector (CHA-DIMM) 19 Mini-Card connector 20 memory-module connector (CHB-DIMM) 21 Mini-Card connector (TV) 22 speaker-cable connector (CN 10) 23 battery socket (CMOS) 24 optical-drive power cable connector (ODD PWR) 18 Technical Overview
...-module connector (CHA-DIMM) 19 Mini-Card connector 20 memory-module connector (CHB-DIMM) 21 Mini-Card connector (TV) 22 speaker-cable connector (CN 10) 23 battery socket (CMOS) 24 optical-drive power cable connector (ODD PWR) 18 Technical Overview
Owners Manual
Page 23
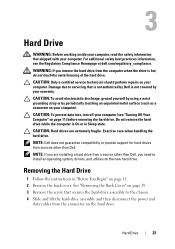
... repairs on page 11. 2 Remove the back cover. CAUTION: To avoid electrostatic discharge, ground yourself by using a wrist grounding strap or by Dell is On or in "Before You Begin" on your computer. Exercise care when handling the hard drive. Do not remove the hard drive while... the screw that is not authorized by periodically touching an unpainted metal surface (such as a connector on the new hard drive. Hard Drive 23 Damage due to servicing that secures the hard-drive assembly to install an operating system, drivers, and utilities on your computer (see the Regulatory...
... repairs on page 11. 2 Remove the back cover. CAUTION: To avoid electrostatic discharge, ground yourself by using a wrist grounding strap or by Dell is On or in "Before You Begin" on your computer. Exercise care when handling the hard drive. Do not remove the hard drive while... the screw that is not authorized by periodically touching an unpainted metal surface (such as a connector on the new hard drive. Hard Drive 23 Damage due to servicing that secures the hard-drive assembly to install an operating system, drivers, and utilities on your computer (see the Regulatory...
Owners Manual
Page 97
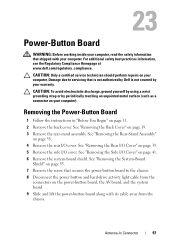
For additional safety best practices information, see the Regulatory Compliance Homepage at www.dell.com/regulatory_compliance. Removing the Power-Button Board 1 Follow the instructions in "Before You Begin" on page 19. 3 Remove the rear-stand assembly. See "...your warranty. See "Removing the Rear-Stand Assembly" on page 35. 4 Remove the rear I/O cover. 23 Power-Button Board WARNING: Before working inside your computer, read the safety information that is not authorized by Dell is not covered by periodically touching an unpainted metal surface (such as a connector on your computer...
For additional safety best practices information, see the Regulatory Compliance Homepage at www.dell.com/regulatory_compliance. Removing the Power-Button Board 1 Follow the instructions in "Before You Begin" on page 19. 3 Remove the rear-stand assembly. See "...your warranty. See "Removing the Rear-Stand Assembly" on page 35. 4 Remove the rear I/O cover. 23 Power-Button Board WARNING: Before working inside your computer, read the safety information that is not authorized by Dell is not covered by periodically touching an unpainted metal surface (such as a connector on your computer...
Owners Manual
Page 128
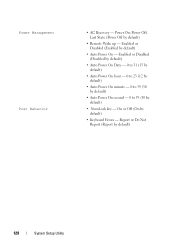
Enabled or Disabled (Disabled by default) • Auto Power On Date - 0 to 31 (15 by default) • Auto Power On hour - 0 to 23 (12 by default) • Auto Power On minute - 0 to 59 (30 by default) • Auto Power On second - 0 to 59 (30 by default) • Remote ...
Enabled or Disabled (Disabled by default) • Auto Power On Date - 0 to 31 (15 by default) • Auto Power On hour - 0 to 23 (12 by default) • Auto Power On minute - 0 to 59 (30 by default) • Auto Power On second - 0 to 59 (30 by default) • Remote ...


