
Owners Manual
Page 6
16 System Board 65 Removing the System Board 65 Replacing the System Board 66 Entering the Service Tag in the BIOS 67 17 Feet 69 Removing the Feet 69 Replacing the Feet 70 18 Middle Frame 71 Removing the Middle Frame 71 Replacing the Middle Frame 72 19 Processor Heat-Sink Fan 75 Removing the Processor Heat-Sink Fan 75 Replacing the Processor Heat-Sink Fan 76 20 Processor Heat-Sink 79 Removing the Processor Heat-Sink 79 Replacing the Processor Heat-Sink 80 6 Contents
16 System Board 65 Removing the System Board 65 Replacing the System Board 66 Entering the Service Tag in the BIOS 67 17 Feet 69 Removing the Feet 69 Replacing the Feet 70 18 Middle Frame 71 Removing the Middle Frame 71 Replacing the Middle Frame 72 19 Processor Heat-Sink Fan 75 Removing the Processor Heat-Sink Fan 75 Replacing the Processor Heat-Sink Fan 76 20 Processor Heat-Sink 79 Removing the Processor Heat-Sink 79 Replacing the Processor Heat-Sink 80 6 Contents
Owners Manual
Page 9
Boot Sequence 131 Clearing Forgotten Passwords 132 Clearing CMOS Passwords 134 31 Flashing the BIOS 137 Contents 9
Boot Sequence 131 Clearing Forgotten Passwords 132 Clearing CMOS Passwords 134 31 Flashing the BIOS 137 Contents 9
Owners Manual
Page 11
... off. If your own personal safety. Safety Instructions Use the following tools: • Small Phillips screwdriver • Hex nut driver • Flash BIOS executable update program available at support.dell.com Turning Off Your Computer CAUTION: To avoid losing data, save and close all open files and exit all open programs. 2 To...
... off. If your own personal safety. Safety Instructions Use the following tools: • Small Phillips screwdriver • Hex nut driver • Flash BIOS executable update program available at support.dell.com Turning Off Your Computer CAUTION: To avoid losing data, save and close all open files and exit all open programs. 2 To...
Owners Manual
Page 67
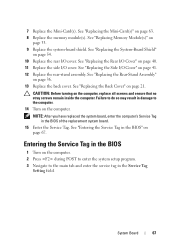
...Replace the memory module(s). See "Replacing the Back Cover" on page 54. 10 Replace the rear I /O cover. Failure to do so may result in the BIOS of the replacement system board. 15 Enter the Service Tag. NOTE: After you have replaced the system board, enter the computer's Service Tag in damage... page 41. 12 Replace the rear-stand assembly. See "Entering the Service Tag in the Service Tag Setting field. Entering the Service Tag in the BIOS 1 Turn on the computer. 2 Press during POST to enter the system setup program. 3 Navigate to the computer. 14 Turn on page 67. 7 ...
...Replace the memory module(s). See "Replacing the Back Cover" on page 54. 10 Replace the rear I /O cover. Failure to do so may result in the BIOS of the replacement system board. 15 Enter the Service Tag. NOTE: After you have replaced the system board, enter the computer's Service Tag in damage... page 41. 12 Replace the rear-stand assembly. See "Entering the Service Tag in the Service Tag Setting field. Entering the Service Tag in the BIOS 1 Turn on the computer. 2 Press during POST to enter the system setup program. 3 Navigate to the computer. 14 Turn on page 67. 7 ...
Owners Manual
Page 126
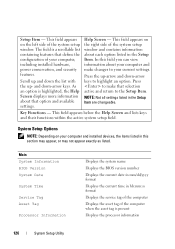
... make that option and available settings. Help Screen - Press the up - Key Functions - Main System Information BIOS Version System Date System Time Service Tag Asset Tag Processor Information Displays the system name Displays the BIOS version number Displays the current date in mm/dd/yyyy format Displays the current time in hh...
... make that option and available settings. Help Screen - Press the up - Key Functions - Main System Information BIOS Version System Date System Time Service Tag Asset Tag Processor Information Displays the system name Displays the BIOS version number Displays the current date in mm/dd/yyyy format Displays the current time in hh...
Owners Manual
Page 131
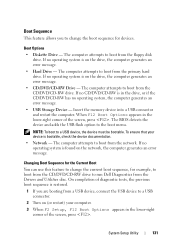
... generates an error message. • CD/DVD/CD-RW Drive - When F12 Boot Options appears in the lower-right corner of the screen, press . The BIOS detects the device and adds the USB flash option to boot from the network. The computer attempts to the boot menu. If no operating system... CD/DVD/CD-RW is in the drive, or if the CD/DVD/CD-RW has no operating system is restored. 1 If you to run Dell Diagnostics from the primary hard drive. System Setup Utility 131 The computer attempts to boot from the Drivers and Utilities disc. To ensure that your...
... generates an error message. • CD/DVD/CD-RW Drive - When F12 Boot Options appears in the lower-right corner of the screen, press . The BIOS detects the device and adds the USB flash option to boot from the network. The computer attempts to the boot menu. If no operating system... CD/DVD/CD-RW is in the drive, or if the CD/DVD/CD-RW has no operating system is restored. 1 If you to run Dell Diagnostics from the primary hard drive. System Setup Utility 131 The computer attempts to boot from the Drivers and Utilities disc. To ensure that your...
Owners Manual
Page 137
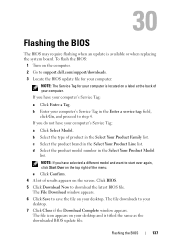
...click Go, and proceed to start over again, click Start Over on the top right of the menu. Click BIOS. 5 Click Download Now to support.dell.com/support/downloads. 3 Locate the BIOS update file for your computer: NOTE: The Service Tag for your computer is available or when replacing the system...a Click Select Model. The file downloads to save the file on your computer's Service Tag: a Click Enter a Tag. Flashing the BIOS 137 30 Flashing the BIOS The BIOS may require flashing when an update is located on a label at the back of your desktop. 7 Click Close if the Download Complete window...
...click Go, and proceed to start over again, click Start Over on the top right of the menu. Click BIOS. 5 Click Download Now to support.dell.com/support/downloads. 3 Locate the BIOS update file for your computer: NOTE: The Service Tag for your computer is available or when replacing the system...a Click Select Model. The file downloads to save the file on your computer's Service Tag: a Click Enter a Tag. Flashing the BIOS 137 30 Flashing the BIOS The BIOS may require flashing when an update is located on a label at the back of your desktop. 7 Click Close if the Download Complete window...
Owners Manual
Page 138
8 Double-click the file icon on the desktop and follow the instructions on the screen. 138 Flashing the BIOS
8 Double-click the file icon on the desktop and follow the instructions on the screen. 138 Flashing the BIOS


