
Owners Manual
Page 3
Contents 1 Before You Begin 11 Recommended Tools 11 Turning Off Your Computer 11 Safety Instructions 11 2 Technical Overview 15 Inside View of Your Inspiron One 15 System Board Components 17 3 Back Cover 19 Removing the Back Cover 19 Replacing the Back Cover 21 4 Hard Drive 23 Removing the Hard Drive 23 Replacing the Hard Drive 25 5 Optical Drive 27 Removing the Optical Drive 27 Contents 3
Contents 1 Before You Begin 11 Recommended Tools 11 Turning Off Your Computer 11 Safety Instructions 11 2 Technical Overview 15 Inside View of Your Inspiron One 15 System Board Components 17 3 Back Cover 19 Removing the Back Cover 19 Replacing the Back Cover 21 4 Hard Drive 23 Removing the Hard Drive 23 Replacing the Hard Drive 25 5 Optical Drive 27 Removing the Optical Drive 27 Contents 3
Owners Manual
Page 23
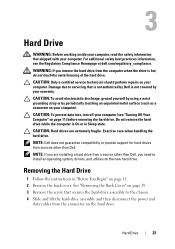
..., turn off your warranty. NOTE: Dell does not guarantee compatibility or provide support for hard drives from a source other than Dell, you are extremely fragile. See "Removing the Back Cover" on the hard drive. CAUTION: Only a certified service technician should perform repairs on the new hard drive. CAUTION: Hard drives are installing a hard drive from sources other than Dell. NOTE: If you need to...
..., turn off your warranty. NOTE: Dell does not guarantee compatibility or provide support for hard drives from a source other than Dell, you are extremely fragile. See "Removing the Back Cover" on the hard drive. CAUTION: Only a certified service technician should perform repairs on the new hard drive. CAUTION: Hard drives are installing a hard drive from sources other than Dell. NOTE: If you need to...
Owners Manual
Page 24
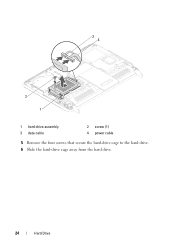
34 2 1 1 hard-drive assembly 3 data cable 2 screw (1) 4 power cable 5 Remove the four screws that secure the hard-drive cage to the hard drive. 6 Slide the hard-drive cage away from the hard drive. 24 Hard Drive
34 2 1 1 hard-drive assembly 3 data cable 2 screw (1) 4 power cable 5 Remove the four screws that secure the hard-drive cage to the hard drive. 6 Slide the hard-drive cage away from the hard drive. 24 Hard Drive
Owners Manual
Page 97
... the chassis. 8 Disconnect the power button and hard-drive activity light cable from the chassis. See "Removing the Back Cover" on page 35. 4 Remove the rear I /O cover. 23 Power-Button Board WARNING: Before working inside your computer, read the safety information that is not authorized by Dell is not covered by periodically touching an unpainted...
... the chassis. 8 Disconnect the power button and hard-drive activity light cable from the chassis. See "Removing the Back Cover" on page 35. 4 Remove the rear I /O cover. 23 Power-Button Board WARNING: Before working inside your computer, read the safety information that is not authorized by Dell is not covered by periodically touching an unpainted...
Owners Manual
Page 125
... you press before the F2 prompt, this keystroke is lost. Entering System Setup 1 Turn on (or restart) your computer. 2 When the DELL logo is displayed, watch for it is recommended that the keyboard has initialized. NOTE: The F2 prompt indicates that you must watch for your computer... the system configuration information after you add, change, or remove any hardware in your computer • Set or change a user-selectable option such as the user password • Read the current amount of memory or set the type of hard drive installed NOTE: Before you change system setup, it , and...
... you press before the F2 prompt, this keystroke is lost. Entering System Setup 1 Turn on (or restart) your computer. 2 When the DELL logo is displayed, watch for it is recommended that the keyboard has initialized. NOTE: The F2 prompt indicates that you must watch for your computer... the system configuration information after you add, change, or remove any hardware in your computer • Set or change a user-selectable option such as the user password • Read the current amount of memory or set the type of hard drive installed NOTE: Before you change system setup, it , and...


