
Owners Manual
Page 3
Contents 1 Before You Begin 11 Recommended Tools 11 Turning Off Your Computer 11 Safety Instructions 11 2 Technical Overview 15 Inside View of Your Inspiron One 15 System Board Components 17 3 Back Cover 19 Removing the Back Cover 19 Replacing the Back Cover 21 4 Hard Drive 23 Removing the Hard Drive 23 Replacing the Hard Drive 25 5 Optical Drive 27 Removing the Optical Drive 27 Contents 3
Contents 1 Before You Begin 11 Recommended Tools 11 Turning Off Your Computer 11 Safety Instructions 11 2 Technical Overview 15 Inside View of Your Inspiron One 15 System Board Components 17 3 Back Cover 19 Removing the Back Cover 19 Replacing the Back Cover 21 4 Hard Drive 23 Removing the Hard Drive 23 Replacing the Hard Drive 25 5 Optical Drive 27 Removing the Optical Drive 27 Contents 3
Owners Manual
Page 25
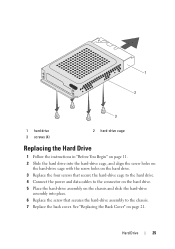
Hard Drive 25 1 2 3 1 hard drive 3 screws (4) 2 hard-drive cage Replacing the Hard Drive 1 Follow the instructions in "Before You Begin" on page 11. 2 Slide the hard drive into the hard-drive cage, and align the screw holes on the hard-drive cage with the screw holes on the hard drive. 3 Replace the four screws that secure the hard-drive cage to the hard drive. 4 Connect the power and data cables to the chassis...
Hard Drive 25 1 2 3 1 hard drive 3 screws (4) 2 hard-drive cage Replacing the Hard Drive 1 Follow the instructions in "Before You Begin" on page 11. 2 Slide the hard drive into the hard-drive cage, and align the screw holes on the hard-drive cage with the screw holes on the hard drive. 3 Replace the four screws that secure the hard-drive cage to the hard drive. 4 Connect the power and data cables to the chassis...
Owners Manual
Page 26
Failure to do so may result in damage to the computer. 8 Connect your computer and all attached devices to electrical outlets, and turn them on the computer, replace all screws and ensure that no stray screws remain inside the computer. CAUTION: Before turning on . 26 Hard Drive
Failure to do so may result in damage to the computer. 8 Connect your computer and all attached devices to electrical outlets, and turn them on the computer, replace all screws and ensure that no stray screws remain inside the computer. CAUTION: Before turning on . 26 Hard Drive
Owners Manual
Page 98
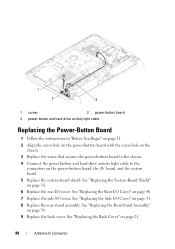
... Rear I/O Cover" on the power-button board, the AV board, and the system board. 5 Replace the system-board shield. 1 2 3 1 screw 2 power-button board 3 power-button and hard-drive activity light cable Replacing the Power-Button Board 1 Follow the instructions in "Before You Begin" on page 11. 2 Align the screw hole on the power-button...
... Rear I/O Cover" on the power-button board, the AV board, and the system board. 5 Replace the system-board shield. 1 2 3 1 screw 2 power-button board 3 power-button and hard-drive activity light cable Replacing the Power-Button Board 1 Follow the instructions in "Before You Begin" on page 11. 2 Align the screw hole on the power-button...


