Setup Guide
Page 15
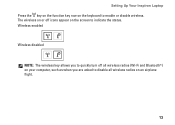
The wireless on or off all wireless radios (Wi-Fi and Bluetooth®) on your computer, such as when you are asked to disable all wireless radios on the screen to enable or disable wireless. Wireless enabled Wireless disabled NOTE: The wireless key allows you to quickly turn off icons appear on an airplane flight. 13 Setting Up Your Inspiron Laptop Press the key on the function key row on the keyboard to indicate the status.
The wireless on or off all wireless radios (Wi-Fi and Bluetooth®) on your computer, such as when you are asked to disable all wireless radios on the screen to enable or disable wireless. Wireless enabled Wireless disabled NOTE: The wireless key allows you to quickly turn off icons appear on an airplane flight. 13 Setting Up Your Inspiron Laptop Press the key on the function key row on the keyboard to indicate the status.
Setup Guide
Page 23
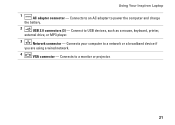
Connects your computer to a monitor or projector. 21 Connects to a network or a broadband device if you are using a wired network. 4 VGA connector - Connects to an AC adapter to USB devices, such as a mouse, keyboard, printer, external drive, or MP3 player. 3 Network connector - Using Your Inspiron Laptop 1 AC adapter connector - Connect to power the computer and charge the battery. 2 USB 2.0 connectors (3) -
Connects your computer to a monitor or projector. 21 Connects to a network or a broadband device if you are using a wired network. 4 VGA connector - Connects to an AC adapter to USB devices, such as a mouse, keyboard, printer, external drive, or MP3 player. 3 Network connector - Using Your Inspiron Laptop 1 AC adapter connector - Connect to power the computer and charge the battery. 2 USB 2.0 connectors (3) -
Setup Guide
Page 29
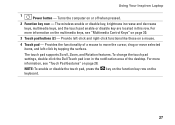
... Pad Gestures" on page 30. 3 Touch pad buttons (2) - Provide left -click by tapping the surface. Turns the computer on the keyboard. 27 To change the touch pad settings, double-click the Dell Touch pad icon in this row. For more information, see "Multimedia Control Keys" on page 28. The touch pad supports... a mouse to move the cursor, drag or move selected items, and left -click and right-click functions like those on a mouse. 4 Touch pad - Using Your Inspiron Laptop 1 Power button -
... Pad Gestures" on page 30. 3 Touch pad buttons (2) - Provide left -click by tapping the surface. Turns the computer on the keyboard. 27 To change the touch pad settings, double-click the Dell Touch pad icon in this row. For more information, see "Multimedia Control Keys" on page 28. The touch pad supports... a mouse to move the cursor, drag or move selected items, and left -click and right-click functions like those on a mouse. 4 Touch pad - Using Your Inspiron Laptop 1 Power button -
Setup Guide
Page 32
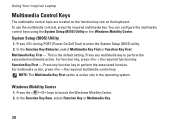
... Setup (BIOS) Utility 1. For function key, press + the required function key. Function Key First - Using Your Inspiron Laptop Multimedia Control Keys The multimedia control keys are located on the function key row on the keyboard. You can configure the multimedia control keys using the System Setup (BIOS) Utility or the Windows Mobility...
... Setup (BIOS) Utility 1. For function key, press + the required function key. Function Key First - Using Your Inspiron Laptop Multimedia Control Keys The multimedia control keys are located on the function key row on the keyboard. You can configure the multimedia control keys using the System Setup (BIOS) Utility or the Windows Mobility...
Setup Guide
Page 45
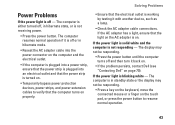
...power button until the computer turns off - The computer is in standby state or the display may not be responding. • Press a key on the keyboard, move the connected mouse or a finger on the touch pad, or press the power button to verify that the computer turns on properly. • ...If the AC adapter has a light, ensure that the electrical outlet is working by testing it back on. • If the problem persists, contact Dell (see "Contacting Dell" on page 70). Solving Problems Power Problems If the power light is off and then turn it with another device, such as a lamp. •...
...power button until the computer turns off - The computer is in standby state or the display may not be responding. • Press a key on the keyboard, move the connected mouse or a finger on the touch pad, or press the power button to verify that the computer turns on properly. • ...If the AC adapter has a light, ensure that the electrical outlet is working by testing it back on. • If the problem persists, contact Dell (see "Contacting Dell" on page 70). Solving Problems Power Problems If the power light is off and then turn it with another device, such as a lamp. •...
Setup Guide
Page 46
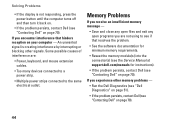
...the display is creating interference by interrupting or blocking other memory problems - • Run the Dell Diagnostics (see "Dell Diagnostics" on page 51). • If the problem persists, contact Dell (see "Contacting Dell" on page 70). An unwanted signal is not responding, press the power button until the... computer turns off and then turn it back on. • If the problem persists, contact Dell (see "Contacting Dell" on page 70). 44 If you are : • Power, keyboard, and mouse extension cables. • Too many devices connected to a power strip. • Multiple power...
...the display is creating interference by interrupting or blocking other memory problems - • Run the Dell Diagnostics (see "Dell Diagnostics" on page 51). • If the problem persists, contact Dell (see "Contacting Dell" on page 70). An unwanted signal is not responding, press the power button until the... computer turns off and then turn it back on. • If the problem persists, contact Dell (see "Contacting Dell" on page 70). 44 If you are : • Power, keyboard, and mouse extension cables. • Too many devices connected to a power strip. • Multiple power...

Setup Guide
Page 48
... program to get a response by pressing a key on your computer. --Ensure that the device drivers do not conflict with the operating system installed on your keyboard or moving your mouse, press the power button until the computer turns off and then restart your computer meets the minimum hardware requirements needed to...
... program to get a response by pressing a key on your computer. --Ensure that the device drivers do not conflict with the operating system installed on your keyboard or moving your mouse, press the power button until the computer turns off and then restart your computer meets the minimum hardware requirements needed to...
Setup Guide
Page 51
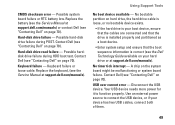
... power source to function properly. CMOS checksum error - Replace the battery (see the Service Manual at support.dell.com/manuals). Contact Dell (see "Contacting Dell" on page 70). Keyboard failure or loose cable. No bootable partition on hard drive, the hard drive cable is loose, or no...page 70). Possible hard-disk drive failure during HDD boot test. Contact Dell (see "Contacting Dell" on your device has two USB cables, connect both of them. 49 Replace the keyboard, (see "Contacting Dell" on the system board might be malfunctioning or system board failure. Possible...
... power source to function properly. CMOS checksum error - Replace the battery (see the Service Manual at support.dell.com/manuals). Contact Dell (see "Contacting Dell" on page 70). Keyboard failure or loose cable. No bootable partition on hard drive, the hard drive cable is loose, or no...page 70). Possible hard-disk drive failure during HDD boot test. Contact Dell (see "Contacting Dell" on your device has two USB cables, connect both of them. 49 Replace the keyboard, (see "Contacting Dell" on the system board might be malfunctioning or system board failure. Possible...
Setup Guide
Page 64
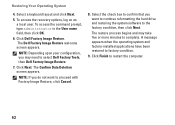
... Image Restore. NOTE: If you do not want to continue reformatting the hard drive and restoring the system software to select Dell Factory Tools, then Dell Factory Image Restore. 7. Select the check box to confirm that you may take five or more minutes to factory condition. 9. Click Finish to proceed... configuration, you want to restart the computer. 62 To access the command prompt, type administrator in the User name field, then click OK. 6. Select a keyboard layout and click Next. 5. The Dell Factory Image Restore welcome screen appears. Restoring Your Operating System 4.
... Image Restore. NOTE: If you do not want to continue reformatting the hard drive and restoring the system software to select Dell Factory Tools, then Dell Factory Image Restore. 7. Select the check box to confirm that you may take five or more minutes to factory condition. 9. Click Finish to proceed... configuration, you want to restart the computer. 62 To access the command prompt, type administrator in the User name field, then click OK. 6. Select a keyboard layout and click Next. 5. The Dell Factory Image Restore welcome screen appears. Restoring Your Operating System 4.
Setup Guide
Page 71
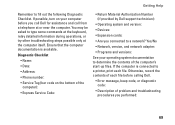
..., version, and network adapter: • Programs and versions: See your computer before calling Dell. • Error message, beep code, or diagnostic code: • Description of problem and troubleshooting procedures you connected to type some commands at the keyboard, relay detailed information during operations, or try other troubleshooting steps possible only at or...
..., version, and network adapter: • Programs and versions: See your computer before calling Dell. • Error message, beep code, or diagnostic code: • Description of problem and troubleshooting procedures you connected to type some commands at the keyboard, relay detailed information during operations, or try other troubleshooting steps possible only at or...
Setup Guide
Page 79
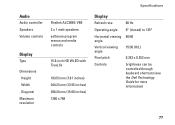
...; (closed) to 135° Horizontal viewing 40/40 angle Vertical viewing angle 15/30 (H/L) Pixel pitch 0.252 x 0.252 mm Controls brightness can be controlled through keyboard shortcuts (see the Dell Technology Guide for more information) 77
...; (closed) to 135° Horizontal viewing 40/40 angle Vertical viewing angle 15/30 (H/L) Pixel pitch 0.252 x 0.252 mm Controls brightness can be controlled through keyboard shortcuts (see the Dell Technology Guide for more information) 77
Setup Guide
Page 80
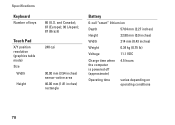
Specifications Keyboard Number of keys Touch Pad X/Y position resolution (graphics table mode) Size Width Height 86 (U.S. and Canada); 87 (Europe); 90 (Japan); 87 (Brazil) 240 cpi 90.00 mm (3.54 inches) sensor-active area 46.00 mm (1.81 inches) rectangle Battery 6-cell "smart" lithium ion Depth 57.64 mm (2.27 inches) Height 22.80 mm (0.9 inches) Width 214 mm (8.43 inches) Weight 0.34 kg (0.75 lb) Voltage 11.1 VDC Charge time when the computer is powered off (approximate) 4.5 hours Operating time varies depending on operating conditions 78
Specifications Keyboard Number of keys Touch Pad X/Y position resolution (graphics table mode) Size Width Height 86 (U.S. and Canada); 87 (Europe); 90 (Japan); 87 (Brazil) 240 cpi 90.00 mm (3.54 inches) sensor-active area 46.00 mm (1.81 inches) rectangle Battery 6-cell "smart" lithium ion Depth 57.64 mm (2.27 inches) Height 22.80 mm (0.9 inches) Width 214 mm (8.43 inches) Weight 0.34 kg (0.75 lb) Voltage 11.1 VDC Charge time when the computer is powered off (approximate) 4.5 hours Operating time varies depending on operating conditions 78
Service Guide
Page 1
Bluetooth is strictly forbidden. Other trademarks and trade names may be used in this text: Dell, the DELL logo, and Inspiron are either trademarks or registered trademarks of Microsoft Corporation in any proprietary interest in this document is used in this... of these materials in the United States and/or other than its own. P07F003 All rights reserved. Dell™ Inspiron™ N5020/M5030/N5030 Service Manual Before You Begin Battery Keyboard Palm Rest Speakers Power Button Module Memory Module(s) Hard Drive Optical Drive Wireless Mini-Card Internal Module With...
Bluetooth is strictly forbidden. Other trademarks and trade names may be used in this text: Dell, the DELL logo, and Inspiron are either trademarks or registered trademarks of Microsoft Corporation in any proprietary interest in this document is used in this... of these materials in the United States and/or other than its own. P07F003 All rights reserved. Dell™ Inspiron™ N5020/M5030/N5030 Service Manual Before You Begin Battery Keyboard Palm Rest Speakers Power Button Module Memory Module(s) Hard Drive Optical Drive Wireless Mini-Card Internal Module With...

Service Guide
Page 5
...grounding strap or by your computer. Removing the Bluetooth Module 1. Remove the keyboard (see Removing the Palm Rest). 5. CAUTION: To help prevent damage to servicing that is not authorized by Dell™ is not covered by periodically touching an unpainted metal surface (such ... should perform repairs on the system board. 6. Back to Contents Page Internal Module With Bluetooth® Wireless Technology Dell™ Inspiron™ N5020/M5030/N5030 Service Manual Removing the Bluetooth Module Replacing the Bluetooth Module WARNING: Before working inside your computer, read the safety ...
...grounding strap or by your computer. Removing the Bluetooth Module 1. Remove the keyboard (see Removing the Palm Rest). 5. CAUTION: To help prevent damage to servicing that is not authorized by Dell™ is not covered by periodically touching an unpainted metal surface (such ... should perform repairs on the system board. 6. Back to Contents Page Internal Module With Bluetooth® Wireless Technology Dell™ Inspiron™ N5020/M5030/N5030 Service Manual Removing the Bluetooth Module Replacing the Bluetooth Module WARNING: Before working inside your computer, read the safety ...

Service Guide
Page 6
Replace the battery (see Replacing the Keyboard). 6. 4. Replace the keyboard (see Replacing the Battery). Back to the computer. Replace the palm rest (see Replacing the Palm Rest). 5. CAUTION: Before turning on the computer, replace all screws and ensure that no stray screws remain inside the computer. Failure to do so may result in damage to Contents Page
Replace the battery (see Replacing the Keyboard). 6. 4. Replace the keyboard (see Replacing the Battery). Back to the computer. Replace the palm rest (see Replacing the Palm Rest). 5. CAUTION: Before turning on the computer, replace all screws and ensure that no stray screws remain inside the computer. Failure to do so may result in damage to Contents Page

Service Guide
Page 7
... Remove the display bezel (see Removing the Battery). 3. Remove the palm rest (see the Regulatory Compliance Homepage at www.dell.com/regulatory_compliance. For additional safety best practices information, see Removing the Palm Rest). 5. Release the camera module from the latches...battery (see Removing the Battery) before working inside the computer. Remove the keyboard (see Replacing the Display Bezel). 4. Back to Contents Page Camera Module Dell™ Inspiron™ N5020/M5030/N5030 Service Manual Removing the Camera Module Replacing the Camera Module WARNING: Before ...
... Remove the display bezel (see Removing the Battery). 3. Remove the palm rest (see the Regulatory Compliance Homepage at www.dell.com/regulatory_compliance. For additional safety best practices information, see Removing the Palm Rest). 5. Release the camera module from the latches...battery (see Removing the Battery) before working inside the computer. Remove the keyboard (see Replacing the Display Bezel). 4. Back to Contents Page Camera Module Dell™ Inspiron™ N5020/M5030/N5030 Service Manual Removing the Camera Module Replacing the Camera Module WARNING: Before ...

Service Guide
Page 8
Failure to do so may result in damage to Contents Page Replace the keyboard (see Replacing the Palm Rest). 6. Back to the computer. CAUTION: Before turning on the computer, replace all screws and ensure that no stray screws remain inside the computer. Replace the palm rest (see Replacing the Keyboard). 7. 5. Replace the battery (see Replacing the Battery).
Failure to do so may result in damage to Contents Page Replace the keyboard (see Replacing the Palm Rest). 6. Back to the computer. CAUTION: Before turning on the computer, replace all screws and ensure that no stray screws remain inside the computer. Replace the palm rest (see Replacing the Keyboard). 7. 5. Replace the battery (see Replacing the Battery).
Service Guide
Page 9
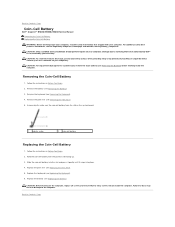
... perform repairs on your computer). Removing the Coin-Cell Battery 1. Follow the instructions in Before You Begin. 2. Replace the keyboard (see Removing the Keyboard). 4. CAUTION: To avoid electrostatic discharge, ground yourself by using a wrist grounding strap or by your warranty. Follow the ...unpainted metal surface (such as a connector on your computer. Damage due to Contents Page Coin-Cell Battery Dell™ Inspiron™ N5020/M5030/N5030 Service Manual Removing the Coin-Cell Battery Replacing the Coin-Cell Battery WARNING: Before working inside your computer....
... perform repairs on your computer). Removing the Coin-Cell Battery 1. Follow the instructions in Before You Begin. 2. Replace the keyboard (see Removing the Keyboard). 4. CAUTION: To avoid electrostatic discharge, ground yourself by using a wrist grounding strap or by your warranty. Follow the ...unpainted metal surface (such as a connector on your computer. Damage due to Contents Page Coin-Cell Battery Dell™ Inspiron™ N5020/M5030/N5030 Service Manual Removing the Coin-Cell Battery Replacing the Coin-Cell Battery WARNING: Before working inside your computer....

Service Guide
Page 10
...heat sink (see Removing the Battery). 3. Back to Contents Page Processor Module Dell™ Inspiron™ N5020/M5030/N5030 Service Manual Removing the Processor Module Replacing the Processor Module WARNING: Before working... inside your computer, read the safety information that is not authorized by Dell™ is perpendicular to the processor when turning the cam screw. 6. For additional safety best practices information, see Removing the Keyboard...
...heat sink (see Removing the Battery). 3. Back to Contents Page Processor Module Dell™ Inspiron™ N5020/M5030/N5030 Service Manual Removing the Processor Module Replacing the Processor Module WARNING: Before working... inside your computer, read the safety information that is not authorized by Dell™ is perpendicular to the processor when turning the cam screw. 6. For additional safety best practices information, see Removing the Keyboard...
Service Guide
Page 11
...: Before turning on the pin-1 corner of the ZIF socket, then insert the processor module. Lift the processor module from the ZIF socket. Replace the keyboard (see Replacing the Processor Heat Sink). 5. Replacing the Processor Module NOTE: If a new processor is installed, you will receive a new thermal-cooling assembly, which will... pad, or you will receive a new thermal pad along with the pin-1 corner of the ZIF socket. Replace the processor heat sink (see Replacing the Keyboard). 7. Back to Contents Page
...: Before turning on the pin-1 corner of the ZIF socket, then insert the processor module. Lift the processor module from the ZIF socket. Replace the keyboard (see Replacing the Processor Heat Sink). 5. Replacing the Processor Module NOTE: If a new processor is installed, you will receive a new thermal-cooling assembly, which will... pad, or you will receive a new thermal pad along with the pin-1 corner of the ZIF socket. Replace the processor heat sink (see Replacing the Keyboard). 7. Back to Contents Page


