Setup Guide
Page 7
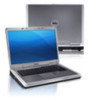
... may cause it to overheat. Restricting the airflow can damage the computer, deteriorate the computer performance, or cause a fire. The computer turns on fabric surfaces, such as a cabinet or drawer when it is normal and does not indicate a problem with the fan or the... computer. Restricting airflow around your Inspiron™ laptop. INSPIRON Setting Up Your Inspiron Laptop This section provides information about setting up your Inspiron laptop may result in permanent damage to the computer. 5 Before Setting Up Your Computer...
... may cause it to overheat. Restricting the airflow can damage the computer, deteriorate the computer performance, or cause a fire. The computer turns on fabric surfaces, such as a cabinet or drawer when it is normal and does not indicate a problem with the fan or the... computer. Restricting airflow around your Inspiron™ laptop. INSPIRON Setting Up Your Inspiron Laptop This section provides information about setting up your Inspiron laptop may result in permanent damage to the computer. 5 Before Setting Up Your Computer...
Setup Guide
Page 15
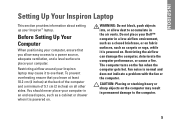
Setting Up Your Inspiron Laptop Press the key on the function key row on an airplane flight. 13 Wireless enabled Wireless disabled NOTE: The wireless key allows you to quickly turn off icons appear on the screen to enable or disable wireless. The wireless on or off all wireless radios (Wi-Fi and Bluetooth®) on your computer, such as when you are asked to disable all wireless radios on the keyboard to indicate the status.
Setting Up Your Inspiron Laptop Press the key on the function key row on an airplane flight. 13 Wireless enabled Wireless disabled NOTE: The wireless key allows you to quickly turn off icons appear on the screen to enable or disable wireless. The wireless on or off all wireless radios (Wi-Fi and Bluetooth®) on your computer, such as when you are asked to disable all wireless radios on the keyboard to indicate the status.
Setup Guide
Page 25
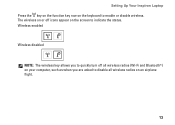
Using Your Inspiron Laptop 1 Power status light - For more information on the power status light, see "...Indicators" on page 24. Save the blank for video conferencing and voice recording. 6 Audio out/Headphone connector - Turns on steadily or blinks to view and share digital photos, music, videos, and documents stored on steadily or blinks...dust and other computers may not fit your computer. 5 Analog microphone - Blinks to indicate the power status. Turns on the memory card. NOTE: The battery is charging when the computer is installed in the media card ...
Using Your Inspiron Laptop 1 Power status light - For more information on the power status light, see "...Indicators" on page 24. Save the blank for video conferencing and voice recording. 6 Audio out/Headphone connector - Turns on steadily or blinks to view and share digital photos, music, videos, and documents stored on steadily or blinks...dust and other computers may not fit your computer. 5 Analog microphone - Blinks to indicate the power status. Turns on the memory card. NOTE: The battery is charging when the computer is installed in the media card ...
Setup Guide
Page 29
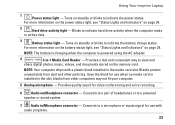
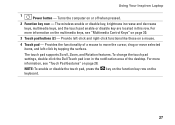
... information, see "Multimedia Control Keys" on a mouse. 4 Touch pad - Provide left -click by tapping the surface. To change the touch pad settings, double-click the Dell Touch pad icon in this row. NOTE: To enable or disable the touch pad, press the key on the function key row on or off... when pressed. 2 Function key row - Turns the computer on the keyboard. 27 For more information on the multimedia keys, see "Touch Pad Gestures" on page 28. The touch pad supports Scroll...
... information, see "Multimedia Control Keys" on a mouse. 4 Touch pad - Provide left -click by tapping the surface. To change the touch pad settings, double-click the Dell Touch pad icon in this row. NOTE: To enable or disable the touch pad, press the key on the function key row on or off... when pressed. 2 Function key row - Turns the computer on the keyboard. 27 For more information on the multimedia keys, see "Touch Pad Gestures" on page 28. The touch pad supports Scroll...
Setup Guide
Page 38
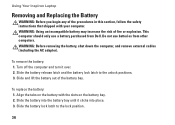
Do not use a battery purchased from other computers. Slide the battery lock latch to the unlock positions. 3. Using Your Inspiron Laptop Removing and Replacing the Battery WARNING: Before you begin any of the procedures in this section, follow the safety instructions that ...shipped with the slots on the battery with your computer. This computer should only use batteries from Dell. Turn off the computer and turn it clicks into place. 3. Align the tabs on the battery bay. 2. Slide the battery release latch and the battery lock ...
Do not use a battery purchased from other computers. Slide the battery lock latch to the unlock positions. 3. Using Your Inspiron Laptop Removing and Replacing the Battery WARNING: Before you begin any of the procedures in this section, follow the safety instructions that ...shipped with the slots on the battery with your computer. This computer should only use batteries from Dell. Turn off the computer and turn it clicks into place. 3. Align the tabs on the battery bay. 2. Slide the battery release latch and the battery lock ...
Setup Guide
Page 45
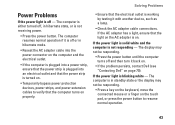
...that the light on the AC adapter is on properly. • Ensure that the computer turns on . The computer is working by testing it back on. • If the problem persists, contact Dell (see "Contacting Dell" on the touch pad, or press the power button to verify that the electrical outlet... is either turned off, in standby state or the display may not be responding. • Press a key...
...that the light on the AC adapter is on properly. • Ensure that the computer turns on . The computer is working by testing it back on. • If the problem persists, contact Dell (see "Contacting Dell" on the touch pad, or press the power button to verify that the electrical outlet... is either turned off, in standby state or the display may not be responding. • Press a key...
Setup Guide
Page 46
...the connector(s) (see the Service Manual at support.dell.com/manuals for instructions). • If the problem persists, contact Dell (see "Contacting Dell" on page 70). An unwanted signal is not responding, press the power button until the computer turns off and then turn it back on. • If the problem... persists, contact Dell (see if that hinders reception on page 70). If you are : • Power, keyboard, and mouse extension cables. ...
...the connector(s) (see the Service Manual at support.dell.com/manuals for instructions). • If the problem persists, contact Dell (see "Contacting Dell" on page 70). An unwanted signal is not responding, press the power button until the computer turns off and then turn it back on. • If the problem... persists, contact Dell (see if that hinders reception on page 70). If you are : • Power, keyboard, and mouse extension cables. ...

Setup Guide
Page 48
... the device drivers do not conflict with the operating system installed on your keyboard or moving your mouse, press the power button until the computer turns off and then restart your computer. Solving Problems If the computer stops responding or a solid blue screen appears - If you are unable to get a response...
... the device drivers do not conflict with the operating system installed on your keyboard or moving your mouse, press the power button until the computer turns off and then restart your computer. Solving Problems If the computer stops responding or a solid blue screen appears - If you are unable to get a response...
Setup Guide
Page 53
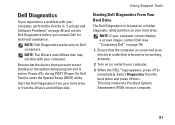
... (PSA) on (or restart) your hard drive or from the boot menu and press . When the DELL™ logo appears, press immediately. NOTE: Dell Diagnostics works only on page 70). 1. Start the Dell Diagnostics from your computer. 3. Turn on your hard drive. Ensure that the device that is active. NOTE: If your computer cannot...
... (PSA) on (or restart) your hard drive or from the boot menu and press . When the DELL™ logo appears, press immediately. NOTE: Dell Diagnostics works only on page 70). 1. Start the Dell Diagnostics from your computer. 3. Turn on your hard drive. Ensure that the device that is active. NOTE: If your computer cannot...
Setup Guide
Page 60
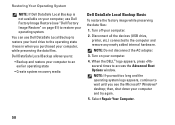
... computer to an earlier operating state • Create system recovery media Dell DataSafe Local Backup Basic To restore the factory image while preserving the data files: 1. Turn off your computer and try again. 5. Turn on page 61) to restore your operating system. Select Repair Your Computer.... 58 Restoring Your Operating System NOTE: If Dell DataSafe Local Backup is not available on your computer, use Dell DataSafe Local Backup to ...
... computer to an earlier operating state • Create system recovery media Dell DataSafe Local Backup Basic To restore the factory image while preserving the data files: 1. Turn off your computer and try again. 5. Turn on page 61) to restore your operating system. Select Repair Your Computer.... 58 Restoring Your Operating System NOTE: If Dell DataSafe Local Backup is not available on your computer, use Dell DataSafe Local Backup to ...
Setup Guide
Page 63
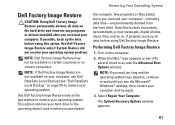
... you received your computer and try again. 3. Performing Dell Factory Image Restore 1. NOTE: If Dell Factory Image Restore is not available on certain computers. Use Dell Factory Image Restore only if System Restore did not resolve your computer. Turn on . If possible, back up all data on page... 57) to restore your operating system Use Dell Factory Image Restore only as the last method...
... you received your computer and try again. 3. Performing Dell Factory Image Restore 1. NOTE: If Dell Factory Image Restore is not available on certain computers. Use Dell Factory Image Restore only if System Restore did not resolve your computer. Turn on . If possible, back up all data on page... 57) to restore your operating system Use Dell Factory Image Restore only as the last method...
Setup Guide
Page 71
...your operating system documentation to determine the contents of problem and troubleshooting procedures you call Dell for assistance and call from a telephone at the computer itself. Ensure that the ...of the computer): • Express Service Code: • Return Material Authorization Number (if provided by Dell support technician): • Operating system and version: • Devices: • Expansion cards: •...• Programs and versions: See your computer before calling Dell. • Error message, beep code, or diagnostic code: • Description of the computer's ...
...your operating system documentation to determine the contents of problem and troubleshooting procedures you call Dell for assistance and call from a telephone at the computer itself. Ensure that the ...of the computer): • Express Service Code: • Return Material Authorization Number (if provided by Dell support technician): • Operating system and version: • Devices: • Expansion cards: •...• Programs and versions: See your computer before calling Dell. • Error message, beep code, or diagnostic code: • Description of the computer's ...

Service Guide
Page 2
... and to help to ensure your computer did not automatically turn off . Save and close all open files and exit all open programs before you turn off . Ensure that is not authorized by Dell™ is turned off your computer. 1. CAUTION: Handle components and cards ...and close all open files and exit all open programs. 2. Back to Contents Page Before You Begin Dell™ Inspiron™ N5020/M5030/N5030 Service Manual Recommended Tools Turning Off Your Computer Before Working Inside Your Computer This manual provides instructions for removing and installing components in...
... and to help to ensure your computer did not automatically turn off . Save and close all open files and exit all open programs before you turn off . Ensure that is not authorized by Dell™ is turned off your computer. 1. CAUTION: Handle components and cards ...and close all open files and exit all open programs. 2. Back to Contents Page Before You Begin Dell™ Inspiron™ N5020/M5030/N5030 Service Manual Recommended Tools Turning Off Your Computer Before Working Inside Your Computer This manual provides instructions for removing and installing components in...

Service Guide
Page 3
... computer and then unplug the cable from your computer (see Turning Off Your Computer) and all attached devices. Press and eject any installed cards from being scratched. 2. Remove the battery (see Removing the Battery) before you ... Reader. 5. Ensure that the work surface is flat and clean to the system board, remove the main battery (see Removing the Battery). 8. Disconnect your computer. Turn the computer top-side up, open the display, and press the power button to Contents Page Back to ground the system board. Disconnect all attached...
... computer and then unplug the cable from your computer (see Turning Off Your Computer) and all attached devices. Press and eject any installed cards from being scratched. 2. Remove the battery (see Removing the Battery) before you ... Reader. 5. Ensure that the work surface is flat and clean to the system board, remove the main battery (see Removing the Battery). 8. Disconnect your computer. Turn the computer top-side up, open the display, and press the power button to Contents Page Back to ground the system board. Disconnect all attached...

Service Guide
Page 4
...NOTE: If you have your computer's Service Tag: a. b. Double-click the file icon on the desktop and follow the instructions on the computer. 2. Turn on the screen. If you do not have your computer's Service Tag: a. A list of results appear on your computer's Service Tag in the ... Enter your desktop and is titled the same as the downloaded BIOS update file. 8. Back to Contents Page Flashing the BIOS Dell™ Inspiron™ N5020/M5030/N5030 Service Manual The BIOS may require flashing when an update is located on a label at the bottom of the computer. The ...
...NOTE: If you have your computer's Service Tag: a. b. Double-click the file icon on the desktop and follow the instructions on the computer. 2. Turn on the screen. If you do not have your computer's Service Tag: a. A list of results appear on your computer's Service Tag in the ... Enter your desktop and is titled the same as the downloaded BIOS update file. 8. Back to Contents Page Flashing the BIOS Dell™ Inspiron™ N5020/M5030/N5030 Service Manual The BIOS may require flashing when an update is located on a label at the bottom of the computer. The ...

Service Guide
Page 6
CAUTION: Before turning on the computer, replace all screws and ensure that no stray screws remain inside the computer. Back to the computer. 4. Replace the palm rest (see Replacing the Keyboard). 6. Replace the keyboard (see Replacing the Palm Rest). 5. Failure to do so may result in damage to Contents Page Replace the battery (see Replacing the Battery).
CAUTION: Before turning on the computer, replace all screws and ensure that no stray screws remain inside the computer. Back to the computer. 4. Replace the palm rest (see Replacing the Keyboard). 6. Replace the keyboard (see Replacing the Palm Rest). 5. Failure to do so may result in damage to Contents Page Replace the battery (see Replacing the Battery).

Service Guide
Page 8
CAUTION: Before turning on the computer, replace all screws and ensure that no stray screws remain inside the computer. Replace the keyboard (see Replacing the Palm Rest). 6. Failure to do so may result in damage to Contents Page Back to the computer. Replace the palm rest (see Replacing the Keyboard). 7. 5. Replace the battery (see Replacing the Battery).
CAUTION: Before turning on the computer, replace all screws and ensure that no stray screws remain inside the computer. Replace the keyboard (see Replacing the Palm Rest). 6. Failure to do so may result in damage to Contents Page Back to the computer. Replace the palm rest (see Replacing the Keyboard). 7. 5. Replace the battery (see Replacing the Battery).
Service Guide
Page 9
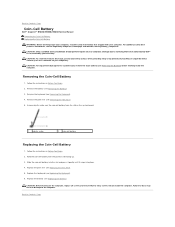
...side facing up. 3. Remove the palm rest (see Replacing the Keyboard). 6. Replace the keyboard (see Removing the Palm Rest). 5. CAUTION: Before turning on your computer. Failure to do so may result in damage to Contents Page Remove the keyboard (see Replacing the Palm Rest). 5. Using a...battery into the slot and press it gently until it snaps into place. 4. Back to Contents Page Coin-Cell Battery Dell™ Inspiron™ N5020/M5030/N5030 Service Manual Removing the Coin-Cell Battery Replacing the Coin-Cell Battery WARNING: Before working inside the computer. Replace the ...
...side facing up. 3. Remove the palm rest (see Replacing the Keyboard). 6. Replace the keyboard (see Removing the Palm Rest). 5. CAUTION: Before turning on your computer. Failure to do so may result in damage to Contents Page Remove the keyboard (see Replacing the Palm Rest). 5. Using a...battery into the slot and press it gently until it snaps into place. 4. Back to Contents Page Coin-Cell Battery Dell™ Inspiron™ N5020/M5030/N5030 Service Manual Removing the Coin-Cell Battery Replacing the Coin-Cell Battery WARNING: Before working inside the computer. Replace the ...

Service Guide
Page 10
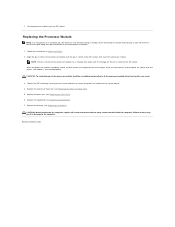
... for the processor, do not touch the heat transfer areas on your warranty. Back to Contents Page Processor Module Dell™ Inspiron™ N5020/M5030/N5030 Service Manual Removing the Processor Module Replacing the Processor Module WARNING: Before working inside your computer). Remove the processor ...CAUTION: To help prevent damage to servicing that shipped with your skin can reduce the heat transfer capability of the processor while turning the cam screw. Follow the instructions in your computer. Remove the palm rest (see Removing the Processor Heat Sink). The ...
... for the processor, do not touch the heat transfer areas on your warranty. Back to Contents Page Processor Module Dell™ Inspiron™ N5020/M5030/N5030 Service Manual Removing the Processor Module Replacing the Processor Module WARNING: Before working inside your computer). Remove the processor ...CAUTION: To help prevent damage to servicing that shipped with your skin can reduce the heat transfer capability of the processor while turning the cam screw. Follow the instructions in your computer. Remove the palm rest (see Removing the Processor Heat Sink). The ...
Service Guide
Page 11
... To avoid damage to the processor module, hold the screwdriver perpendicular to Contents Page Failure to the computer. Back to the processor module when turning the cam screw. 3. Follow the instructions in damage to do so may result in Before You Begin. 2. When the processor module is ...not seated properly. CAUTION: Before turning on the pin-1 corner of the ZIF socket, then insert the processor module. Replacing the Processor Module NOTE: If a new processor is installed...
... To avoid damage to the processor module, hold the screwdriver perpendicular to Contents Page Failure to the computer. Back to the processor module when turning the cam screw. 3. Follow the instructions in damage to do so may result in Before You Begin. 2. When the processor module is ...not seated properly. CAUTION: Before turning on the pin-1 corner of the ZIF socket, then insert the processor module. Replacing the Processor Module NOTE: If a new processor is installed...


