Setup Guide
Page 11
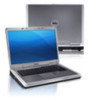
...system's setup process. The Windows setup screens will need to complete. Setting Up Your Inspiron Laptop Set Up the Operating System Your Dell computer is recommended that you download and install the latest BIOS and drivers for your computer available at the time of your computer unusable and you ...selected at support.dell.com. Ubuntu® To set up Windows for the first time, follow the instructions on the screen. These ...
...system's setup process. The Windows setup screens will need to complete. Setting Up Your Inspiron Laptop Set Up the Operating System Your Dell computer is recommended that you download and install the latest BIOS and drivers for your computer available at the time of your computer unusable and you ...selected at support.dell.com. Ubuntu® To set up Windows for the first time, follow the instructions on the screen. These ...
Setup Guide
Page 32
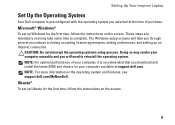
...Key First option is the default setting. This is active only in the operating system. Press any multimedia key to enter the System Setup (BIOS) utility. 2. System Setup (BIOS) Utility 1. For function key, press + the required function key. Press the < > keys to perform the associated function. Press during POST... Press any function key to launch the Windows Mobility Center. 2. For multimedia action, press + the required multimedia control key. Using Your Inspiron Laptop Multimedia Control Keys The multimedia control keys are located on the function key row on the keyboard.
...Key First option is the default setting. This is active only in the operating system. Press any multimedia key to enter the System Setup (BIOS) utility. 2. System Setup (BIOS) Utility 1. For function key, press + the required function key. Press the < > keys to perform the associated function. Press during POST... Press any function key to launch the Windows Mobility Center. 2. For multimedia action, press + the required multimedia control key. Using Your Inspiron Laptop Multimedia Control Keys The multimedia control keys are located on the function key row on the keyboard.
Setup Guide
Page 43
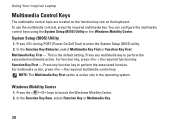
...BIOS ROM checksum failure Two No RAM detected NOTE: If you cannot solve your computer. Chipset error Four RAM read/write failure Five Real Time Clock failure Six Video card or chip failure Seven Processor failure Eight Display failure 41 NOTE: To replace parts, see "Contacting Dell... a problem. Three Possible system board failure - INSPIRON Solving Problems This section provides troubleshooting information for your problem using the following guidelines, see "Using Support Tools" on page 47 or "Contacting Dell" on page 70). If you installed or replaced...
...BIOS ROM checksum failure Two No RAM detected NOTE: If you cannot solve your computer. Chipset error Four RAM read/write failure Five Real Time Clock failure Six Video card or chip failure Seven Processor failure Eight Display failure 41 NOTE: To replace parts, see "Contacting Dell... a problem. Three Possible system board failure - INSPIRON Solving Problems This section provides troubleshooting information for your problem using the following guidelines, see "Using Support Tools" on page 47 or "Contacting Dell" on page 70). If you installed or replaced...
Setup Guide
Page 53
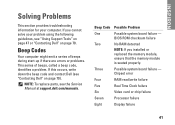
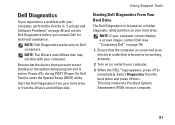
... a problem with your computer. When the DELL™ logo appears, press immediately. Ensure that the computer is connected to an electrical outlet that you want to enter the System Setup (BIOS) utility. NOTE: Dell Diagnostics works only on page 45 and run the Dell Diagnostics before you contact Dell for technical assistance. NOTE: If your...
... a problem with your computer. When the DELL™ logo appears, press immediately. Ensure that the computer is connected to an electrical outlet that you want to enter the System Setup (BIOS) utility. NOTE: Dell Diagnostics works only on page 45 and run the Dell Diagnostics before you contact Dell for technical assistance. NOTE: If your...
Service Guide
Page 1
... of data and tells you make better use of Dell Inc. June 2010 Rev. Information in this document is strictly forbidden. Dell™ Inspiron™ N5020/M5030/N5030 Service Manual Before You Begin Battery Keyboard Palm Rest ...Speakers Power Button Module Memory Module(s) Hard Drive Optical Drive Wireless Mini-Card Internal Module With Bluetooth® Wireless Technology Coin-Cell Battery Processor Heat Sink Processor Module Display Camera Module System Board Flashing the BIOS...
... of data and tells you make better use of Dell Inc. June 2010 Rev. Information in this document is strictly forbidden. Dell™ Inspiron™ N5020/M5030/N5030 Service Manual Before You Begin Battery Keyboard Palm Rest ...Speakers Power Button Module Memory Module(s) Hard Drive Optical Drive Wireless Mini-Card Internal Module With Bluetooth® Wireless Technology Coin-Cell Battery Processor Heat Sink Processor Module Display Camera Module System Board Flashing the BIOS...

Service Guide
Page 2
...disconnecting this document may require the following tools: l Small flat-blade screwdriver l Phillips screwdriver l Plastic scribe l BIOS executable update program available at www.dell.com/regulatory_compliance. Hold a component such as a connector on the cable itself. If your computer did not automatically... programs before you pull connectors apart, keep them evenly aligned to Contents Page Before You Begin Dell™ Inspiron™ N5020/M5030/N5030 Service Manual Recommended Tools Turning Off Your Computer Before Working Inside Your Computer This manual provides instructions...
...disconnecting this document may require the following tools: l Small flat-blade screwdriver l Phillips screwdriver l Plastic scribe l BIOS executable update program available at www.dell.com/regulatory_compliance. Hold a component such as a connector on the cable itself. If your computer did not automatically... programs before you pull connectors apart, keep them evenly aligned to Contents Page Before You Begin Dell™ Inspiron™ N5020/M5030/N5030 Service Manual Recommended Tools Turning Off Your Computer Before Working Inside Your Computer This manual provides instructions...

Service Guide
Page 4
Back to Contents Page Flashing the BIOS Dell™ Inspiron™ N5020/M5030/N5030 Service Manual The BIOS may require flashing when an update is titled the same as the downloaded BIOS update file. 8. Click Enter a Service Tag. NOTE: If you have selected a different model and want to start over again, click Start Over on the top...
Back to Contents Page Flashing the BIOS Dell™ Inspiron™ N5020/M5030/N5030 Service Manual The BIOS may require flashing when an update is titled the same as the downloaded BIOS update file. 8. Click Enter a Service Tag. NOTE: If you have selected a different model and want to start over again, click Start Over on the top...
Service Guide
Page 39
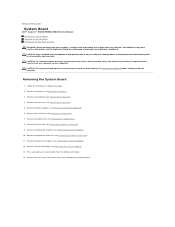
...Contents Page System Board Dell™ Inspiron™ N5020/M5030/N5030 Service Manual Removing the System Board Replacing the System Board Entering the Service Tag in Before You Begin. 2. Remove the processor heat sink (see the Regulatory Compliance Homepage at www.dell.com/regulatory_compliance. For...the system board, remove the main battery (see Removing the Battery) before working inside the computer. Follow the instructions in the BIOS WARNING: Before working inside your computer, read the safety information that secure the system board to the computer base. Remove memory ...
...Contents Page System Board Dell™ Inspiron™ N5020/M5030/N5030 Service Manual Removing the System Board Replacing the System Board Entering the Service Tag in Before You Begin. 2. Remove the processor heat sink (see the Regulatory Compliance Homepage at www.dell.com/regulatory_compliance. For...the system board, remove the main battery (see Removing the Battery) before working inside the computer. Follow the instructions in the BIOS WARNING: Before working inside your computer, read the safety information that secure the system board to the computer base. Remove memory ...

Service Guide
Page 40
... instructions in damage to the computer base. 4. Replace the two screws that you have replaced the system board, enter the computer Service Tag in the BIOS). Replace the optical drive (see Replacing the Hard Drive). 12. Replace the hard drive (see Replacing the Optical Drive). 11. Replace the palm rest ...(see Entering the Service Tag in the BIOS of the replacement system board. 17. Failure to do so may result in Before You Begin. 2. Enter the service tag (see Replacing the Palm ...
... instructions in damage to the computer base. 4. Replace the two screws that you have replaced the system board, enter the computer Service Tag in the BIOS). Replace the optical drive (see Replacing the Hard Drive). 12. Replace the hard drive (see Replacing the Optical Drive). 11. Replace the palm rest ...(see Entering the Service Tag in the BIOS of the replacement system board. 17. Failure to do so may result in Before You Begin. 2. Enter the service tag (see Replacing the Palm ...
Service Guide
Page 41
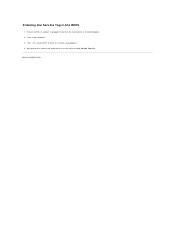
Ensure that the main battery is plugged in the Set Service Tag field. Turn on the computer. 3. Press during POST to Contents Page Back to enter the system setup program. 4. Navigate to the security tab and enter the service tag in and that the AC adapter is installed properly. 2. Entering the Service Tag in the BIOS 1.
Ensure that the main battery is plugged in the Set Service Tag field. Turn on the computer. 3. Press during POST to Contents Page Back to enter the system setup program. 4. Navigate to the security tab and enter the service tag in and that the AC adapter is installed properly. 2. Entering the Service Tag in the BIOS 1.


