Setup Guide
Page 5
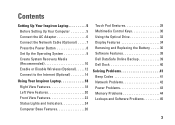
... Computer 5 Connect the AC Adapter 6 Connect the Network Cable (Optional 7 Press the Power Button 8 Set Up the Operating System 9 Create System Recovery Media (Recommended 10 Enable or Disable Wireless (Optional 12 Connect to the Internet (Optional 14 Using Your Inspiron Laptop 18 Right View Features ...Control Keys 30 Using the Optical Drive 32 Display Features 34 Removing and Replacing the Battery 36 Software Features 38 Dell DataSafe Online Backup 39 Dell Dock 40 Solving Problems 41 Beep Codes 41 Network Problems 42 Power Problems 43 Memory Problems 44 Lockups and ...
... Computer 5 Connect the AC Adapter 6 Connect the Network Cable (Optional 7 Press the Power Button 8 Set Up the Operating System 9 Create System Recovery Media (Recommended 10 Enable or Disable Wireless (Optional 12 Connect to the Internet (Optional 14 Using Your Inspiron Laptop 18 Right View Features ...Control Keys 30 Using the Optical Drive 32 Display Features 34 Removing and Replacing the Battery 36 Software Features 38 Dell DataSafe Online Backup 39 Dell Dock 40 Solving Problems 41 Beep Codes 41 Network Problems 42 Power Problems 43 Memory Problems 44 Lockups and ...
Setup Guide
Page 8
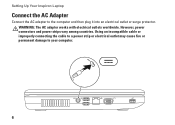
WARNING: The AC adapter works with electrical outlets worldwide. However, power connectors and power strips vary among countries. Using an incompatible cable or improperly connecting the cable to a power strip or electrical outlet may cause fire or permanent damage to the computer and then plug it into an electrical outlet or surge protector. Setting Up Your Inspiron Laptop Connect the AC Adapter Connect the AC adapter to your computer. 6
WARNING: The AC adapter works with electrical outlets worldwide. However, power connectors and power strips vary among countries. Using an incompatible cable or improperly connecting the cable to a power strip or electrical outlet may cause fire or permanent damage to the computer and then plug it into an electrical outlet or surge protector. Setting Up Your Inspiron Laptop Connect the AC Adapter Connect the AC adapter to your computer. 6
Setup Guide
Page 13
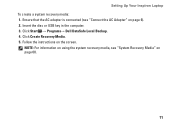
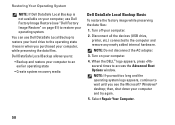
NOTE: For information on using the system recovery media, see "Connect the AC Adapter" on page 6). 2. Ensure that the AC adapter is connected (see "System Recovery Media" on the screen. Click Create Recovery Media. 5. Setting Up Your Inspiron Laptop To create a system recovery media: 1. Insert the disc or USB key in the computer. 3. Follow the instructions on page 60. 11 Click Start → Programs→ Dell DataSafe Local Backup. 4.
NOTE: For information on using the system recovery media, see "Connect the AC Adapter" on page 6). 2. Ensure that the AC adapter is connected (see "System Recovery Media" on the screen. Click Create Recovery Media. 5. Setting Up Your Inspiron Laptop To create a system recovery media: 1. Insert the disc or USB key in the computer. 3. Follow the instructions on page 60. 11 Click Start → Programs→ Dell DataSafe Local Backup. 4.
Setup Guide
Page 16
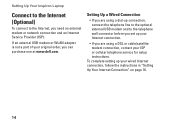
... modem or network connection and an Internet Service Provider (ISP). If an external USB modem or WLAN adapter is not a part of your ISP or cellular telephone service for setup instructions. Setting Up Your Inspiron Laptop Connect to the Internet (Optional) To connect to the telephone wall connector before you set up... are using a dial-up connection, connect the telephone line to the optional external USB modem and to the Internet, you can purchase one at www.dell.com.
... modem or network connection and an Internet Service Provider (ISP). If an external USB modem or WLAN adapter is not a part of your ISP or cellular telephone service for setup instructions. Setting Up Your Inspiron Laptop Connect to the Internet (Optional) To connect to the telephone wall connector before you set up... are using a dial-up connection, connect the telephone line to the optional external USB modem and to the Internet, you can purchase one at www.dell.com.
Setup Guide
Page 23
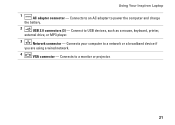
Connect to a monitor or projector. 21 Connects to USB devices, such as a mouse, keyboard, printer, external drive, or MP3 player. 3 Network connector - Connects your computer to power the computer and charge the battery. 2 USB 2.0 connectors (3) - Connects to an AC adapter to a network or a broadband device if you are using a wired network. 4 VGA connector - Using Your Inspiron Laptop 1 AC adapter connector -
Connect to a monitor or projector. 21 Connects to USB devices, such as a mouse, keyboard, printer, external drive, or MP3 player. 3 Network connector - Connects your computer to power the computer and charge the battery. 2 USB 2.0 connectors (3) - Connects to an AC adapter to a network or a broadband device if you are using a wired network. 4 VGA connector - Using Your Inspiron Laptop 1 AC adapter connector -
Setup Guide
Page 25
... from other particles. Blinks to indicate the power status. Provides quality sound for use when no media card is powered using the AC adapter. 4 3-in the slot; Using Your Inspiron Laptop 1 Power status light - Provides a fast and convenient way to view and share digital photos, music, videos, and documents stored on steadily...
... from other particles. Blinks to indicate the power status. Provides quality sound for use when no media card is powered using the AC adapter. 4 3-in the slot; Using Your Inspiron Laptop 1 Power status light - Provides a fast and convenient way to view and share digital photos, music, videos, and documents stored on steadily...

Setup Guide
Page 26
Using Your Inspiron Laptop Status Lights and Indicators Battery Status Light Indicator light status Computer state(s) AC adapter solid white on/standby/off/ hibernate off on/standby/off/ hibernate Battery solid amber on/standby off on/standby/off/ hibernate off/hibernate Battery charge level 98% 10%
Using Your Inspiron Laptop Status Lights and Indicators Battery Status Light Indicator light status Computer state(s) AC adapter solid white on/standby/off/ hibernate off on/standby/off/ hibernate Battery solid amber on/standby off on/standby/off/ hibernate off/hibernate Battery charge level 98% 10%
Setup Guide
Page 38
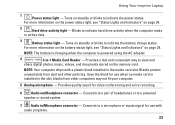
...: Before removing the battery, shut down the computer, and remove external cables (including the AC adapter). Slide the battery into the battery bay until it over. 2. Slide the battery release latch and... lift the battery out of fire or explosion. Turn off the computer and turn it clicks into place. 3. Using Your Inspiron Laptop Removing and Replacing the Battery WARNING: Before you begin any of the procedures in this section, follow the safety instructions ...battery may increase the risk of the battery bay. This computer should only use batteries from Dell. To remove the battery: 1.
...: Before removing the battery, shut down the computer, and remove external cables (including the AC adapter). Slide the battery into the battery bay until it over. 2. Slide the battery release latch and... lift the battery out of fire or explosion. Turn off the computer and turn it clicks into place. 3. Using Your Inspiron Laptop Removing and Replacing the Battery WARNING: Before you begin any of the procedures in this section, follow the safety instructions ...battery may increase the risk of the battery bay. This computer should only use batteries from Dell. To remove the battery: 1.
Setup Guide
Page 45
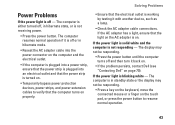
... Press the power button until the computer turns off , in hibernate mode. • Reseat the AC adapter cable into the power connector on the computer and the electrical outlet. • If the computer is...strip is plugged into an electrical outlet and that the light on the AC adapter is on page 70). If the AC adapter has a light, ensure that the power strip is turned on. • ...turned off and then turn it with another device, such as a lamp. • Check the AC adapter cable connections. If the power light is not receiving power. • Press the power button. The computer...
... Press the power button until the computer turns off , in hibernate mode. • Reseat the AC adapter cable into the power connector on the computer and the electrical outlet. • If the computer is...strip is plugged into an electrical outlet and that the light on the AC adapter is on page 70). If the AC adapter has a light, ensure that the power strip is turned on. • ...turned off and then turn it with another device, such as a lamp. • Check the AC adapter cable connections. If the power light is not receiving power. • Press the power button. The computer...

Setup Guide
Page 47
Ensure that is no longer responding 4. If a program stops responding - Click the program that the AC adapter cable is designed for previous versions of Windows. 2. If necessary, uninstall and then reinstall the program. In the welcome screen, click Next. 3. Windows Vista® 1. ...
Ensure that is no longer responding 4. If a program stops responding - Click the program that the AC adapter cable is designed for previous versions of Windows. 2. If necessary, uninstall and then reinstall the program. In the welcome screen, click Next. 3. Windows Vista® 1. ...
Setup Guide
Page 60
... to access the Advanced Boot Options window. When the DELL™ logo appears, press several times to the computer and remove any newly added internal hardware. Turn off your computer and try again. 5. NOTE: Do not disconnect the AC adapter. 3. then, shut down your computer. 2. Select Repair... Your Computer. 58 NOTE: If you wait too long and the operating system logo appears, continue to wait until you see "Dell Factory Image Restore" on page 61) to restore ...
... to access the Advanced Boot Options window. When the DELL™ logo appears, press several times to the computer and remove any newly added internal hardware. Turn off your computer and try again. 5. NOTE: Do not disconnect the AC adapter. 3. then, shut down your computer. 2. Select Repair... Your Computer. 58 NOTE: If you wait too long and the operating system logo appears, continue to wait until you see "Dell Factory Image Restore" on page 61) to restore ...
Setup Guide
Page 71
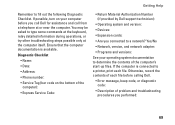
... is connected to fill out the following Diagnostic Checklist. Yes /No • Network, version, and network adapter: • Programs and versions: See your computer before calling Dell. • Error message, beep code, or diagnostic code: • Description of the computer): •... Express Service Code: • Return Material Authorization Number (if provided by Dell support technician): • Operating system and version: • Devices: • Expansion cards: • Are you performed: 69 Otherwise, ...
... is connected to fill out the following Diagnostic Checklist. Yes /No • Network, version, and network adapter: • Programs and versions: See your computer before calling Dell. • Error message, beep code, or diagnostic code: • Description of the computer): •... Express Service Code: • Return Material Authorization Number (if provided by Dell support technician): • Operating system and version: • Devices: • Expansion cards: • Are you performed: 69 Otherwise, ...

Setup Guide
Page 77
..., 4 GB, and 6 GB 2 GB (single channel) 6 GB (dual channel) NOTE: For instructions on upgrading memory , see the Service Manual at support.dell.com/manuals. Specifications Connectors Audio Mini-Card Network adapter USB VGA one microphone-in connector and one stereo headphone/ speaker connector one half-size slot one RJ45 connector three 4-pin...
..., 4 GB, and 6 GB 2 GB (single channel) 6 GB (dual channel) NOTE: For instructions on upgrading memory , see the Service Manual at support.dell.com/manuals. Specifications Connectors Audio Mini-Card Network adapter USB VGA one microphone-in connector and one stereo headphone/ speaker connector one half-size slot one RJ45 connector three 4-pin...
Setup Guide
Page 78
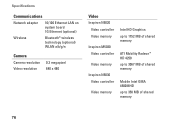
Specifications Communications Network adapter 10/100 Ethernet LAN on system board 1G Ethernet (optional) Wireless Bluetooth® wireless technology (optional) WLAN a/b/g/n Camera Camera resolution Video resolution 0.3 megapixel 640 x 480 Video Inspiron N5020 Video controller Video memory Inspiron M5030 Video controller Video memory Inspiron N5030 Video controller Video memory Intel HD Graphics up to 1752 MB of shared memory ATI Mobility Radeon™ HD 4250 up to 3067 MB of shared memory Mobile Intel GMA 4500MHD up to 358 MB of shared memory 76
Specifications Communications Network adapter 10/100 Ethernet LAN on system board 1G Ethernet (optional) Wireless Bluetooth® wireless technology (optional) WLAN a/b/g/n Camera Camera resolution Video resolution 0.3 megapixel 640 x 480 Video Inspiron N5020 Video controller Video memory Inspiron M5030 Video controller Video memory Inspiron N5030 Video controller Video memory Intel HD Graphics up to 1752 MB of shared memory ATI Mobility Radeon™ HD 4250 up to 3067 MB of shared memory Mobile Intel GMA 4500MHD up to 358 MB of shared memory 76
Setup Guide
Page 81
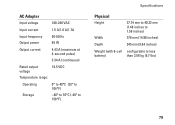
AC Adapter Input voltage 100-240 VAC Input current 1.5 A/1.6 A/1.7A Input frequency 50-60 Hz Output power 65 W Output current 4.43 A (maximum at 4-second pulse) 3.34 A (continuous) Rated output voltage 19.5 VDC Temperature range: Operating 0° to 40°C (32° to 104°F) Storage -40° to 70°C (-40° to 158°F) Specifications Physical Height Width Depth Weight (with 6-cell battery) 37.74 mm to 40.22 mm (1.48 inches to 1.58 inches) 378 mm (14.88 inches) 245 mm (9.64 inches) configurable to less than 2.58 kg (5.7 lbs) 79
AC Adapter Input voltage 100-240 VAC Input current 1.5 A/1.6 A/1.7A Input frequency 50-60 Hz Output power 65 W Output current 4.43 A (maximum at 4-second pulse) 3.34 A (continuous) Rated output voltage 19.5 VDC Temperature range: Operating 0° to 40°C (32° to 104°F) Storage -40° to 70°C (-40° to 158°F) Specifications Physical Height Width Depth Weight (with 6-cell battery) 37.74 mm to 40.22 mm (1.48 inches to 1.58 inches) 378 mm (14.88 inches) 245 mm (9.64 inches) configurable to less than 2.58 kg (5.7 lbs) 79

Service Guide
Page 41
Turn on the computer. 3. Navigate to enter the system setup program. 4. Press during POST to the security tab and enter the service tag in the Set Service Tag field. Ensure that the AC adapter is installed properly. 2. Entering the Service Tag in and that the main battery is plugged in the BIOS 1. Back to Contents Page
Turn on the computer. 3. Navigate to enter the system setup program. 4. Press during POST to the security tab and enter the service tag in the Set Service Tag field. Ensure that the AC adapter is installed properly. 2. Entering the Service Tag in and that the main battery is plugged in the BIOS 1. Back to Contents Page


