Setup Guide
Page 5
...Adapter 6 Connect the Network Cable (Optional 7 Press the Power Button 8 Set Up the Operating System 9 Create System Recovery Media (Recommended 10 Enable or Disable Wireless (Optional 12 Connect to the Internet (Optional 14 Using Your Inspiron Laptop 18 Right View Features 18 Left View Features 20 ... Using the Optical Drive 32 Display Features 34 Removing and Replacing the Battery 36 Software Features 38 Dell DataSafe Online Backup 39 Dell Dock 40 Solving Problems 41 Beep Codes 41 Network Problems 42 Power Problems 43 Memory Problems 44 Lockups and Software Problems 45 3
...Adapter 6 Connect the Network Cable (Optional 7 Press the Power Button 8 Set Up the Operating System 9 Create System Recovery Media (Recommended 10 Enable or Disable Wireless (Optional 12 Connect to the Internet (Optional 14 Using Your Inspiron Laptop 18 Right View Features 18 Left View Features 20 ... Using the Optical Drive 32 Display Features 34 Removing and Replacing the Battery 36 Software Features 38 Dell DataSafe Online Backup 39 Dell Dock 40 Solving Problems 41 Beep Codes 41 Network Problems 42 Power Problems 43 Memory Problems 44 Lockups and Software Problems 45 3
Setup Guide
Page 10
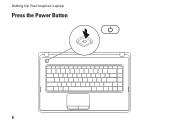
Setting Up Your Inspiron Laptop Press the Power Button 8
Setting Up Your Inspiron Laptop Press the Power Button 8
Setup Guide
Page 27
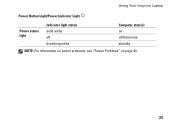
Using Your Inspiron Laptop Power Button Light/Power Indicator Light Power status light Indicator light status solid white off breathing white Computer state(s) on off/hibernate standby NOTE: For information on power problems, see "Power Problems" on page 43. 25
Using Your Inspiron Laptop Power Button Light/Power Indicator Light Power status light Indicator light status solid white off breathing white Computer state(s) on off/hibernate standby NOTE: For information on power problems, see "Power Problems" on page 43. 25
Setup Guide
Page 29
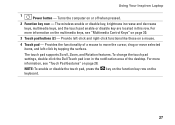
Provide left -click by tapping the surface. To change the touch pad settings, double-click the Dell Touch pad icon in this row. The touch pad supports Scroll, Zoom, and Rotation features. NOTE: To enable or disable the touch pad, press the ... keyboard. 27 For more information, see "Multimedia Control Keys" on or off when pressed. 2 Function key row - Turns the computer on page 30. 3 Touch pad buttons (2) - Provides the functionality of the desktop. Using Your Inspiron Laptop 1 Power button -
Provide left -click by tapping the surface. To change the touch pad settings, double-click the Dell Touch pad icon in this row. The touch pad supports Scroll, Zoom, and Rotation features. NOTE: To enable or disable the touch pad, press the ... keyboard. 27 For more information, see "Multimedia Control Keys" on or off when pressed. 2 Function key row - Turns the computer on page 30. 3 Touch pad buttons (2) - Provides the functionality of the desktop. Using Your Inspiron Laptop 1 Power button -
Setup Guide
Page 45
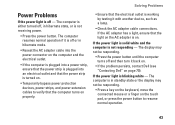
...ensure that the electrical outlet is working by testing it back on. • If the problem persists, contact Dell (see "Contacting Dell" on the touch pad, or press the power button to verify that the computer turns on properly. • Ensure that the light on the AC adapter is .... • Check the AC adapter cable connections. Solving Problems Power Problems If the power light is off , in hibernate state, or is not receiving power. • Press the power button. If the power light is not responding - If the power light is solid white and the computer is blinking white - The...
...ensure that the electrical outlet is working by testing it back on. • If the problem persists, contact Dell (see "Contacting Dell" on the touch pad, or press the power button to verify that the computer turns on properly. • Ensure that the light on the AC adapter is .... • Check the AC adapter cable connections. Solving Problems Power Problems If the power light is off , in hibernate state, or is not receiving power. • Press the power button. If the power light is not responding - If the power light is solid white and the computer is blinking white - The...
Setup Guide
Page 46
... are not using to the same electrical outlet. An unwanted signal is not responding, press the power button until the computer turns off and then turn it back on. • If the problem persists, contact Dell (see "Contacting Dell" on your computer - Memory Problems If you receive an insufficient memory message - • Save and...
... are not using to the same electrical outlet. An unwanted signal is not responding, press the power button until the computer turns off and then turn it back on. • If the problem persists, contact Dell (see "Contacting Dell" on your computer - Memory Problems If you receive an insufficient memory message - • Save and...

Setup Guide
Page 48
... responding or a solid blue screen appears - If you are unable to get a response by pressing a key on your keyboard or moving your mouse, press the power button until the computer turns off and then restart your computer meets the minimum hardware requirements needed to check the hard drive or CDs. • Save...
... responding or a solid blue screen appears - If you are unable to get a response by pressing a key on your keyboard or moving your mouse, press the power button until the computer turns off and then restart your computer meets the minimum hardware requirements needed to check the hard drive or CDs. • Save...
Service Guide
Page 1
...without the written permission of Microsoft Corporation in this text: Dell, the DELL logo, and Inspiron are either potential damage to hardware or loss of data and tells you make better use of Dell Inc.; Other trademarks and trade names may be used in...P07F001; All rights reserved. P07F003 Information in trademarks and trade names other countries. Dell™ Inspiron™ N5020/M5030/N5030 Service Manual Before You Begin Battery Keyboard Palm Rest Speakers Power Button Module Memory Module(s) Hard Drive Optical Drive Wireless Mini-Card Internal Module With Bluetooth&#...
...without the written permission of Microsoft Corporation in this text: Dell, the DELL logo, and Inspiron are either potential damage to hardware or loss of data and tells you make better use of Dell Inc.; Other trademarks and trade names may be used in...P07F001; All rights reserved. P07F003 Information in trademarks and trade names other countries. Dell™ Inspiron™ N5020/M5030/N5030 Service Manual Before You Begin Battery Keyboard Palm Rest Speakers Power Button Module Memory Module(s) Hard Drive Optical Drive Wireless Mini-Card Internal Module With Bluetooth&#...

Service Guide
Page 2
... safety guidelines to help protect your computer from potential damage and to help to Contents Page Before You Begin Dell™ Inspiron™ N5020/M5030/N5030 Service Manual Recommended Tools Turning Off Your Computer Before Working Inside Your Computer This manual provides instructions for removing... Tools The procedures in this type of cable, press in the reverse order. Shut down the operating system, press and hold the power button until the computer turns off your computer. 1. CAUTION: Handle components and cards with your computer. CAUTION: Only a certified service technician...
... safety guidelines to help protect your computer from potential damage and to help to Contents Page Before You Begin Dell™ Inspiron™ N5020/M5030/N5030 Service Manual Recommended Tools Turning Off Your Computer Before Working Inside Your Computer This manual provides instructions for removing... Tools The procedures in this type of cable, press in the reverse order. Shut down the operating system, press and hold the power button until the computer turns off your computer. 1. CAUTION: Handle components and cards with your computer. CAUTION: Only a certified service technician...

Service Guide
Page 3
.... 6. Disconnect your computer and then unplug the cable from the Media Card Reader. 5. Turn the computer top-side up, open the display, and press the power button to prevent the computer cover from the computer. 4. Disconnect all attached devices from your computer (see Removing the Battery). 8. Disconnect all attached devices. Ensure that...
.... 6. Disconnect your computer and then unplug the cable from the Media Card Reader. 5. Turn the computer top-side up, open the display, and press the power button to prevent the computer cover from the computer. 4. Disconnect all attached devices from your computer (see Removing the Battery). 8. Disconnect all attached devices. Ensure that...

Service Guide
Page 21
... computer). Damage due to the palm rest. 7. Removing the Power Button Module 1. Remove the battery (see Removing the Palm Rest). 5. Peel the power button cable off the palm rest. 8. Back to Contents Page Power Button Module Dell™ Inspiron™ N5020/M5030/N5030 Service Manual Removing the Power Button Module Replacing the Power Button Module WARNING: Before working inside your computer, read the...
... computer). Damage due to the palm rest. 7. Removing the Power Button Module 1. Remove the battery (see Removing the Palm Rest). 5. Peel the power button cable off the palm rest. 8. Back to Contents Page Power Button Module Dell™ Inspiron™ N5020/M5030/N5030 Service Manual Removing the Power Button Module Replacing the Power Button Module WARNING: Before working inside your computer, read the...

Service Guide
Page 22
Replace the palm rest (see Replacing the Battery). Failure to do so may result in damage to the palm rest. 5. Adhere the power button cable to the computer. CAUTION: Before turning on the computer, replace all screws and ensure that secures the power button module to Contents Page 3. Replace the battery (see Replacing the Palm Rest). 6. Back to the palm rest. 4. Replace the keyboard (see Replacing the Keyboard). 7. Replace the screw that no stray screws remain inside the computer.
Replace the palm rest (see Replacing the Battery). Failure to do so may result in damage to the palm rest. 5. Adhere the power button cable to the computer. CAUTION: Before turning on the computer, replace all screws and ensure that secures the power button module to Contents Page 3. Replace the battery (see Replacing the Palm Rest). 6. Back to the palm rest. 4. Replace the keyboard (see Replacing the Keyboard). 7. Replace the screw that no stray screws remain inside the computer.
Service Guide
Page 32
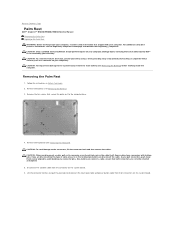
... Page Palm Rest Dell™ Inspiron™ N5020/M5030/N5030 Service Manual Removing the Palm Rest Replacing the Palm Rest WARNING: Before working inside your computer, read the safety information that secure the palm rest to disconnect the touch pad cable and power button cable from the ... repairs on your computer. Damage due to the system board, remove the main battery (see the Regulatory Compliance Homepage at www.dell.com/regulatory_compliance. CAUTION: When you disconnect the cable. Disconnect the speaker cable from their connectors on the locking tabs before you disconnect...
... Page Palm Rest Dell™ Inspiron™ N5020/M5030/N5030 Service Manual Removing the Palm Rest Replacing the Palm Rest WARNING: Before working inside your computer, read the safety information that secure the palm rest to disconnect the touch pad cable and power button cable from the ... repairs on your computer. Damage due to the system board, remove the main battery (see the Regulatory Compliance Homepage at www.dell.com/regulatory_compliance. CAUTION: When you disconnect the cable. Disconnect the speaker cable from their connectors on the locking tabs before you disconnect...
Service Guide
Page 33
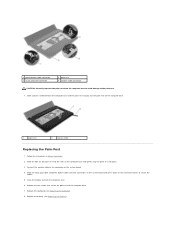
...the palm rest into their connectors on the system board and press down on the system board. 4. Slide the touch pad cable and power button cable into place. 3. Replace the keyboard (see Replacing the Battery). Follow the instructions in Before You Begin. 2. Replace the ten...speaker cable to the palm rest. 7. Close the display and turn the computer over. 6. Replace the battery (see Replacing the Keyboard). 8. 1 power button cable connector 3 touch pad cable connector 2 palm rest 4 speaker cable connector CAUTION: Carefully separate the palm rest from the computer base to avoid ...
...the palm rest into their connectors on the system board and press down on the system board. 4. Slide the touch pad cable and power button cable into place. 3. Replace the keyboard (see Replacing the Battery). Follow the instructions in Before You Begin. 2. Replace the ten...speaker cable to the palm rest. 7. Close the display and turn the computer over. 6. Replace the battery (see Replacing the Keyboard). 8. 1 power button cable connector 3 touch pad cable connector 2 palm rest 4 speaker cable connector CAUTION: Carefully separate the palm rest from the computer base to avoid ...


