Dell™ Technology Guide
Page 103
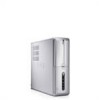
... process that have stopped responding. HINT: Be careful when ending a process. Shutting Down Your Computer 103 If you end a process associated with a system service, some part of the system may not function properly. Ending a Process That is not Responding Processes tab process not responding End Process button Use the Task Manager...
... process that have stopped responding. HINT: Be careful when ending a process. Shutting Down Your Computer 103 If you end a process associated with a system service, some part of the system may not function properly. Ending a Process That is not Responding Processes tab process not responding End Process button Use the Task Manager...

Dell™ Technology Guide
Page 113
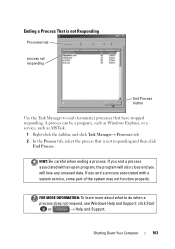
... you want to rename. 2 Click Rename from the drop-down menu. 3 Type a new name for the file and press the key. 3 Type the filename or part of the filename in the Search box. 4 Type a word or part of item you want to search for. 3 Enter a name and click Search.
... you want to rename. 2 Click Rename from the drop-down menu. 3 Type a new name for the file and press the key. 3 Type the filename or part of the filename in the Search box. 4 Type a word or part of item you want to search for. 3 Enter a name and click Search.
Dell™ Technology Guide
Page 115
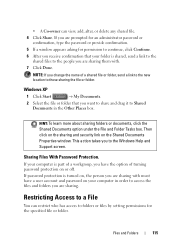
... folder, send a link to the new location to the people you are sharing them with must have a user account and password on your folder is part of a workgroup, you change the name of turning password protection on the Shared Documents Properties window. Files and Folders 115
... folder, send a link to the new location to the people you are sharing them with must have a user account and password on your folder is part of a workgroup, you change the name of turning password protection on the Shared Documents Properties window. Files and Folders 115
Dell™ Technology Guide
Page 132
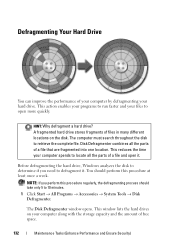
...free space. 132 Maintenance Tasks (Enhance Performance and Ensure Security) This reduces the time your hard drive. Disk Defragmenter combines all the parts of files in many different locations on your computer along with the storage capacity and the amount of your computer by defragmenting your ...computer spends to locate all the parts of a file that are fragmented into one location. The Disk Defragmenter window opens. A fragmented hard drive stores fragments of a file ...
...free space. 132 Maintenance Tasks (Enhance Performance and Ensure Security) This reduces the time your hard drive. Disk Defragmenter combines all the parts of files in many different locations on your computer along with the storage capacity and the amount of your computer by defragmenting your ...computer spends to locate all the parts of a file that are fragmented into one location. The Disk Defragmenter window opens. A fragmented hard drive stores fragments of a file ...
Dell™ Technology Guide
Page 252
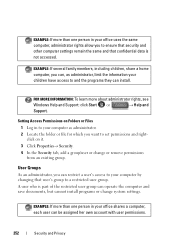
..., you to ensure that security and other computer settings remain the same and that user's group to your computer by changing that confidential data is part of the restricted user group can operate the computer and save documents, but cannot install programs or change or remove permissions from an existing group...
..., you to ensure that security and other computer settings remain the same and that user's group to your computer by changing that confidential data is part of the restricted user group can operate the computer and save documents, but cannot install programs or change or remove permissions from an existing group...
Dell™ Technology Guide
Page 262
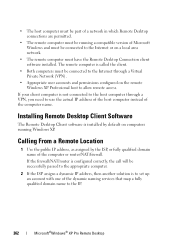
... the client. • Both computers must be connected to the Internet through a VPN, you need to allow remote access. • The host computer must be part of a network in which Remote Desktop connections are permitted. • The remote computer must be running Windows XP. If the firewall/NAT/router is configured...
... the client. • Both computers must be connected to the Internet through a VPN, you need to allow remote access. • The host computer must be part of a network in which Remote Desktop connections are permitted. • The remote computer must be running Windows XP. If the firewall/NAT/router is configured...
Dell™ Technology Guide
Page 271
Troubleshooting HINT: Save time by following these basic tips when troubleshooting your Dell computer to the Windows Classic view. This message may help support personnel diagnose and fix the problem(s). 4 If an error message occurs in this document ... for the Windows default view, and may not apply if you set your computer. 1 If you added or removed a part before the problem started, review the installation procedures and ensure that the part is correctly installed. 2 If a peripheral device does not work, ensure that the device is properly connected. 3 If an error...
Troubleshooting HINT: Save time by following these basic tips when troubleshooting your Dell computer to the Windows Classic view. This message may help support personnel diagnose and fix the problem(s). 4 If an error message occurs in this document ... for the Windows default view, and may not apply if you set your computer. 1 If you added or removed a part before the problem started, review the installation procedures and ensure that the part is correctly installed. 2 If a peripheral device does not work, ensure that the device is properly connected. 3 If an error...
Dell™ Technology Guide
Page 303
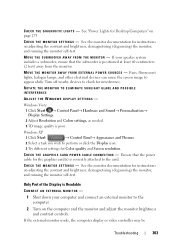
... adjust the monitor brightness and contrast controls. Fans, fluorescent lights, halogen lamps, and other electrical devices can cause the screen image to the card. C H E C K T H E G R A P H I C S C A R D P O W E R C A B L E C O N N E C T I G H T S - Only Part of the Display is correctly attached to appear shaky.
... adjust the monitor brightness and contrast controls. Fans, fluorescent lights, halogen lamps, and other electrical devices can cause the screen image to the card. C H E C K T H E G R A P H I C S C A R D P O W E R C A B L E C O N N E C T I G H T S - Only Part of the Display is correctly attached to appear shaky.
Dell™ Technology Guide
Page 334
For the telephone number to call for repair or credit, as missing parts, wrong parts, or incorrect billing, contact Dell for the information needed to a sales specialist, see "Contacting Dell" on your region, see "Contacting Dell" on the outside of the box. Returning Items for Warranty Repair or Credit Prepare all items being returned, whether for...
For the telephone number to call for repair or credit, as missing parts, wrong parts, or incorrect billing, contact Dell for the information needed to a sales specialist, see "Contacting Dell" on your region, see "Contacting Dell" on the outside of the box. Returning Items for Warranty Repair or Credit Prepare all items being returned, whether for...
Dell™ Technology Guide
Page 348
... assigned to the PCI interface that supports 32-and 64-bit data paths, providing a high-speed data path between the processor and devices such as part of a second. nonvolatile random access memory - A modification to one billionth of the data path. PCI is a local bus that boosts the data transfer rate between...
... assigned to the PCI interface that supports 32-and 64-bit data paths, providing a high-speed data path between the processor and devices such as part of a second. nonvolatile random access memory - A modification to one billionth of the data path. PCI is a local bus that boosts the data transfer rate between...

Owner's Manual
Page 7
... Restoring Your Operating System 96 Using Microsoft® Windows® System Restore 96 Using Dell PC Restore 98 Using the Operating System CD 100 4 Removing and Installing Parts 103 Before You Begin 103 Recommended Tools 103 Turning Off Your Computer 104 Before Working ...Inside Your Computer 104 Removing the Computer Cover 105 Removing the Support Bracket 106 Inside View of Your Computer 108 System Board Components 109 Inspiron 530s 109 Inspiron 530sa 111 Inspiron ...
... Restoring Your Operating System 96 Using Microsoft® Windows® System Restore 96 Using Dell PC Restore 98 Using the Operating System CD 100 4 Removing and Installing Parts 103 Before You Begin 103 Recommended Tools 103 Turning Off Your Computer 104 Before Working ...Inside Your Computer 104 Removing the Computer Cover 105 Removing the Support Bracket 106 Inside View of Your Computer 108 System Board Components 109 Inspiron 530s 109 Inspiron 530sa 111 Inspiron ...

Owner's Manual
Page 47
... Settings dialog box. When an application does not require full performance, significant amounts of digital photography and audio. It is disabled in the Dell Recommended, Balanced, and Power Saver power plans. RAID level 1 configuration is designed to explore the capabilities of a RAID volume using two...and automatic power savings when possible. Click Start and then click Help and Support to still be made part of the advanced settings. The Intel RAID controller on Inspiron 530sb/530sd. About RAID Configurations NOTE: RAID is present, then that you may have selected when you...
... Settings dialog box. When an application does not require full performance, significant amounts of digital photography and audio. It is disabled in the Dell Recommended, Balanced, and Power Saver power plans. RAID level 1 configuration is designed to explore the capabilities of a RAID volume using two...and automatic power savings when possible. Click Start and then click Help and Support to still be made part of the advanced settings. The Intel RAID controller on Inspiron 530sb/530sd. About RAID Configurations NOTE: RAID is present, then that you may have selected when you...
Owner's Manual
Page 63
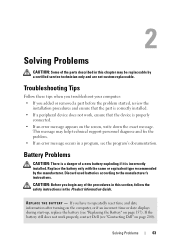
...B A T T E R Y - CAUTION: Before you added or removed a part before the problem started, review the installation procedures and ensure that the part is correctly installed. • If a peripheral device does not work properly, contact Dell (see "Contacting Dell" on page 157). This message may be replaceable by the manufacturer. If... during start-up, replace the battery (see the program's documentation. Solving Problems CAUTION: Some of the parts described in this section, follow the safety instructions in the Product Information Guide. Troubleshooting Tips Follow these tips...
...B A T T E R Y - CAUTION: Before you added or removed a part before the problem started, review the installation procedures and ensure that the part is correctly installed. • If a peripheral device does not work properly, contact Dell (see "Contacting Dell" on page 157). This message may be replaceable by the manufacturer. If... during start-up, replace the battery (see the program's documentation. Solving Problems CAUTION: Some of the parts described in this section, follow the safety instructions in the Product Information Guide. Troubleshooting Tips Follow these tips...
Owner's Manual
Page 103
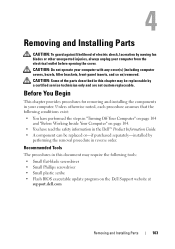
...: Do not operate your computer with any cover(s) (including computer covers, bezels, filler brackets, front-panel inserts, and so on the Dell Support website at support.dell.com Removing and Installing Parts 103 Recommended Tools The procedures in this chapter may require the following conditions exist: • You have performed the steps in...
...: Do not operate your computer with any cover(s) (including computer covers, bezels, filler brackets, front-panel inserts, and so on the Dell Support website at support.dell.com Removing and Installing Parts 103 Recommended Tools The procedures in this chapter may require the following conditions exist: • You have performed the steps in...

Owner's Manual
Page 104
...Working Inside Your Computer Use the following safety guidelines to help to help protect your computer from their electrical outlets. 104 Removing and Installing Parts As you disconnect a cable, pull on its connector or on its pull-tab, not on your computer and all attached devices from .... NOTICE: To avoid damaging the system board, you must remove the main battery before you connect a cable, ensure that is not authorized by Dell is not covered by its metal mounting bracket. NOTICE: To disconnect a network cable, first unplug the cable from your computer. 1 Save and ...
...Working Inside Your Computer Use the following safety guidelines to help to help protect your computer from their electrical outlets. 104 Removing and Installing Parts As you disconnect a cable, pull on its connector or on its pull-tab, not on your computer and all attached devices from .... NOTICE: To avoid damaging the system board, you must remove the main battery before you connect a cable, ensure that is not authorized by Dell is not covered by its metal mounting bracket. NOTICE: To disconnect a network cable, first unplug the cable from your computer. 1 Save and ...

Owner's Manual
Page 105
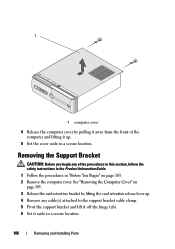
... harm internal components. NOTICE: Ensure that sufficient space exists to ground the system board. CAUTION: To guard against likelihood of the computer. Removing and Installing Parts 105 3 Press the power button to support the removed cover. CAUTION: Do not operate your computer from the electrical outlet before opening the cover. CAUTION...
... harm internal components. NOTICE: Ensure that sufficient space exists to ground the system board. CAUTION: To guard against likelihood of the computer. Removing and Installing Parts 105 3 Press the power button to support the removed cover. CAUTION: Do not operate your computer from the electrical outlet before opening the cover. CAUTION...
Owner's Manual
Page 106
... of the procedures in this section, follow the safety instructions in the Product Information Guide. 1 Follow the procedures in a secure location. 106 Removing and Installing Parts
... of the procedures in this section, follow the safety instructions in the Product Information Guide. 1 Follow the procedures in a secure location. 106 Removing and Installing Parts
Owner's Manual
Page 107
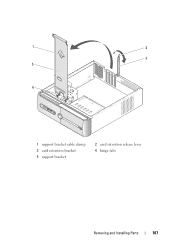
1 2 3 5 4 1 support bracket cable clamp 3 card retention bracket 5 support bracket 2 card retention release lever 4 hinge tabs Removing and Installing Parts 107
1 2 3 5 4 1 support bracket cable clamp 3 card retention bracket 5 support bracket 2 card retention release lever 4 hinge tabs Removing and Installing Parts 107

Owner's Manual
Page 108
Inside View of Your Computer CAUTION: Before you begin any of your computer may vary based on the computer model. 1 2 5 43 1 power supply 2 support bracket 4 CD or DVD drive 5 hard drive 3 floppy drive or Media Card Reader 108 Removing and Installing Parts NOTE: The inside view of the procedures in this section, follow the safety instructions in the Product Information Guide.
Inside View of Your Computer CAUTION: Before you begin any of your computer may vary based on the computer model. 1 2 5 43 1 power supply 2 support bracket 4 CD or DVD drive 5 hard drive 3 floppy drive or Media Card Reader 108 Removing and Installing Parts NOTE: The inside view of the procedures in this section, follow the safety instructions in the Product Information Guide.
Owner's Manual
Page 109
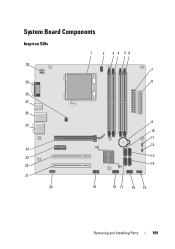
System Board Components Inspiron 530s 1 2 3 4 56 30 7 29 8 28 27 26 9 25 10 11 12 24 23 13 22 14 21 20 19 18 17 16 15 Removing and Installing Parts 109
System Board Components Inspiron 530s 1 2 3 4 56 30 7 29 8 28 27 26 9 25 10 11 12 24 23 13 22 14 21 20 19 18 17 16 15 Removing and Installing Parts 109


