Dell™ Technology Guide
Page 7
... Drive Problems 82 Hard Drive Problems 82 Working with RAID 83 RAID Level 0 83 RAID Level 1 84 RAID Level 0+1 Configuration 86 RAID Level 5 Configuration 87 Setting Your Computer to RAID-Enabled Mode 87 Configuring RAID 88 7 Shutting Down Your Computer 99 Windows Vista 99 Windows® XP 99 Shutdown States 101 Microsoft® Windows Vista 101 Windows® XP 101 Contents 7
... Drive Problems 82 Hard Drive Problems 82 Working with RAID 83 RAID Level 0 83 RAID Level 1 84 RAID Level 0+1 Configuration 86 RAID Level 5 Configuration 87 Setting Your Computer to RAID-Enabled Mode 87 Configuring RAID 88 7 Shutting Down Your Computer 99 Windows Vista 99 Windows® XP 99 Shutdown States 101 Microsoft® Windows Vista 101 Windows® XP 101 Contents 7

Dell™ Technology Guide
Page 83
...0 provides no redundancy. Drives and Media 83 Windows Vista® 1 Click Start → Computer. Working with RAID A redundant array of hard drives required varies depending on the computer, click Continue; For information about these levels, see support.dell.com. Therefore, a failure of one drive ...results in this section. If you are four basic RAID levels discussed in the loss of data integrity. • RAID level 0+1 is recommended for users who need a high level of all data. For Windows® XP: ...
...0 provides no redundancy. Drives and Media 83 Windows Vista® 1 Click Start → Computer. Working with RAID A redundant array of hard drives required varies depending on the computer, click Continue; For information about these levels, see support.dell.com. Therefore, a failure of one drive ...results in this section. If you are four basic RAID levels discussed in the loss of data integrity. • RAID level 0+1 is recommended for users who need a high level of all data. For Windows® XP: ...
Dell™ Technology Guide
Page 89
..., and then shut down -arrow keys to select a hard drive to include in the RAID array. Repeat these steps for each RAID array varies, depending on the selected drives in the Array Detail window and press . Back up , use the arrow keys to select the array and press . 10 Press... the Free Disks field to select Striping. The Array Detail window appears. 2 Restart the computer. 3 Press when prompted to the RAID Mode field. and down your computer and try again. 4 Press to navigate to enter the RAID BIOS. To create a RAID 0 configuration, use the right-arrow key to move the ...
..., and then shut down -arrow keys to select a hard drive to include in the RAID array. Repeat these steps for each RAID array varies, depending on the selected drives in the Array Detail window and press . Back up , use the arrow keys to select the array and press . 10 Press... the Free Disks field to select Striping. The Array Detail window appears. 2 Restart the computer. 3 Press when prompted to the RAID Mode field. and down your computer and try again. 4 Press to navigate to enter the RAID BIOS. To create a RAID 0 configuration, use the right-arrow key to move the ...
Dell™ Technology Guide
Page 90
...The NVIDIA Create Array Wizard screen appears and lists the disks that will make up the RAID configuration, click Next, and then click Next again. The MediaShield RAID management utility window appears and lists the array along with a partition, and leaves any data you want to...all data on your computer, launch Nvidia MediaShield. 3 Click Create under System Tasks. Deleting a RAID Array Deleting a RAID 1 volume splits the volume into a RAID array. The Clearing System Data window appears. NOTICE: The following procedure deletes all data on page 87). 2 After restarting your hard ...
...The NVIDIA Create Array Wizard screen appears and lists the disks that will make up the RAID configuration, click Next, and then click Next again. The MediaShield RAID management utility window appears and lists the array along with a partition, and leaves any data you want to...all data on your computer, launch Nvidia MediaShield. 3 Click Create under System Tasks. Deleting a RAID Array Deleting a RAID 1 volume splits the volume into a RAID array. The Clearing System Data window appears. NOTICE: The following procedure deletes all data on page 87). 2 After restarting your hard ...

Dell™ Technology Guide
Page 91
The MediaShield RAID management utility window appears and lists any remaining arrays along with the name and size of the drives in the current configuration. 1 Ensure that you have marked for example - The NVIDIA Convert Array Wizard screen appears. 5 Click Next. NOTICE: Deleting a RAID 0 volume destroys all... data. The NVIDIA Delete Array Wizard screen appears. 4 Click Next. A confirmation screen appears with any data you want to delete the RAID configuration. without losing any of the array that all data on page 87). 2 Launch Nvidia MediaShield. 3 Click to select the array ...
The MediaShield RAID management utility window appears and lists any remaining arrays along with the name and size of the drives in the current configuration. 1 Ensure that you have marked for example - The NVIDIA Convert Array Wizard screen appears. 5 Click Next. NOTICE: Deleting a RAID 0 volume destroys all... data. The NVIDIA Delete Array Wizard screen appears. 4 Click Next. A confirmation screen appears with any data you want to delete the RAID configuration. without losing any of the array that all data on page 87). 2 Launch Nvidia MediaShield. 3 Click to select the array ...
Dell™ Technology Guide
Page 92
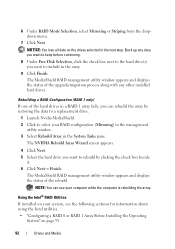
..., select Mirroring or Striping from the dropdown menu. 7 Click Next. The MediaShield RAID management utility window appears and displays the status of the rebuild. The MediaShield RAID management utility window appears and displays the status of the upgrade/migration process along with any data you... drives selected in the System Tasks pane. Using the Intel® RAID Utilities If installed on your RAID configuration (Mirroring) in the management utility window. 3 Select Rebuild Array in the next step. Rebuilding a RAID Configuration (RAID 1 only) If one of the hard drives in the array. ...
..., select Mirroring or Striping from the dropdown menu. 7 Click Next. The MediaShield RAID management utility window appears and displays the status of the rebuild. The MediaShield RAID management utility window appears and displays the status of the upgrade/migration process along with any data you... drives selected in the System Tasks pane. Using the Intel® RAID Utilities If installed on your RAID configuration (Mirroring) in the management utility window. 3 Select Rebuild Array in the next step. Rebuilding a RAID Configuration (RAID 1 only) If one of the hard drives in the array. ...
Dell™ Technology Guide
Page 94
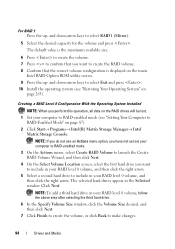
...hard drive to select RAID1 (Mirror). 5 Select the desired capacity for the volume and press . and down -arrow keys to include in the Selected window. NOTE: To add a third hard drive in your computer to RAID-enabled mode (see an Actions menu option, you have not yet set your computer to... . 10 Install the operating system (see "Restoring Your Operating System" on the RAID drives will be lost. 1 Set your RAID level 0 volume, follow the above step after selecting the third hard drive. 6 In the Specify Volume Size window, click the Volume Size desired, and then click Next. 7 Click Finish to ...
...hard drive to select RAID1 (Mirror). 5 Select the desired capacity for the volume and press . and down -arrow keys to include in the Selected window. NOTE: To add a third hard drive in your computer to RAID-enabled mode (see an Actions menu option, you have not yet set your computer to... . 10 Install the operating system (see "Restoring Your Operating System" on the RAID drives will be lost. 1 Set your RAID level 0 volume, follow the above step after selecting the third hard drive. 6 In the Specify Volume Size window, click the Volume Size desired, and then click Next. 7 Click Finish to ...

Dell™ Technology Guide
Page 95
... Confirm the volume name, select RAID 1 as the RAID level, and then click Next to continue. 6 On the Select Volume Location screen, click the first hard drive you want to use, and then click the right arrow. 7 Click a second hard drive until two drives appear in the Selected window, and then click Next.... 8 In the Specify Volume Size window,...
... Confirm the volume name, select RAID 1 as the RAID level, and then click Next to continue. 6 On the Select Volume Location screen, click the first hard drive you want to use, and then click the right arrow. 7 Click a second hard drive until two drives appear in the Selected window, and then click Next.... 8 In the Specify Volume Size window,...
Owner's Manual
Page 4
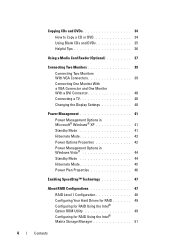
...the Display Settings 40 Power Management 41 Power Management Options in Microsoft® Windows® XP 41 Standby Mode 41 Hibernate Mode 42 Power Options Properties 42 Power Management Options in Windows Vista 44 Standby Mode 44 Hibernate Mode 45 Power Plan Properties 46 Enabling... SpeedStep™ Technology 47 About RAID Configurations 47 RAID Level 1 Configuration 48 Configuring Your Hard Drives for RAID 49 Configuring for RAID Using the Intel® Option...
...the Display Settings 40 Power Management 41 Power Management Options in Microsoft® Windows® XP 41 Standby Mode 41 Hibernate Mode 42 Power Options Properties 42 Power Management Options in Windows Vista 44 Standby Mode 44 Hibernate Mode 45 Power Plan Properties 46 Enabling... SpeedStep™ Technology 47 About RAID Configurations 47 RAID Level 1 Configuration 48 Configuring Your Hard Drives for RAID 49 Configuring for RAID Using the Intel® Option...

Owner's Manual
Page 47
...when required, and automatic power savings when possible. Windows Vista automatically sets Intel Speedstep technologies in the High Performance power plan. RAID level 1 configuration is present, then that you ...RAID configuration that drive cannot be made part of power can only create a RAID volume using the Intel RAID configuration program, although it can be saved. The Intel RAID controller on Inspiron... allows you to set , then leave settings at hand. Performance is disabled in the Dell Recommended, Balanced, and Power Saver power plans. It is designed to change. 2 Click...
...when required, and automatic power savings when possible. Windows Vista automatically sets Intel Speedstep technologies in the High Performance power plan. RAID level 1 configuration is present, then that you ...RAID configuration that drive cannot be made part of power can only create a RAID volume using the Intel RAID configuration program, although it can be saved. The Intel RAID controller on Inspiron... allows you to set , then leave settings at hand. Performance is disabled in the Dell Recommended, Balanced, and Power Saver power plans. It is designed to change. 2 Click...
Owner's Manual
Page 51
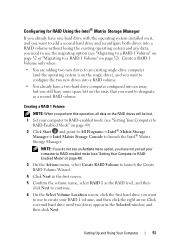
...RAID-enabled mode (see "Setting Your Computer...RAID Volume to launch the Create RAID Volume Wizard. 4 Click Next at the first screen. 5 Confirm the volume name, select RAID 1 as a second RAID...Storage Console to designate as the RAID level, and then click Next to...RAID 1 Volume" on page 52 or "Migrating to create your computer to RAID...RAID volume. • You already have a two-hard drive computer configured into a RAID...RAID 1 Volume" on the RAID drives will be lost. 1 Set your RAID 1 volume, and then click the right arrow. Create a RAID... page 52). Creating a RAID 1 Volume NOTE: When you want...
...RAID-enabled mode (see "Setting Your Computer...RAID Volume to launch the Create RAID Volume Wizard. 4 Click Next at the first screen. 5 Confirm the volume name, select RAID 1 as a second RAID...Storage Console to designate as the RAID level, and then click Next to...RAID 1 Volume" on page 52 or "Migrating to create your computer to RAID...RAID volume. • You already have a two-hard drive computer configured into a RAID...RAID 1 Volume" on the RAID drives will be lost. 1 Set your RAID 1 volume, and then click the right arrow. Create a RAID... page 52). Creating a RAID 1 Volume NOTE: When you want...

Owner's Manual
Page 52
... Create RAID Volume From Existing Hard Drive to launch the Migration Wizard. 4 Click Next on page 49). 2 Click Start and point to All Programs→ Intel® Matrix Storage Manager→ Intel Matrix Storage Console to launch the Intel® Matrix Storage Manager. 7 In the Specify Volume Size window, select... the Volume Size desired and click Next. 8 Click Finish to create the volume, or click Back to make changes. 9 Follow Microsoft Windows procedures for creating a partition on the volume. 1 Click Start and point to All Programs→ Intel® Matrix Storage Manager→ Intel ...
... Create RAID Volume From Existing Hard Drive to launch the Migration Wizard. 4 Click Next on page 49). 2 Click Start and point to All Programs→ Intel® Matrix Storage Manager→ Intel Matrix Storage Console to launch the Intel® Matrix Storage Manager. 7 In the Specify Volume Size window, select... the Volume Size desired and click Next. 8 Click Finish to create the volume, or click Back to make changes. 9 Follow Microsoft Windows procedures for creating a partition on the volume. 1 Click Start and point to All Programs→ Intel® Matrix Storage Manager→ Intel ...

Owner's Manual
Page 54
... to a New Computer You can use your computer is rebuilding the RAID 1 volume. Microsoft® Windows® XP The Microsoft Windows XP operating system provides the Files and Settings Transfer Wizard to move data from an old computer to a new computer. Rebuilding a Degraded RAID 1 Volume If your computer does not have a spare hard drive...
... to a New Computer You can use your computer is rebuilding the RAID 1 volume. Microsoft® Windows® XP The Microsoft Windows XP operating system provides the Files and Settings Transfer Wizard to move data from an old computer to a new computer. Rebuilding a Degraded RAID 1 Volume If your computer does not have a spare hard drive...


