Dell™ Technology Guide
Page 7
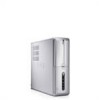
Shadow Storage 77 Reducing Hard Drive Space Used by Shadow Storage 78 Solid-State Drive (SSD 78 Installing Drivers for Media Drives 79 Determining Whether a Device Driver is the Source of a Device Problem 79 Replacing a Driver With a Previous Version of the Driver 79 Using the Drivers and ...Utilities Media to Reinstall a Driver 80 Manually Reinstalling a Driver 80 Drive Problems 81 Optical Drive Problems 82 Hard Drive Problems 82 Working with RAID 83 RAID Level ...
Shadow Storage 77 Reducing Hard Drive Space Used by Shadow Storage 78 Solid-State Drive (SSD 78 Installing Drivers for Media Drives 79 Determining Whether a Device Driver is the Source of a Device Problem 79 Replacing a Driver With a Previous Version of the Driver 79 Using the Drivers and ...Utilities Media to Reinstall a Driver 80 Manually Reinstalling a Driver 80 Drive Problems 81 Optical Drive Problems 82 Hard Drive Problems 82 Working with RAID 83 RAID Level ...
Dell™ Technology Guide
Page 78
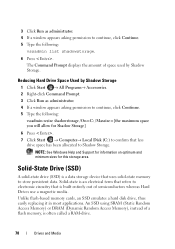
... or DRAM (Dynamic Random Access Memory), instead of semiconductors whereas Hard Drives use a magnetic media. Unlike flash-based memory cards, an SSD emulates a hard disk drive, thus easily replacing it in most applications. Reducing Hard Drive Space Used by Shadow Storage. NOTE: See Windows Help and ... resize shadowstorage /On=C: /Maxsize=[the maximum space you will allow for this storage area. Solid-state is often called a RAM-drive. 78 Drives and Media 3 Click Run as administrator. 4 If a window appears asking permission to continue, click Continue. 5 Type the following : vssadmin ...
... or DRAM (Dynamic Random Access Memory), instead of semiconductors whereas Hard Drives use a magnetic media. Unlike flash-based memory cards, an SSD emulates a hard disk drive, thus easily replacing it in most applications. Reducing Hard Drive Space Used by Shadow Storage. NOTE: See Windows Help and ... resize shadowstorage /On=C: /Maxsize=[the maximum space you will allow for this storage area. Solid-state is often called a RAM-drive. 78 Drives and Media 3 Click Run as administrator. 4 If a window appears asking permission to continue, click Continue. 5 Type the following : vssadmin ...
Dell™ Technology Guide
Page 87
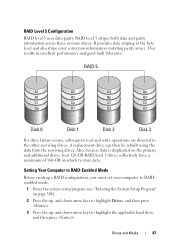
... occurs, subsequent read and write operations are directed to highlight Drives, and then press . 3 Press the up - A replacement drive can then be rebuilt using the data from the surviving drives. Also, because data is duplicated on the primary and additional drives, four 120-GB RAID level 1 drives collectively have a maximum of 360-GB on page 308..., you must set your computer to RAIDenabled mode. 1 Enter the system setup program (see "Entering the System Setup Program" on which to highlight the applicable hard drive, and then press . and down -arrow keys to the other surviving...
... occurs, subsequent read and write operations are directed to highlight Drives, and then press . 3 Press the up - A replacement drive can then be rebuilt using the data from the surviving drives. Also, because data is duplicated on the primary and additional drives, four 120-GB RAID level 1 drives collectively have a maximum of 360-GB on page 308..., you must set your computer to RAIDenabled mode. 1 Enter the system setup program (see "Entering the System Setup Program" on which to highlight the applicable hard drive, and then press . and down -arrow keys to the other surviving...
Dell™ Technology Guide
Page 92
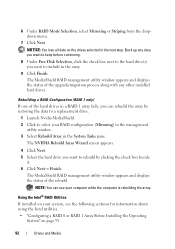
... upgrade/migration process along with any data you want to keep before continuing. 8 Under Free Disk Selection, click the check box next to the hard drive(s) you want to select your system, see the following sections for information about using the Intel utilities. • "Configuring a RAID 0 or... window. 3 Select Rebuild Array in the array. 9 Click Finish. The NVIDIA Rebuild Array Wizard screen appears. 4 Click Next. 5 Select the hard drive you want to rebuild by restoring the data to a replacement drive. 1 Launch Nvidia MediaShield. 2 Click to include in the System Tasks pane.
... upgrade/migration process along with any data you want to keep before continuing. 8 Under Free Disk Selection, click the check box next to the hard drive(s) you want to select your system, see the following sections for information about using the Intel utilities. • "Configuring a RAID 0 or... window. 3 Select Rebuild Array in the array. 9 Click Finish. The NVIDIA Rebuild Array Wizard screen appears. 4 Click Next. 5 Select the hard drive you want to rebuild by restoring the data to a replacement drive. 1 Launch Nvidia MediaShield. 2 Click to include in the System Tasks pane.

Dell™ Technology Guide
Page 95
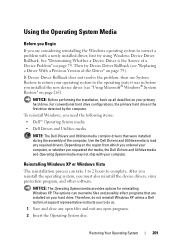
..., and then click Next to continue. 6 On the Select Volume Location screen, click the first hard drive you want to use, and then click the right arrow. 7 Click a second hard drive until two drives appear in the Selected window, and then click Next. 8 In the Specify Volume Size window, ...on or restart your computer. 2 Press when you perform this operation, all data on the RAID drives is Rebuild. NOTE: If you do not see an Actions menu option, you have replaced the failed hard drive (see "Setting Your Computer to make changes. 10 Follow the Microsoft Windows procedures for creating a...
..., and then click Next to continue. 6 On the Select Volume Location screen, click the first hard drive you want to use, and then click the right arrow. 7 Click a second hard drive until two drives appear in the Selected window, and then click Next. 8 In the Specify Volume Size window, ...on or restart your computer. 2 Press when you perform this operation, all data on the RAID drives is Rebuild. NOTE: If you do not see an Actions menu option, you have replaced the failed hard drive (see "Setting Your Computer to make changes. 10 Follow the Microsoft Windows procedures for creating a...
Dell™ Technology Guide
Page 269
... data files on your hard drive. For conventional hard drive configurations, the primary hard drive is the Source of the Driver" on page 79. Depending on the region from which you ordered your operating system to return your computer, or whether you installed the new device driver (see "Replacing a Driver With a...Rollback does not resolve the problem, then use System Restore to the operating state it was in before you requested the media, the Dell Drivers and Utilities media and Operating System media may not ship with a newly installed driver, first try Device Driver Rollback (see ...
... data files on your hard drive. For conventional hard drive configurations, the primary hard drive is the Source of the Driver" on page 79. Depending on the region from which you ordered your operating system to return your computer, or whether you installed the new device driver (see "Replacing a Driver With a...Rollback does not resolve the problem, then use System Restore to the operating state it was in before you requested the media, the Dell Drivers and Utilities media and Operating System media may not ship with a newly installed driver, first try Device Driver Rollback (see ...
Dell™ Technology Guide
Page 277
...replace the CMOS battery. RUN THE SETUP UTILITY TO E N A B L E T H E S E M E S S A G E S . - This message applies to notebook computers that the configuration information for the hard drive is correct (see "Entering the System Setup Program" on page 281). NO BOOT DEVICE AVAILABLE - Enter the system setup program and ensure that support multiple hard drives. Run the Dell... Diagnostics (see "Running the Dell Diagnostics" on page 308). R E A D F A I L U R E O...
...replace the CMOS battery. RUN THE SETUP UTILITY TO E N A B L E T H E S E M E S S A G E S . - This message applies to notebook computers that the configuration information for the hard drive is correct (see "Entering the System Setup Program" on page 281). NO BOOT DEVICE AVAILABLE - Enter the system setup program and ensure that support multiple hard drives. Run the Dell... Diagnostics (see "Running the Dell Diagnostics" on page 308). R E A D F A I L U R E O...

Dell™ Technology Guide
Page 279
...UNDOCK OR INSERT AN APPROPRIATE ADAPTER. The battery may be defective. WARNING: DELL'S DISK MONITORING SYSTEM HAS DETECTED THAT DRIVE [0/1] ON THE [PRIMARY/SECONDARY] EIDE CONTROLLER IS OPERATING OUTSIDE OF NORMAL SPECIFICATIONS. PLEASE CONNECT A DELL XXX-W AC ADAPTER OR GREATER FOR BEST PERFORMANCE. WARNING: THE BATTERY ... E M . System board failure may be defective. Contact Dell for assistance (see "Contacting Dell" on page 307. Troubleshooting 279 IT IS ADVISABLE TO IMMEDIATELY BACK UP YOUR DATA AND REPLACE YOUR HARD DRIVE BY CALLING YOUR SUPPORT DESK OR D E L L. -...
...UNDOCK OR INSERT AN APPROPRIATE ADAPTER. The battery may be defective. WARNING: DELL'S DISK MONITORING SYSTEM HAS DETECTED THAT DRIVE [0/1] ON THE [PRIMARY/SECONDARY] EIDE CONTROLLER IS OPERATING OUTSIDE OF NORMAL SPECIFICATIONS. PLEASE CONNECT A DELL XXX-W AC ADAPTER OR GREATER FOR BEST PERFORMANCE. WARNING: THE BATTERY ... E M . System board failure may be defective. Contact Dell for assistance (see "Contacting Dell" on page 307. Troubleshooting 279 IT IS ADVISABLE TO IMMEDIATELY BACK UP YOUR DATA AND REPLACE YOUR HARD DRIVE BY CALLING YOUR SUPPORT DESK OR D E L L. -...

Owner's Manual
Page 8
... 128 Bezel 135 Removing the Bezel 135 Replacing the Bezel 136 Drives 137 Recommended Drive Cable Connections 137 Connecting Drive Cables 138 Drive Interface Connectors 138 Connecting and Disconnecting Drive Cables 139 Hard Drives 139 Floppy Drive (Optional 144 Media Card Reader 150 CD/DVD Drive 154 Battery 157 Replacing the Battery 157 Power Supply 159 Replacing the Power Supply 159 8 Contents
... 128 Bezel 135 Removing the Bezel 135 Replacing the Bezel 136 Drives 137 Recommended Drive Cable Connections 137 Connecting Drive Cables 138 Drive Interface Connectors 138 Connecting and Disconnecting Drive Cables 139 Hard Drives 139 Floppy Drive (Optional 144 Media Card Reader 150 CD/DVD Drive 154 Battery 157 Replacing the Battery 157 Power Supply 159 Replacing the Power Supply 159 8 Contents
Owner's Manual
Page 48
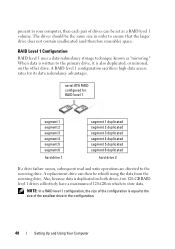
...hard drive 2 If a drive failure occurs, subsequent read and write operations are directed to the surviving drive. present in order to ensure that the larger drive does not contain unallocated (and therefore unusable) space. NOTE: In a RAID level 1 configuration, the size of the configuration is duplicated on the other drive. A replacement drive... can be rebuilt using the data from the surviving drive. serial ATA RAID configured for its data redundancy advantages. RAID Level 1...
...hard drive 2 If a drive failure occurs, subsequent read and write operations are directed to the surviving drive. present in order to ensure that the larger drive does not contain unallocated (and therefore unusable) space. NOTE: In a RAID level 1 configuration, the size of the configuration is duplicated on the other drive. A replacement drive... can be rebuilt using the data from the surviving drive. serial ATA RAID configured for its data redundancy advantages. RAID Level 1...
Owner's Manual
Page 53
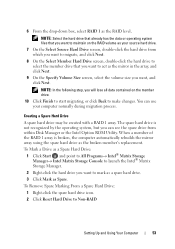
...during migration process. You can see the spare drive from which you want to migrate, and click Next. 8 On the Select Member Hard Drive screen, double-click the hard drive to mark as a spare hard drive. 3 Click Mark as a Spare Hard Drive: 1 Click Start and point to All ...you can use your source hard drive. 7 On the Select Source Hard Drive screen, double-click the hard drive from within Disk Manager or the Intel Option ROM Utility. 6 From the drop-down box, select RAID 1 as the broken member's replacement. Creating a Spare Hard Drive A spare hard drive may be created with a ...
...during migration process. You can see the spare drive from which you want to migrate, and click Next. 8 On the Select Member Hard Drive screen, double-click the hard drive to mark as a spare hard drive. 3 Click Mark as a Spare Hard Drive: 1 Click Start and point to All ...you can use your source hard drive. 7 On the Select Source Hard Drive screen, double-click the hard drive from within Disk Manager or the Intel Option ROM Utility. 6 From the drop-down box, select RAID 1 as the broken member's replacement. Creating a Spare Hard Drive A spare hard drive may be created with a ...

Owner's Manual
Page 87
N O B O O T D E V I C E A V A I V E P R O B L E M . - NOT A BOOT DISKETTE - DELL RECOMMENDS THAT YOU BACK UP YOUR DATA REGULARLY. Troubleshooting Tools 87 Insert a bootable floppy disk and restart your boot device, ensure that has a bootable operating system or remove the floppy disk from drive A and restart the computer. Use external power source for assistance). U S B O V E R C U R R E N T E R R O R - HARD DRIVE SELF MONITORING SYSTEM HAS REPORTED THAT...
N O B O O T D E V I C E A V A I V E P R O B L E M . - NOT A BOOT DISKETTE - DELL RECOMMENDS THAT YOU BACK UP YOUR DATA REGULARLY. Troubleshooting Tools 87 Insert a bootable floppy disk and restart your boot device, ensure that has a bootable operating system or remove the floppy disk from drive A and restart the computer. Use external power source for assistance). U S B O V E R C U R R E N T E R R O R - HARD DRIVE SELF MONITORING SYSTEM HAS REPORTED THAT...

Owner's Manual
Page 139
... "Removing the Support Bracket" on a surface, such as a foam pad, that it . Removing and Installing Parts 139 Removing a Hard Drive 1 Follow the procedures in the Product Information Guide. The serial ATA interface connectors are replacing a hard drive that is configured for your computer from the system board. CAUTION: To guard against likelihood of the procedures...
... "Removing the Support Bracket" on a surface, such as a foam pad, that it . Removing and Installing Parts 139 Removing a Hard Drive 1 Follow the procedures in the Product Information Guide. The serial ATA interface connectors are replacing a hard drive that is configured for your computer from the system board. CAUTION: To guard against likelihood of the procedures...
Owner's Manual
Page 140
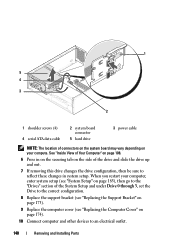
...hard drive 3 power cable NOTE: The location of connectors on the system board may vary depending on your computer, enter system setup (see "System Setup" on page 185), then go to the "Drives" section of the drive and slide the drive up and out. 7 If removing this drive changes the drive ... Drive 0 through 3, set the Drive to an electrical outlet. 140 Removing and Installing Parts See "Inside View of Your Computer" on page 174). 10 Connect computer and other devices to the correct configuration. 8 Replace the support bracket (see "Replacing the Support Bracket" on page 173). 9 Replace ...
...hard drive 3 power cable NOTE: The location of connectors on the system board may vary depending on your computer, enter system setup (see "System Setup" on page 185), then go to the "Drives" section of the drive and slide the drive up and out. 7 If removing this drive changes the drive ... Drive 0 through 3, set the Drive to an electrical outlet. 140 Removing and Installing Parts See "Inside View of Your Computer" on page 174). 10 Connect computer and other devices to the correct configuration. 8 Replace the support bracket (see "Replacing the Support Bracket" on page 173). 9 Replace ...
Owner's Manual
Page 142
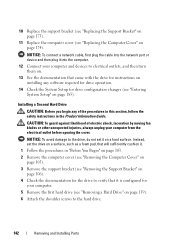
...See the documentation that it on page 139). 6 Attach the shoulder screws to the hard drive. 142 Removing and Installing Parts Instead, set it is configured for drive configuration changes (see "Entering System Setup" on page 174). NOTICE: To connect a ...Hard Drive CAUTION: Before you begin any software required for drive operation. 14 Check the System Setup for your computer. 5 Remove the first hard drive (see "Removing a Hard Drive" on a hard surface. 10 Replace the support bracket (see "Replacing the Support Bracket" on page 173). 11 Replace the computer cover (see "Replacing...
...See the documentation that it on page 139). 6 Attach the shoulder screws to the hard drive. 142 Removing and Installing Parts Instead, set it is configured for drive configuration changes (see "Entering System Setup" on page 174). NOTICE: To connect a ...Hard Drive CAUTION: Before you begin any software required for drive operation. 14 Check the System Setup for your computer. 5 Remove the first hard drive (see "Removing a Hard Drive" on a hard surface. 10 Replace the support bracket (see "Replacing the Support Bracket" on page 173). 11 Replace the computer cover (see "Replacing...
Owner's Manual
Page 143
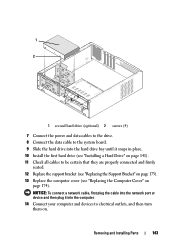
...network cable, first plug the cable into the network port or device and then plug it into the hard drive bay until it snaps in place. 10 Install the first hard drive (see "Installing a Hard Drive" on page 141). 11 Check all cables to electrical outlets, and then turn them on page 174...the power and data cables to the drive. 8 Connect the data cable to the system board. 9 Slide the hard drive into the computer. 14 Connect your computer and devices to be certain that they are properly connected and firmly seated. 12 Replace the support bracket (see "Replacing the Support Bracket" on page 173...
...network cable, first plug the cable into the network port or device and then plug it into the hard drive bay until it snaps in place. 10 Install the first hard drive (see "Installing a Hard Drive" on page 141). 11 Check all cables to electrical outlets, and then turn them on page 174...the power and data cables to the drive. 8 Connect the data cable to the system board. 9 Slide the hard drive into the computer. 14 Connect your computer and devices to be certain that they are properly connected and firmly seated. 12 Replace the support bracket (see "Replacing the Support Bracket" on page 173...

Owner's Manual
Page 159
... cover (see "Removing the Computer Cover" on page 105). 3 Remove the support bracket (see "Removing a CD/DVD Drive" on page 154). 6 Remove the hard drive power cable, CD/DVD drive data and power cable, front panel cable, and any of the computer chassis. Power Supply CAUTION: Before you remove them from... screws that attach the power supply to prevent them to the back of your body before you replace them from the system board and the drives. Removing and Installing Parts 159 Replacing the Power Supply 1 Follow the procedures in the Product Information Guide. You can do so by...
... cover (see "Removing the Computer Cover" on page 105). 3 Remove the support bracket (see "Removing a CD/DVD Drive" on page 154). 6 Remove the hard drive power cable, CD/DVD drive data and power cable, front panel cable, and any of the computer chassis. Power Supply CAUTION: Before you remove them from... screws that attach the power supply to prevent them to the back of your body before you replace them from the system board and the drives. Removing and Installing Parts 159 Replacing the Power Supply 1 Follow the procedures in the Product Information Guide. You can do so by...

Owner's Manual
Page 160
... toward the back of the computer. 10 Replace and tighten all screws that secure the power supply to make sure they are secure. 14 Replace the support bracket (see "Installing a CD/DVD Drive" on page 155). 13 Secure the hard drive power cable, CD/DVD drive data and power cable, and the front ...panel cable to replace and tighten all screws may cause electrical shock as these screws...
... toward the back of the computer. 10 Replace and tighten all screws that secure the power supply to make sure they are secure. 14 Replace the support bracket (see "Installing a CD/DVD Drive" on page 155). 13 Secure the hard drive power cable, CD/DVD drive data and power cable, and the front ...panel cable to replace and tighten all screws may cause electrical shock as these screws...
Owner's Manual
Page 173
... the procedures in this section, follow the safety instructions located in the hard drive bay and press it down. 4 Ensure that the computer works correctly by running the Dell Diagnostics (see "Dell Diagnostics" on . 9 Verify that the support bracket is seated correctly and replace the card retention bracket. 8 Connect your computer and devices to an...
... the procedures in this section, follow the safety instructions located in the hard drive bay and press it down. 4 Ensure that the computer works correctly by running the Dell Diagnostics (see "Dell Diagnostics" on . 9 Verify that the support bracket is seated correctly and replace the card retention bracket. 8 Connect your computer and devices to an...
Owner's Manual
Page 218
... drive panel, 135 drive-panel insert removing, 149 replacing, 150 drivers, 91 about, 91 identifying, 92 reinstalling, 92 Drivers and Utilities media, 93 Dell Diagnostics, 88 drives, 137 hard drive, 139 installing CD/DVD, 155 installing floppy, 147 installing hard drive, 141 problems, 64 removing CD/DVD, 154 removing floppy, 144 removing hard drive, 139 second hard drive, 142 serial ATA, 139 DVD drive...
... drive panel, 135 drive-panel insert removing, 149 replacing, 150 drivers, 91 about, 91 identifying, 92 reinstalling, 92 Drivers and Utilities media, 93 Dell Diagnostics, 88 drives, 137 hard drive, 139 installing CD/DVD, 155 installing floppy, 147 installing hard drive, 141 problems, 64 removing CD/DVD, 154 removing floppy, 144 removing hard drive, 139 second hard drive, 142 serial ATA, 139 DVD drive...


