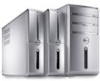
Dell Inspiron 660 Support Question
Dell Inspiron 660 Support Question
Find answers below for this question about Dell Inspiron 660.Need a Dell Inspiron 660 manual? We have 2 online manuals for this item!
Question posted by jfrey007 on April 17th, 2013
How To Partition New Dell Inspiron 660 Hard Drive?
I'm ready to boot up my Inspiron 660 for the 1st time, but before I start loading data on the hard drive, can I partition the drive first to be able to separate Windows 8 and OS files from storage requirements for pics, music, and personal stuff? If possible, I'd like to have maybe 3 or 4 partitions. I have 1 TB hard drive. Thanks
Current Answers
Answer #1: Posted by RoyanAtDell on April 17th, 2013 7:01 AM
RoyanAtDell

Member since:
April 3rd, 2013 Points: 232,700

Member since:
April 3rd, 2013 Points: 232,700
Hi,
I work for Dell's Social Media Team. Before you partition your hard drive I recommend you create a backup of the system using Dell Data Safe available on your system. I also recommend you do not format the recovery partition, as this has the factory settings and diagnostics. Use the below link for help in partitioning you hard drive.
Thank you.
Dell-Royan
RoyanAtDell.
Dell Social Media and Communities.
Related Dell Inspiron 660 Manual Pages
Owners Manual - Page 1
Dell Inspiron 660 Owner's Manual
Computer model: Inspiron 660 Regulatory model: D11M Regulatory type: D11M002
Owners Manual - Page 2
...Dell under license; Dell Inc. Microsoft®, Windows®, and the Windows start button logo are either the entities claiming the marks and names or their products. and/or other than its own.
2012 - 04
Rev.
Information in this text: Dell™, the DELL logo, and Inspiron... or registered trademarks of Dell Inc. WARNING: A ... make better use of Dell Inc.;
CAUTION: A CAUTION...
Owners Manual - Page 4
... Your Computer After Removing or Installing the PCI Express Card 37
9 Mini-Card 39
Removing the Mini-Card 40 Replacing the Mini-Card 41
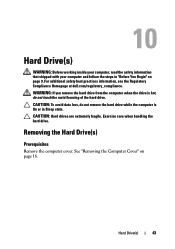
10 Hard Drive(s 43
Removing the Hard Drive(s 43 Replacing the Hard Drive(s 48
4
Contents
Owners Manual - Page 5
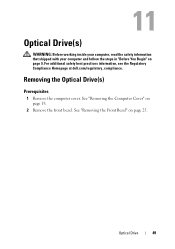
11 Optical Drive(s 49
Removing the Optical Drive(s 49 Replacing the Optical Drives(s 53
12 Front I/O Panel 57
Removing the Front I/O Panel 57 Replacing the Front I/O Panel 59
13 Power Button Module 61
Removing the Power Button Module ...
Owners Manual - Page 10
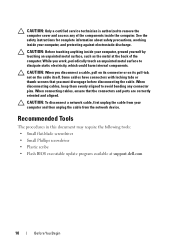
... your computer, and protecting against electrostatic discharge. Recommended Tools
The procedures in this document may require the following tools:
• Small flat-blade screwdriver
• Small Phillips screwdriver
•... yourself by touching an unpainted metal surface, such as the metal at support.dell.com
10
Before You Begin CAUTION: Only a certified service technician is authorized ...
Owners Manual - Page 13
...
6
10
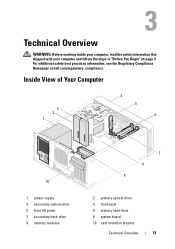
1 power supply 3 secondary optical-drive 5 front I/O panel 7 secondary hard-drive 9 memory modules
7 8 9
2 primary optical-drive 4 front bezel 6 primary hard-drive 8 system board 10 card retention bracket
Technical Overview
13 For additional safety best practices information, see the Regulatory Compliance Homepage at dell.com/regulatory_compliance.
Technical Overview
WARNING: Before...
Owners Manual - Page 22
.... Otherwise, your computer during a memory upgrade, keep them separate from any new memory module(s) that you may not start properly.
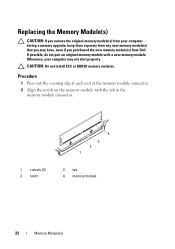
Replacing the Memory Module(s)
CAUTION: If you remove the original memory module(s) from your computer may have, even if you purchased the new memory module(s) from Dell. If possible, do not pair an original memory...
Owners Manual - Page 43
... with your computer and follow the steps in Sleep state. CAUTION: To avoid data loss, do not touch the metal housing of the hard drive. WARNING: If you remove the hard drive from the computer when the drive is hot, do not remove the hard drive while the computer is On or in "Before You Begin" on page...
Owners Manual - Page 44
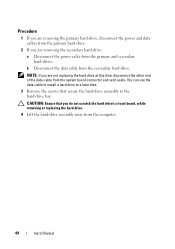
... that secure the hard-drive assembly to the hard-drive bay. NOTE: If you are not replacing the hard drive at a later time.
3 Remove the screws that you are removing the primary hard-drive, disconnect the power and data cables from the primary hard-drive.
2 If you do not scratch the hard drive's circuit board, while removing or replacing the hard drive.
4 Lift the hard-drive assembly away...
Owners Manual - Page 47
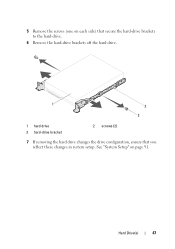
See "System Setup" on each side) that secure the hard-drive brackets to the hard-drive.
6 Remove the hard-drive brackets off the hard drive.
1
3
2
1 hard drive 3 hard-drive bracket
2 screws (2)
7 If removing the hard drive changes the drive configuration, ensure that you reflect these changes in system setup. Hard Drive(s)
47
5 Remove the screws (one on page 91.
Owners Manual - Page 48
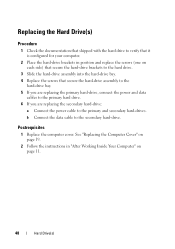
..." on each side) that secure the hard-drive brackets to the hard drive.
3 Slide the hard-drive assembly into the hard-drive bay. 4 Replace the screws that secure the hard-drive assembly to the
hard-drive bay. 5 If you are replacing the primary hard-drive, connect the power and data
cables to the primary hard drive. 6 If you are replacing the secondary hard-drive:
a Connect the power cable to...
Owners Manual - Page 49
..." on page 9. Optical Drive
49 Optical Drive(s)
WARNING: Before working inside your computer, read the safety information that shipped with your computer and follow the steps in "Before You Begin" on page 18.
2 Remove the front bezel. For additional safety best practices information, see the Regulatory Compliance Homepage at dell.com/regulatory_compliance. See...
Owners Manual - Page 53
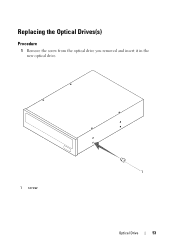
Replacing the Optical Drives(s)
Procedure
1 Remove the screw from the optical drive you removed and insert it in the new optical drive.
1 screw
1
Optical Drive
53
Owners Manual - Page 91
...that the keyboard has initialized.
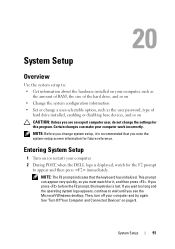
Then, turn off your computer. 2 During POST, when the DELL logo is lost.
Certain changes can appear very quickly, so you change system setup, it ,..., such as the user password, type of
hard drive installed, enabling or disabling base devices, and so on CAUTION: Unless you see the Microsoft Windows desktop. NOTE: Before you must watch for future ...
Owners Manual - Page 94
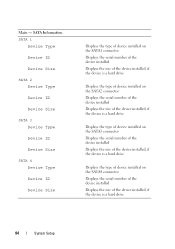
... of the device installed Displays the size of the device installed, if the device is a hard drive
Displays the type of device installed on the SATA2 connector Displays the serial number of the device... installed Displays the size of the device installed, if the device is a hard drive
Displays the type of device installed on the SATA3 connector Displays the serial number of the device...
Owners Manual - Page 96

... Audio Controller
Allows you to enable or disabled the audio controller
Enabled or Disable (Enabled by default)
CAUTION: Changing the SATA Mode may prevent booting of the integrated hard-drive controller
ATA Mode; AHCI Mode (AHCI Mode by default)
SATA Mode
Allows you to configure the operating mode of your computer
Enabled or...
Owners Manual - Page 97
... by default)
Auto Power On
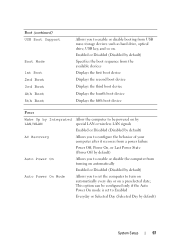
Allows you to enable or disable the computer from USB mass storage devices such as hard drive, optical drive, USB key, and so on a preselected date; Boot (continued) USB Boot Support
Boot Mode
1st Boot 2nd Boot 3rd Boot 4th Boot 5th Boot
Allows you to Enabled
Everyday or Selected Day (Selected Day by default)
System Setup
97...
Owners Manual - Page 100

... no operating system, the computer generates an error message.
• USB Storage Device - The computer attempts to boot from the network. NOTE: To boot to the boot menu. See "System Setup" on the floppy disk, the computer generates an error message.
• Hard Drive - The BIOS detects the device and adds the USB flash option to...
Owners Manual - Page 101
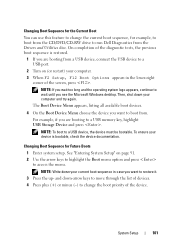
...Windows desktop. and down-arrow keys to move through the list of devices. 4 Press plus (+) or minus (-) to change the current boot sequence, for example, to boot from the CD/DVD/CD-RW drive to run Dell... up-
Changing Boot Sequence for Future Boots
1 Enter system setup.
System Setup
101 Changing Boot Sequence for the Current Boot
You can use this feature to change the boot priority of the...
Owners Manual - Page 107
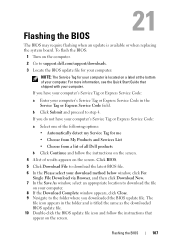
...require flashing when an update is titled the same as the downloaded BIOS update file. 10 Double-click the BIOS update file... file. b Click Submit and proceed to support.dell.com/support/downloads.
3 Locate the BIOS update file ...window appears, click Close. 9 Navigate to download the file on a label at the bottom of results appears on the screen.
For more information, see the Quick Start...
Similar Questions


How To Remove Power Supply From Dell Inspiron 660s
I can't find a way to take out the old power supply in my Inspiron 660s. It's loose but there I no r...
I can't find a way to take out the old power supply in my Inspiron 660s. It's loose but there I no r...
(Posted by sfishesfish 10 years ago)

I Am Using An New Inspiron 660 Tower Computer.
Question – Which all video cards would go well with this computer? I am just looking to upgrade t...
Question – Which all video cards would go well with this computer? I am just looking to upgrade t...
(Posted by Donnantylor2 10 years ago)

My All In One Inspiron 2305 Will Not Start.
My all in ine inspiron 2305 will not start, no sound no image nothing. Yet when I add the roku it wi...
My all in ine inspiron 2305 will not start, no sound no image nothing. Yet when I add the roku it wi...
(Posted by ebookrus 10 years ago)