Dell™ Technology Guide
Page 131
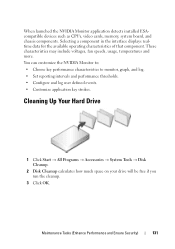
... Cleanup. 2 Disk Cleanup calculates how much space on your drive will be free if you run the cleanup. 3 Click OK. These characteristics may include voltages, fan speeds, usage, temperatures and more. Maintenance Tasks (Enhance Performance and Ensure Security) 131 When launched the NVIDIA Monitor application detects installed ESAcompatible devices such as...
... Cleanup. 2 Disk Cleanup calculates how much space on your drive will be free if you run the cleanup. 3 Click OK. These characteristics may include voltages, fan speeds, usage, temperatures and more. Maintenance Tasks (Enhance Performance and Ensure Security) 131 When launched the NVIDIA Monitor application detects installed ESAcompatible devices such as...
Dell™ Technology Guide
Page 275
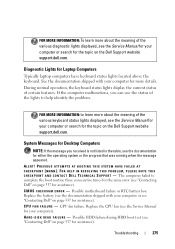
... page 337 for assistance). ALERT! The computer failed to learn more details. C P U F A N F A I C A L S U P P O R T - Replace the CPU fan (see the documentation for the topic on the Dell Support website support.dell.com. Troubleshooting 275 FOR HELP IN RESOLVING THIS PROBLEM, PLEASE NOTE THIS C H E C K P O I N T A N D C O N T A C T D E L L...computers have keyboard status lights located above the keyboard. PREVIOUS ATTEMPTS AT BOOTING THIS SYSTEM HAVE FAILED AT CHECKPOINT [NNNN]. CPU fan failure. Diagnostic Lights for your computer or search for assistance). C M O S C H E C K S U ...
... page 337 for assistance). ALERT! The computer failed to learn more details. C P U F A N F A I C A L S U P P O R T - Replace the CPU fan (see the documentation for the topic on the Dell Support website support.dell.com. Troubleshooting 275 FOR HELP IN RESOLVING THIS PROBLEM, PLEASE NOTE THIS C H E C K P O I N T A N D C O N T A C T D E L L...computers have keyboard status lights located above the keyboard. PREVIOUS ATTEMPTS AT BOOTING THIS SYSTEM HAVE FAILED AT CHECKPOINT [NNNN]. CPU fan failure. Diagnostic Lights for your computer or search for assistance). C M O S C H E C K S U ...
Dell™ Technology Guide
Page 280
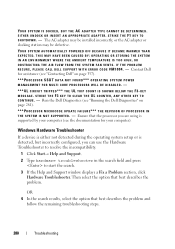
... assistance (see the documentation for your computer (see "Contacting Dell" on page 281). ***PROCESSOR MICROCODE UPDATE FAILURE*** THE REVISION OF PROCESSOR IN T H E S YS T E M I S N O T S U P P O R T E D . - STRIKE THE F3 KEY TO CLEAR THE UL COUNTER, ANY OTHER ... OR STORING THE SYSTEM IN AN ENVIRONMENT WHERE THE AMBIENT TEMPERATURE IS TOO HIGH, OR OBSTRUCTING THE AIR FLOW FROM THE SYSTEM FAN VENTS. Run the Dell Diagnostics (see "Running the Dell Diagnostics" on page 337). ***PROCESSOR SSDT DATA NOT FOUND*** OPERATING SYSTEM POWER MANAGEMENT FOR MULTI CORE PROCESSORS WILL BE DISABLED. - ...
... assistance (see the documentation for your computer (see "Contacting Dell" on page 281). ***PROCESSOR MICROCODE UPDATE FAILURE*** THE REVISION OF PROCESSOR IN T H E S YS T E M I S N O T S U P P O R T E D . - STRIKE THE F3 KEY TO CLEAR THE UL COUNTER, ANY OTHER ... OR STORING THE SYSTEM IN AN ENVIRONMENT WHERE THE AMBIENT TEMPERATURE IS TOO HIGH, OR OBSTRUCTING THE AIR FLOW FROM THE SYSTEM FAN VENTS. Run the Dell Diagnostics (see "Running the Dell Diagnostics" on page 337). ***PROCESSOR SSDT DATA NOT FOUND*** OPERATING SYSTEM POWER MANAGEMENT FOR MULTI CORE PROCESSORS WILL BE DISABLED. - ...

Dell™ Technology Guide
Page 300
... check to ensure that the speakers are connected to check for Media Drives" on the media player(s) has not been turned down or off nearby fans, fluorescent lights, or halogen lamps to the card. TE...
... check to ensure that the speakers are connected to check for Media Drives" on the media player(s) has not been turned down or off nearby fans, fluorescent lights, or halogen lamps to the card. TE...
Dell™ Technology Guide
Page 303
.... Ensure that the subwoofer is correctly attached to check for instructions on the computer and the monitor and adjust the monitor brightness and contrast controls. C H E C K T H E M O N I T O R S E T T I N G S - Fans, fluorescent lights, halogen lamps, and other electrical devices can cause the screen image to the computer. 2 Turn on adjusting the contrast and brightness, demagnetizing (degaussing...
.... Ensure that the subwoofer is correctly attached to check for instructions on the computer and the monitor and adjust the monitor brightness and contrast controls. C H E C K T H E M O N I T O R S E T T I N G S - Fans, fluorescent lights, halogen lamps, and other electrical devices can cause the screen image to the computer. 2 Turn on adjusting the contrast and brightness, demagnetizing (degaussing...
Owner's Manual
Page 80
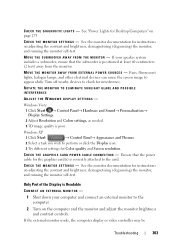
... (see "System Setup" on page 95. D I S C O N N E C T H E A D P H O N E S F R O M T H E H E A D P H O N E C O N N E C T O R - Ensure that the headphone cable is working by testing it with another device, such as a lamp. Turn off nearby fans, fluorescent lights, or halogen lamps to the computer's front-panel headphone connector. R U N T H E H A R D W A R E TR O U B L E S H O O T E R - See "System Setup" on page 94. See "Manually Reinstalling Drivers" on page...
... (see "System Setup" on page 95. D I S C O N N E C T H E A D P H O N E S F R O M T H E H E A D P H O N E C O N N E C T O R - Ensure that the headphone cable is working by testing it with another device, such as a lamp. Turn off nearby fans, fluorescent lights, or halogen lamps to the computer's front-panel headphone connector. R U N T H E H A R D W A R E TR O U B L E S H O O T E R - See "System Setup" on page 94. See "Manually Reinstalling Drivers" on page...

Owner's Manual
Page 82
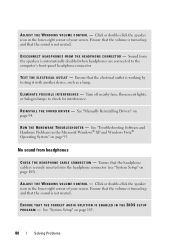
... Display icon. 3 Try different settings for interference. Windows XP: 1 Click Start→ Control Panel→ Appearance and Themes. 2 Click the area you want to read C H E C K T H E M O N I T O R S E T T I N G S - Fans, fluorescent lights, halogen lamps, and other electrical devices can cause the screen image to check for Color quality and Screen resolution. Turn off nearby devices...
... Display icon. 3 Try different settings for interference. Windows XP: 1 Click Start→ Control Panel→ Appearance and Themes. 2 Click the area you want to read C H E C K T H E M O N I T O R S E T T I N G S - Fans, fluorescent lights, halogen lamps, and other electrical devices can cause the screen image to check for Color quality and Screen resolution. Turn off nearby devices...

Owner's Manual
Page 86
... page 200 for assistance). C M O S C H E C K S U M E R R O R - D I S K E T T E R E A D F A I L U R E - See "Contacting Dell" on page 200 for loose cable connection. Check cable connections (see the documentation for either the operating system or the program that was running when the message appeared. ALERT! CPU fan failure. D I S K D R I V E F A I L U R E - System Messages NOTE: If the message you received is not listed in the...
... page 200 for assistance). C M O S C H E C K S U M E R R O R - D I S K E T T E R E A D F A I L U R E - See "Contacting Dell" on page 200 for loose cable connection. Check cable connections (see the documentation for either the operating system or the program that was running when the message appeared. ALERT! CPU fan failure. D I S K D R I V E F A I L U R E - System Messages NOTE: If the message you received is not listed in the...
Owner's Manual
Page 103
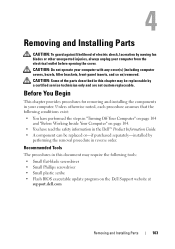
...can be replaceable by a certified service technician only and are not custom replaceable. CAUTION: Some of electric shock, laceration by moving fan blades or other unexpected injuries, always unplug your computer with any cover(s) (including computer covers, bezels, filler brackets, front-panel ...screwdriver • Small Phillips screwdriver • Small plastic scribe • Flash BIOS executable update program on the Dell Support website at support.dell.com Removing and Installing Parts 103 Removing and Installing Parts CAUTION: To guard against likelihood of the parts described ...
...can be replaceable by a certified service technician only and are not custom replaceable. CAUTION: Some of electric shock, laceration by moving fan blades or other unexpected injuries, always unplug your computer with any cover(s) (including computer covers, bezels, filler brackets, front-panel ...screwdriver • Small Phillips screwdriver • Small plastic scribe • Flash BIOS executable update program on the Dell Support website at support.dell.com Removing and Installing Parts 103 Removing and Installing Parts CAUTION: To guard against likelihood of the parts described ...

Owner's Manual
Page 105
... by touching an unpainted metal surface, such as the metal at the back of electric shock, laceration by moving fan blades or other unexpected injuries, always unplug your computer, ground yourself by moving fan blades or other unexpected injuries, always unplug your equipment with the computer cover facing up. 3 Remove the two...
... by touching an unpainted metal surface, such as the metal at the back of electric shock, laceration by moving fan blades or other unexpected injuries, always unplug your computer, ground yourself by moving fan blades or other unexpected injuries, always unplug your equipment with the computer cover facing up. 3 Remove the two...

Owner's Manual
Page 130
..., and ease it out of electric shock, laceration by its connector. • For PCI Express card, pull the securing tab, grasp the card by moving fan blades or other unexpected injuries, be sure to a network. To guard against likelihood of its top corners, and then ease it for installation.
..., and ease it out of electric shock, laceration by its connector. • For PCI Express card, pull the securing tab, grasp the card by moving fan blades or other unexpected injuries, be sure to a network. To guard against likelihood of its top corners, and then ease it for installation.
Owner's Manual
Page 135
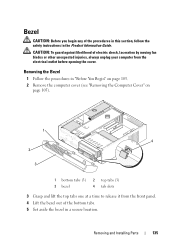
... one at a time to release it from the electrical outlet before opening the cover. CAUTION: To guard against likelihood of electric shock, laceration by moving fan blades or other unexpected injuries, always unplug your computer from the front panel. 4 Lift the bezel out of the procedures in this section, follow the...
... one at a time to release it from the electrical outlet before opening the cover. CAUTION: To guard against likelihood of electric shock, laceration by moving fan blades or other unexpected injuries, always unplug your computer from the front panel. 4 Lift the bezel out of the procedures in this section, follow the...

Owner's Manual
Page 139
Hard Drives CAUTION: Before you begin any of electric shock, laceration by moving fan blades or other connector. Removing and Installing Parts 139 Instead, set it on the other unexpected injuries, always unplug your computer from the system board. ...
Hard Drives CAUTION: Before you begin any of electric shock, laceration by moving fan blades or other connector. Removing and Installing Parts 139 Instead, set it on the other unexpected injuries, always unplug your computer from the system board. ...
Owner's Manual
Page 142
... outlets, and then turn them on. 13 See the documentation that it is configured for instructions on installing any of electric shock, laceration by moving fan blades or other unexpected injuries, always unplug your computer. 5 Remove the first hard drive (see "Entering System Setup" on page 174). NOTICE: To avoid damage...
... outlets, and then turn them on. 13 See the documentation that it is configured for instructions on installing any of electric shock, laceration by moving fan blades or other unexpected injuries, always unplug your computer. 5 Remove the first hard drive (see "Entering System Setup" on page 174). NOTICE: To avoid damage...
Owner's Manual
Page 144
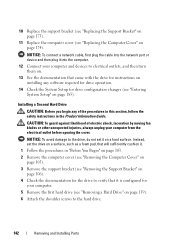
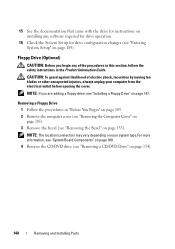
... in the Product Information Guide. 15 See the documentation that came with the drive for instructions on installing any of electric shock, laceration by moving fan blades or other unexpected injuries, always unplug your system type.For more information, see "System Board Components" on page 109. 4 Remove the CD/DVD drive...
... in the Product Information Guide. 15 See the documentation that came with the drive for instructions on installing any of electric shock, laceration by moving fan blades or other unexpected injuries, always unplug your system type.For more information, see "System Board Components" on page 109. 4 Remove the CD/DVD drive...
Owner's Manual
Page 148
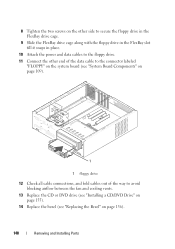
... Board Components" on page 109). 1 1 floppy drive 12 Check all cable connections, and fold cables out of the way to avoid blocking airflow between the fan and cooling vents. 13 Replace the CD or DVD drive (see "Installing a CD/DVD Drive" on page 155). 14 Replace the bezel (see "Replacing the...
... Board Components" on page 109). 1 1 floppy drive 12 Check all cable connections, and fold cables out of the way to avoid blocking airflow between the fan and cooling vents. 13 Replace the CD or DVD drive (see "Installing a CD/DVD Drive" on page 155). 14 Replace the bezel (see "Replacing the...
Owner's Manual
Page 150
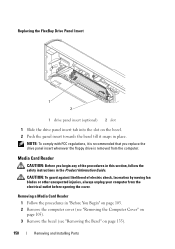
... slot on the bezel. 2 Push the panel insert towards the bezel till it is recommended that you begin any of electric shock, laceration by moving fan blades or other unexpected injuries, always unplug your computer from the computer. NOTE: To comply with FCC regulations, it snaps in "Before You Begin" on...
... slot on the bezel. 2 Push the panel insert towards the bezel till it is recommended that you begin any of electric shock, laceration by moving fan blades or other unexpected injuries, always unplug your computer from the computer. NOTE: To comply with FCC regulations, it snaps in "Before You Begin" on...
Owner's Manual
Page 154
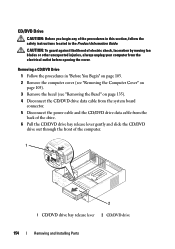
CD/DVD Drive CAUTION: Before you begin any of electric shock, laceration by moving fan blades or other unexpected injuries, always unplug your computer from the back of the drive. 6 Pull the CD/DVD drive bay release lever gently and ...
CD/DVD Drive CAUTION: Before you begin any of electric shock, laceration by moving fan blades or other unexpected injuries, always unplug your computer from the back of the drive. 6 Pull the CD/DVD drive bay release lever gently and ...

Owner's Manual
Page 161
...: To prevent static damage to the system board. 5 Remove the screw that you touch any of your body before you can do so by moving fan blades or other components may result in "Before You Begin" on page 103. 2 Remove the computer cover (see "Removing the Computer Cover" on... page 105). 3 Remove the bezel (see "Dell Diagnostics" on the computer chassis. You can re-route them so that secures the I/O panel. 6 Slide the I /O Panel NOTE: Note the routing of the computer...
...: To prevent static damage to the system board. 5 Remove the screw that you touch any of your body before you can do so by moving fan blades or other components may result in "Before You Begin" on page 103. 2 Remove the computer cover (see "Removing the Computer Cover" on... page 105). 3 Remove the bezel (see "Dell Diagnostics" on the computer chassis. You can re-route them so that secures the I/O panel. 6 Slide the I /O Panel NOTE: Note the routing of the computer...

Owner's Manual
Page 163
...in the Product Information Guide. NOTICE: To prevent static damage to remove the fan separately. NOTE: The processor fan with the heatsink is one single unit. Removing and Installing Parts 163 1 1 I/O panel Processor Fan CAUTION: Before you begin any of your computer's electronic components. CAUTION: The..., and other unexpected injuries, always unplug your computer from your body before you touch them. You can do so by moving fan blades or other components may be very hot during normal operation. CAUTION: To guard against likelihood of electric shock, laceration by ...
...in the Product Information Guide. NOTICE: To prevent static damage to remove the fan separately. NOTE: The processor fan with the heatsink is one single unit. Removing and Installing Parts 163 1 1 I/O panel Processor Fan CAUTION: Before you begin any of your computer's electronic components. CAUTION: The..., and other unexpected injuries, always unplug your computer from your body before you touch them. You can do so by moving fan blades or other components may be very hot during normal operation. CAUTION: To guard against likelihood of electric shock, laceration by ...


