
Quick Start Guide
Page 7
... stretch or excessively bend or twist the power cord. or 3-way adapter, etc.). If the machine is placed at the power supply and call for service. Leaving the machine plugged in may cause insulation failure and fire. Safety Precautions 3 z You may cause an electric shock, fire, or damage the ...unplug the machine at a location exposed to a lot of these safety precautions. Safety Precautions Please read the safety warnings and cautions provided in this manual to ensure that is shared with the machine. Do not attempt to use the machine if the power cord is bundled or knotted. Do not...
... stretch or excessively bend or twist the power cord. or 3-way adapter, etc.). If the machine is placed at the power supply and call for service. Leaving the machine plugged in may cause insulation failure and fire. Safety Precautions 3 z You may cause an electric shock, fire, or damage the ...unplug the machine at a location exposed to a lot of these safety precautions. Safety Precautions Please read the safety warnings and cautions provided in this manual to ensure that is shared with the machine. Do not attempt to use the machine if the power cord is bundled or knotted. Do not...

Quick Start Guide
Page 63
... Do not branch the telephone line before the splitter (wall side). z Connecting to an ISDN Line For details on ISDN (Integrated Service Digital Network) connection and settings, refer to a nonanalog telephone line. „ Methods of Connecting to the Various Lines The following are... some basic connection schemes that apply when you are connecting to the manuals supplied with the network device (control devices such as you are connecting to suit every connecting condition. z Before connecting a telephone ...
... Do not branch the telephone line before the splitter (wall side). z Connecting to an ISDN Line For details on ISDN (Integrated Service Digital Network) connection and settings, refer to a nonanalog telephone line. „ Methods of Connecting to the Various Lines The following are... some basic connection schemes that apply when you are connecting to the manuals supplied with the network device (control devices such as you are connecting to suit every connecting condition. z Before connecting a telephone ...

Quick Start Guide
Page 93
... RX" in ECM (Error Correction Mode). Refer to tone dialing. Note When you use the telephone connecting the machine to dial the information service, you can disable ECM sending/reception. Note z If the sender's or recipient's fax machine is enabled. z You can send faxes using... errors and resend the fax. For details on -screen manual. If the recipient's fax machine is set to tone dialing. 4 When the recorded message for the information service answers, use the machine to switch to finish using the service. „ Sending from any application software that has a...
... RX" in ECM (Error Correction Mode). Refer to tone dialing. Note When you use the telephone connecting the machine to dial the information service, you can disable ECM sending/reception. Note z If the sender's or recipient's fax machine is enabled. z You can send faxes using... errors and resend the fax. For details on -screen manual. If the recipient's fax machine is set to tone dialing. 4 When the recorded message for the information service answers, use the machine to switch to finish using the service. „ Sending from any application software that has a...

Quick Start Guide
Page 96
... you pick up the handset to answer the call : The telephone will receive faxes automatically even if you have subscribed to Duplex Ringing service in RX settings under FAX settings to receive faxes automatically after the telephone rings for a specified length of the User's Guide on page... to TEL priority mode. 92 Faxing z If you set to ON, and then specify the automatic reception start time. See "Remote Receiving" on -screen manual. z If You Are Using a Single Telephone Line for Faxes and Voice Calls and Use Voice Calls More Frequently: Select TEL priority mode. (B) (C) (A)...
... you pick up the handset to answer the call : The telephone will receive faxes automatically even if you have subscribed to Duplex Ringing service in RX settings under FAX settings to receive faxes automatically after the telephone rings for a specified length of the User's Guide on page... to TEL priority mode. 92 Faxing z If you set to ON, and then specify the automatic reception start time. See "Remote Receiving" on -screen manual. z If You Are Using a Single Telephone Line for Faxes and Voice Calls and Use Voice Calls More Frequently: Select TEL priority mode. (B) (C) (A)...
Quick Start Guide
Page 118
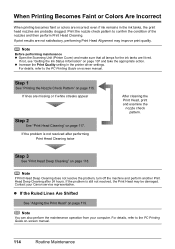
... action. For details, refer to the PC Printing Guide on page 115. Step 1 See "Printing the Nozzle Check Pattern" on -screen manual. 114 Routine Maintenance If the problem is still not resolved, the Print Head may improve print quality. When Printing Becomes Faint or Colors Are... Head Cleaning" on page 117. If lines are probably clogged. Contact your computer. Note You can also perform the maintenance operation from your Canon service representative. If the problem is not resolved after 24 hours. Note If Print Head Deep Cleaning does not resolve the problem, turn off the...
... action. For details, refer to the PC Printing Guide on page 115. Step 1 See "Printing the Nozzle Check Pattern" on -screen manual. 114 Routine Maintenance If the problem is still not resolved, the Print Head may improve print quality. When Printing Becomes Faint or Colors Are... Head Cleaning" on page 117. If lines are probably clogged. Contact your computer. Note You can also perform the maintenance operation from your Canon service representative. If the problem is not resolved after 24 hours. Note If Print Head Deep Cleaning does not resolve the problem, turn off the...
Quick Start Guide
Page 132
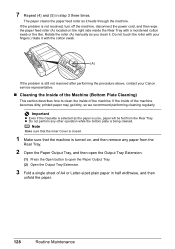
Rotate the roller (A) manually as it feeds through the machine. Note Make sure that the Inner Cover is closed. 1 Make sure that the machine is turned on the right side inside the Rear Tray with your Canon service representative. „ Cleaning the Inside of the Machine (Bottom Plate Cleaning) This section describes how to...
Rotate the roller (A) manually as it feeds through the machine. Note Make sure that the Inner Cover is closed. 1 Make sure that the machine is turned on the right side inside the Rear Tray with your Canon service representative. „ Cleaning the Inside of the Machine (Bottom Plate Cleaning) This section describes how to...
Quick Start Guide
Page 137
... If the lamp on the ink tank is flashing, ink may damage the machine. "Print head is recommended. z Since printing in memory manually after the printing. Printing with the ink tank installed. Note z If the function for any machine malfunction or damage caused by refilled ink ...page 107. Then printing can set the machine to be lost , the machine stores received faxes in memory without storing them in your Canon service representative. Replacing the ink tank is recommended after replacing the ink tank. Install the print head." You can continue. If you want to...
... If the lamp on the ink tank is flashing, ink may damage the machine. "Print head is recommended. z Since printing in memory manually after the printing. Printing with the ink tank installed. Note z If the function for any machine malfunction or damage caused by refilled ink ...page 107. Then printing can set the machine to be lost , the machine stores received faxes in memory without storing them in your Canon service representative. Replacing the ink tank is recommended after replacing the ink tank. Install the print head." You can continue. If you want to...
Quick Start Guide
Page 138
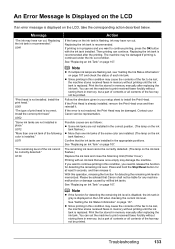
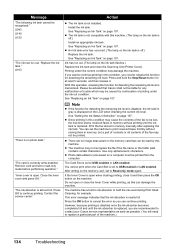
...hold the Stop/Reset button for example. See "Getting the Ink Status Information" on page 107. z There are recommended to contact your Canon service representative as early as this operation, releasing the function for any malfunction or trouble which may be caused by this condition may cause the... "Inner cover is not installed. Remove card and set to read by continuation of the machine.) 134 Troubleshooting z Since printing in memory manually after replacing the ink tank. Close the inner cover and press OK." After writing on the LCD when checking the current ink level. ...
...hold the Stop/Reset button for example. See "Getting the Ink Status Information" on page 107. z There are recommended to contact your Canon service representative as early as this operation, releasing the function for any malfunction or trouble which may be caused by this condition may cause the... "Inner cover is not installed. Remove card and set to read by continuation of the machine.) 134 Troubleshooting z Since printing in memory manually after replacing the ink tank. Close the inner cover and press OK." After writing on the LCD when checking the current ink level. ...
Quick Start Guide
Page 139
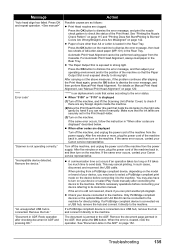
... device connected to the error status. In such cases, disconnect and reconnect the USB cable. When printing from the power supply. z Check your Canon service representative. If a PictBridge compliant device is connected via a USB hub, remove the hub and connect it takes too much time to the machine..... The document is loaded in the ADF. " "**** Error code" "Scanner is connected via a USB hub, remove the hub and connect it manually. "Document in ADF and pressing OK." Redo operation after aligning the Print Head again, press the OK button to the machine. If the same ...
... device connected to the error status. In such cases, disconnect and reconnect the USB cable. When printing from the power supply. z Check your Canon service representative. If a PictBridge compliant device is connected via a USB hub, remove the hub and connect it takes too much time to the machine..... The document is loaded in the ADF. " "**** Error code" "Scanner is connected via a USB hub, remove the hub and connect it manually. "Document in ADF and pressing OK." Redo operation after aligning the Print Head again, press the OK button to the machine. If the same ...
Quick Start Guide
Page 152
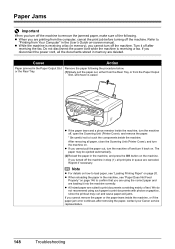
... machine, or if the paper jam error continues after receiving the fax. z When reloading the paper in the machine, see "Loading Printing Paper" on -screen manual. Turn it into the machine correctly. Do not disconnect the power cord while the machine is easier. Paper Jams Important When you cannot pull the... be ejected automatically. (2)Reload the paper in the Paper Output Slot Remove the paper following . z When you turned off after removing the paper, contact your Canon service representative. 148 Troubleshooting
... machine, or if the paper jam error continues after receiving the fax. z When reloading the paper in the machine, see "Loading Printing Paper" on -screen manual. Turn it into the machine correctly. Do not disconnect the power cord while the machine is easier. Paper Jams Important When you cannot pull the... be ejected automatically. (2)Reload the paper in the Paper Output Slot Remove the paper following . z When you turned off after removing the paper, contact your Canon service representative. 148 Troubleshooting
Quick Start Guide
Page 164
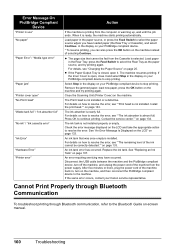
... is nearly full. Press OK to resolve the error, see ""The remaining level of the machine back in the display on your Canon service representative. Disconnect the USB cable between the machine and the PictBridge compliant device, turn on how to select the Rear Tray as the... the Paper Source" on your PictBridge compliant device to the machine. Install the print head."" on -screen manual. 160 Troubleshooting For details on how to continue printing. Contact the service center."" on page 133. See "An Error Message Is Displayed on the LCD" on page 134. An...
... is nearly full. Press OK to resolve the error, see ""The remaining level of the machine back in the display on your Canon service representative. Disconnect the USB cable between the machine and the PictBridge compliant device, turn on how to select the Rear Tray as the... the Paper Source" on your PictBridge compliant device to the machine. Install the print head."" on -screen manual. 160 Troubleshooting For details on how to continue printing. Contact the service center."" on page 133. See "An Error Message Is Displayed on the LCD" on page 134. An...
Quick Start Guide
Page 165
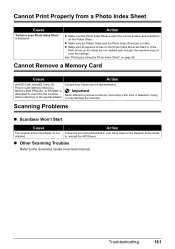
...z Make sure the Photo Index Sheet is displayed. z Make sure the Platen Glass and the Photo Index Sheet are filled in your Canon service representative. If the filled circles on the Platen Glass. Doing so may not scan the settings. z Make sure all required circles on...; ScanGear Won't Start Cause The scanner driver (ScanGear) is attempted to insert into the machine without attaching to the Scanning Guide on-screen manual. Troubleshooting 161 Cannot Remove a Memory Card Cause Action miniSD Card, microSD Card, xDPicture Card, Memory Stick Duo, Memory Stick PRO Duo, or...
...z Make sure the Photo Index Sheet is displayed. z Make sure the Platen Glass and the Photo Index Sheet are filled in your Canon service representative. If the filled circles on the Platen Glass. Doing so may not scan the settings. z Make sure all required circles on...; ScanGear Won't Start Cause The scanner driver (ScanGear) is attempted to insert into the machine without attaching to the Scanning Guide on-screen manual. Troubleshooting 161 Cannot Remove a Memory Card Cause Action miniSD Card, microSD Card, xDPicture Card, Memory Stick Duo, Memory Stick PRO Duo, or...

Quick Start Guide
Page 167
...fax after correcting errors automatically. The image quality of Received Fax is Poor Cause ECM RX is set to a Distinctive Ring Pattern Detection (DRPD) Service with Your Machine, or Have a Dedicated Telephone Line for Faxes and Voice Calls and Use Voice Calls More Frequently:" on page 92. *1 This...receive mode, displayed in "Device Settings" of his/her fax machine is mainly determined by the Call Ring Patterns (Network Switch):" on -screen manual. If the receive mode is TEL priority mode, connect an answering machine to the machine and check that a message plays back when the ...
...fax after correcting errors automatically. The image quality of Received Fax is Poor Cause ECM RX is set to a Distinctive Ring Pattern Detection (DRPD) Service with Your Machine, or Have a Dedicated Telephone Line for Faxes and Voice Calls and Use Voice Calls More Frequently:" on page 92. *1 This...receive mode, displayed in "Device Settings" of his/her fax machine is mainly determined by the Call Ring Patterns (Network Switch):" on -screen manual. If the receive mode is TEL priority mode, connect an answering machine to the machine and check that a message plays back when the ...
Quick Start Guide
Page 181
... equipment and software that cause damage to abuse, neglect, mishandling, improper packaging by you in new condition in , Canon USA's user's manual or other documentation, or services performed by someone other than those sold by Canon U.S.A., Inc. ("Canon USA") with respect to have no warranty or replacement. A dated proof of original purchase for a refurbished Product...
... equipment and software that cause damage to abuse, neglect, mishandling, improper packaging by you in new condition in , Canon USA's user's manual or other documentation, or services performed by someone other than those sold by Canon U.S.A., Inc. ("Canon USA") with respect to have no warranty or replacement. A dated proof of original purchase for a refurbished Product...


