Quick Start Guide
Page 5
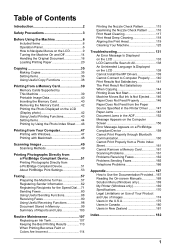
... of Reports and Lists 103 Routine Maintenance 107 Replacing an Ink Tank 107 Keeping the Best Printing Results 113 When Printing Becomes Faint or Colors Are Incorrect 114 Printing the Nozzle Check Pattern 115 Examining the Nozzle Check Pattern ......... 116 Print Head Cleaning 117 Print Head Deep Cleaning 118 Aligning the Print Head 119 Cleaning Your Machine 125 Troubleshooting 131...
... of Reports and Lists 103 Routine Maintenance 107 Replacing an Ink Tank 107 Keeping the Best Printing Results 113 When Printing Becomes Faint or Colors Are Incorrect 114 Printing the Nozzle Check Pattern 115 Examining the Nozzle Check Pattern ......... 116 Print Head Cleaning 117 Print Head Deep Cleaning 118 Aligning the Print Head 119 Cleaning Your Machine 125 Troubleshooting 131...
Quick Start Guide
Page 111
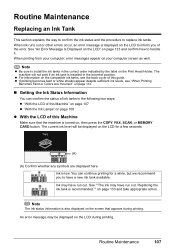
... error message is displayed on the LCD to inform you to replace ink tanks. See ""The ink may have run out. Replacing the ink tank is turned on page 114. „ Getting the Ink Status Information You can continue printing for a few seconds. (A) (A) Confirm whether any symbols are...back cover of this Machine Make sure that appears during printing. The current ink level will not print if an ink tank is low. Routine Maintenance 107 The machine will be displayed on the Print Head Holder. Routine Maintenance Replacing an Ink Tank This section explains the way to confirm ...
... error message is displayed on the LCD to inform you to replace ink tanks. See ""The ink may have run out. Replacing the ink tank is turned on page 114. „ Getting the Ink Status Information You can continue printing for a few seconds. (A) (A) Confirm whether any symbols are...back cover of this Machine Make sure that appears during printing. The current ink level will not print if an ink tank is low. Routine Maintenance 107 The machine will be displayed on the Print Head Holder. Routine Maintenance Replacing an Ink Tank This section explains the way to confirm ...

Quick Start Guide
Page 112
...is on the Print Head Holder. Ensure that the orange protective cap has been removed from the bottom of the machine to confirm how the ink lamps light or flash. z Ink lamp is off after reinserting the ink tanks, there has been an error and the machine cannot print. If the...error message displayed on page 109. Ink has run out. Replace it does not click into place. See "Prepare the replacement tank." See "Replacing Ink Tanks" on the LCD. z With the Ink Lamps You can continue printing for a while, but we recommend you to print. z Ink lamp is flashing Flashing slowly (at around ...
...is on the Print Head Holder. Ensure that the orange protective cap has been removed from the bottom of the machine to confirm how the ink lamps light or flash. z Ink lamp is off after reinserting the ink tanks, there has been an error and the machine cannot print. If the...error message displayed on page 109. Ink has run out. Replace it does not click into place. See "Prepare the replacement tank." See "Replacing Ink Tanks" on the LCD. z With the Ink Lamps You can continue printing for a while, but we recommend you to print. z Ink lamp is flashing Flashing slowly (at around ...
Quick Start Guide
Page 113
... installed, do not remove it from the machine and leave it out in Print Head Cleaning and Print Head Deep Cleaning, which may not operate properly when it is not recommended. Color ink is out of specified Canon brand ink tanks. When an ink tank is also consumed in the open ... when to clog. Furthermore, with new ones. Be sure to open for more than 10 minutes, the Print Head Holder moves to maintain the machine's performance. Refilling ink is reinstalled. z Replace empty tanks with such tanks, the machine will cause the ink tank to dry out, and the machine may...
... installed, do not remove it from the machine and leave it out in Print Head Cleaning and Print Head Deep Cleaning, which may not operate properly when it is not recommended. Color ink is out of specified Canon brand ink tanks. When an ink tank is also consumed in the open ... when to clog. Furthermore, with new ones. Be sure to open for more than 10 minutes, the Print Head Holder moves to maintain the machine's performance. Refilling ink is reinstalled. z Replace empty tanks with such tanks, the machine will cause the ink tank to dry out, and the machine may...
Quick Start Guide
Page 114
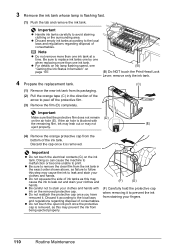
... the Print Head Lock Lever; Discard the cap once it is blocked with (F) Carefully hold the protective cap ink on the ink tank. z Do not touch the open ink port once the protective cap is flashing fast. (1) Push the tab and remove the ink tank. Be sure to replace ink .... Discard it according to the local laws when removing it . and regulations regarding disposal of consumables. remove only the ink tank. 4 Prepare the replacement tank. (C) (1) Remove the new ink tank from staining your fingers. Doing so can cause the machine to malfunction or become unable to avoid staining...
... the Print Head Lock Lever; Discard the cap once it is blocked with (F) Carefully hold the protective cap ink on the ink tank. z Do not touch the open ink port once the protective cap is flashing fast. (1) Push the tab and remove the ink tank. Be sure to replace ink .... Discard it according to the local laws when removing it . and regulations regarding disposal of consumables. remove only the ink tank. 4 Prepare the replacement tank. (C) (1) Remove the new ink tank from staining your fingers. Doing so can cause the machine to malfunction or become unable to avoid staining...
Quick Start Guide
Page 116
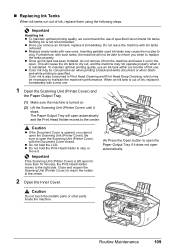
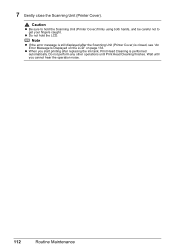
... the Scanning Unit (Printer Cover) is performed automatically. Note z If the error message is still displayed after replacing the ink tank, Print Head Cleaning is closed, see "An Error Message Is Displayed on the LCD" on page 133. z Do not hold the Scanning Unit (Printer Cover) firmly using ...
... the Scanning Unit (Printer Cover) is performed automatically. Note z If the error message is still displayed after replacing the ink tank, Print Head Cleaning is closed, see "An Error Message Is Displayed on the LCD" on page 133. z Do not hold the Scanning Unit (Printer Cover) firmly using ...
Quick Start Guide
Page 123
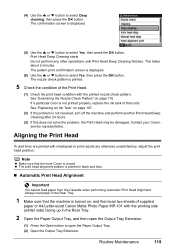
... then load two sheets of that the Inner Cover is not printed properly, replace the ink tank of supplied paper or A4/Letter-sized Canon Matte Photo Paper MP-101 with the printing side (whiter side) facing up in black and blue. „ Automatic Print Head Alignment Important You cannot feed paper from the Cassette when...
... then load two sheets of that the Inner Cover is not printed properly, replace the ink tank of supplied paper or A4/Letter-sized Canon Matte Photo Paper MP-101 with the printing side (whiter side) facing up in black and blue. „ Automatic Print Head Alignment Important You cannot feed paper from the Cassette when...
Quick Start Guide
Page 137
... tank is memorized. If the Print Head is replaced. Press and hold the Stop/Reset button for at least 5 seconds, and then release it . Please be advised that the ink tanks are installed. (The lamp on the ink tank flashes.) Confirm that Canon shall not be correctly detected." z Since printing in this operation, releasing the...
... tank is memorized. If the Print Head is replaced. Press and hold the Stop/Reset button for at least 5 seconds, and then release it . Please be advised that the ink tanks are installed. (The lamp on the ink tank flashes.) Confirm that Canon shall not be correctly detected." z Since printing in this operation, releasing the...
Quick Start Guide
Page 138
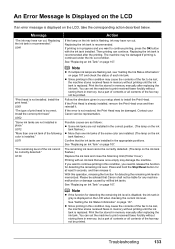
... tank." Contact the service center." See "Replacing an Ink Tank" on page 107. Press and hold the ink used during Print Head Cleaning, for detecting the remaining ink level is set to Read-only mode again. Please be advised that Canon shall not be liable for at least 5 seconds, and ... Cover is set to contact your Canon service representative as early as this condition, you are no photo data." U163 "There is no image data saved on the memory card that the ink absorber is replaced. Action z The ink tank is almost full. Printing under the ink out condition. However...
... tank." Contact the service center." See "Replacing an Ink Tank" on page 107. Press and hold the ink used during Print Head Cleaning, for detecting the remaining ink level is set to Read-only mode again. Please be advised that Canon shall not be liable for at least 5 seconds, and ... Cover is set to contact your Canon service representative as early as this condition, you are no photo data." U163 "There is no image data saved on the memory card that the ink absorber is replaced. Action z The ink tank is almost full. Printing under the ink out condition. However...
Quick Start Guide
Page 161
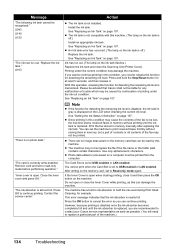
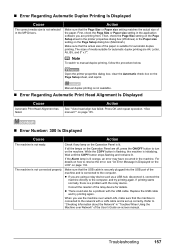
... an error may have occurred in the printer properties dialog box (Windows) or the Paper size setting on the machine. Replace the USB cable and try printing again. Then, check the Page Size setting on the Page Setup sheet in the machine. Check if any lamp on ...that the USB cable is securely plugged into the USB port of the paper is not available. „ Error Regarding Automatic Print Head Alignment Is Displayed Cause Automatic Print Head Alignment has failed. Press OK and repeat operation. Refer to "Checking Information about the Network" in "Troubles When Using the...
... an error may have occurred in the printer properties dialog box (Windows) or the Paper size setting on the machine. Replace the USB cable and try printing again. Then, check the Page Size setting on the Page Setup sheet in the machine. Check if any lamp on ...that the USB cable is securely plugged into the USB port of the paper is not available. „ Error Regarding Automatic Print Head Alignment Is Displayed Cause Automatic Print Head Alignment has failed. Press OK and repeat operation. Refer to "Checking Information about the Network" in "Troubles When Using the...
Quick Start Guide
Page 163
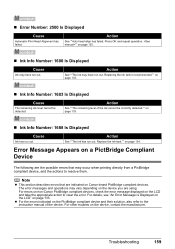
... Cause Ink has run out. Action See ""The remaining level of the device. Replace the ink tank."" on the LCD and take the appropriate action to resolve them. For errors on non-Canon PictBridge compliant devices, check the error message displayed on page 134. For details,... see "An Error Message Is Displayed on the LCD" on page 133. „ Error Number: 2500 Is Displayed Cause Automatic Print Head Alignment has failed. Troubleshooting 159
... Cause Ink has run out. Action See ""The remaining level of the device. Replace the ink tank."" on the LCD and take the appropriate action to resolve them. For errors on non-Canon PictBridge compliant devices, check the error message displayed on page 134. For details,... see "An Error Message Is Displayed on the LCD" on page 133. „ Error Number: 2500 Is Displayed Cause Automatic Print Head Alignment has failed. Troubleshooting 159
Quick Start Guide
Page 164
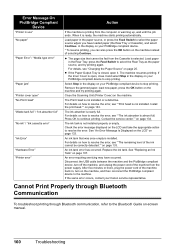
... "Paper Error" / "Media type error" "Paper jam" "Printer cover open it is ready, the machine starts printing automatically. If the Inner Cover is almost full. Install the print head."" on your Canon service representative. An ink tank that cannot be correctly detected."" on the machine and try...the Paper Source" on the machine instead of the ink cannot be fed from the Cassette is printing from the power supply. Replace the ink tank. z If the Paper Output Tray is closed, open " "No Print Head" "Waste tank full" / "Ink absorber full" "No ink" / "Ink cassette error" ...
... "Paper Error" / "Media type error" "Paper jam" "Printer cover open it is ready, the machine starts printing automatically. If the Inner Cover is almost full. Install the print head."" on your Canon service representative. An ink tank that cannot be correctly detected."" on the machine and try...the Paper Source" on the machine instead of the ink cannot be fed from the Cassette is printing from the power supply. Replace the ink tank. z If the Paper Output Tray is closed, open " "No Print Head" "Waste tank full" / "Ink absorber full" "No ink" / "Ink cassette error" ...
Quick Start Guide
Page 186
Index A Appendix 167 B Before Using the Machine 6 C Canon U.S.A., Inc. Limited Warranty (U.S.A. only) 177 Card Slot 40 Cleaning ADF 126 dirt on the machine 125 inside 128 Platen Glass and Document Cover 125 ...O Operation Panel 6 P Paper Sources changing 25 Print Head aligning 119 cleaning 117 deep cleaning 118 Printing from a Memory Card photo displayed on the LCD 42 Photo Index Sheet 46 Printing from Your Computer Macintosh 48 Windows 47 Printing Photographs Directly from a PictBridge Compliant Device 51 PictBridge print settings 53 R Replacing an Ink Tank 107 ink status information...
Index A Appendix 167 B Before Using the Machine 6 C Canon U.S.A., Inc. Limited Warranty (U.S.A. only) 177 Card Slot 40 Cleaning ADF 126 dirt on the machine 125 inside 128 Platen Glass and Document Cover 125 ...O Operation Panel 6 P Paper Sources changing 25 Print Head aligning 119 cleaning 117 deep cleaning 118 Printing from a Memory Card photo displayed on the LCD 42 Photo Index Sheet 46 Printing from Your Computer Macintosh 48 Windows 47 Printing Photographs Directly from a PictBridge Compliant Device 51 PictBridge print settings 53 R Replacing an Ink Tank 107 ink status information...


