Quick Start Guide
Page 13
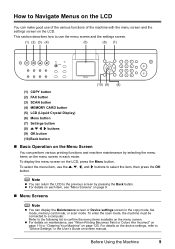
... make good use the {, }, [, and ] buttons to select the item, then press the OK button. Refer to the following list to "Device Settings" in the User's Guide on-screen manual. To enter the scan mode, the machine must be connected to a computer. How to Navigate Menus on the LCD You can return...
... make good use the {, }, [, and ] buttons to select the item, then press the OK button. Refer to the following list to "Device Settings" in the User's Guide on-screen manual. To enter the scan mode, the machine must be connected to a computer. How to Navigate Menus on the LCD You can return...
Quick Start Guide
Page 15
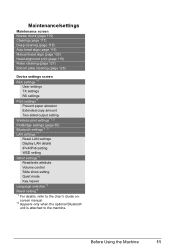
...(page 120) Head alignment print (page 119) Roller cleaning (page 127) Bottom plate cleaning (page 128) Device settings screen FAX settings *1 User settings TX settings RX settings Print settings*1 Prevent paper abrasion Extended copy amount Two-sided output setting Wireless print settings*1, 2 PictBridge settings (page 55...write attribute Volume control Slide show setting Quiet mode Key repeat Language selection*1 Reset setting*1 *1 For details, refer to the User's Guide onscreen manual. *2 Appears only when the optional Bluetooth unit is attached to the machine. Before Using the Machine 11
...(page 120) Head alignment print (page 119) Roller cleaning (page 127) Bottom plate cleaning (page 128) Device settings screen FAX settings *1 User settings TX settings RX settings Print settings*1 Prevent paper abrasion Extended copy amount Two-sided output setting Wireless print settings*1, 2 PictBridge settings (page 55...write attribute Volume control Slide show setting Quiet mode Key repeat Language selection*1 Reset setting*1 *1 For details, refer to the User's Guide onscreen manual. *2 Appears only when the optional Bluetooth unit is attached to the machine. Before Using the Machine 11
Quick Start Guide
Page 16
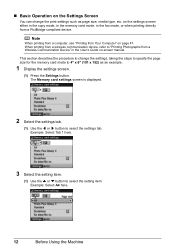
.... Example: Select A4 here. 12 Before Using the Machine on the settings screen either in the copy mode, in the memory card mode, in the User's Guide on page 47.
.... Example: Select A4 here. 12 Before Using the Machine on the settings screen either in the copy mode, in the memory card mode, in the User's Guide on page 47.
Quick Start Guide
Page 26
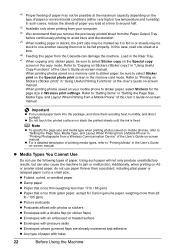
... Printing from a Wireless Communication Device" of paper. Additionally, when printing on A5 or smaller sized paper, do not use the following types of the User's Guide on -screen manual. Important z Put unused paper back into the package, and store them not to "Printing Media" in Wireless print settings. Using ... conditions (either very high or low temperature and humidity). In this paper from your mobile phone to sticker paper, select Stickers for Canon genuine paper, weighing more than a postcard, including plain paper or notepad paper cut to a small size.
... Printing from a Wireless Communication Device" of paper. Additionally, when printing on A5 or smaller sized paper, do not use the following types of the User's Guide on -screen manual. Important z Put unused paper back into the package, and store them not to "Printing Media" in Wireless print settings. Using ... conditions (either very high or low temperature and humidity). In this paper from your mobile phone to sticker paper, select Stickers for Canon genuine paper, weighing more than a postcard, including plain paper or notepad paper cut to a small size.
Quick Start Guide
Page 39
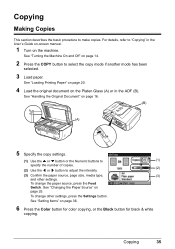
... the Feed Switch. To change other settings. See "Loading Printing Paper" on page 20. 4 Load the original document on the Platen Glass (A) or in the User's Guide on-screen manual. 1 Turn on page 36. 6 Press the Color button for color copying, or the Black button for black & white copying. See "Changing the...
... the Feed Switch. To change other settings. See "Loading Printing Paper" on page 20. 4 Load the original document on the Platen Glass (A) or in the User's Guide on-screen manual. 1 Turn on page 36. 6 Press the Color button for color copying, or the Black button for black & white copying. See "Changing the...
Quick Start Guide
Page 40
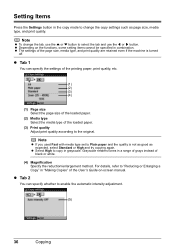
... of the printing paper, print quality, etc. (1) (2) (3) (4) (1) Page size Select the page size of the loaded paper. (2) Media type Select the media type of the User's Guide on the functions, some setting items cannot be specified in combination. z Tab 1 You can specify whether to the original. For details, refer to "Reducing or...
... of the printing paper, print quality, etc. (1) (2) (3) (4) (1) Page size Select the page size of the loaded paper. (2) Media type Select the media type of the User's Guide on the functions, some setting items cannot be specified in combination. z Tab 1 You can specify whether to the original. For details, refer to "Reducing or...
Quick Start Guide
Page 42
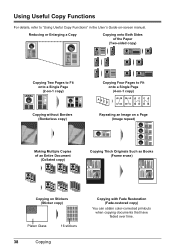
...) Copying Two Pages to Fit onto a Single Page (2-on-1 copy) Copying without Borders (Borderless copy) Copying Four Pages to "Using Useful Copy Functions" in the User's Guide on Stickers (Sticker copy) Platen Glass 16 stickers 38 Copying Copying with Fade Restoration (Fade-restored copy) You can obtain color-corrected printouts when copying...
...) Copying Two Pages to Fit onto a Single Page (2-on-1 copy) Copying without Borders (Borderless copy) Copying Four Pages to "Using Useful Copy Functions" in the User's Guide on Stickers (Sticker copy) Platen Glass 16 stickers 38 Copying Copying with Fade Restoration (Fade-restored copy) You can obtain color-corrected printouts when copying...
Quick Start Guide
Page 47
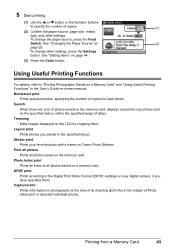
...press the Settings button. DPOF print Prints according to "Printing Photographs Saved on a Memory Card" and "Using Useful Printing Functions" in the User's Guide on a memory card. Layout print Prints photos you have specified them . Print all photos Prints all photos saved on -screen manual. Printing...Changing the Paper Source" on page 44. (3) Press the Color button. See "Setting Items" on (2) page 25. Trimming Edits images displayed on Canon Photo Stickers. Photo Index print Prints an index of dates. 5 Start printing. (1) Use the { or } button or the Numeric buttons to ...
...press the Settings button. DPOF print Prints according to "Printing Photographs Saved on a Memory Card" and "Using Useful Printing Functions" in the User's Guide on a memory card. Layout print Prints photos you have specified them . Print all photos Prints all photos saved on -screen manual. Printing...Changing the Paper Source" on page 44. (3) Press the Color button. See "Setting Items" on (2) page 25. Trimming Edits images displayed on Canon Photo Stickers. Photo Index print Prints an index of dates. 5 Start printing. (1) Use the { or } button or the Numeric buttons to ...
Quick Start Guide
Page 54
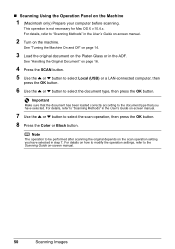
...OK button. 6 Use the { or } button to be performed after scanning the original depends on the scan operation setting you have selected in the User's Guide on-screen manual. 2 Turn on -screen manual. 50 Scanning Images Note The operation to select the document type, then press the OK button. For... the Machine On and Off" on page 14. 3 Load the original document on the Platen Glass or in the User's Guide on-screen manual. 7 Use the { or } button to the Scanning Guide on the machine. Important Make sure that you have selected. For details, refer to "Scanning Methods" in the ADF...
...OK button. 6 Use the { or } button to be performed after scanning the original depends on the scan operation setting you have selected in the User's Guide on-screen manual. 2 Turn on -screen manual. 50 Scanning Images Note The operation to select the document type, then press the OK button. For... the Machine On and Off" on page 14. 3 Load the original document on the Platen Glass or in the User's Guide on-screen manual. 7 Use the { or } button to the Scanning Guide on the machine. Important Make sure that you have selected. For details, refer to "Scanning Methods" in the ADF...
Quick Start Guide
Page 66
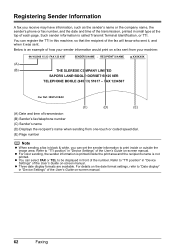
... print inside the print area and the recipient's name is called Transmit Terminal Identification, or TTI. Refer to "TTI position" in "Device Settings" of the User's Guide on a fax sent from one-touch or coded speed dial. (E) Page number Note z When sending a fax in black & white, you receive may have information... company name, the sender's phone or fax number, and the date and time of the transmission, printed in small type at the top of the User's Guide on -screen manual. z You can select FAX or TEL to "TTI position" in "Device Settings" of each page. Refer to be displayed in...
... print inside the print area and the recipient's name is called Transmit Terminal Identification, or TTI. Refer to "TTI position" in "Device Settings" of the User's Guide on a fax sent from one-touch or coded speed dial. (E) Page number Note z When sending a fax in black & white, you receive may have information... company name, the sender's phone or fax number, and the date and time of the transmission, printed in small type at the top of the User's Guide on -screen manual. z You can select FAX or TEL to "TTI position" in "Device Settings" of each page. Refer to be displayed in...

Quick Start Guide
Page 68
... the Date/time setting screen. (1) Use the { or } button to "Date display" in "Device Settings" of the User's Guide on-screen manual. The User settings screen is displayed. 3 Display the User settings screen. (1) Use the { or } button to select Maintenance/settings, then press the OK button. For details on ... to select Device settings, then press the OK button. The Maintenance/settings screen is displayed. 64 Faxing When you do not need to select User settings, then press the OK button. z To delete an entire entry: Press and hold the [ button. „ Entering the Date and...
... the Date/time setting screen. (1) Use the { or } button to "Date display" in "Device Settings" of the User's Guide on-screen manual. The User settings screen is displayed. 3 Display the User settings screen. (1) Use the { or } button to select Maintenance/settings, then press the OK button. For details on ... to select Device settings, then press the OK button. The Maintenance/settings screen is displayed. 64 Faxing When you do not need to select User settings, then press the OK button. z To delete an entire entry: Press and hold the [ button. „ Entering the Date and...

Quick Start Guide
Page 91
You can set for the automatic redialing settings varies depending on the country or region of the User's Guide on-screen manual. For details, see "Sending a Fax using the Numeric Buttons" on the automatic redialing settings, refer to 99 minutes) To change the automatic ...
You can set for the automatic redialing settings varies depending on the country or region of the User's Guide on-screen manual. For details, see "Sending a Fax using the Numeric Buttons" on the automatic redialing settings, refer to 99 minutes) To change the automatic ...

Quick Start Guide
Page 93
z You can send faxes using the service. For details, refer to the FAX Driver Guide onscreen manual. „ Sending/Receiving Using ECM This machine is connected to the instruction manual supplied with ECM, ECM automatically corrects errors and resend the ... the service. „ Sending from Your Computer (Windows only) If your machine is set to "ECM TX" and "ECM RX" in "Device Settings" of the User's Guide on how to switch to tone dialing, refer to a computer, you can disable ECM sending/reception. z Transmission may take longer when ECM is not compatible...
z You can send faxes using the service. For details, refer to the FAX Driver Guide onscreen manual. „ Sending/Receiving Using ECM This machine is connected to the instruction manual supplied with ECM, ECM automatically corrects errors and resend the ... the service. „ Sending from Your Computer (Windows only) If your machine is set to "ECM TX" and "ECM RX" in "Device Settings" of the User's Guide on how to switch to tone dialing, refer to a computer, you can disable ECM sending/reception. z Transmission may take longer when ECM is not compatible...

Quick Start Guide
Page 95
... machine does not ring when it to ring immediately, set to answer the call . Specify the FAX priority mode settings in "Device Settings" of the User's Guide on-screen manual. - It also takes a little time until the machine rings when the call was a voice call : The machine will ring. Pick up the...
... machine does not ring when it to ring immediately, set to answer the call . Specify the FAX priority mode settings in "Device Settings" of the User's Guide on-screen manual. - It also takes a little time until the machine rings when the call was a voice call : The machine will ring. Pick up the...

Quick Start Guide
Page 96
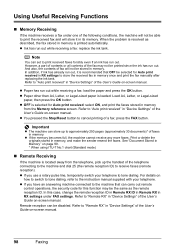
..., press the FAX button, then press the Color or Black button to receive the fax. Refer to "Manual/auto switch" in "Device Settings" of the User's Guide on-screen manual. (D) When the answering machine responds: If it is a fax call . (C) Fax: The telephone will ring. Refer to "Remote RX" in ..."Device Settings" of the machine to send a fax. The entire message should be set the receiving mode of the User's Guide on page 98. If you set to answer the call , the machine receives the fax automatically. See "Remote Receiving" on -screen manual. Note z ...
..., press the FAX button, then press the Color or Black button to receive the fax. Refer to "Manual/auto switch" in "Device Settings" of the User's Guide on-screen manual. (D) When the answering machine responds: If it is a fax call . (C) Fax: The telephone will ring. Refer to "Remote RX" in ..."Device Settings" of the machine to send a fax. The entire message should be set the receiving mode of the User's Guide on page 98. If you set to answer the call , the machine receives the fax automatically. See "Remote Receiving" on -screen manual. Note z ...
Quick Start Guide
Page 101
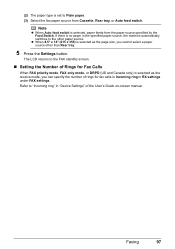
... Cassette, Rear tray, or Auto feed switch. Note z When Auto feed switch is set to the FAX standby screen. „ Setting the Number of the User's Guide on-screen manual. If there is selected as the page size, you can specify the number of rings for Fax Calls When FAX priority mode...
... Cassette, Rear tray, or Auto feed switch. Note z When Auto feed switch is set to the FAX standby screen. „ Setting the Number of the User's Guide on-screen manual. If there is selected as the page size, you can specify the number of rings for Fax Calls When FAX priority mode...
Quick Start Guide
Page 102
... Print or delete the originals stored in its memory. For details on -screen manual. Refer to "Remote RX" in "Device Settings" of the User's Guide on how to switch to tone dialing, refer to the instruction manual supplied with your telephone to "Remote RX" in "Device Settings" of the fax... the Stop/Reset button to store the received fax in memory. Important z The machine can set to approximately 250 pages (approximately 30 documents)* of the User's Guide on page 99. * When using ITU-T No.1 chart (Standard mode) „ Remote Receiving If the machine is loaded: Load A4, Letter, or ...
... Print or delete the originals stored in its memory. For details on -screen manual. Refer to "Remote RX" in "Device Settings" of the User's Guide on how to switch to tone dialing, refer to the instruction manual supplied with your telephone to "Remote RX" in "Device Settings" of the fax... the Stop/Reset button to store the received fax in memory. Important z The machine can set to approximately 250 pages (approximately 30 documents)* of the User's Guide on page 99. * When using ITU-T No.1 chart (Standard mode) „ Remote Receiving If the machine is loaded: Load A4, Letter, or ...
Quick Start Guide
Page 107
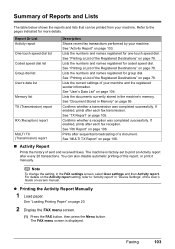
See "Activity Report" on page 99. See "Printing a List of the User's Guide on page 78. Lists the documents currently stored in the FAX settings screen, select User settings and then Activity report. See "Document Stored in "Device Settings" of the Registered Destinations" on -screen manual. See "...Activity report after each fax transmission. Report Or List Activity report One-touch speed dial list Coded speed dial list Group dial list User's data list Memory list TX (Transmission) report RX (Reception) report MULTI TX (Transmission) report Description Shows recent fax transactions ...
See "Activity Report" on page 99. See "Printing a List of the User's Guide on page 78. Lists the documents currently stored in the FAX settings screen, select User settings and then Activity report. See "Document Stored in "Device Settings" of the Registered Destinations" on -screen manual. See "...Activity report after each fax transmission. Report Or List Activity report One-touch speed dial list Coded speed dial list Group dial list User's data list Memory list TX (Transmission) report RX (Reception) report MULTI TX (Transmission) report Description Shows recent fax transactions ...
Quick Start Guide
Page 109
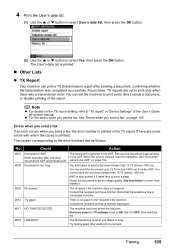
... list. (1) Use the { or } button to select User's data list, then press the OK button. (2) Use the { or } button to ON. Errors when ...select Yes, then press the OK button. There is also printed if it sends a document, or disable printing of the User's Guide on the TX report setting, refer to send a document longer than 15.75 inches / 400 mm. #003 is no...the document up to the error numbers are some errors with which the cause is connected correctly. #012 Try again. The User's data list is cleared, redo the operation. z For the errors when you send a fax, see "Errors when you...
... list. (1) Use the { or } button to select User's data list, then press the OK button. (2) Use the { or } button to ON. Errors when ...select Yes, then press the OK button. There is also printed if it sends a document, or disable printing of the User's Guide on the TX report setting, refer to send a document longer than 15.75 inches / 400 mm. #003 is no...the document up to the error numbers are some errors with which the cause is connected correctly. #012 Try again. The User's data list is cleared, redo the operation. z For the errors when you send a fax, see "Errors when you...
Quick Start Guide
Page 110
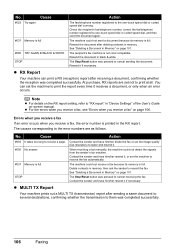
... set the image quality (fax resolution) to "RX report" in memory. You can print a RX (reception) report after deleting contents in "Device Settings" of the User's Guide on page 106. Note z For details on the RX report setting, refer to lower and resend it if necessary. z For the errors when you receive...
... set the image quality (fax resolution) to "RX report" in memory. You can print a RX (reception) report after deleting contents in "Device Settings" of the User's Guide on page 106. Note z For details on the RX report setting, refer to lower and resend it if necessary. z For the errors when you receive...


