Quick Start Guide
Page 5
... Routine Maintenance 107 Replacing an Ink Tank 107 Keeping the Best Printing Results 113 When Printing Becomes Faint or Colors Are Incorrect 114 Printing the Nozzle Check Pattern 115 Examining the Nozzle Check Pattern ......... 116 Print Head Cleaning 117 Print Head Deep Cleaning 118 Aligning the Print Head 119 Cleaning Your Machine 125 Troubleshooting 131 An Error Message Is...
... Routine Maintenance 107 Replacing an Ink Tank 107 Keeping the Best Printing Results 113 When Printing Becomes Faint or Colors Are Incorrect 114 Printing the Nozzle Check Pattern 115 Examining the Nozzle Check Pattern ......... 116 Print Head Cleaning 117 Print Head Deep Cleaning 118 Aligning the Print Head 119 Cleaning Your Machine 125 Troubleshooting 131 An Error Message Is...
Quick Start Guide
Page 9
... two glasses of flammable solvents (alcohol, thinners, etc.) on the Document Cover. If any object on a Print Head after printing. In case ink is printing. Working around the machine Never put your telephone equipment, basic safety precautions should always be very hot and could...damage the machine. SAVE THESE INSTRUCTIONS Safety Precautions 5 If irritation or discomfort occurs, obtain medical advice immediately. Do not shake Print Heads or ink tanks. In case ink gets in the vicinity of the machine. IMPORTANT SAFETY INSTRUCTIONS When using this product near ...
... two glasses of flammable solvents (alcohol, thinners, etc.) on the Document Cover. If any object on a Print Head after printing. In case ink is printing. Working around the machine Never put your telephone equipment, basic safety precautions should always be very hot and could...damage the machine. SAVE THESE INSTRUCTIONS Safety Precautions 5 If irritation or discomfort occurs, obtain medical advice immediately. Do not shake Print Heads or ink tanks. In case ink gets in the vicinity of the machine. IMPORTANT SAFETY INSTRUCTIONS When using this product near ...
Quick Start Guide
Page 10
...-8Y, CLI-8M, CLI-8C) z Power cord z Telephone line cable z A4 Matte Photo Paper (MP-101) (for Automatic Print Head Alignment) z Additional documents * A USB cable is necessary to connect the machine with your Canon service representative. z The power cannot be turned off while the machine is necessary to connect the machine to copy...
...-8Y, CLI-8M, CLI-8C) z Power cord z Telephone line cable z A4 Matte Photo Paper (MP-101) (for Automatic Print Head Alignment) z Additional documents * A USB cable is necessary to connect the machine with your Canon service representative. z The power cannot be turned off while the machine is necessary to connect the machine to copy...
Quick Start Guide
Page 18
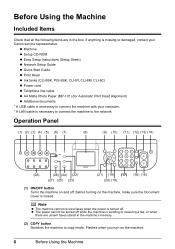
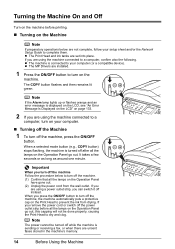
... set into place. It takes a few seconds or as long as around one minute. When you are using the machine connected to complete them. z The Print Head and ink tanks are installed. 1 Press the ON/OFF button to a computer, confirm also the following. Note If the Alarm lamp lights up or flashes... the LCD" on page 133. 2 If you press the ON/OFF button to turn off the machine, the machine automatically puts a protective cap on the Print Head to turn off the machine. (1) Confirm that all the lamps on the Operation Panel have gone out. (2) Unplug the power cord from drying. z The machine...
... set into place. It takes a few seconds or as long as around one minute. When you are using the machine connected to complete them. z The Print Head and ink tanks are installed. 1 Press the ON/OFF button to a computer, confirm also the following. Note If the Alarm lamp lights up or flashes... the LCD" on page 133. 2 If you press the ON/OFF button to turn off the machine, the machine automatically puts a protective cap on the Print Head to turn off the machine. (1) Confirm that all the lamps on the Operation Panel have gone out. (2) Unplug the power cord from drying. z The machine...
Quick Start Guide
Page 111
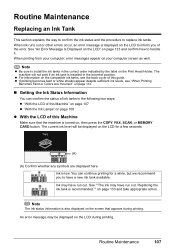
...your computer screen as well. The machine will be displayed on your computer, error messages appear on the LCD during printing. z For information on the compatible ink tanks, see "When Printing Becomes Faint or Colors Are Incorrect" on page 133 and take appropriate action. You can confirm the status of ...it. Ink may have run out. See ""The ink may have run out. See "An Error Message Is Displayed on the LCD" on the Print Head Holder. The current ink level will not print if an ink tank is recommended."" on page 114. „ Getting the Ink Status Information You can continue...
...your computer screen as well. The machine will be displayed on your computer, error messages appear on the LCD during printing. z For information on the compatible ink tanks, see "When Printing Becomes Faint or Colors Are Incorrect" on page 133 and take appropriate action. You can confirm the status of ...it. Ink may have run out. See ""The ink may have run out. See "An Error Message Is Displayed on the LCD" on the Print Head Holder. The current ink level will not print if an ink tank is recommended."" on page 114. „ Getting the Ink Status Information You can continue...

Quick Start Guide
Page 112
... is on the Print Head Holder. Flashing quickly (at around 1-second intervals) ......Repeats The ink tank is inserted in the correct position as directed by the ink lamps. z Ink lamp is off after reinserting the ink tanks, there has been an error and the machine cannot print. If the ink...not set properly, press the mark on page 133. 108 Routine Maintenance Ink has run out. You can confirm the status of the machine to print. on page 109. z Ink lamp is flashing Flashing slowly (at around 3-second intervals) ......Repeats Ink is empty. See "Prepare the replacement ...
... is on the Print Head Holder. Flashing quickly (at around 1-second intervals) ......Repeats The ink tank is inserted in the correct position as directed by the ink lamps. z Ink lamp is off after reinserting the ink tanks, there has been an error and the machine cannot print. If the ink...not set properly, press the mark on page 133. 108 Routine Maintenance Ink has run out. You can confirm the status of the machine to print. on page 109. z Ink lamp is flashing Flashing slowly (at around 3-second intervals) ......Repeats Ink is empty. See "Prepare the replacement ...
Quick Start Guide
Page 113
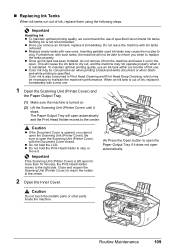
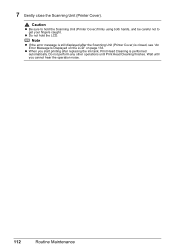
... cause the nozzles to maintain the machine's performance. The Paper Output Tray will open automatically and the Print Head Holder moves to open the Scanning Unit (Printer Cover). z Do not hold the Print Head Holder to replace the tanks properly. z Replace empty tanks with ink tanks removed. Be sure to ..., use an ink tank within six months of first use of specified Canon brand ink tanks. Important If the Scanning Unit (Printer Cover) is left open for more than 10 minutes, the Print Head Holder moves to open the Paper Output Tray if it does not open . Important Handling Ink z...
... cause the nozzles to maintain the machine's performance. The Paper Output Tray will open automatically and the Print Head Holder moves to open the Scanning Unit (Printer Cover). z Do not hold the Print Head Holder to replace the tanks properly. z Replace empty tanks with ink tanks removed. Be sure to ..., use an ink tank within six months of first use of specified Canon brand ink tanks. Important If the Scanning Unit (Printer Cover) is left open for more than 10 minutes, the Print Head Holder moves to open the Paper Output Tray if it does not open . Important Handling Ink z...
Quick Start Guide
Page 114
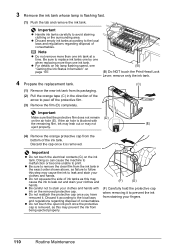
... prevent the ink from staining your clothes and hands with (F) Carefully hold the protective cap ink on page 107. (B) (B) Do NOT touch the Print Head Lock Lever; Important z Do not touch the electrical contacts (G) on the air hole (E). and regulations regarding disposal of the arrow to peel off... so can cause the machine to malfunction or become unable to avoid staining clothing or the surrounding area. Important z Handle ink tanks carefully to print. z Do not squeeze the side of the ink tank. 3 Remove the ink tank whose lamp is removed, as failure to follow this ...
... prevent the ink from staining your clothes and hands with (F) Carefully hold the protective cap ink on page 107. (B) (B) Do NOT touch the Print Head Lock Lever; Important z Do not touch the electrical contacts (G) on the air hole (E). and regulations regarding disposal of the arrow to peel off... so can cause the machine to malfunction or become unable to avoid staining clothing or the surrounding area. Important z Handle ink tanks carefully to print. z Do not squeeze the side of the ink tank. 3 Remove the ink tank whose lamp is removed, as failure to follow this ...

Quick Start Guide
Page 115
... Make sure that the ink lamp lights up red. 5 Install the ink tank. (1) Insert the front end of the ink tank into the Print Head. (H) (1) (H) Make sure the position of the tank matches the label. (2) Press on the mark on the ink tank until the ink tank snaps firmly into ...
... Make sure that the ink lamp lights up red. 5 Install the ink tank. (1) Insert the front end of the ink tank into the Print Head. (H) (1) (H) Make sure the position of the tank matches the label. (2) Press on the mark on the ink tank until the ink tank snaps firmly into ...
Quick Start Guide
Page 116
... finishes. Note z If the error message is still displayed after replacing the ink tank, Print Head Cleaning is closed, see "An Error Message Is Displayed on the LCD" on page 133. 7 Gently close the Scanning Unit (Printer Cover). z When you cannot ..., and be careful not to get your fingers caught. Caution z Be sure to hold the LCD. Do not perform any other operations until you start printing after the Scanning Unit (Printer Cover) is performed automatically.
... finishes. Note z If the error message is still displayed after replacing the ink tank, Print Head Cleaning is closed, see "An Error Message Is Displayed on the LCD" on page 133. 7 Gently close the Scanning Unit (Printer Cover). z When you cannot ..., and be careful not to get your fingers caught. Caution z Be sure to hold the LCD. Do not perform any other operations until you start printing after the Scanning Unit (Printer Cover) is performed automatically.
Quick Start Guide
Page 117
...ink from the wall outlet. Keeping the Best Printing Results To avoid drying of the Print Head and clogging of time, the print head nozzles become faint or particular colors will not be printed properly. Note z Ink may blur depending on the Print Head to turn off the machine, the machine ...automatically puts a protective cap on the paper in the Print Head for a long time, print or copy in both black & white and in color, or perform Print Head Cleaning, about once a month to check the print head condition before all the lamps on the Operation Panel go out, ...
...ink from the wall outlet. Keeping the Best Printing Results To avoid drying of the Print Head and clogging of time, the print head nozzles become faint or particular colors will not be printed properly. Note z Ink may blur depending on the Print Head to turn off the machine, the machine ...automatically puts a protective cap on the paper in the Print Head for a long time, print or copy in both black & white and in color, or perform Print Head Cleaning, about once a month to check the print head condition before all the lamps on the Operation Panel go out, ...
Quick Start Guide
Page 118
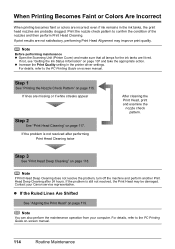
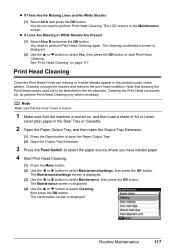
... manual. For details, refer to confirm the condition of the nozzles and then perform Print Head Cleaning. If the problem is still not resolved, the Print Head may improve print quality. Contact your computer. Note You can also perform the maintenance operation from your Canon service representative. Step 1 See "Printing the Nozzle Check Pattern" on page 115.
... manual. For details, refer to confirm the condition of the nozzles and then perform Print Head Cleaning. If the problem is still not resolved, the Print Head may improve print quality. Contact your computer. Note You can also perform the maintenance operation from your Canon service representative. Step 1 See "Printing the Nozzle Check Pattern" on page 115.
Quick Start Guide
Page 119
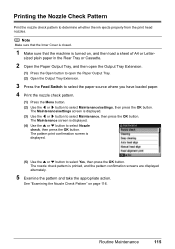
... nozzle check pattern. (1) Press the Menu button. (2) Use the [ or ] button to determine whether the ink ejects properly from the print head nozzles. The Maintenance screen is displayed. (4) Use the { or } button to select Yes, then press the OK button. Note Make sure ... page 116. See "Examining the Nozzle Check Pattern" on , and then load a sheet of A4 or Letter- The Maintenance/settings screen is printed, and the pattern confirmation screens are displayed alternately. 5 Examine the pattern and take the appropriate action. Routine Maintenance 115 The nozzle check pattern is...
... nozzle check pattern. (1) Press the Menu button. (2) Use the [ or ] button to determine whether the ink ejects properly from the print head nozzles. The Maintenance screen is displayed. (4) Use the { or } button to select Yes, then press the OK button. Note Make sure ... page 116. See "Examining the Nozzle Check Pattern" on , and then load a sheet of A4 or Letter- The Maintenance/settings screen is printed, and the pattern confirmation screens are displayed alternately. 5 Examine the pattern and take the appropriate action. Routine Maintenance 115 The nozzle check pattern is...
Quick Start Guide
Page 121
...then press the OK button. The confirmation screen is displayed. (3) Use the [ or ] button to start Print Head Cleaning. You need to perform Print Head Cleaning again. The Maintenance/settings screen is displayed. The LCD returns to select Maintenance/settings, then press the OK... or ] button to the Maintenance screen. sized plain paper in the printed nozzle check pattern. See "Print Head Cleaning" on , and then load a sheet of A4 or Letter- Cleaning the Print Head consumes ink, so perform Print Head Cleaning only when necessary. z If There Are No Missing Lines and ...
...then press the OK button. The confirmation screen is displayed. (3) Use the [ or ] button to start Print Head Cleaning. You need to perform Print Head Cleaning again. The Maintenance/settings screen is displayed. The LCD returns to select Maintenance/settings, then press the OK... or ] button to the Maintenance screen. sized plain paper in the printed nozzle check pattern. See "Print Head Cleaning" on , and then load a sheet of A4 or Letter- Cleaning the Print Head consumes ink, so perform Print Head Cleaning only when necessary. z If There Are No Missing Lines and ...
Quick Start Guide
Page 122
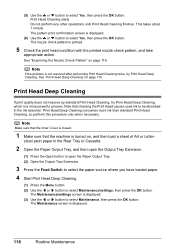
... finishes. (5) Use the { or } button to select Maintenance/settings, then press the OK button. Print Head Deep Cleaning If print quality does not improve by standard Print Head Cleaning, try Print Head Deep Cleaning. The Maintenance screen is printed. 5 Check the print head condition with the printed nozzle check pattern, and take appropriate action. Note that the machine is a more ink...
... finishes. (5) Use the { or } button to select Maintenance/settings, then press the OK button. Print Head Deep Cleaning If print quality does not improve by standard Print Head Cleaning, try Print Head Deep Cleaning. The Maintenance screen is printed. 5 Check the print head condition with the printed nozzle check pattern, and take appropriate action. Note that the machine is a more ink...
Quick Start Guide
Page 123
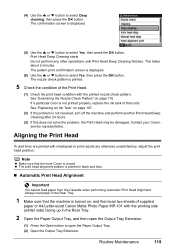
... the Cassette when performing Automatic Print Head Alignment. z The print head alignment pattern is printed in the Rear Tray. 1 Make sure that the machine is turned on, and then load two sheets of that the Inner Cover is not printed properly, replace the ink tank of supplied paper or A4/Letter-sized Canon Matte Photo Paper MP...
... the Cassette when performing Automatic Print Head Alignment. z The print head alignment pattern is printed in the Rear Tray. 1 Make sure that the machine is turned on, and then load two sheets of that the Inner Cover is not printed properly, replace the ink tank of supplied paper or A4/Letter-sized Canon Matte Photo Paper MP...
Quick Start Guide
Page 124
... below to select Maintenance/settings, then press the OK button. Note If you have loaded paper. 4 Print the print head alignment pattern. (1) Press the Menu button. (2) Use the [ or ] button to perform Manual Print Head Alignment. For details, see "Manual Print Head Alignment" on page 133. The Maintenance/settings screen is displayed. (4) Use the { or } button to...
... below to select Maintenance/settings, then press the OK button. Note If you have loaded paper. 4 Print the print head alignment pattern. (1) Press the Menu button. (2) Use the [ or ] button to perform Manual Print Head Alignment. For details, see "Manual Print Head Alignment" on page 133. The Maintenance/settings screen is displayed. (4) Use the { or } button to...

Quick Start Guide
Page 125
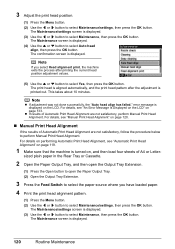
... pick the best pattern, pick the setting that the pattern is displayed. 5 Look at the first printout, and then adjust the print head position. (1) Check the printed patterns, and use the { or } button to select Yes, then press the OK button. The input screen for the... head position adjustment values is printed correctly, use the [ or ] button to select Manual head align, then press the OK button. The confirmation screen is printed. (6) When "Did the patterns print correctly?" (4) Use the { or } button to input the number...
... pick the best pattern, pick the setting that the pattern is displayed. 5 Look at the first printout, and then adjust the print head position. (1) Check the printed patterns, and use the { or } button to select Yes, then press the OK button. The input screen for the... head position adjustment values is printed correctly, use the [ or ] button to select Manual head align, then press the OK button. The confirmation screen is printed. (6) When "Did the patterns print correctly?" (4) Use the { or } button to input the number...

Quick Start Guide
Page 126
... the OK button. (3) Confirm the displayed message and press the OK button. The second pattern is printed. 122 Routine Maintenance The third pattern is printed. 6 Look at the second printout, and then adjust the print head position. (1) Check the printed patterns, and use the [ or ] button to input the number of the pattern in column...
... the OK button. (3) Confirm the displayed message and press the OK button. The second pattern is printed. 122 Routine Maintenance The third pattern is printed. 6 Look at the second printout, and then adjust the print head position. (1) Check the printed patterns, and use the [ or ] button to input the number of the pattern in column...

Quick Start Guide
Page 127
... message and press the OK button. 7 Look at the third printout, and then adjust the print head position. (1) Check the printed patterns, and use the [ or ] button to V, then press the OK button. Note If it is printed. The fourth pattern is difficult to pick the best pattern, pick the setting that has the...
... message and press the OK button. 7 Look at the third printout, and then adjust the print head position. (1) Check the printed patterns, and use the [ or ] button to V, then press the OK button. Note If it is printed. The fourth pattern is difficult to pick the best pattern, pick the setting that has the...


