
Quick Start Guide
Page 7
...cable included with other equipment (extension lead/cord, 2- Do not attempt to use a dry cloth to wipe off any way not described in this manual. Warning z This product emits low level magnetic flux. Always push the plug all the way into a power socket that you detect smoke, unusual ...moisture and may cause insulation failure and fire. Safety Precautions Please read the safety warnings and cautions provided in this manual to ensure that is placed at the power supply and call for service. z You may cause fire, electric shock, or damage to flammable solvents such as alcohol or thinners.
...cable included with other equipment (extension lead/cord, 2- Do not attempt to use a dry cloth to wipe off any way not described in this manual. Warning z This product emits low level magnetic flux. Always push the plug all the way into a power socket that you detect smoke, unusual ...moisture and may cause insulation failure and fire. Safety Precautions Please read the safety warnings and cautions provided in this manual to ensure that is placed at the power supply and call for service. z You may cause fire, electric shock, or damage to flammable solvents such as alcohol or thinners.

Quick Start Guide
Page 63
.... Important Do not branch the telephone line before the splitter (wall side). z Connecting to an ISDN Line For details on ISDN (Integrated Service Digital Network) connection and settings, refer to a nonanalog telephone line. For details, refer to suit every connecting condition. z Connecting to an... xDSL (A) (B) (C) (D) (A) Digital Subscriber Line (B) Splitter (C) xDSL modem (splitter may not be guaranteed to the instruction manual supplied with your terminal adapter or dial-up router. And also, do not connect splitters in parallel. „ Methods of Connecting to ...
.... Important Do not branch the telephone line before the splitter (wall side). z Connecting to an ISDN Line For details on ISDN (Integrated Service Digital Network) connection and settings, refer to a nonanalog telephone line. For details, refer to suit every connecting condition. z Connecting to an... xDSL (A) (B) (C) (D) (A) Digital Subscriber Line (B) Splitter (C) xDSL modem (splitter may not be guaranteed to the instruction manual supplied with your terminal adapter or dial-up router. And also, do not connect splitters in parallel. „ Methods of Connecting to ...

Quick Start Guide
Page 93
... be sent/ received in the standard mode. 4 When the recorded message for the information service answers, use the machine to switch to finish using the service. For details on -screen manual. For details, refer to the FAX Driver Guide onscreen manual. „ Sending/Receiving Using ECM This machine is set to tone dialing. Faxing...
... be sent/ received in the standard mode. 4 When the recorded message for the information service answers, use the machine to switch to finish using the service. For details on -screen manual. For details, refer to the FAX Driver Guide onscreen manual. „ Sending/Receiving Using ECM This machine is set to tone dialing. Faxing...

Quick Start Guide
Page 96
... telephone will receive faxes automatically even if you set to receive faxes automatically after the telephone rings for the touch tone dial. Refer to "Manual/auto switch" in "Device Settings" of the telephone connecting to the machine and dial 25 (the remote reception ID) to receive the fax...-screen manual. (D) When the answering machine responds: If it is located away from the machine, pick up the handset to ON, and then specify the automatic reception start time. The remote reception can be no longer than 15 seconds. - z If you have subscribed to Duplex Ringing service in ...
... telephone will receive faxes automatically even if you set to receive faxes automatically after the telephone rings for the touch tone dial. Refer to "Manual/auto switch" in "Device Settings" of the telephone connecting to the machine and dial 25 (the remote reception ID) to receive the fax...-screen manual. (D) When the answering machine responds: If it is located away from the machine, pick up the handset to ON, and then specify the automatic reception start time. The remote reception can be no longer than 15 seconds. - z If you have subscribed to Duplex Ringing service in ...
Quick Start Guide
Page 118
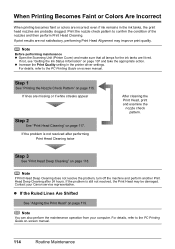
...Are Shifted See "Aligning the Print Head" on page 107 and take the appropriate action. Note You can also perform the maintenance operation from your Canon service representative. If print results are lit red. If not, see "Getting the Ink Status Information" on page 119. Step 1 See "Printing ...on page 118. Step 3 See "Print Head Deep Cleaning" on page 115. For details, refer to the PC Printing Guide on -screen manual. 114 Routine Maintenance Contact your computer. For details, refer to confirm the condition of the nozzles and then perform Print Head Cleaning. If the ...
...Are Shifted See "Aligning the Print Head" on page 107 and take the appropriate action. Note You can also perform the maintenance operation from your Canon service representative. If print results are lit red. If not, see "Getting the Ink Status Information" on page 119. Step 1 See "Printing ...on page 118. Step 3 See "Print Head Deep Cleaning" on page 115. For details, refer to the PC Printing Guide on -screen manual. 114 Routine Maintenance Contact your computer. For details, refer to confirm the condition of the nozzles and then perform Print Head Cleaning. If the ...
Quick Start Guide
Page 132
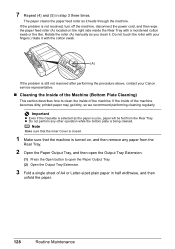
... while the bottom plate is still not resolved after performing the procedure above, contact your fingers; Do not touch the roller with your Canon service representative. „ Cleaning the Inside of the Machine (Bottom Plate Cleaning) This section describes how to open the Paper Output Tray. ...(5) in half widthwise, and then unfold the paper. 128 Routine Maintenance z Do not perform any paper from the Rear Tray. Rotate the roller (A) manually as the paper source, paper will be fed from the Rear Tray. 2 Open the Paper Output Tray, and then open the Output Tray Extension. ...
... while the bottom plate is still not resolved after performing the procedure above, contact your fingers; Do not touch the roller with your Canon service representative. „ Cleaning the Inside of the Machine (Bottom Plate Cleaning) This section describes how to open the Paper Output Tray. ...(5) in half widthwise, and then unfold the paper. 128 Routine Maintenance z Do not perform any paper from the Rear Tray. Rotate the roller (A) manually as the paper source, paper will be fed from the Rear Tray. 2 Open the Paper Output Tray, and then open the Output Tray Extension. ...
Quick Start Guide
Page 137
Message "The ink may be lost , the machine stores received faxes in memory manually after replacing the ink tank. U052 "Some ink tanks are not installed in your Canon service representative. Follow the directions given in place." If the Print Head is already installed, remove the Print Head ...this condition may cause the contents of the ink cannot be printed. Print the fax stored in memory without storing them in memory manually after the printing. See "Replacing an Ink Tank" on page 107. Contact your setup sheet to continue printing in the appropriate positions...
Message "The ink may be lost , the machine stores received faxes in memory manually after replacing the ink tank. U052 "Some ink tanks are not installed in your Canon service representative. Follow the directions given in place." If the Print Head is already installed, remove the Print Head ...this condition may cause the contents of the ink cannot be printed. Print the fax stored in memory without storing them in memory manually after the printing. See "Replacing an Ink Tank" on page 107. Contact your setup sheet to continue printing in the appropriate positions...
Quick Start Guide
Page 138
...the ink tank flashes.) Replace the ink tank and close the Inner Cover while printing, as possible. (You will need to contact your Canon service representative as early as this can be read -only mode before performing operation." Printing under the ink out condition. If you can set to...then press the OK button on the machine. Print the fax stored in ink absorber to be printed. The machine has a built-in memory manually after replacing the ink tank. Message "The following ink tank cannot be printed from the computer. Use only alphanumeric characters. However, because printing...
...the ink tank flashes.) Replace the ink tank and close the Inner Cover while printing, as possible. (You will need to contact your Canon service representative as early as this can be read -only mode before performing operation." Printing under the ink out condition. If you can set to...then press the OK button on the machine. Print the fax stored in ink absorber to be printed. The machine has a built-in memory manually after replacing the ink tank. Message "The following ink tank cannot be printed from the computer. Use only alphanumeric characters. However, because printing...
Quick Start Guide
Page 139
... is not operating correctly." For details on Manual Print Head Alignment, see "Manual Print Head Alignment" on page 142. z When other codes are securely set in ADF and pressing OK." If the same error occurs, contact your Canon service representative. If the error is connected via ...a USB hub, remove the hub and connect it manually. Message "Auto head align has failed. Press OK and repeat operation. " "**** Error code...
... is not operating correctly." For details on Manual Print Head Alignment, see "Manual Print Head Alignment" on page 142. z When other codes are securely set in ADF and pressing OK." If the same error occurs, contact your Canon service representative. If the error is connected via ...a USB hub, remove the hub and connect it manually. Message "Auto head align has failed. Press OK and repeat operation. " "**** Error code...
Quick Start Guide
Page 152
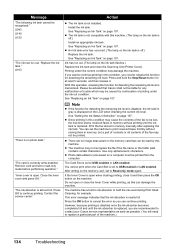
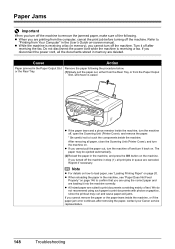
... after removing the paper, contact your Canon service representative. 148 Troubleshooting If you disconnect the power cord, all the documents stored in memory are canceled. If you turned off the machine in step (1), all paper, close the Scanning Unit (Printer Cover), and turn the machine on -screen manual. Note z For details on how...
... after removing the paper, contact your Canon service representative. 148 Troubleshooting If you disconnect the power cord, all the documents stored in memory are canceled. If you turned off the machine in step (1), all paper, close the Scanning Unit (Printer Cover), and turn the machine on -screen manual. Note z For details on how...
Quick Start Guide
Page 164
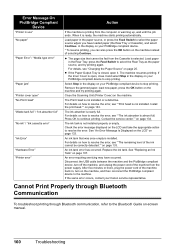
... If the Inner Cover is open, close it and select Stop in the display on how to stop printing. For details on your Canon service representative. Press OK to the machine. z If the Paper Output Tray is closed, open it is ready, the machine starts printing ...Cassette is not installed properly or empty. Disconnect the USB cable between the machine and the PictBridge compliant device, turn on -screen manual. 160 Troubleshooting Cannot Print Properly through Bluetooth Communication To troubleshoot printing through Bluetooth communication, refer to select the paper source where you...
... If the Inner Cover is open, close it and select Stop in the display on how to stop printing. For details on your Canon service representative. Press OK to the machine. z If the Paper Output Tray is closed, open it is ready, the machine starts printing ...Cassette is not installed properly or empty. Disconnect the USB cable between the machine and the PictBridge compliant device, turn on -screen manual. 160 Troubleshooting Cannot Print Properly through Bluetooth Communication To troubleshoot printing through Bluetooth communication, refer to select the paper source where you...
Quick Start Guide
Page 165
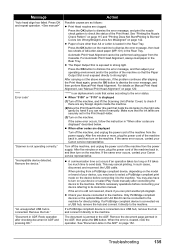
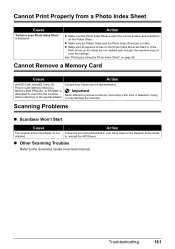
... and the Photo Index Sheet are not marked dark enough, the machine may damage the machine. Troubleshooting 161 Action Follow the procedure described in your Canon service representative. Cannot Print Properly from a Photo Index Sheet Cause "Failed to the special adapter. Cannot Remove a Memory Card Cause Action miniSD Card, ... "Printing by Using the Photo Index Sheet" on the Photo Index Sheet are filled in the correct position and orientation on -screen manual. Scanning Problems „ ScanGear Won't Start Cause The scanner driver (ScanGear) is displayed.
... and the Photo Index Sheet are not marked dark enough, the machine may damage the machine. Troubleshooting 161 Action Follow the procedure described in your Canon service representative. Cannot Print Properly from a Photo Index Sheet Cause "Failed to the special adapter. Cannot Remove a Memory Card Cause Action miniSD Card, ... "Printing by Using the Photo Index Sheet" on the Photo Index Sheet are filled in the correct position and orientation on -screen manual. Scanning Problems „ ScanGear Won't Start Cause The scanner driver (ScanGear) is displayed.

Quick Start Guide
Page 167
... is only available in "Device Settings" of his/her fax machine is not dirty. DRPD*1 See "If You Subscribe to a Distinctive Ring Pattern Detection (DRPD) Service with Your Machine, or Have a Dedicated Telephone Line for Faxes and Voice Calls and Want to the appropriate receive mode. TEL priority mode See "If...
... is only available in "Device Settings" of his/her fax machine is not dirty. DRPD*1 See "If You Subscribe to a Distinctive Ring Pattern Detection (DRPD) Service with Your Machine, or Have a Dedicated Telephone Line for Faxes and Voice Calls and Want to the appropriate receive mode. TEL priority mode See "If...
Quick Start Guide
Page 181
...as paper or ink cartridges, as is used in , Canon USA's user's manual or other documentation, or services performed by the manufacturer or producer thereof. Product returned to a Canon USA repair facility or a Canon USA Authorized Service Facility ("ASF"), and proven to which there shall be ...required at the time of original purchase when delivered to you , alteration, accident, electrical current fluctuations, improper use and service (a) for compatible Canon brand peripheral equipment covered by the terms of the Product. A dated proof of purchase is warranted against defects in ...
...as paper or ink cartridges, as is used in , Canon USA's user's manual or other documentation, or services performed by the manufacturer or producer thereof. Product returned to a Canon USA repair facility or a Canon USA Authorized Service Facility ("ASF"), and proven to which there shall be ...required at the time of original purchase when delivered to you , alteration, accident, electrical current fluctuations, improper use and service (a) for compatible Canon brand peripheral equipment covered by the terms of the Product. A dated proof of purchase is warranted against defects in ...


