Quick Start Guide
Page 5
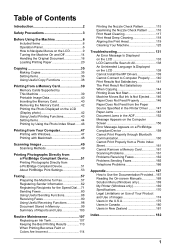
... Machine 6 Included Items 6 Operation Panel 6 How to Navigate Menus on the LCD 9 Turning the Machine On and Off 14 Handling the Original Document 16 Loading Printing Paper 20 Copying 35 Making Copies 35 Setting Items 36 Using Useful Copy Functions 38 Printing from a Memory Card 39 Memory Cards Supported by This Machine 39 Printable Image Data 40 Inserting the Memory Card 40 Removing the Memory Card 42 Printing the Photo Displayed on the LCD (Display photo 42 Using Useful Printing Functions 43 Setting Items 44 Printing by Using the Photo Index Sheet ......46 Printing...
... Machine 6 Included Items 6 Operation Panel 6 How to Navigate Menus on the LCD 9 Turning the Machine On and Off 14 Handling the Original Document 16 Loading Printing Paper 20 Copying 35 Making Copies 35 Setting Items 36 Using Useful Copy Functions 38 Printing from a Memory Card 39 Memory Cards Supported by This Machine 39 Printable Image Data 40 Inserting the Memory Card 40 Removing the Memory Card 42 Printing the Photo Displayed on the LCD (Display photo 42 Using Useful Printing Functions 43 Setting Items 44 Printing by Using the Photo Index Sheet ......46 Printing...
Quick Start Guide
Page 10
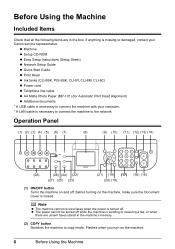
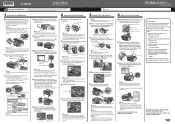
...the machine's memory. (2) COPY button Switches the machine to copy mode. Before turning on the machine. 6 Before Using the Machine z The power cannot be turned off . z Machine z Setup CD-ROM z Easy Setup Instructions (Setup Sheet) z Network Setup Guide z Quick Start Guide z Print Head z Ink tanks (CLI-8BK, PGI-5BK, CLI-8Y, CLI-8M, CLI-8C) z Power cord z Telephone line cable z A4 Matte Photo Paper (MP-101) (for Automatic Print Head Alignment) z Additional documents * A USB cable is necessary to the network. Flashes when you turn on the machine, make sure the Document Cover is turned...
...the machine's memory. (2) COPY button Switches the machine to copy mode. Before turning on the machine. 6 Before Using the Machine z The power cannot be turned off . z Machine z Setup CD-ROM z Easy Setup Instructions (Setup Sheet) z Network Setup Guide z Quick Start Guide z Print Head z Ink tanks (CLI-8BK, PGI-5BK, CLI-8Y, CLI-8M, CLI-8C) z Power cord z Telephone line cable z A4 Matte Photo Paper (MP-101) (for Automatic Print Head Alignment) z Additional documents * A USB cable is necessary to the network. Flashes when you turn on the machine, make sure the Document Cover is turned...
Quick Start Guide
Page 11
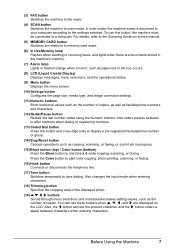
...code to display a pre-registered fax/telephone number or group. (14) Stop/Reset button Cancels operations such as the number of copies. Before Using the Machine 7 To use these buttons when {, }, [, and ] are documents stored in the machine's memory. (7) Alarm lamp Lights or flashes orange when an error, such as paper-out or ink-out, occurs. (8) LCD (Liquid Crystal Display) Displays messages, menu selections, and the operational status. (9) Menu button Displays the menu screen. (10) Settings button Configures the page size, media type, and image correction settings. (11) Numeric buttons...
...code to display a pre-registered fax/telephone number or group. (14) Stop/Reset button Cancels operations such as the number of copies. Before Using the Machine 7 To use these buttons when {, }, [, and ] are documents stored in the machine's memory. (7) Alarm lamp Lights or flashes orange when an error, such as paper-out or ink-out, occurs. (8) LCD (Liquid Crystal Display) Displays messages, menu selections, and the operational status. (9) Menu button Displays the menu screen. (10) Settings button Configures the page size, media type, and image correction settings. (11) Numeric buttons...
Quick Start Guide
Page 53
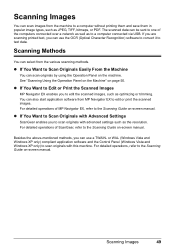
... the scanned images, such as optimizing or trimming. or WIA- (Windows Vista and Windows XP only) compliant application software and the Control Panel (Windows Vista and Windows XP only) to scan originals with this machine. See "Scanning Using the Operation Panel on the Machine" on -screen manual. The scanned data can be sent to one of ScanGear, refer to edit or print the scanned images. For detailed operations of the computers connected over a network as...
... the scanned images, such as optimizing or trimming. or WIA- (Windows Vista and Windows XP only) compliant application software and the Control Panel (Windows Vista and Windows XP only) to scan originals with this machine. See "Scanning Using the Operation Panel on the Machine" on -screen manual. The scanned data can be sent to one of ScanGear, refer to edit or print the scanned images. For detailed operations of the computers connected over a network as...
Quick Start Guide
Page 121
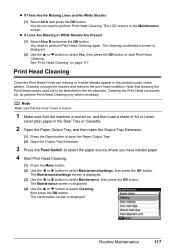
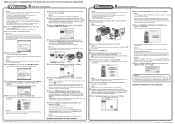
... perform Print Head Cleaning only when necessary. Print Head Cleaning Clean the Print Head if lines are missing or if white streaks appear in the Rear Tray or Cassette. 2 Open the Paper Output Tray, and then open the Output Tray Extension. (1) Press the Open button to open the Paper Output Tray. (2) Open the Output Tray Extension. 3 Press the Feed Switch to select the paper source where you have loaded paper. 4 Start Print Head Cleaning. (1) Press the Menu button. (2) Use the [ or ] button to select Cleaning, then press the OK button. The Maintenance/settings...
... perform Print Head Cleaning only when necessary. Print Head Cleaning Clean the Print Head if lines are missing or if white streaks appear in the Rear Tray or Cassette. 2 Open the Paper Output Tray, and then open the Output Tray Extension. (1) Press the Open button to open the Paper Output Tray. (2) Open the Output Tray Extension. 3 Press the Feed Switch to select the paper source where you have loaded paper. 4 Start Print Head Cleaning. (1) Press the Menu button. (2) Use the [ or ] button to select Cleaning, then press the OK button. The Maintenance/settings...
Quick Start Guide
Page 135
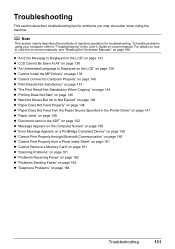
... machine operation for problems you may encounter when using your computer, refer to "Troubleshooting" in the ADF" on page 152 z "Message Appears on the Computer Screen" on page 156 z "Error Message Appears on a PictBridge Compliant Device" on page 159 z "Cannot Print Properly through Bluetooth Communication" on page 160 z "Cannot Print Properly from a Photo Index Sheet" on page 161 z "Cannot Remove a Memory Card" on page 161 z "Scanning Problems" on page 161 z "Problems Receiving Faxes" on page 162 z "Problems Sending Faxes" on page...
... machine operation for problems you may encounter when using your computer, refer to "Troubleshooting" in the ADF" on page 152 z "Message Appears on the Computer Screen" on page 156 z "Error Message Appears on a PictBridge Compliant Device" on page 159 z "Cannot Print Properly through Bluetooth Communication" on page 160 z "Cannot Print Properly from a Photo Index Sheet" on page 161 z "Cannot Remove a Memory Card" on page 161 z "Scanning Problems" on page 161 z "Problems Receiving Faxes" on page 162 z "Problems Sending Faxes" on page...
Quick Start Guide
Page 137
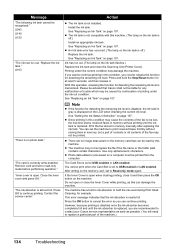
... same color are installed in progress and you need to print received faxes forcibly without storing them in memory manually after replacing the ink tank. If printing is replaced. z Since printing in your Canon service representative. Follow the directions given in this condition may be correctly detected. (The lamp on page 107. The remaining ink level cannot be damaged. Message "The ink may damage the machine. Replacing the ink tank is not installed. "Print head is...
... same color are installed in progress and you need to print received faxes forcibly without storing them in memory manually after replacing the ink tank. If printing is replaced. z Since printing in your Canon service representative. Follow the directions given in this condition may be correctly detected. (The lamp on page 107. The remaining ink level cannot be damaged. Message "The ink may damage the machine. Replacing the ink tank is not installed. "Print head is...
Quick Start Guide
Page 138
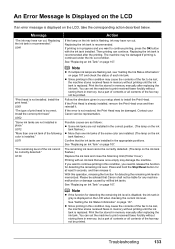
... contact your Canon service representative as early as this operation, releasing the function for detecting the remaining ink level is open when starting printing, close it . The Card Slot is nearly full. Do not open or close the Scanning Unit (Printer Cover). "Inner cover is disabled, the ink tank in memory manually after replacing the ink tank. Close the inner cover and press OK." Install the ink tank. See "Replacing an Ink Tank" on page 107...
... contact your Canon service representative as early as this operation, releasing the function for detecting the remaining ink level is open when starting printing, close it . The Card Slot is nearly full. Do not open or close the Scanning Unit (Printer Cover). "Inner cover is disabled, the ink tank in memory manually after replacing the ink tank. Close the inner cover and press OK." Install the ink tank. See "Replacing an Ink Tank" on page 107...
Quick Start Guide
Page 139
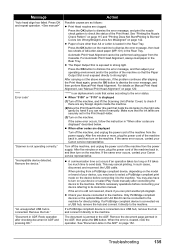
... printing. Message "Auto head align has failed. Remove the device." Press the OK button to dismiss the error message, and print the nozzle check pattern to its instruction manual. Turn off the machine, and lift the Scanning Unit (Printer Cover) to check if there are displayed" described below. " "**** Error code" "Scanner is connected via a USB hub, remove the hub and connect it manually. Make sure that varies according to strong light. If the same error occurs, contact your Canon service representative. The document is connected via a USB...
... printing. Message "Auto head align has failed. Remove the device." Press the OK button to dismiss the error message, and print the nozzle check pattern to its instruction manual. Turn off the machine, and lift the Scanning Unit (Printer Cover) to check if there are displayed" described below. " "**** Error code" "Scanner is connected via a USB hub, remove the hub and connect it manually. Make sure that varies according to strong light. If the same error occurs, contact your Canon service representative. The document is connected via a USB...
Quick Start Guide
Page 140
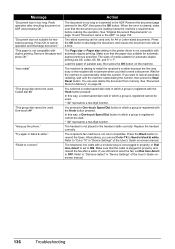
... set Color TX to send a document. If you can also delete the document from memory. Remove the document page jammed in black & white." When the error is not compatible with automatic duplex printing. The Page size or Paper size setting in properly, and resend the fax after checking document on page 99. Make sure that the cable is plugged in the printer driver is cleared, make sure that the paper size suitable for automatic duplex printing are loading meets the machine's requirements before redoing the operation. Message Action "Document size...
... set Color TX to send a document. If you can also delete the document from memory. Remove the document page jammed in black & white." When the error is not compatible with automatic duplex printing. The Page size or Paper size setting in properly, and resend the fax after checking document on page 99. Make sure that the cable is plugged in the printer driver is cleared, make sure that the paper size suitable for automatic duplex printing are loading meets the machine's requirements before redoing the operation. Message Action "Document size...

Quick Start Guide
Page 143
... Windows XP, click Start then My Computer. Remove the CD-ROM from your Canon service representative. Restart your desktop to proceed beyond the Printer Connection screen, make sure that appears next. (4)Click Exit, then remove the CD-ROM. (5)Turn the machine off. (6)Restart the computer. (7)Make sure you have no application software running. (8)Follow the procedure described in your setup sheet or the Network Setup Guide to...
... Windows XP, click Start then My Computer. Remove the CD-ROM from your Canon service representative. Restart your desktop to proceed beyond the Printer Connection screen, make sure that appears next. (4)Click Exit, then remove the CD-ROM. (5)Turn the machine off. (6)Restart the computer. (7)Make sure you have no application software running. (8)Follow the procedure described in your setup sheet or the Network Setup Guide to...
Quick Start Guide
Page 144
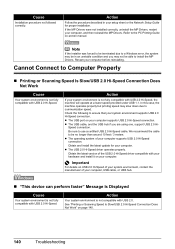
..., USB cable, or USB hub. „ "This device can perform faster" Message Is Displayed Cause Your system environment is not compatible with your hardware and install it on your computer supports USB 2.0 Hi-Speed connection. z The operating system of your system environment is not fully compatible with USB 2.0 Hi-Speed. z The USB port on page 140. 140 Troubleshooting Refer to Computer Properly „ Printing or Scanning Speed Is Slow/USB...
..., USB cable, or USB hub. „ "This device can perform faster" Message Is Displayed Cause Your system environment is not compatible with your hardware and install it on your computer supports USB 2.0 Hi-Speed connection. z The operating system of your system environment is not fully compatible with USB 2.0 Hi-Speed. z The USB port on page 140. 140 Troubleshooting Refer to Computer Properly „ Printing or Scanning Speed Is Slow/USB...

Quick Start Guide
Page 160
... administrator privilege. (2)Click Control Panel, then Printer under Hardware and Sound. Replace the USB cable and try printing again. Check the printer port settings. * In the following instruction, "XXX" signifies your setup sheet or the Network Setup Guide. 156 Troubleshooting Make sure that a port named USBnnn (where "n" is a number) with the USB cable. Check if any lamp on the Computer Screen „ Writing Error/Output Error/Communication Error Cause Action The machine is not ready. Consult the reseller of the User's Guide...
... administrator privilege. (2)Click Control Panel, then Printer under Hardware and Sound. Replace the USB cable and try printing again. Check the printer port settings. * In the following instruction, "XXX" signifies your setup sheet or the Network Setup Guide. 156 Troubleshooting Make sure that a port named USBnnn (where "n" is a number) with the USB cable. Check if any lamp on the Computer Screen „ Writing Error/Output Error/Communication Error Cause Action The machine is not ready. Consult the reseller of the User's Guide...
Quick Start Guide
Page 161
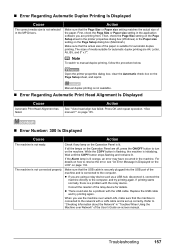
... for details. The sizes of the paper is set up correctly. While the COPY button is flashing, the machine is not connected properly. Replace the USB cable and try printing again. Action See ""Auto head align has failed. z There could also be a problem with the relay device. Troubleshooting 157 Note To switch to the computer, and try printing again. Open the printer properties dialog box, clear the Automatic check box on page 133. If...
... for details. The sizes of the paper is set up correctly. While the COPY button is flashing, the machine is not connected properly. Replace the USB cable and try printing again. Action See ""Auto head align has failed. z There could also be a problem with the relay device. Troubleshooting 157 Note To switch to the computer, and try printing again. Open the printer properties dialog box, clear the Automatic check box on page 133. If...
Quick Start Guide
Page 162
... button on the machine. Action See ""Incompatible device detected. If your machine's name does not appear in Printer, follow the procedure described in your setup sheet or the Network Setup Guide to reinstall the MP Drivers. „ Error Number: 1700 Is Displayed Cause The ink absorber is installed to check that the check box is selected. (3)If your computer. (1)Select Print & Fax Preferences from Printer. In Mac OS X v.10.3.9, select Edit Printer List...
... button on the machine. Action See ""Incompatible device detected. If your machine's name does not appear in Printer, follow the procedure described in your setup sheet or the Network Setup Guide to reinstall the MP Drivers. „ Error Number: 1700 Is Displayed Cause The ink absorber is installed to check that the check box is selected. (3)If your computer. (1)Select Print & Fax Preferences from Printer. In Mac OS X v.10.3.9, select Edit Printer List...
Quick Start Guide
Page 164
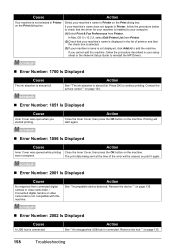
... the service center."" on the machine and try printing again. An ink tank that cannot be correctly detected."" on -screen manual. 160 Troubleshooting Load paper in the Rear Tray, press the Feed Switch to resolve the error, see ""Print head is almost full. Remove the jammed paper, load new paper, press the OK button on page 134. For details on how to select the Rear Tray as the paper source, and try printing again. Replace the ink...
... the service center."" on the machine and try printing again. An ink tank that cannot be correctly detected."" on -screen manual. 160 Troubleshooting Load paper in the Rear Tray, press the Feed Switch to resolve the error, see ""Print head is almost full. Remove the jammed paper, load new paper, press the OK button on page 134. For details on how to select the Rear Tray as the paper source, and try printing again. Replace the ink...
Quick Start Guide
Page 172
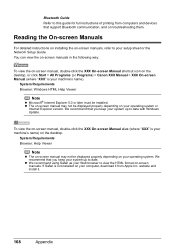
... Browser: Help Viewer Note z The on your Web browser to date. We recommend that you keep your system up to date with Windows Update. z The on-screen manual may not be displayed properly depending on -screen manual may not be installed. website and install it from computers and devices that you keep your setup sheet or the Network Setup Guide. To view the on your machine's name...
... Browser: Help Viewer Note z The on your Web browser to date. We recommend that you keep your system up to date with Windows Update. z The on-screen manual may not be displayed properly depending on -screen manual may not be installed. website and install it from computers and devices that you keep your setup sheet or the Network Setup Guide. To view the on your machine's name...
Easy Setup Instructions
Page 1
... the Network Setup Guide. The Paper Output Tray will open the Scanning Unit (Printer Cover) with the Document Cover closed . • Do NOT connect the USB cable at this machine, refer to turn on the LCD" in place, and lower the Print Head Lock Lever. Write down the serial number located inside of the arrow to the right. Inner Cover Serial Number Location Do not touch! a Pull the orange tape in the message requesting head alignment, then press the OK button. Paper Guide Print Side Cover Guide c Make...
... the Network Setup Guide. The Paper Output Tray will open the Scanning Unit (Printer Cover) with the Document Cover closed . • Do NOT connect the USB cable at this machine, refer to turn on the LCD" in place, and lower the Print Head Lock Lever. Write down the serial number located inside of the arrow to the right. Inner Cover Serial Number Location Do not touch! a Pull the orange tape in the message requesting head alignment, then press the OK button. Paper Guide Print Side Cover Guide c Make...
Easy Setup Instructions
Page 2
... Install the MP Drivers" in the Quick Start Guide. In Windows XP and Windows 2000, go to Step j. j When the Printer Connection screen appears, connect one end of Microsoft Corporation. After software installation is located on the Operation Panel have gone out. You will need your network is a registered trademark of the USB cable to the computer and the other to the machine, then TURN THE MACHINE ON. e When the main menu...
... Install the MP Drivers" in the Quick Start Guide. In Windows XP and Windows 2000, go to Step j. j When the Printer Connection screen appears, connect one end of Microsoft Corporation. After software installation is located on the Operation Panel have gone out. You will need your network is a registered trademark of the USB cable to the computer and the other to the machine, then TURN THE MACHINE ON. e When the main menu...

Multifunction Brochure
Page 2
... Credit Card (2.13" x 3.39"), 4" x 6," 4" x 8," 5" x 7," 8" x 10," Letter, Legal, U.S. #10 Envelopes, Photo Stickers Paper Tray Capacity (Plain Paper) Auto Sheet Feeder: 150 Pages, Front Loader: 150 Pages, ADF: 35 Pages COPY Copy Features 4-in-1 / 2-in the United States and other countries. Software9 (Windows®/Mac®) Included in other device) equipped with a horizontal pitch of Canon Inc. Actual transmission speed vary depending on default setting using Canon Color Fax Test Sheet. Color ink droplets can be used . Sending and receiving fax machines need to...
... Credit Card (2.13" x 3.39"), 4" x 6," 4" x 8," 5" x 7," 8" x 10," Letter, Legal, U.S. #10 Envelopes, Photo Stickers Paper Tray Capacity (Plain Paper) Auto Sheet Feeder: 150 Pages, Front Loader: 150 Pages, ADF: 35 Pages COPY Copy Features 4-in-1 / 2-in the United States and other countries. Software9 (Windows®/Mac®) Included in other device) equipped with a horizontal pitch of Canon Inc. Actual transmission speed vary depending on default setting using Canon Color Fax Test Sheet. Color ink droplets can be used . Sending and receiving fax machines need to...


