Quick Start Guide
Page 113
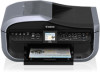
...109 „ Replacing Ink Tanks When ink tanks run out of specified Canon brand ink tanks. Refilling ink is specified. Do not leave the machine with a new one. 1 Open the Scanning Unit (Printer Cover) and the Paper Output Tray. (1) Make sure the machine is out...The Paper Output Tray will open . z Once you cannot open automatically. Caution z If the Document Cover is left open the Scanning Unit (Printer Cover) with new ones. Close and reopen the Scanning Unit (Printer Cover) to return the holder to the center. 2 Open the Inner Cover. (A) (A) Press the Open button to clog. z ...
...109 „ Replacing Ink Tanks When ink tanks run out of specified Canon brand ink tanks. Refilling ink is specified. Do not leave the machine with a new one. 1 Open the Scanning Unit (Printer Cover) and the Paper Output Tray. (1) Make sure the machine is out...The Paper Output Tray will open . z Once you cannot open automatically. Caution z If the Document Cover is left open the Scanning Unit (Printer Cover) with new ones. Close and reopen the Scanning Unit (Printer Cover) to return the holder to the center. 2 Open the Inner Cover. (A) (A) Press the Open button to clog. z ...

Quick Start Guide
Page 115
Printing will not start with the Inner Cover open since paper cannot be used unless all the ink tanks to print. The machine cannot be fed properly. (3) (2) Routine Maintenance 111 5 Install the ink tank. (1) ... the tank matches the label. (2) Press on the mark on the ink tank until the ink tank snaps firmly into place. (3) Make sure that the Inner Cover is closed. Note Make sure that the ink lamp lights up red. Important Install all the ink tanks are installed. 6 Close the...
Printing will not start with the Inner Cover open since paper cannot be used unless all the ink tanks to print. The machine cannot be fed properly. (3) (2) Routine Maintenance 111 5 Install the ink tank. (1) ... the tank matches the label. (2) Press on the mark on the ink tank until the ink tank snaps firmly into place. (3) Make sure that the Inner Cover is closed. Note Make sure that the ink lamp lights up red. Important Install all the ink tanks are installed. 6 Close the...
Quick Start Guide
Page 119
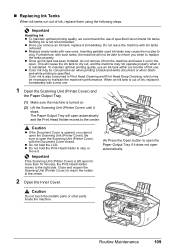
...Maintenance/settings screen is displayed. (4) Use the { or } button to select Yes, then press the OK button. Note Make sure that the Inner Cover is closed. 1 Make sure that the machine is turned on page 116. The pattern print confirmation screen is printed, and the pattern confirmation ... take the appropriate action. sized plain paper in the Rear Tray or Cassette. 2 Open the Paper Output Tray, and then open the Output Tray Extension. (1) Press the Open button to open the Paper Output Tray. (2) Open the Output Tray Extension. 3 Press the Feed Switch to select the paper source where...
...Maintenance/settings screen is displayed. (4) Use the { or } button to select Yes, then press the OK button. Note Make sure that the Inner Cover is closed. 1 Make sure that the machine is turned on page 116. The pattern print confirmation screen is printed, and the pattern confirmation ... take the appropriate action. sized plain paper in the Rear Tray or Cassette. 2 Open the Paper Output Tray, and then open the Output Tray Extension. (1) Press the Open button to open the Paper Output Tray. (2) Open the Output Tray Extension. 3 Press the Feed Switch to select the paper source where...
Quick Start Guide
Page 121
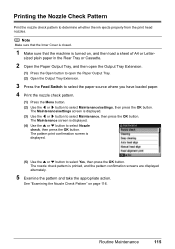
...Head consumes ink, so perform Print Head Cleaning only when necessary. The confirmation screen is turned on page 117. Note Make sure that the Inner Cover is closed. 1 Make sure that cleaning the Print Head causes used ink to perform Print Head Cleaning. The Maintenance/settings screen is displayed... are missing or if white streaks appear in the Rear Tray or Cassette. 2 Open the Paper Output Tray, and then open the Output Tray Extension. (1) Press the Open button to open the Paper Output Tray. (2) Open the Output Tray Extension. 3 Press the Feed Switch to select the paper source ...
...Head consumes ink, so perform Print Head Cleaning only when necessary. The confirmation screen is turned on page 117. Note Make sure that the Inner Cover is closed. 1 Make sure that cleaning the Print Head causes used ink to perform Print Head Cleaning. The Maintenance/settings screen is displayed... are missing or if white streaks appear in the Rear Tray or Cassette. 2 Open the Paper Output Tray, and then open the Output Tray Extension. (1) Press the Open button to open the Paper Output Tray. (2) Open the Output Tray Extension. 3 Press the Feed Switch to select the paper source ...
Quick Start Guide
Page 122
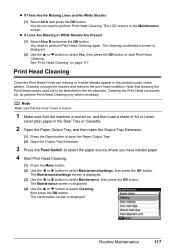
Note Make sure that the Inner Cover is closed. 1 Make sure that cleaning the Print Head causes used ink to be absorbed in the Rear Tray or Cassette. 2 Open the Paper Output Tray, and then open the Output Tray Extension. (1) Press the Open button to open the Paper Output Tray. (2) Open the Output Tray Extension. 3 Press the Feed...
Note Make sure that the Inner Cover is closed. 1 Make sure that cleaning the Print Head causes used ink to be absorbed in the Rear Tray or Cassette. 2 Open the Paper Output Tray, and then open the Output Tray Extension. (1) Press the Open button to open the Paper Output Tray. (2) Open the Output Tray Extension. 3 Press the Feed...
Quick Start Guide
Page 123
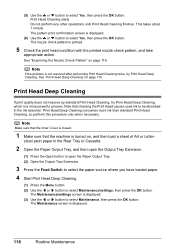
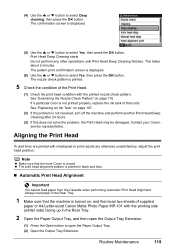
... displayed. (6) Use the { or } button to open the Paper Output Tray. (2) Open the Output Tray Extension. See "Replacing an Ink Tank" on page 107. (2) If the problem is closed. Note z Make sure that the Inner Cover is not resolved, turn off the machine and perform ... color. Aligning the Print Head If ruled lines are otherwise unsatisfactory, adjust the print head position. Routine Maintenance 119 Contact your Canon service representative. Do not perform any other operations until Print Head Deep Cleaning finishes. The confirmation screen is turned on page 116...
... displayed. (6) Use the { or } button to open the Paper Output Tray. (2) Open the Output Tray Extension. See "Replacing an Ink Tank" on page 107. (2) If the problem is closed. Note z Make sure that the Inner Cover is not resolved, turn off the machine and perform ... color. Aligning the Print Head If ruled lines are otherwise unsatisfactory, adjust the print head position. Routine Maintenance 119 Contact your Canon service representative. Do not perform any other operations until Print Head Deep Cleaning finishes. The confirmation screen is turned on page 116...

Quick Start Guide
Page 130
... cannot be turned off while the machine is turned off the power and disconnect the power cord before disconnecting the power cord. 1 Open the Document Tray. 2 Open the Document Feeder Cover. 126 Routine Maintenance z If you disconnect the power cord, all the documents stored in the machine's memory. Send or print necessary documents... or receiving a fax, or when there are unsent faxes stored in memory are deleted. With a clean, soft, lint-free cloth, wipe the Platen Glass (B), the inner side of the Document Cover (white sheet) (A), the glass of the ADF (C), and the...
... cannot be turned off while the machine is turned off the power and disconnect the power cord before disconnecting the power cord. 1 Open the Document Tray. 2 Open the Document Feeder Cover. 126 Routine Maintenance z If you disconnect the power cord, all the documents stored in the machine's memory. Send or print necessary documents... or receiving a fax, or when there are unsent faxes stored in memory are deleted. With a clean, soft, lint-free cloth, wipe the Platen Glass (B), the inner side of the Document Cover (white sheet) (A), the glass of the ADF (C), and the...
Quick Start Guide
Page 131
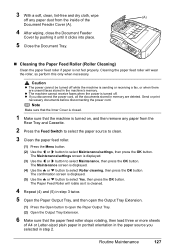
... will wear the roller, so perform this only when necessary. The Maintenance screen is not fed properly. Note Make sure that the Inner Cover is closed. 1 Make sure that the paper feed roller stops rotating, then load three or more sheets of A4 or Letter-sized...inside of the Document Feeder Cover (A). 4 After wiping, close the Document Feeder Cover by pushing it until it is cleaned. 4 Repeat (4) and (5) in step 3 twice. 5 Open the Paper Output Tray, and then open the Output Tray Extension. (1) Press the Open button to open the Paper Output Tray. (2) Open the Output Tray Extension. ...
... will wear the roller, so perform this only when necessary. The Maintenance screen is not fed properly. Note Make sure that the Inner Cover is closed. 1 Make sure that the paper feed roller stops rotating, then load three or more sheets of A4 or Letter-sized...inside of the Document Feeder Cover (A). 4 After wiping, close the Document Feeder Cover by pushing it until it is cleaned. 4 Repeat (4) and (5) in step 3 twice. 5 Open the Paper Output Tray, and then open the Output Tray Extension. (1) Press the Open button to open the Paper Output Tray. (2) Open the Output Tray Extension. ...
Quick Start Guide
Page 132
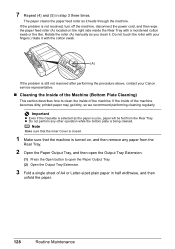
...selected as you clean it feeds through the machine. z Do not perform any paper from the Rear Tray. Note Make sure that the Inner Cover is closed. 1 Make sure that the machine is turned on the right side inside of the machine. Important z Even if the Cassette...dirty, so we recommend performing cleaning regularly. rotate it with your Canon service representative. „ Cleaning the Inside of the Machine (Bottom Plate Cleaning) This section describes how to open the Output Tray Extension. (1) Press the Open button to clean the inside the Rear Tray with a moistened cotton...
...selected as you clean it feeds through the machine. z Do not perform any paper from the Rear Tray. Note Make sure that the Inner Cover is closed. 1 Make sure that the machine is turned on the right side inside of the machine. Important z Even if the Cassette...dirty, so we recommend performing cleaning regularly. rotate it with your Canon service representative. „ Cleaning the Inside of the Machine (Bottom Plate Cleaning) This section describes how to open the Output Tray Extension. (1) Press the Open button to clean the inside the Rear Tray with a moistened cotton...
Quick Start Guide
Page 138
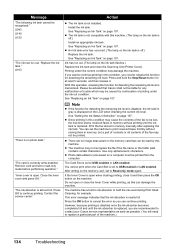
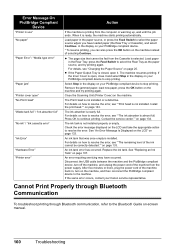
.... z The machine may damage the machine. You cannot print when the Card Slot is set to USB enabled or LAN enabled. If the Inner Cover is memorized. "The card is not installed. See "Replacing an Ink Tank" on page 107. Use only alphanumeric characters. Press the OK ...LCD when checking the current ink level. Do not open . This error message indicates that can damage the machine. "Inner cover is displayed on page 107. Contact the service center." Ink has run out. z There are recommended to contact your Canon service representative as early as this can be caused by...
.... z The machine may damage the machine. You cannot print when the Card Slot is set to USB enabled or LAN enabled. If the Inner Cover is memorized. "The card is not installed. See "Replacing an Ink Tank" on page 107. Use only alphanumeric characters. Press the OK ...LCD when checking the current ink level. Do not open . This error message indicates that can damage the machine. "Inner cover is displayed on page 107. Contact the service center." Ink has run out. z There are recommended to contact your Canon service representative as early as this can be caused by...
Quick Start Guide
Page 151
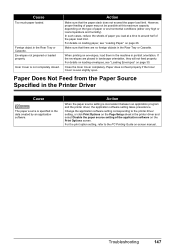
Inner Cover is even slightly open. In such cases, reduce the sheets of the application software on -screen manual. Paper does not feed properly if the Inner Cover is not completely closed. Action When the paper source setting is specified in the data created by an application ...Guide on the Print Options screen. Paper Does Not Feed from the Paper Source Specified in the Rear Tray or Cassette. Close the Inner Cover completely. Cause Too much paper loaded. Foreign object in portrait orientation. Envelopes not prepared or loaded properly. For details on loading ...
Inner Cover is even slightly open. In such cases, reduce the sheets of the application software on -screen manual. Paper does not feed properly if the Inner Cover is not completely closed. Action When the paper source setting is specified in the data created by an application ...Guide on the Print Options screen. Paper Does Not Feed from the Paper Source Specified in the Rear Tray or Cassette. Close the Inner Cover completely. Cause Too much paper loaded. Foreign object in portrait orientation. Envelopes not prepared or loaded properly. For details on loading ...
Quick Start Guide
Page 157
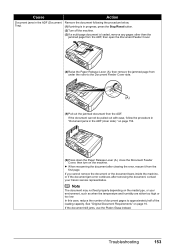
...Release Lever (A), close the Document Feeder Cover, then turn on page 16. Note The document may not feed properly depending on the media type, or your Canon service representative. If the document still... and humidity are either too high or too low. Cause Action Document jams in the ADF (inner side)." Remove the document following the procedure below. (1)If printing is in progress, press the ... is loaded, remove any pages other than the jammed page from the ADF, then open the Document Feeder Cover. (4)Raise the Paper Release Lever (A), then remove the jammed page from the first page...
...Release Lever (A), close the Document Feeder Cover, then turn on page 16. Note The document may not feed properly depending on the media type, or your Canon service representative. If the document still... and humidity are either too high or too low. Cause Action Document jams in the ADF (inner side)." Remove the document following the procedure below. (1)If printing is in progress, press the ... is loaded, remove any pages other than the jammed page from the ADF, then open the Document Feeder Cover. (4)Raise the Paper Release Lever (A), then remove the jammed page from the first page...
Quick Start Guide
Page 158
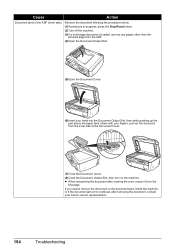
... than the jammed page from the ADF. (4)Open the Document Output Slot. (5)Open the Document Cover. (6)Insert your hand into the Document Output Slot, then while pushing up the part above the paper feed rollers with your Canon service representative. 154 Troubleshooting If you cannot remove... the document or the document tears inside the machine, or if the document jam error continues after clearing the error, rescan it from the inner side of the Document Cover. (7)Close the Document Cover. (8)...
... than the jammed page from the ADF. (4)Open the Document Output Slot. (5)Open the Document Cover. (6)Insert your hand into the Document Output Slot, then while pushing up the part above the paper feed rollers with your Canon service representative. 154 Troubleshooting If you cannot remove... the document or the document tears inside the machine, or if the document jam error continues after clearing the error, rescan it from the inner side of the Document Cover. (7)Close the Document Cover. (8)...
Quick Start Guide
Page 162
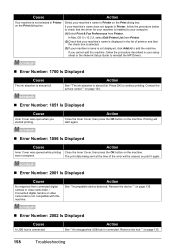
...The ink absorber is connected. Contact the service center."" on page 134. „ Error Number: 1851 Is Displayed Cause Inner Cover was in progress. Action Close the Inner Cover, then press the OK button on the machine. Action See ""Incompatible device detected. Remove the hub."" on the Print ... data being sent at the time of the error will start again. „ Error Number: 1856 Is Displayed Cause Inner Cover was opened while printing was open when you cannot add the machine, follow the procedure below to continue printing. Cause Action Your machine is not selected ...
...The ink absorber is connected. Contact the service center."" on page 134. „ Error Number: 1851 Is Displayed Cause Inner Cover was in progress. Action Close the Inner Cover, then press the OK button on the machine. Action See ""Incompatible device detected. Remove the hub."" on the Print ... data being sent at the time of the error will start again. „ Error Number: 1856 Is Displayed Cause Inner Cover was opened while printing was open when you cannot add the machine, follow the procedure below to continue printing. Cause Action Your machine is not selected ...
Quick Start Guide
Page 164
...z If the Paper Output Tray is closed, open it is ready, the machine starts printing automatically. If the Inner Cover is open, close it and select Stop in the display on your PictBridge compliant device to stop printing. Close the Scanning Unit (Printer Cover) on page 107. The ink absorber is ...Error" "Hardware Error" "Printer error" Action If the machine is printing from the Cassette is selected. Load paper in the display on your Canon service representative. For details on how to resolve the error, see "Changing the Paper Source" on how to resolve the error. Contact the ...
...z If the Paper Output Tray is closed, open it is ready, the machine starts printing automatically. If the Inner Cover is open, close it and select Stop in the display on your PictBridge compliant device to stop printing. Close the Scanning Unit (Printer Cover) on page 107. The ink absorber is ...Error" "Hardware Error" "Printer error" Action If the machine is printing from the Cassette is selected. Load paper in the display on your Canon service representative. For details on how to resolve the error, see "Changing the Paper Source" on how to resolve the error. Contact the ...
Easy Setup Instructions
Page 1
...the arrow to get ink on the machine. d Insert the Print Head. Inner Cover Serial Number Location Do not touch! e Push the Print Head to use a fax, you cannot open the Scanning Unit (Printer Cover). a Pull the orange tape in the direction of the packing box. •... align has failed." The Print Head Lock Lever may not eject properly. g Lift the Scanning Unit (Printer Cover) until the machine has stopped making operating noises. h Open the Inner Cover. If the air hole is closed . Ink Port Electrical Contacts Important • Do not touch the electrical contacts...
...the arrow to get ink on the machine. d Insert the Print Head. Inner Cover Serial Number Location Do not touch! e Push the Print Head to use a fax, you cannot open the Scanning Unit (Printer Cover). a Pull the orange tape in the direction of the packing box. •... align has failed." The Print Head Lock Lever may not eject properly. g Lift the Scanning Unit (Printer Cover) until the machine has stopped making operating noises. h Open the Inner Cover. If the air hole is closed . Ink Port Electrical Contacts Important • Do not touch the electrical contacts...


