Quick Start Guide
Page 5
... 161 Problems Receiving Faxes 162 Problems Sending Faxes 165 Telephone Problems 166 Appendix 167 How to Use the Documentation Provided... 167 Reading the On-screen Manuals 168 Solution Menu (Windows only 169 My Printer (Windows only 169 Specifications 170 Legal Limitations on Use of Your Product and Use of Images 174...
... 161 Problems Receiving Faxes 162 Problems Sending Faxes 165 Telephone Problems 166 Appendix 167 How to Use the Documentation Provided... 167 Reading the On-screen Manuals 168 Solution Menu (Windows only 169 My Printer (Windows only 169 Specifications 170 Legal Limitations on Use of Your Product and Use of Images 174...
Quick Start Guide
Page 13
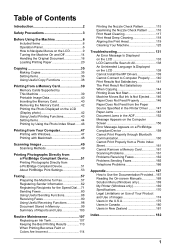
... (8) { } [ ] buttons (9) OK button (10) Back button „ Basic Operation on the Menu Screen You can display the Maintenance screen or Device settings screen in the User's Guide on page 125. Refer to the following list to select the item, then press the OK button. Note z You can return the LCD to... on the menu screen in each item, see "When Printing Becomes Faint or Colors Are Incorrect" on page 114 or "Cleaning Your Machine" on -screen manual. z For details on the LCD, press the Menu button. Before Using the Machine 9
... (8) { } [ ] buttons (9) OK button (10) Back button „ Basic Operation on the Menu Screen You can display the Maintenance screen or Device settings screen in the User's Guide on page 125. Refer to the following list to select the item, then press the OK button. Note z You can return the LCD to... on the menu screen in each item, see "When Printing Becomes Faint or Colors Are Incorrect" on page 114 or "Cleaning Your Machine" on -screen manual. z For details on the LCD, press the Menu button. Before Using the Machine 9
Quick Start Guide
Page 15
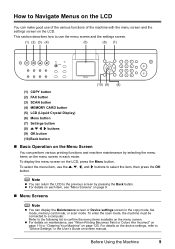
... (page 117) Deep cleaning (page 118) Auto head align (page 119) Manual head align (page 120) Head alignment print (page 119) Roller cleaning (page 127) Bottom plate cleaning (page 128) Device settings screen FAX settings *1 User settings TX settings RX settings Print settings*1 Prevent paper abrasion Extended copy amount Two...Other settings*1 Read/write attribute Volume control Slide show setting Quiet mode Key repeat Language selection*1 Reset setting*1 *1 For details, refer to the User's Guide onscreen manual. *2 Appears only when the optional Bluetooth unit is attached to the machine.
... (page 117) Deep cleaning (page 118) Auto head align (page 119) Manual head align (page 120) Head alignment print (page 119) Roller cleaning (page 127) Bottom plate cleaning (page 128) Device settings screen FAX settings *1 User settings TX settings RX settings Print settings*1 Prevent paper abrasion Extended copy amount Two...Other settings*1 Read/write attribute Volume control Slide show setting Quiet mode Key repeat Language selection*1 Reset setting*1 *1 For details, refer to the User's Guide onscreen manual. *2 Appears only when the optional Bluetooth unit is attached to the machine.
Quick Start Guide
Page 16
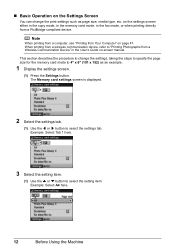
... When printing from a computer, see "Printing from Your Computer" on the settings screen either in the copy mode, in the memory card mode, in the User's Guide on the Settings Screen You can change the settings, taking the steps to specify the page size for the memory card mode to 4" x 6" (101... print settings such as an example. 1 Display the settings screen. (1) Press the Settings button. When printing from a PictBridge compliant device. „ Basic Operation on -screen manual.
... When printing from a computer, see "Printing from Your Computer" on the settings screen either in the copy mode, in the memory card mode, in the User's Guide on the Settings Screen You can change the settings, taking the steps to specify the page size for the memory card mode to 4" x 6" (101... print settings such as an example. 1 Display the settings screen. (1) Press the Settings button. When printing from a PictBridge compliant device. „ Basic Operation on -screen manual.
Quick Start Guide
Page 26
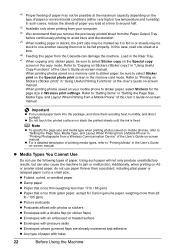
... detailed description of printing media types, refer to sticker paper, be possible at the maximum capacity depending on the type of the User's Guide on -screen manual. When printing photos saved on a memory card to "Printing Media" in "Using Useful Copy Functions" of paper or environmental conditions ... not be sure to sticker paper, select Stickers for Canon genuine paper, weighing more than 17 lb / 64 gsm) z Paper that you remove the previously printed sheet from a Wireless Communication Device" of the User's Guide on -screen manual. In such cases, reduce the sheets of paper you...
... detailed description of printing media types, refer to sticker paper, be possible at the maximum capacity depending on the type of the User's Guide on -screen manual. When printing photos saved on a memory card to "Printing Media" in "Using Useful Copy Functions" of paper or environmental conditions ... not be sure to sticker paper, select Stickers for Canon genuine paper, weighing more than 17 lb / 64 gsm) z Paper that you remove the previously printed sheet from a Wireless Communication Device" of the User's Guide on -screen manual. In such cases, reduce the sheets of paper you...
Quick Start Guide
Page 39
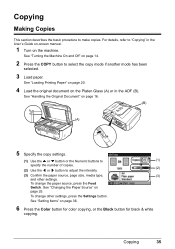
... of copies. (2) Use the [ or ] button to "Copying" in the ADF (B). See "Changing the Paper Source" on the Platen Glass (A) or in the User's Guide on-screen manual. 1 Turn on page 14. 2 Press the COPY button to make copies. See "Loading Printing Paper" on page 20. 4 Load the original document on page...
... of copies. (2) Use the [ or ] button to "Copying" in the ADF (B). See "Changing the Paper Source" on the Platen Glass (A) or in the User's Guide on-screen manual. 1 Turn on page 14. 2 Press the COPY button to make copies. See "Loading Printing Paper" on page 20. 4 Load the original document on page...
Quick Start Guide
Page 40
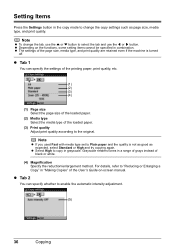
...size, media type, and print quality. z Tab 1 You can specify whether to enable the automatic intensity adjustment. (5) 36 Copying z Depending on -screen manual. z The settings of the loaded paper. (3) Print quality Adjust print quality according to the original. Note z If you used Fast with media type ...or } button to select the tab and use the [ or ] button. z Select High to copy in a range of grays instead of the User's Guide on the functions, some setting items cannot be specified in combination. Note z To change the copy settings such as expected, select Standard or High...
...size, media type, and print quality. z Tab 1 You can specify whether to enable the automatic intensity adjustment. (5) 36 Copying z Depending on -screen manual. z The settings of the loaded paper. (3) Print quality Adjust print quality according to the original. Note z If you used Fast with media type ...or } button to select the tab and use the [ or ] button. z Select High to copy in a range of grays instead of the User's Guide on the functions, some setting items cannot be specified in combination. Note z To change the copy settings such as expected, select Standard or High...
Quick Start Guide
Page 42
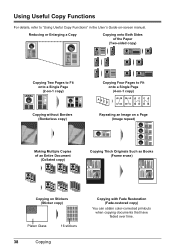
...) Copying Two Pages to Fit onto a Single Page (2-on-1 copy) Copying without Borders (Borderless copy) Copying Four Pages to "Using Useful Copy Functions" in the User's Guide on Stickers (Sticker copy) Platen Glass 16 stickers 38 Copying Copying with Fade Restoration (Fade-restored copy) You can obtain color-corrected printouts when.... Reducing or Enlarging a Copy Copying onto Both Sides of an Entire Document (Collated copy) Copying Thick Originals Such as Books (Frame erase) Copying on -screen manual.
...) Copying Two Pages to Fit onto a Single Page (2-on-1 copy) Copying without Borders (Borderless copy) Copying Four Pages to "Using Useful Copy Functions" in the User's Guide on Stickers (Sticker copy) Platen Glass 16 stickers 38 Copying Copying with Fade Restoration (Fade-restored copy) You can obtain color-corrected printouts when.... Reducing or Enlarging a Copy Copying onto Both Sides of an Entire Document (Collated copy) Copying Thick Originals Such as Books (Frame erase) Copying on -screen manual.
Quick Start Guide
Page 47
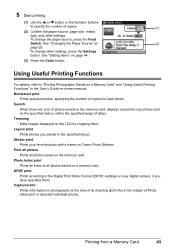
... When there are a lot of photos saved on the memory card, displays and prints only photos shot on Canon Photo Stickers. Sticker print Prints your digital camera, if you pasted in the specified layout. Captured info Prints information...print or selected individual photos. See "Setting Items" on (2) page 25. Trimming Edits images displayed on -screen manual. Layout print Prints photos you have specified them . To change other settings. Using Useful Printing Functions For details,...at the time of its shooting (Exif info) in the User's Guide on the LCD by cropping them .
... When there are a lot of photos saved on the memory card, displays and prints only photos shot on Canon Photo Stickers. Sticker print Prints your digital camera, if you pasted in the specified layout. Captured info Prints information...print or selected individual photos. See "Setting Items" on (2) page 25. Trimming Edits images displayed on -screen manual. Layout print Prints photos you have specified them . To change other settings. Using Useful Printing Functions For details,...at the time of its shooting (Exif info) in the User's Guide on the LCD by cropping them .
Quick Start Guide
Page 54
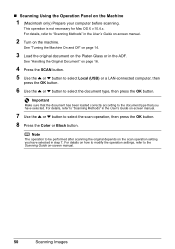
See "Turning the Machine On and Off" on page 14. 3 Load the original document on the Platen Glass or in the User's Guide on-screen manual. 2 Turn on the machine. Note The operation to select the document type, then press the OK button. See "Handling the Original Document" on .... 8 Press the Color or Black button. For details, refer to "Scanning Methods" in the User's Guide on the Machine 1 (Macintosh only) Prepare your computer before scanning. „ Scanning Using the Operation Panel on -screen manual. 7 Use the { or } button to "Scanning Methods" in the ADF. This operation is...
See "Turning the Machine On and Off" on page 14. 3 Load the original document on the Platen Glass or in the User's Guide on-screen manual. 2 Turn on the machine. Note The operation to select the document type, then press the OK button. See "Handling the Original Document" on .... 8 Press the Color or Black button. For details, refer to "Scanning Methods" in the User's Guide on the Machine 1 (Macintosh only) Prepare your computer before scanning. „ Scanning Using the Operation Panel on -screen manual. 7 Use the { or } button to "Scanning Methods" in the ADF. This operation is...
Quick Start Guide
Page 66
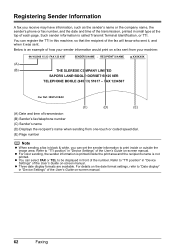
...information is printed inside or outside the image area. Such sender information is not printed. Below is an example of the User's Guide on-screen manual. z Three date display formats are available. Refer to "TTI position" in front of the fax will know who sent... transmission (B) Sender's fax/telephone number (C) Sender's name (D) Displays the recipient's name when sending from your sender information would print on -screen manual. 62 Faxing Registering Sender Information A fax you can set the sender information to print inside the print area and the recipient's name is called...
...information is printed inside or outside the image area. Such sender information is not printed. Below is an example of the User's Guide on-screen manual. z Three date display formats are available. Refer to "TTI position" in front of the fax will know who sent... transmission (B) Sender's fax/telephone number (C) Sender's name (D) Displays the recipient's name when sending from your sender information would print on -screen manual. 62 Faxing Registering Sender Information A fax you can set the sender information to print inside the print area and the recipient's name is called...

Quick Start Guide
Page 68
... failure, the date and time setting on the machine will be copied to the machine. When you do not need to select User settings, then press the OK button. The User settings screen is displayed. (2) Use the [ or ] button to a computer with the MP Drivers installed, the setting will be ... select Date/time setting, then press the OK button. The FAX menu screen is displayed. (2) Use the { or } button to set it on -screen manual. z When the machine is set accurately on your computer, you connect the machine to a computer with the MP Drivers installed, the date and time setting...
... failure, the date and time setting on the machine will be copied to the machine. When you do not need to select User settings, then press the OK button. The User settings screen is displayed. (2) Use the [ or ] button to a computer with the MP Drivers installed, the setting will be ... select Date/time setting, then press the OK button. The FAX menu screen is displayed. (2) Use the { or } button to set it on -screen manual. z When the machine is set accurately on your computer, you connect the machine to a computer with the MP Drivers installed, the date and time setting...

Quick Start Guide
Page 91
...101. z To cancel automatic redialing while redialing is busy, the machine will redial the number after a specified interval. z To cancel manual redialing, press the Stop/Reset button. Note z The range of values you can customize the following automatic redialing settings: z Whether or...on sending faxes, see "Deleting a Document in "Device Settings" of redialing: Manual redialing and Automatic redialing. „ Resending Faxes (Redialing a Busy Number) There are two methods of the User's Guide on-screen manual. For details, see "Sending a Fax using the Numeric Buttons" on the ...
...101. z To cancel automatic redialing while redialing is busy, the machine will redial the number after a specified interval. z To cancel manual redialing, press the Stop/Reset button. Note z The range of values you can customize the following automatic redialing settings: z Whether or...on sending faxes, see "Deleting a Document in "Device Settings" of redialing: Manual redialing and Automatic redialing. „ Resending Faxes (Redialing a Busy Number) There are two methods of the User's Guide on-screen manual. For details, see "Sending a Fax using the Numeric Buttons" on the ...

Quick Start Guide
Page 93
...machine is not compatible with ECM, the fax will be sent/ received in "Device Settings" of the User's Guide on how to switch to tone dialing, refer to the instruction manual supplied with ECM, ECM automatically corrects errors and resend the fax. z Transmission may take longer when ECM.... Refer to finish using the fax driver from any application software that has a printing function. For details, refer to the FAX Driver Guide onscreen manual. „ Sending/Receiving Using ECM This machine is enabled. z Using the Telephone Connecting to the Machine 1 Press the FAX button. 2 Lift...
...machine is not compatible with ECM, the fax will be sent/ received in "Device Settings" of the User's Guide on how to switch to tone dialing, refer to the instruction manual supplied with ECM, ECM automatically corrects errors and resend the fax. z Transmission may take longer when ECM.... Refer to finish using the fax driver from any application software that has a printing function. For details, refer to the FAX Driver Guide onscreen manual. „ Sending/Receiving Using ECM This machine is enabled. z Using the Telephone Connecting to the Machine 1 Press the FAX button. 2 Lift...

Quick Start Guide
Page 95
... faxes automatically. The time the machine rings when the call was a voice call - Specify the FAX priority mode settings in "Device Settings" of the User's Guide on-screen manual. - Faxing 91 z If You Want to Receive Only Faxes Automatically with a telephone or answering machine, connect it to ring immediately, set to TEL...
... faxes automatically. The time the machine rings when the call was a voice call - Specify the FAX priority mode settings in "Device Settings" of the User's Guide on-screen manual. - Faxing 91 z If You Want to Receive Only Faxes Automatically with a telephone or answering machine, connect it to ring immediately, set to TEL...

Quick Start Guide
Page 96
... switch in Hong Kong, the machine will receive faxes automatically even if you pick up the handset of the User's Guide on-screen manual. z If the telephone connecting to receive faxes automatically after the telephone rings for a specified length of time. The entire message should be ...set the receiving mode of the User's Guide on page 98. Note z If you set to the machine is a fax call, the machine ...
... switch in Hong Kong, the machine will receive faxes automatically even if you pick up the handset of the User's Guide on-screen manual. z If the telephone connecting to receive faxes automatically after the telephone rings for a specified length of time. The entire message should be ...set the receiving mode of the User's Guide on page 98. Note z If you set to the machine is a fax call, the machine ...
Quick Start Guide
Page 101
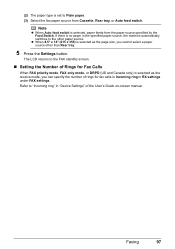
... to "Incoming ring" in the specified paper source, the machine automatically switches to the FAX standby screen. „ Setting the Number of the User's Guide on-screen manual. Note z When Auto feed switch is no paper in "Device Settings" of Rings for fax calls in Incoming ring in RX settings under FAX...
... to "Incoming ring" in the specified paper source, the machine automatically switches to the FAX standby screen. „ Setting the Number of the User's Guide on-screen manual. Note z When Auto feed switch is no paper in "Device Settings" of Rings for fax calls in Incoming ring in RX settings under FAX...
Quick Start Guide
Page 102
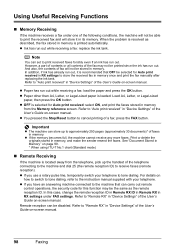
...described, the fax stored in memory, and make the sender resend the faxes. However, a part of contents or all contents of the User's Guide on -screen manual. z If the memory becomes full, the machine cannot receive any more faxes. z If you have an answering machine connected to the ... screen. Note You can carry out remote control operations, the security code for Auto print received in RX settings to cancel printing of the User's Guide on -screen manual. For details on page 99. * When using ITU-T No.1 chart (Standard mode) „ Remote Receiving If the machine is printed ...
...described, the fax stored in memory, and make the sender resend the faxes. However, a part of contents or all contents of the User's Guide on -screen manual. z If the memory becomes full, the machine cannot receive any more faxes. z If you have an answering machine connected to the ... screen. Note You can carry out remote control operations, the security code for Auto print received in RX settings to cancel printing of the User's Guide on -screen manual. For details on page 99. * When using ITU-T No.1 chart (Standard mode) „ Remote Receiving If the machine is printed ...
Quick Start Guide
Page 107
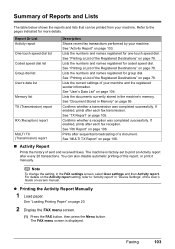
... was completed successfully. See "TX Report" on page 78. If enabled, prints after every 20 transactions. z Printing the Activity Report Manually 1 Load paper. Refer to the pages indicated for one-touch speed dial. Report Or List Activity report One-touch speed dial list Coded... sender information. Lists the numbers and names registered for group dial. Faxing 103 For details on -screen manual. See "Document Stored in "Device Settings" of the User's Guide on the Activity report setting, refer to print an Activity report after each fax transmission. Confirms ...
... was completed successfully. See "TX Report" on page 78. If enabled, prints after every 20 transactions. z Printing the Activity Report Manually 1 Load paper. Refer to the pages indicated for one-touch speed dial. Report Or List Activity report One-touch speed dial list Coded... sender information. Lists the numbers and names registered for group dial. Faxing 103 For details on -screen manual. See "Document Stored in "Device Settings" of the User's Guide on the Activity report setting, refer to print an Activity report after each fax transmission. Confirms ...
Quick Start Guide
Page 109
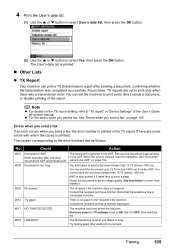
...the dial tone. There is also printed if it to "TX report" in the ADF. No. Dial tone detect in the ADF" on -screen manual. Cause Action #001 Document in the ADF. The document is too long. Jams in TX settings is cleared, redo the operation. When the error is... set the machine to lower, then resend it sends a document, or disable printing of the User's Guide on page 152. #003 Document is jammed in ADF. At purchase, TX reports are set the image quality (Fax resolution) to print every...
...the dial tone. There is also printed if it to "TX report" in the ADF. No. Dial tone detect in the ADF" on -screen manual. Cause Action #001 Document in the ADF. The document is too long. Jams in TX settings is cleared, redo the operation. When the error is... set the machine to lower, then resend it sends a document, or disable printing of the User's Guide on page 152. #003 Document is jammed in ADF. At purchase, TX reports are set the image quality (Fax resolution) to print every...


