Quick Start Guide
Page 2
...on the CD-ROM Purchase Date Customer Technical Support Sequence* 1. www.canontechsupport.com For quick and comprehensive self-help in an intuitively guided interactive troubleshooting environment, the place to your Canon service and support, call (1-800-385-2155), or visit...buy" instructions are subject to three full years of service and support coverage at www.canontechsupport.com. * Support program specifics are found here. 2. CarePAK offers toll-free Canon technical support and includes Canon's superb InstantExchange product replacement program. For more information and updated...
...on the CD-ROM Purchase Date Customer Technical Support Sequence* 1. www.canontechsupport.com For quick and comprehensive self-help in an intuitively guided interactive troubleshooting environment, the place to your Canon service and support, call (1-800-385-2155), or visit...buy" instructions are subject to three full years of service and support coverage at www.canontechsupport.com. * Support program specifics are found here. 2. CarePAK offers toll-free Canon technical support and includes Canon's superb InstantExchange product replacement program. For more information and updated...
Quick Start Guide
Page 5
... 16 Loading Printing Paper 20 Copying 35 Making Copies 35 Setting Items 36 Using Useful Copy Functions 38 Printing from a Memory Card 39 Memory Cards Supported by This Machine 39 Printable Image Data 40 Inserting the Memory Card 40 Removing the Memory Card 42 Printing the Photo Displayed on the LCD...
... 16 Loading Printing Paper 20 Copying 35 Making Copies 35 Setting Items 36 Using Useful Copy Functions 38 Printing from a Memory Card 39 Memory Cards Supported by This Machine 39 Printable Image Data 40 Inserting the Memory Card 40 Removing the Memory Card 42 Printing the Photo Displayed on the LCD...
Quick Start Guide
Page 31
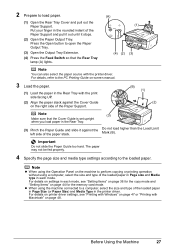
... card mode. Before Using the Machine 27 Important Do not slide the Paper Guide too hard. For details on the right side of the Paper Support. (B) (1) (2) Note (3) Make sure that the Rear Tray lamp (A) lights. (A) (1) (4) (2) (3) Note You can also select the paper source with the print side facing... properly. 4 Specify the page size and media type settings according to load paper. (1) Open the Rear Tray Cover and pull out the Paper Support. Do not load higher than the Load Limit Mark (B). Press the Open button to open the Paper Output Tray. (3) Open the Output Tray ...
... card mode. Before Using the Machine 27 Important Do not slide the Paper Guide too hard. For details on the right side of the Paper Support. (B) (1) (2) Note (3) Make sure that the Rear Tray lamp (A) lights. (A) (1) (4) (2) (3) Note You can also select the paper source with the print side facing... properly. 4 Specify the page size and media type settings according to load paper. (1) Open the Rear Tray Cover and pull out the Paper Support. Do not load higher than the Load Limit Mark (B). Press the Open button to open the Paper Output Tray. (3) Open the Output Tray ...
Quick Start Guide
Page 35
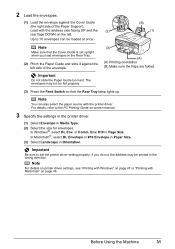
... envelopes can also select the paper source with the address side facing UP and the (2) rear flaps DOWN on the left side of the Paper Support). Up to set upright when you do not, the address may not be printed in the Rear Tray. (2) Pinch the Paper Guide and slide it...
... envelopes can also select the paper source with the address side facing UP and the (2) rear flaps DOWN on the left side of the Paper Support). Up to set upright when you do not, the address may not be printed in the Rear Tray. (2) Pinch the Paper Guide and slide it...
Quick Start Guide
Page 37
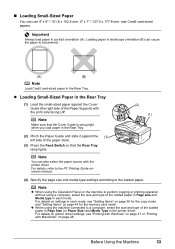
Important Always load paper in the Rear Tray. (2) (1) (2) Pinch the Paper Guide and slide it against the Cover Guide (the right side of the Paper Support) with the print side facing UP. Note Make sure that the Rear Tray lamp lights. For details on page 44 for the copy mode and "...
Important Always load paper in the Rear Tray. (2) (1) (2) Pinch the Paper Guide and slide it against the Cover Guide (the right side of the Paper Support) with the print side facing UP. Note Make sure that the Rear Tray lamp lights. For details on page 44 for the copy mode and "...

Quick Start Guide
Page 43
...cards that can be directly inserted into the Card Slot: z SD Secure Digital memory card z SDHC memory card z MultiMediaCard z Compact Flash (CF) Card Supports Type I/II (3.3 V) z Microdrive z Memory Stick z Memory Stick PRO Memory cards that can be able to the Card Slot. Printing from a Memory Card ...Memory Cards Supported by This Machine The following memory cards is inserted without an adapter, you may not be inserted in the Card Slot using the adapter: Important...
...cards that can be directly inserted into the Card Slot: z SD Secure Digital memory card z SDHC memory card z MultiMediaCard z Compact Flash (CF) Card Supports Type I/II (3.3 V) z Microdrive z Memory Stick z Memory Stick PRO Memory cards that can be able to the Card Slot. Printing from a Memory Card ...Memory Cards Supported by This Machine The following memory cards is inserted without an adapter, you may not be inserted in the Card Slot using the adapter: Important...

Quick Start Guide
Page 44
.... 3 Open the Card Slot Cover. (A) 40 Printing from a Memory Card See "Turning the Machine On and Off" on the machine. Printable Image Data This machine supports JPEG and TIFF images created by DCF ver. 1.0/2.0 standard compliant digital cameras (Exif ver. 2.2/2.21 compliant). Other image or movie types such as RAW images...
.... 3 Open the Card Slot Cover. (A) 40 Printing from a Memory Card See "Turning the Machine On and Off" on the machine. Printable Image Data This machine supports JPEG and TIFF images created by DCF ver. 1.0/2.0 standard compliant digital cameras (Exif ver. 2.2/2.21 compliant). Other image or movie types such as RAW images...
Quick Start Guide
Page 51
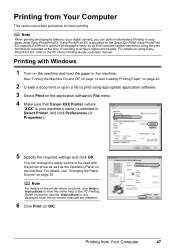
Easy-PhotoPrint EX is provided on -screen manuals are installed. 6 Click Print (or OK). Easy-PhotoPrint EX supports Exif Print to optimize photographs taken by an Exif-compliant digital camera by your machine's name) is only displayed when the on the Setup CD-... to print using EasyPhotoPrint EX, refer to view the online help or the PC Printing Guide on the application software's File menu. 4 Make sure that Canon XXX Printer (where "XXX" is your digital camera, you can change the paper source to achieve higher print quality. Note For details on the printer...
Easy-PhotoPrint EX is provided on -screen manuals are installed. 6 Click Print (or OK). Easy-PhotoPrint EX supports Exif Print to optimize photographs taken by an Exif-compliant digital camera by your machine's name) is only displayed when the on the Setup CD-... to print using EasyPhotoPrint EX, refer to view the online help or the PC Printing Guide on the application software's File menu. 4 Make sure that Canon XXX Printer (where "XXX" is your digital camera, you can change the paper source to achieve higher print quality. Note For details on the printer...

Quick Start Guide
Page 64
Note z Rotary pulse is not supported depending on page 104. 1 Display the FAX menu screen. (1) Press the FAX button, then press the Menu button. z You can print the User's data list ...
Note z Rotary pulse is not supported depending on page 104. 1 Display the FAX menu screen. (1) Press the FAX button, then press the Menu button. z You can print the User's data list ...
Quick Start Guide
Page 86
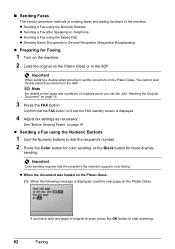
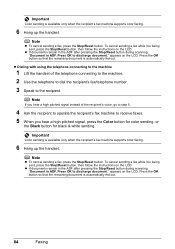
Confirm that the recipient's fax machine supports color faxing. z When the document was loaded on the Platen Glass: (1) When the following message is displayed. 4 Adjust fax settings as necessary. If you can ...
Confirm that the recipient's fax machine supports color faxing. z When the document was loaded on the Platen Glass: (1) When the following message is displayed. 4 Adjust fax settings as necessary. If you can ...
Quick Start Guide
Page 88
...84 Faxing Press OK to discharge document." Press OK to discharge document." Important Color sending is available only when the recipient's fax machine supports color faxing. 6 Hang up the handset. z If documents remain in the ADF after pressing the Stop/Reset button during scanning, "Document... in ADF. appears on the LCD. appears on the LCD. Important Color sending is available only when the recipient's fax machine supports color faxing. 6 Hang up the handset. z If documents remain in the ADF after pressing the Stop/Reset button during scanning, "Document ...
...84 Faxing Press OK to discharge document." Press OK to discharge document." Important Color sending is available only when the recipient's fax machine supports color faxing. 6 Hang up the handset. z If documents remain in the ADF after pressing the Stop/Reset button during scanning, "Document... in ADF. appears on the LCD. appears on the LCD. Important Color sending is available only when the recipient's fax machine supports color faxing. 6 Hang up the handset. z If documents remain in the ADF after pressing the Stop/Reset button during scanning, "Document ...
Quick Start Guide
Page 89
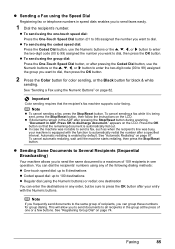
... button. To cancel sending a fax while it is enabled by default. appears on page 87. Press the OK button so that the recipient's fax machine supports color faxing. To cancel automatic redialing, wait until the machine starts redialing, then press the Stop/Reset button. z Sending Same Documents to Several Recipients (Sequential...
... button. To cancel sending a fax while it is enabled by default. appears on page 87. Press the OK button so that the recipient's fax machine supports color faxing. To cancel automatic redialing, wait until the machine starts redialing, then press the Stop/Reset button. z Sending Same Documents to Several Recipients (Sequential...
Quick Start Guide
Page 90
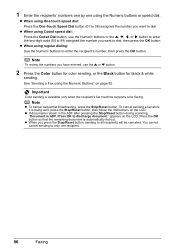
.... Press OK to all recipients will be canceled. Press the OK button so that the remaining document is available only when the recipient's fax machine supports color faxing. z When using the Numeric Buttons" on page 82. Important Color sending is automatically fed out. z When you want to dial, then press the...
.... Press OK to all recipients will be canceled. Press the OK button so that the remaining document is available only when the recipient's fax machine supports color faxing. z When using the Numeric Buttons" on page 82. Important Color sending is automatically fed out. z When you want to dial, then press the...
Quick Start Guide
Page 144
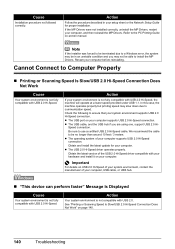
... procedure not followed correctly. Action If your system environment is not fully compatible with USB 2.0 Hi-Speed. z The operating system of your computer supports USB 2.0 Hi-Speed connection. z The USB 2.0 Hi-Speed driver operates properly. We recommend the cable to use a certified USB 2.0 Hi-...printing speed may not be in your setup sheet or the Network Setup Guide for your computer. Refer to ensure that your computer supports USB 2.0 Hi-Speed connection. Obtain and install the latest update for proper installation. Obtain the latest version of the USB 2.0...
... procedure not followed correctly. Action If your system environment is not fully compatible with USB 2.0 Hi-Speed. z The operating system of your computer supports USB 2.0 Hi-Speed connection. z The USB 2.0 Hi-Speed driver operates properly. We recommend the cable to use a certified USB 2.0 Hi-...printing speed may not be in your setup sheet or the Network Setup Guide for your computer. Refer to ensure that your computer supports USB 2.0 Hi-Speed connection. Obtain and install the latest update for proper installation. Obtain the latest version of the USB 2.0...
Quick Start Guide
Page 172
... On-screen Manual shortcut icon on the desktop, or click Start > All Programs (or Programs) > Canon XXX Manual > XXX On-screen Manual (where "XXX" is your system up to date with Windows Update. We recommend that support Bluetooth communication, and on the desktop. website and install it from computers and devices that...
... On-screen Manual shortcut icon on the desktop, or click Start > All Programs (or Programs) > Canon XXX Manual > XXX On-screen Manual (where "XXX" is your system up to date with Windows Update. We recommend that support Bluetooth communication, and on the desktop. website and install it from computers and devices that...

Quick Start Guide
Page 174
... V, 50/60 Hz Printing (Copy): Approx. 21 W Standby (minimum): Approx. 5.5 W OFF: Approx. 1.4 W Approx. 20.0 (W) x 19.0 (D) x 10.2 (H) inches / Approx. 508 (W) x 483 (D) x 260 (H) mm * With the Paper Support, Paper Output Tray, and Document Tray retracted. Specifications Printing resolution (dpi) Interface Print width Acoustic noise level Operating environment Storage environment Power supply Power consumption...
... V, 50/60 Hz Printing (Copy): Approx. 21 W Standby (minimum): Approx. 5.5 W OFF: Approx. 1.4 W Approx. 20.0 (W) x 19.0 (D) x 10.2 (H) inches / Approx. 508 (W) x 483 (D) x 260 (H) mm * With the Paper Support, Paper Output Tray, and Document Tray retracted. Specifications Printing resolution (dpi) Interface Print width Acoustic noise level Operating environment Storage environment Power supply Power consumption...
Quick Start Guide
Page 182
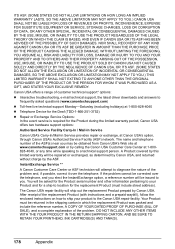
... Product and for a ship-to location for the Product during the limited warranty period, Canon USA offers two hardware support options: Authorized Service Facility Carry-In / Mail-In Service Canon USA's Carry-In/Mail-In Service provides repair or exchange, at 1-800828-4040, or... any time while speaking to a technical support person. After receipt of customer technical support* options: z Interactive troubleshooting, e-mail technical support, the latest driver downloads and ...
... Product and for a ship-to location for the Product during the limited warranty period, Canon USA offers two hardware support options: Authorized Service Facility Carry-In / Mail-In Service Canon USA's Carry-In/Mail-In Service provides repair or exchange, at 1-800828-4040, or... any time while speaking to a technical support person. After receipt of customer technical support* options: z Interactive troubleshooting, e-mail technical support, the latest driver downloads and ...
Quick Start Guide
Page 183
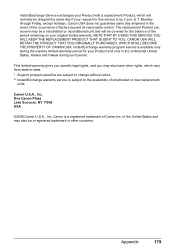
...which will be covered for the balance of the period remaining on your original limited warranty. Canon U.S.A., Inc. One Canon Plaza Lake Success, NY 11042 USA ©2008 Canon U.S.A., Inc. The replacement Product you may also have other countries. This limited warranty gives you...warranty service is by 3 p.m. CANON USA WILL RETAIN THE PRODUCT THAT YOU ORIGINALLY PURCHASED, WHICH SHALL BECOME THE PROPERTY OF CANON USA. Appendix 179 InstantExchange Service exchanges your Product with a replacement Product, which vary from state to state. * Support program specifics are subject to the...
...which will be covered for the balance of the period remaining on your original limited warranty. Canon U.S.A., Inc. One Canon Plaza Lake Success, NY 11042 USA ©2008 Canon U.S.A., Inc. The replacement Product you may also have other countries. This limited warranty gives you...warranty service is by 3 p.m. CANON USA WILL RETAIN THE PRODUCT THAT YOU ORIGINALLY PURCHASED, WHICH SHALL BECOME THE PROPERTY OF CANON USA. Appendix 179 InstantExchange Service exchanges your Product with a replacement Product, which vary from state to state. * Support program specifics are subject to the...
Quick Start Guide
Page 186
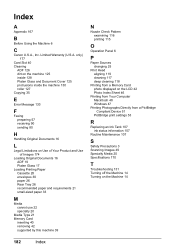
... 26 recommended paper and requirements 21 small-sized paper 33 M Media cannot use 22 specialty 20 Media Type 21 Memory Card inserting 40 removing 42 supported by this machine 39 N Nozzle Check Pattern examining 116 printing 115 O Operation Panel 6 P Paper Sources changing 25 Print Head aligning 119 cleaning 117 deep cleaning... Media 20 Specifications 170 T Troubleshooting 131 Turning off the Machine 14 Turning on the Machine 14 182 Index Index A Appendix 167 B Before Using the Machine 6 C Canon U.S.A., Inc. Limited Warranty (U.S.A.
... 26 recommended paper and requirements 21 small-sized paper 33 M Media cannot use 22 specialty 20 Media Type 21 Memory Card inserting 40 removing 42 supported by this machine 39 N Nozzle Check Pattern examining 116 printing 115 O Operation Panel 6 P Paper Sources changing 25 Print Head aligning 119 cleaning 117 deep cleaning... Media 20 Specifications 170 T Troubleshooting 131 Turning off the Machine 14 Turning on the Machine 14 182 Index Index A Appendix 167 B Before Using the Machine 6 C Canon U.S.A., Inc. Limited Warranty (U.S.A.
Easy Setup Instructions
Page 1
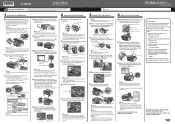
... company. Do not start another operation until it clicks into place. 4 Align the Print Head a Open the Rear Tray Cover, pull out the Paper Support, then pinch the Paper Guide and slide it . b Remove the protective material in place, and lower the Print Head Lock Lever. e Press the ...Output Tray will initialize. Then open the Scanning Unit (Printer Cover) with the remaining film, ink may leak out or may feel heavy. Paper Support Extension Paper Guide Rear Tray Cover b Load two sheets of the arrow to the Quick Start Guide. Refer to "An Error Message Is Displayed...
... company. Do not start another operation until it clicks into place. 4 Align the Print Head a Open the Rear Tray Cover, pull out the Paper Support, then pinch the Paper Guide and slide it . b Remove the protective material in place, and lower the Print Head Lock Lever. e Press the ...Output Tray will initialize. Then open the Scanning Unit (Printer Cover) with the remaining film, ink may leak out or may feel heavy. Paper Support Extension Paper Guide Rear Tray Cover b Load two sheets of the arrow to the Quick Start Guide. Refer to "An Error Message Is Displayed...


