MX310 series Quick Start Guide
Page 6
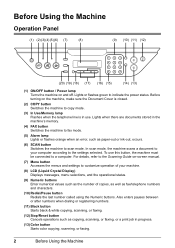
... menus and settings to customize operation of copies, as well as copying, scanning, or faxing, or a print job in progress. (13) Color button Starts color copying, scanning, or faxing. 2 Before Using the Machine In scan mode, the machine scans a document to a computer. Also enters pauses ...between or after numbers when dialing or registering numbers. (11) Black button Starts black & white copying, scanning, or faxing. (12) Stop/Reset button ...
... menus and settings to customize operation of copies, as well as copying, scanning, or faxing, or a print job in progress. (13) Color button Starts color copying, scanning, or faxing. 2 Before Using the Machine In scan mode, the machine scans a document to a computer. Also enters pauses ...between or after numbers when dialing or registering numbers. (11) Black button Starts black & white copying, scanning, or faxing. (12) Stop/Reset button ...
MX310 series Quick Start Guide
Page 16
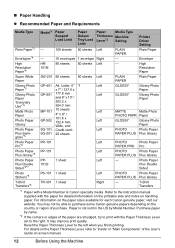
... Paper PAPER PLUS Plus Glossy T-Shirt Transfers*4 TR-301 1 sheet Right - Reset the Paper Thickness Lever to "Inside" in the US by name. *2 If the corners or edges of purchase. Refer to purchase some Canon genuine papers depending on -screen manual. 12 Before Using the Machine You may... to the instruction manual supplied with the paper for detailed information on the printable side and notes on the paper sizes available for each Canon genuine paper, visit our website. For details on the Paper Thickness Lever, refer to the left when you finish printing. Printer Driver...
... Paper PAPER PLUS Plus Glossy T-Shirt Transfers*4 TR-301 1 sheet Right - Reset the Paper Thickness Lever to "Inside" in the US by name. *2 If the corners or edges of purchase. Refer to purchase some Canon genuine papers depending on -screen manual. 12 Before Using the Machine You may... to the instruction manual supplied with the paper for detailed information on the printable side and notes on the paper sizes available for each Canon genuine paper, visit our website. For details on the Paper Thickness Lever, refer to the left when you finish printing. Printer Driver...

MX310 series Quick Start Guide
Page 19
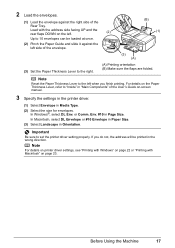
... the Rear Tray with the print side facing UP. (2) Align the paper stack against the left when you finish printing. It may improve print quality. Reset the Paper Thickness Lever to the left side of the paper stack. (A) (1) (2) * Do not load higher than the Load Limit Mark (A). 4 Specify the page size...
... the Rear Tray with the print side facing UP. (2) Align the paper stack against the left when you finish printing. It may improve print quality. Reset the Paper Thickness Lever to the left side of the paper stack. (A) (1) (2) * Do not load higher than the Load Limit Mark (A). 4 Specify the page size...
MX310 series Quick Start Guide
Page 21
... to the right. (A) Printing orientation (B) Make sure the flaps are folded. Important Be sure to 10 envelopes can be printed in the wrong direction. Note Reset the Paper Thickness Lever to the left side of the envelope. (B) (1) (3) (A) (3) Set the Paper Thickness Lever to "Inside" in "Main Components" of the Rear Tray...
... to the right. (A) Printing orientation (B) Make sure the flaps are folded. Important Be sure to 10 envelopes can be printed in the wrong direction. Note Reset the Paper Thickness Lever to the left side of the envelope. (B) (1) (3) (A) (3) Set the Paper Thickness Lever to "Inside" in "Main Components" of the Rear Tray...

MX310 series Quick Start Guide
Page 37
Note You cannot use ROTARY PULSE depending on the country or region of purchase. 5 Press the Stop/Reset button. TOUCH TONE: Suitable for pulse dialing. 4 Press the [ or ] button to select the telephone line type, then press the OK button. Faxing 33 ROTARY PULSE: Suitable for tone dialing.
Note You cannot use ROTARY PULSE depending on the country or region of purchase. 5 Press the Stop/Reset button. TOUCH TONE: Suitable for pulse dialing. 4 Press the [ or ] button to select the telephone line type, then press the OK button. Faxing 33 ROTARY PULSE: Suitable for tone dialing.
MX310 series Quick Start Guide
Page 40
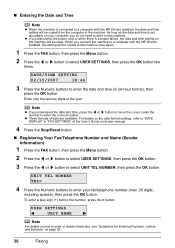
... OK button. When you disconnect the power cord or when there is a power failure, the date and time setting on -screen manual. 4 Press the Stop/Reset button. „ Registering Your Fax/Telephone Number and Name (Sender Information) 1 Press the FAX button, then press the Menu button. 2 Press the [ or ] button to... are available. „ Entering the Date and Time Note z When the machine is connected to a computer with the MP Drivers installed, the setting will be reset.
... OK button. When you disconnect the power cord or when there is a power failure, the date and time setting on -screen manual. 4 Press the Stop/Reset button. „ Registering Your Fax/Telephone Number and Name (Sender Information) 1 Press the FAX button, then press the Menu button. 2 Press the [ or ] button to... are available. „ Entering the Date and Time Note z When the machine is connected to a computer with the MP Drivers installed, the setting will be reset.
MX310 series Quick Start Guide
Page 41
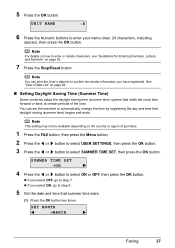
... name (max. 24 characters, including spaces), then press the OK button. Note This setting may not be available depending on page 35. 7 Press the Stop/Reset button. z If you select ON, go to confirm the sender information you have registered. UNIT NAME :A 6 Press the Numeric buttons to select ON or OFF...
... name (max. 24 characters, including spaces), then press the OK button. Note This setting may not be available depending on page 35. 7 Press the Stop/Reset button. z If you select ON, go to confirm the sender information you have registered. UNIT NAME :A 6 Press the Numeric buttons to select ON or OFF...
MX310 series Quick Start Guide
Page 42
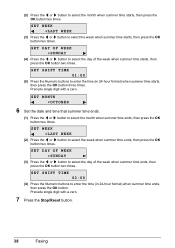
... [ or ] button to select the week when summer time ends, then press the OK button two times. Precede single digit with a zero. 7 Press the Stop/Reset button. 38 Faxing Precede single digit with a zero. SET WEEK LAST WEEK (2) Press the [ or ] button to select the month when summer time starts, then...
... [ or ] button to select the week when summer time ends, then press the OK button two times. Precede single digit with a zero. 7 Press the Stop/Reset button. 38 Faxing Precede single digit with a zero. SET WEEK LAST WEEK (2) Press the [ or ] button to select the month when summer time starts, then...
MX310 series Quick Start Guide
Page 44
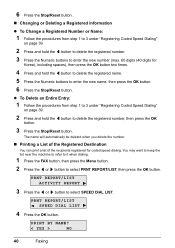
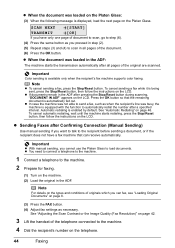
6 Press the Stop/Reset button. „ Changing or Deleting a Registered Information z To Change a Registered Number or Name: 1 Follow the procedures from step 1 to 3 under "...button to delete the registered name. 5 Press the Numeric buttons to enter the new name, then press the OK button. 6 Press the Stop/Reset button. You may want to keep the list near the machine to refer to it when dialing. 1 Press the FAX button, then press ...delete the registered number. 3 Press the Numeric buttons to delete the registered number, then press the OK button. 3 Press the Stop/Reset button.
6 Press the Stop/Reset button. „ Changing or Deleting a Registered Information z To Change a Registered Number or Name: 1 Follow the procedures from step 1 to 3 under "...button to delete the registered name. 5 Press the Numeric buttons to enter the new name, then press the OK button. 6 Press the Stop/Reset button. You may want to keep the list near the machine to refer to it when dialing. 1 Press the FAX button, then press ...delete the registered number. 3 Press the Numeric buttons to delete the registered number, then press the OK button. 3 Press the Stop/Reset button.
MX310 series Quick Start Guide
Page 48
... as when the recipient's line was loaded on the Platen Glass: (3) When the following message is being sent, press the Stop/Reset button, then follow the instructions on the LCD. Note For details on the machine. (2) Load the original in the ADF: The... telephone to the machine. 4 Dial the recipient's number on the Platen Glass. Automatic redialing is available only when the recipient's fax machine supports color faxing. See "Automatic Redialing" on the LCD. Important z With manual sending, you can receive automatically. z When the document was loaded in the...
... as when the recipient's line was loaded on the Platen Glass: (3) When the following message is being sent, press the Stop/Reset button, then follow the instructions on the LCD. Note For details on the machine. (2) Load the original in the ADF: The... telephone to the machine. 4 Dial the recipient's number on the Platen Glass. Automatic redialing is available only when the recipient's fax machine supports color faxing. See "Automatic Redialing" on the LCD. Important z With manual sending, you can receive automatically. z When the document was loaded in the...

MX310 series Quick Start Guide
Page 49
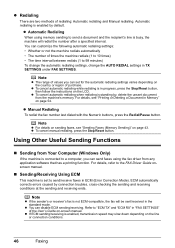
... the LCD. Note To cancel manual sending, press the Stop/Reset button. Important Color sending is available only when the recipient's fax machine supports color faxing. Faxing 45 Then hang up the handset. 5 Talk through the handset to dial. 4 Press the Color button for color sending, or the Black button for black & white sending. If...
... the LCD. Note To cancel manual sending, press the Stop/Reset button. Important Color sending is available only when the recipient's fax machine supports color faxing. Faxing 45 Then hang up the handset. 5 Talk through the handset to dial. 4 Press the Color button for color sending, or the Black button for black & white sending. If...
MX310 series Quick Start Guide
Page 50
...'s line is connected to a computer, you can disable ECM sending/receiving. z If ECM sending/receiving is in progress, press the Stop/Reset button, then follow the instructions on the line or connection conditions. 46 Faxing z Manual Redialing To redial the fax number last dialed with... the Numeric buttons, press the Redial/Pause button. z To cancel manual redialing, press the Stop/Reset button. z To cancel automatic redialing while redialing is enabled, transmission speed may slow down depending on the LCD. Using Other Useful Sending ...
...'s line is connected to a computer, you can disable ECM sending/receiving. z If ECM sending/receiving is in progress, press the Stop/Reset button, then follow the instructions on the line or connection conditions. 46 Faxing z Manual Redialing To redial the fax number last dialed with... the Numeric buttons, press the Redial/Pause button. z To cancel manual redialing, press the Stop/Reset button. z To cancel automatic redialing while redialing is enabled, transmission speed may slow down depending on the LCD. Using Other Useful Sending ...
MX310 series Quick Start Guide
Page 51
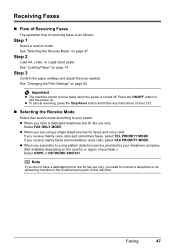
... a receive mode. See "Changing the Print Settings" on the country or region of purchase.): Select DRPD or NETWORK SWITCH. z To cancel receiving, press the Stop/Reset button and follow any instructions on the LCD. „ Selecting the Receive Mode Select the receive mode according to a ring pattern detection service provided by...
... a receive mode. See "Changing the Print Settings" on the country or region of purchase.): Select DRPD or NETWORK SWITCH. z To cancel receiving, press the Stop/Reset button and follow any instructions on the LCD. „ Selecting the Receive Mode Select the receive mode according to a ring pattern detection service provided by...

MX310 series Quick Start Guide
Page 53
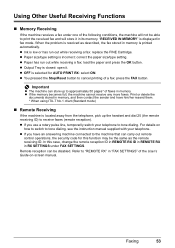
...service in RX SETTINGS under FAX SETTINGS. z If you have subscribed to pick up the handset before picking up the handset, then press the Stop/Reset button to control how the machine handles incoming calls. z If You Are Using a Single Telephone Line for a specified length of the User's Guide ... the telephone call will be modified to answer the call : The machine will receive faxes automatically even if you press the Stop/Reset button before pressing the Stop/Reset button. Set MAN/AUTO SWITCH in Hong Kong, the machine will ring. Refer to "MAN/AUTO SWITCH" in RX SETTINGS under...
...service in RX SETTINGS under FAX SETTINGS. z If you have subscribed to pick up the handset before picking up the handset, then press the Stop/Reset button to control how the machine handles incoming calls. z If You Are Using a Single Telephone Line for a specified length of the User's Guide ... the telephone call will be modified to answer the call : The machine will receive faxes automatically even if you press the Stop/Reset button before pressing the Stop/Reset button. Set MAN/AUTO SWITCH in Hong Kong, the machine will ring. Refer to "MAN/AUTO SWITCH" in RX SETTINGS under...
MX310 series Quick Start Guide
Page 57
... z The machine can be able to print the received fax and will store it . For details on -screen manual. Faxing 53 z You pressed the Stop/Reset button to the machine that can carry out remote control operations, the security code for this case, change the remote reception ID in REMOTE RX...
... z The machine can be able to print the received fax and will store it . For details on -screen manual. Faxing 53 z You pressed the Stop/Reset button to the machine that can carry out remote control operations, the security code for this case, change the remote reception ID in REMOTE RX...

MX310 series Quick Start Guide
Page 58
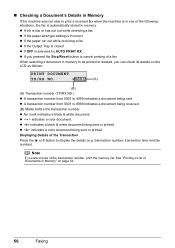
... PRNT REPORT/LIST (see "Summary of each document. Document Stored in Memory Important If you have canceled receiving a fax in progress by pressing the Stop/Reset button, the fax may be printed after the memory list. „ Printing or Deleting a Document in Memory 1 Press the FAX button, then press the Menu...
... PRNT REPORT/LIST (see "Summary of each document. Document Stored in Memory Important If you have canceled receiving a fax in progress by pressing the Stop/Reset button, the fax may be printed after the memory list. „ Printing or Deleting a Document in Memory 1 Press the FAX button, then press the Menu...

MX310 series Quick Start Guide
Page 59
If you want to print, or enter the number by pressing the Stop/Reset button, the fax may be printed after the selected document. (6) To print another document, return to step (2), or to finish deleting, go to select PRINT ... button. (4) Press the [ button to select YES to print the first page only, or press the ] button to select NO to step 5. 5 Press the Stop/Reset button.
If you want to print, or enter the number by pressing the Stop/Reset button, the fax may be printed after the selected document. (6) To print another document, return to step (2), or to finish deleting, go to select PRINT ... button. (4) Press the [ button to select YES to print the first page only, or press the ] button to select NO to step 5. 5 Press the Stop/Reset button.
MX310 series Quick Start Guide
Page 60
z A transaction number from 0001 to 4999 indicates a document being sent or printed. z indicates a color document being received. (B) Marks before the transaction number z No mark indicates a black & white document. Displaying Details of Documents in Memory" on the LCD as follows: ... a received fax when the machine is in one of the following situations, the fax is selected for AUTO PRINT RX z If you pressed the Stop/Reset button to cancel printing of a fax When selecting a document in memory to be printed or deleted, you are unsure of the transaction number, print the...
z A transaction number from 0001 to 4999 indicates a document being sent or printed. z indicates a color document being received. (B) Marks before the transaction number z No mark indicates a black & white document. Displaying Details of Documents in Memory" on the LCD as follows: ... a received fax when the machine is in one of the following situations, the fax is selected for AUTO PRINT RX z If you pressed the Stop/Reset button to cancel printing of a fax When selecting a document in memory to be printed or deleted, you are unsure of the transaction number, print the...
MX310 series Quick Start Guide
Page 72
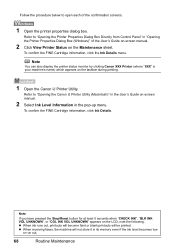
...View Printer Status on the Maintenance sheet. To confirm the FINE Cartridge information, click the Ink Details menu. Note If you have pressed the Stop/Reset button for at least 5 seconds when "CHECK INK", "BLK INK VOL UNKNOWN", or "COL INK VOL UNKNOWN" appears on the taskbar during ...the machine will be printed. To confirm the FINE Cartridge information, click Ink Details. Note You can also display the printer status monitor by clicking Canon XXX Printer (where "XXX" is your machine's name) which appears on the LCD, note the following. Follow the procedure below to "Opening...
...View Printer Status on the Maintenance sheet. To confirm the FINE Cartridge information, click the Ink Details menu. Note If you have pressed the Stop/Reset button for at least 5 seconds when "CHECK INK", "BLK INK VOL UNKNOWN", or "COL INK VOL UNKNOWN" appears on the taskbar during ...the machine will be printed. To confirm the FINE Cartridge information, click Ink Details. Note You can also display the printer status monitor by clicking Canon XXX Printer (where "XXX" is your machine's name) which appears on the LCD, note the following. Follow the procedure below to "Opening...
MX310 series Quick Start Guide
Page 82
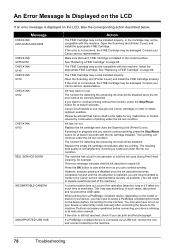
...is not resolved, the FINE Cartridge may be installed properly. Contact your Canon service representative. Canon recommends to use new genuine Canon cartridges in ink absorber to continue printing, press the Stop/Reset button for example. This error message indicates that each FINE Cartridge is installed...part of printing under the ink out condition. When printing from a PictBridge compliant device, depending on the device before connecting your Canon service representative as early as possible. (You will need to cancel the error so you may not be damaged. Install the ...
...is not resolved, the FINE Cartridge may be installed properly. Contact your Canon service representative. Canon recommends to use new genuine Canon cartridges in ink absorber to continue printing, press the Stop/Reset button for example. This error message indicates that each FINE Cartridge is installed...part of printing under the ink out condition. When printing from a PictBridge compliant device, depending on the device before connecting your Canon service representative as early as possible. (You will need to cancel the error so you may not be damaged. Install the ...


