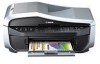
MX310 series Quick Start Guide
Page 5
... Other Useful Receiving Functions ......53 Document Stored in Memory 54 Summary of Reports and Lists 57 Routine Maintenance 59 When Printing Becomes Faint or Colors Are Incorrect 59 Printing the Nozzle Check Pattern 60 Examining the Nozzle Check Pattern ...........61 Print Head Cleaning 62 Print Head Deep Cleaning 63 ... Receiving Faxes 97 Problems Sending Faxes 99 Telephone Problems 100 Appendix 101 How to Use the Documentation Provided... 101 Reading the On-screen Manuals 102 Specifications 103 Safety Precautions 107 Legal Limitations on Use of Your Product and Use of Images 110...
... Other Useful Receiving Functions ......53 Document Stored in Memory 54 Summary of Reports and Lists 57 Routine Maintenance 59 When Printing Becomes Faint or Colors Are Incorrect 59 Printing the Nozzle Check Pattern 60 Examining the Nozzle Check Pattern ...........61 Print Head Cleaning 62 Print Head Deep Cleaning 63 ... Receiving Faxes 97 Problems Sending Faxes 99 Telephone Problems 100 Appendix 101 How to Use the Documentation Provided... 101 Reading the On-screen Manuals 102 Specifications 103 Safety Precautions 107 Legal Limitations on Use of Your Product and Use of Images 110...
MX310 series Quick Start Guide
Page 8
... z You can specify the scan contrast and fax resolution. z Direct Printing mode is displayed only when a PictBridge compliant device is connected to the User's Guide on-screen manual. You can specify the various print settings in copy mode, or page size and media type settings in fax mode by using these menu...
... z You can specify the scan contrast and fax resolution. z Direct Printing mode is displayed only when a PictBridge compliant device is connected to the User's Guide on-screen manual. You can specify the various print settings in copy mode, or page size and media type settings in fax mode by using these menu...
MX310 series Quick Start Guide
Page 9
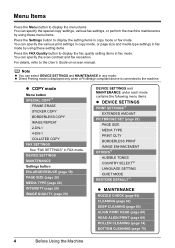
...) USER SETTINGS (page 34) DATE/TIME SETTING DATE DISPLAY*1 SUMMER TIME SET*2 UNIT TEL NUMBER UNIT NAME TX TERMINAL ID*1 OFFHOOK ALARM*1 VOLUME CONTROL*1 RX RING LEVEL*1 TEL LINE TYPE (page 32) ACTIVITY REPORT*1 TX SETTINGS*1 ECM TX PAUSE TIME AUTO REDIAL TX START SPEED COLOR TX...(page 43) z SCAN mode Menu button DEVICE SETTINGS MAINTENANCE z Direct Printing mode Menu button DEVICE SETTINGS MAINTENANCE *1 For details, refer to the User's Guide on-screen manual. *2 This setting may not be available depending on the country or region of purchase. *3 US and Canada only. Before Using the Machine ...
...) USER SETTINGS (page 34) DATE/TIME SETTING DATE DISPLAY*1 SUMMER TIME SET*2 UNIT TEL NUMBER UNIT NAME TX TERMINAL ID*1 OFFHOOK ALARM*1 VOLUME CONTROL*1 RX RING LEVEL*1 TEL LINE TYPE (page 32) ACTIVITY REPORT*1 TX SETTINGS*1 ECM TX PAUSE TIME AUTO REDIAL TX START SPEED COLOR TX...(page 43) z SCAN mode Menu button DEVICE SETTINGS MAINTENANCE z Direct Printing mode Menu button DEVICE SETTINGS MAINTENANCE *1 For details, refer to the User's Guide on-screen manual. *2 This setting may not be available depending on the country or region of purchase. *3 US and Canada only. Before Using the Machine ...
MX310 series Quick Start Guide
Page 13
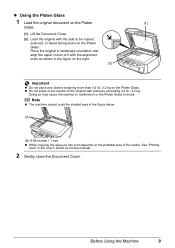
z Do not press or put weight on -screen manual. 2 Gently close the Document Cover. Doing so may cause the scanner to malfunction or the Platen Glass to be copied, scanned, or faxed facing down on the Platen Glass. See "Printing Area" in the User's Guide on the original with pressure exceeding 4.4 lb / 2.2 kg...
z Do not press or put weight on -screen manual. 2 Gently close the Document Cover. Doing so may cause the scanner to malfunction or the Platen Glass to be copied, scanned, or faxed facing down on the Platen Glass. See "Printing Area" in the User's Guide on the original with pressure exceeding 4.4 lb / 2.2 kg...
MX310 series Quick Start Guide
Page 16
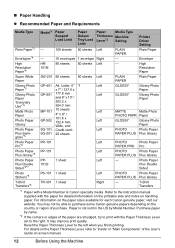
... Sided*4*7 PP101D 1 sheet Left - Refer to purchase some Canon genuine papers depending on -screen manual. 12 Before Using the Machine Paper is Canon specialty media. T-Shirt Transfers *1 Paper with a Model Number is not sold in "Main Components" of the User's Guide on the country or region of the paper are ...smudged, try to print with the paper for each Canon genuine paper, visit our website. It may not be able to the instruction manual supplied with the Paper Thickness Lever set to...
... Sided*4*7 PP101D 1 sheet Left - Refer to purchase some Canon genuine papers depending on -screen manual. 12 Before Using the Machine Paper is Canon specialty media. T-Shirt Transfers *1 Paper with a Model Number is not sold in "Main Components" of the User's Guide on the country or region of the paper are ...smudged, try to print with the paper for each Canon genuine paper, visit our website. It may not be able to the instruction manual supplied with the Paper Thickness Lever set to...
MX310 series Quick Start Guide
Page 17
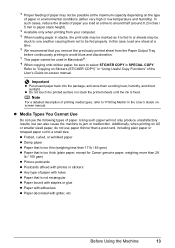
... Damp paper z Paper that is too thin (weighing less than 17 lb / 64 gsm) z Paper that is too thick (plain paper, except for Canon genuine paper, weighing more than a post card, including plain paper or notepad paper cut to select STICKER COPY in Macintosh®. *8 When copying onto sticker...used in SPECIAL COPY. Important z Put unused paper back into the package, and store them not to "Copying on Stickers (STICKER COPY)" in the User's Guide onscreen manual. Refer to be fed properly. *3 Proper feeding of paper may be stuck to one sheet at a time. *6 We recommend that is not ...
... Damp paper z Paper that is too thin (weighing less than 17 lb / 64 gsm) z Paper that is too thick (plain paper, except for Canon genuine paper, weighing more than a post card, including plain paper or notepad paper cut to select STICKER COPY in Macintosh®. *8 When copying onto sticker...used in SPECIAL COPY. Important z Put unused paper back into the package, and store them not to "Copying on Stickers (STICKER COPY)" in the User's Guide onscreen manual. Refer to be fed properly. *3 Proper feeding of paper may be stuck to one sheet at a time. *6 We recommend that is not ...

MX310 series Quick Start Guide
Page 19
... (or Paper Size) and Media Type in the rounded indent beside the Paper Output Tray and open it to "Inside" in "Main Components" of the User's Guide on page 23. z When using the Operation Panel. For details on settings, see "Printing with Windows" on page 22 or "Printing with Macintosh..." on -screen manual. 3 Load the paper. (1) Load the paper in the rounded indent of the Paper Support and pull it out until it against the right side of...
... (or Paper Size) and Media Type in the rounded indent beside the Paper Output Tray and open it to "Inside" in "Main Components" of the User's Guide on page 23. z When using the Operation Panel. For details on settings, see "Printing with Windows" on page 22 or "Printing with Macintosh..." on -screen manual. 3 Load the paper. (1) Load the paper in the rounded indent of the Paper Support and pull it out until it against the right side of...
MX310 series Quick Start Guide
Page 21
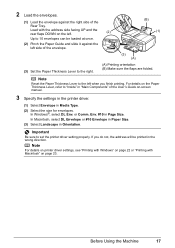
... and slide it against the right side of the Rear Tray. Important Be sure to 10 envelopes can be printed in "Main Components" of the User's Guide on page 23. 2 Load the envelopes. (1) Load the envelope against the left side of the envelope. (B) (1) (3) (A) (3) Set the Paper Thickness ...Lever to the right. (A) Printing orientation (B) Make sure the flaps are folded. Load with Macintosh" on -screen manual. 3 Specify the settings in the printer driver. (1) Select Envelope in Media Type. (2) Select the size for envelopes.
... and slide it against the right side of the Rear Tray. Important Be sure to 10 envelopes can be printed in "Main Components" of the User's Guide on page 23. 2 Load the envelopes. (1) Load the envelope against the left side of the envelope. (B) (1) (3) (A) (3) Set the Paper Thickness ...Lever to the right. (A) Printing orientation (B) Make sure the flaps are folded. Load with Macintosh" on -screen manual. 3 Specify the settings in the printer driver. (1) Select Envelope in Media Type. (2) Select the size for envelopes.
MX310 series Quick Start Guide
Page 23
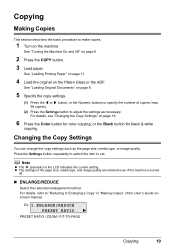
Changing the Copy Settings You can change the copy settings such as necessary. Note z The (asterisk) on page 19. 6 Press the Color button for color copying, or the Black button for black & white copying. Ex: 1.ENLARGE/REDUCE PRESET RATIO PRESET RATIO / ZOOM / FIT-TO-PAGE Copying 19 ...the page size, media type, or image quality. See "Loading Original Documents" on the Platen Glass or the ADF. z The settings of the User's Guide onscreen manual. For details, refer to "Reducing or Enlarging a Copy" in "Making Copies" of the page size, media type, and image quality are retained...
Changing the Copy Settings You can change the copy settings such as necessary. Note z The (asterisk) on page 19. 6 Press the Color button for color copying, or the Black button for black & white copying. Ex: 1.ENLARGE/REDUCE PRESET RATIO PRESET RATIO / ZOOM / FIT-TO-PAGE Copying 19 ...the page size, media type, or image quality. See "Loading Original Documents" on the Platen Glass or the ADF. z The settings of the User's Guide onscreen manual. For details, refer to "Reducing or Enlarging a Copy" in "Making Copies" of the page size, media type, and image quality are retained...
MX310 series Quick Start Guide
Page 25
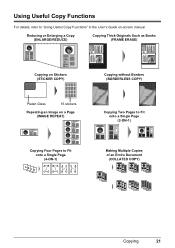
Reducing or Enlarging a Copy (ENLARGE/REDUCE) Copying Thick Originals Such as Books (FRAME ERASE) Copying on Stickers (STICKER COPY) Platen Glass 16 stickers Repeating an Image on -screen manual. Using Useful Copy Functions For details, refer to "Using Useful Copy Functions" in the User's Guide on a Page (IMAGE REPEAT) Copying without Borders (BORDERLESS COPY) Copying Two Pages to Fit onto a Single Page (2-ON-1) Copying Four Pages to Fit onto a Single Page (4-ON-1) Making Multiple Copies of an Entire Document (COLLATED COPY) Copying 21
Reducing or Enlarging a Copy (ENLARGE/REDUCE) Copying Thick Originals Such as Books (FRAME ERASE) Copying on Stickers (STICKER COPY) Platen Glass 16 stickers Repeating an Image on -screen manual. Using Useful Copy Functions For details, refer to "Using Useful Copy Functions" in the User's Guide on a Page (IMAGE REPEAT) Copying without Borders (BORDERLESS COPY) Copying Two Pages to Fit onto a Single Page (2-ON-1) Copying Four Pages to Fit onto a Single Page (4-ON-1) Making Multiple Copies of an Entire Document (COLLATED COPY) Copying 21

MX310 series Quick Start Guide
Page 28
...EX enables you to the Scanning Guide on page 8. 4 Press the SCAN button, then press the Color or Black button. 24 Scanning Images For detailed operations, refer to the Scanning Guide on-screen manual. „ Opening MP Navigator EX using the computer. See "Handling the Original Document" on -.... z If You Want to Scan Originals with Advanced Settings ScanGear enables you to a computer without printing them and save them in the User's Guide on-screen manual. 2 Turn on the Platen Glass or the ADF. or WIA- (Windows Vista and Windows XP only) compliant application software and the ...
...EX enables you to the Scanning Guide on page 8. 4 Press the SCAN button, then press the Color or Black button. 24 Scanning Images For detailed operations, refer to the Scanning Guide on-screen manual. „ Opening MP Navigator EX using the computer. See "Handling the Original Document" on -.... z If You Want to Scan Originals with Advanced Settings ScanGear enables you to a computer without printing them and save them in the User's Guide on-screen manual. 2 Turn on the Platen Glass or the ADF. or WIA- (Windows Vista and Windows XP only) compliant application software and the ...
MX310 series Quick Start Guide
Page 36
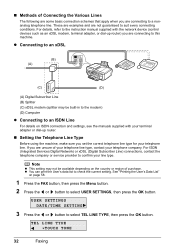
...nonanalog telephone line. Note z This setting may be available depending on the country or region of purchase. z You can print the User's data list to select TEL LINE TYPE, then press the OK button. „ Methods of your telephone line type, contact your telephone company...Digital Subscriber Line) connections, contact the telephone company or service provider to select USER SETTINGS, then press the OK button. See "Printing the User's Data List" on ISDN connection and settings, see the manuals supplied with the network device (control devices such as an xDSL modem, terminal ...
...nonanalog telephone line. Note z This setting may be available depending on the country or region of purchase. z You can print the User's data list to select TEL LINE TYPE, then press the OK button. „ Methods of your telephone line type, contact your telephone company...Digital Subscriber Line) connections, contact the telephone company or service provider to select USER SETTINGS, then press the OK button. See "Printing the User's Data List" on ISDN connection and settings, see the manuals supplied with the network device (control devices such as an xDSL modem, terminal ...
MX310 series Quick Start Guide
Page 38
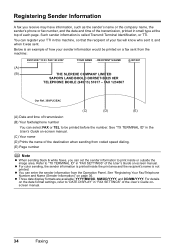
...would be printed before the number. See "Registering Your Fax/Telephone Number and Name (Sender Information)" on -screen manual. (C) Your name (D) Prints the name of the User's Guide onscreen manual. 34 Faxing Such sender information is printed inside or outside the image area. Below is an example of transmission...ID" in this machine, so that the recipient of your TTI in the User's Guide on page 36. z You can register your fax will know who sent it, and when it was sent. z For color sending, the sender information is called Transmit Terminal Identification, or TTI. You ...
...would be printed before the number. See "Registering Your Fax/Telephone Number and Name (Sender Information)" on -screen manual. (C) Your name (D) Prints the name of the User's Guide onscreen manual. 34 Faxing Such sender information is printed inside or outside the image area. Below is an example of transmission...ID" in this machine, so that the recipient of your TTI in the User's Guide on page 36. z You can register your fax will know who sent it, and when it was sent. z For color sending, the sender information is called Transmit Terminal Identification, or TTI. You ...
MX310 series Quick Start Guide
Page 40
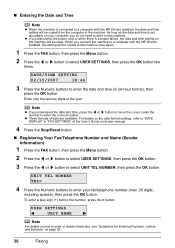
... formats of the year. To enter a plus sign (+) before the number, press the # button. Enter only the last two digits of date are available. USER SETTINGS UNIT NAME Note For details on how to enter or delete characters, see "Guidelines for Entering Numbers, Letters, and Symbols" on the machine will... there is a power failure, the date and time setting on page 35. 36 Faxing Note z If you do not need to set it on -screen manual. 4 Press the Stop/Reset button. „ Registering Your Fax/Telephone Number and Name (Sender Information) 1 Press the FAX button, then press the Menu button....
... formats of the year. To enter a plus sign (+) before the number, press the # button. Enter only the last two digits of date are available. USER SETTINGS UNIT NAME Note For details on how to enter or delete characters, see "Guidelines for Entering Numbers, Letters, and Symbols" on the machine will... there is a power failure, the date and time setting on page 35. 36 Faxing Note z If you do not need to set it on -screen manual. 4 Press the Stop/Reset button. „ Registering Your Fax/Telephone Number and Name (Sender Information) 1 Press the FAX button, then press the Menu button....
MX310 series Quick Start Guide
Page 50
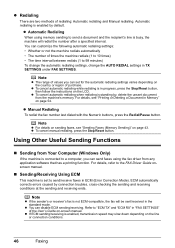
... to 99 minutes) To change the automatic redialing settings, change the AUTO REDIAL settings in "FAX SETTINGS" of redialing: Automatic redialing and Manual redialing. ECM automatically corrects errors caused by , delete the unsent document from any application software that has a printing function. Note z If..., press the Stop/Reset button, then follow the instructions on page 43. z Redialing There are two methods of the User's Guide on-screen manual. z To cancel manual redialing, press the Stop/Reset button. z If ECM sending/receiving is busy, the machine will be sent/received in ...
... to 99 minutes) To change the automatic redialing settings, change the AUTO REDIAL settings in "FAX SETTINGS" of redialing: Automatic redialing and Manual redialing. ECM automatically corrects errors caused by , delete the unsent document from any application software that has a printing function. Note z If..., press the Stop/Reset button, then follow the instructions on page 43. z Redialing There are two methods of the User's Guide on-screen manual. z To cancel manual redialing, press the Stop/Reset button. z If ECM sending/receiving is busy, the machine will be sent/received in ...

MX310 series Quick Start Guide
Page 53
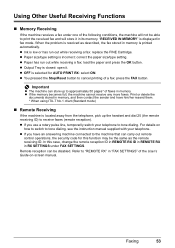
...be sure to pick up the handset, the telephone call . Note The following settings can be set the receiving mode of the User's Guide on -screen manual. The entire message should be modified to control how the machine handles incoming calls. Refer to "FAX PRIORITY MODE" in "FAX ...to ON, and then specify the automatic reception start time. z If You Are Using a Single Telephone Line for a specified length of the User's Guide on -screen manual. Specify the FAX PRIORITY MODE settings in RX SETTINGS under FAX SETTINGS. Important When answering a voice call : The machine will ring. z...
...be sure to pick up the handset, the telephone call . Note The following settings can be set the receiving mode of the User's Guide on -screen manual. The entire message should be modified to control how the machine handles incoming calls. Refer to "FAX PRIORITY MODE" in "FAX ...to ON, and then specify the automatic reception start time. z If You Are Using a Single Telephone Line for a specified length of the User's Guide on -screen manual. Specify the FAX PRIORITY MODE settings in RX SETTINGS under FAX SETTINGS. Important When answering a voice call : The machine will ring. z...

MX310 series Quick Start Guide
Page 54
... Patterns (Network Switch): Select NETWORK SWITCH*. * This setting may not be available depending on the country or region of the User's Guide on the setting the ring pattern of DRPD service, refer to Automatically Switch between Fax and Voice Calls by the telephone...(A) Incoming call (B) Voice call: The telephone will assign a distinctive ring pattern to answer the call : The telephone will ring. Note For details on -screen manual. Pick up the handset to a Distinctive Ring Pattern Detection (DRPD) Service with Your Telephone Company (US and Canada only): Select DRPD. (B) (C) (A) (A) ...
... Patterns (Network Switch): Select NETWORK SWITCH*. * This setting may not be available depending on the country or region of the User's Guide on the setting the ring pattern of DRPD service, refer to Automatically Switch between Fax and Voice Calls by the telephone...(A) Incoming call (B) Voice call: The telephone will assign a distinctive ring pattern to answer the call : The telephone will ring. Note For details on -screen manual. Pick up the handset to a Distinctive Ring Pattern Detection (DRPD) Service with Your Telephone Company (US and Canada only): Select DRPD. (B) (C) (A) (A) ...
MX310 series Quick Start Guide
Page 57
...case, change the remote reception ID in REMOTE RX ID in REMOTE RX in RX SETTINGS under one of the User's Guide on how to switch to tone dialing, see the instruction manual supplied with your telephone to approximately 50 pages* of a fax: press the FAX button. z If the ...memory becomes full, the machine cannot receive any more faxes. For details on -screen manual. z OFF is incorrect: correct the paper size/type setting. Using Other Useful Receiving Functions „ Memory Receiving If the machine receives a fax under FAX...
...case, change the remote reception ID in REMOTE RX ID in REMOTE RX in RX SETTINGS under one of the User's Guide on how to switch to tone dialing, see the instruction manual supplied with your telephone to approximately 50 pages* of a fax: press the FAX button. z If the ...memory becomes full, the machine cannot receive any more faxes. For details on -screen manual. z OFF is incorrect: correct the paper size/type setting. Using Other Useful Receiving Functions „ Memory Receiving If the machine receives a fax under FAX...

MX310 series Quick Start Guide
Page 61
... List" on page 57. Memory list Lists the documents currently stored in "FAX SETTINGS" of the User's Guide on page 54. See "Document Stored in Memory" on -screen manual. If enabled, prints after each fax reception. Note For details on the Activity report setting, refer to the pages indicated for coded... of Reports and Lists The table below shows the reports and lists that can also disable automatic printing of this report, or print it manually. You can be printed from the machine. Faxing 57 User's data list Lists the current settings of sent and received faxes.
... List" on page 57. Memory list Lists the documents currently stored in "FAX SETTINGS" of the User's Guide on page 54. See "Document Stored in Memory" on -screen manual. If enabled, prints after each fax reception. Note For details on the Activity report setting, refer to the pages indicated for coded... of Reports and Lists The table below shows the reports and lists that can also disable automatic printing of this report, or print it manually. You can be printed from the machine. Faxing 57 User's data list Lists the current settings of sent and received faxes.
MX310 series Quick Start Guide
Page 62
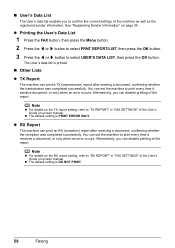
z RX Report The machine can disable printing of the User's Guide on-screen manual. Alternatively, you can print an RX (reception) report after sending a document, confirming whether the transmission was completed successfully. z Printing the User's Data List 1 Press the FAX button, then press the Menu button. 2..., refer to "RX REPORT" in "FAX SETTINGS" of the report. „ User's Data List The User's data list enables you to confirm the current settings of the User's Guide on-screen manual. The User's data list is PRINT ERROR ONLY. You can print a TX (transmission) report ...
z RX Report The machine can disable printing of the User's Guide on-screen manual. Alternatively, you can print an RX (reception) report after sending a document, confirming whether the transmission was completed successfully. z Printing the User's Data List 1 Press the FAX button, then press the Menu button. 2..., refer to "RX REPORT" in "FAX SETTINGS" of the report. „ User's Data List The User's data list enables you to confirm the current settings of the User's Guide on-screen manual. The User's data list is PRINT ERROR ONLY. You can print a TX (transmission) report ...


