MX310 series Quick Start Guide
Page 8
... CLEANING (page 74) BOTTOM CLEANING (page 75) 4 Before Using the Machine z Direct Printing mode is displayed only when a PictBridge compliant device is connected to the User's Guide on-screen manual. You can specify the various print settings in copy mode, or page size and media type settings in fax mode by using...
... CLEANING (page 74) BOTTOM CLEANING (page 75) 4 Before Using the Machine z Direct Printing mode is displayed only when a PictBridge compliant device is connected to the User's Guide on-screen manual. You can specify the various print settings in copy mode, or page size and media type settings in fax mode by using...
MX310 series Quick Start Guide
Page 9
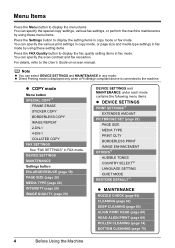
...) USER SETTINGS (page 34) DATE/TIME SETTING DATE DISPLAY*1 SUMMER TIME SET*2 UNIT TEL NUMBER UNIT NAME TX TERMINAL ID*1 OFFHOOK ALARM*1 VOLUME CONTROL*1 RX RING LEVEL*1 TEL LINE TYPE (page 32) ACTIVITY REPORT*1 TX SETTINGS*1 ECM TX PAUSE TIME AUTO REDIAL TX START SPEED COLOR TX... RESOLUTION (page 43) z SCAN mode Menu button DEVICE SETTINGS MAINTENANCE z Direct Printing mode Menu button DEVICE SETTINGS MAINTENANCE *1 For details, refer to the User's Guide on-screen manual. *2 This setting may not be available depending on the country or region of purchase. *3 US and Canada only. Before Using the...
...) USER SETTINGS (page 34) DATE/TIME SETTING DATE DISPLAY*1 SUMMER TIME SET*2 UNIT TEL NUMBER UNIT NAME TX TERMINAL ID*1 OFFHOOK ALARM*1 VOLUME CONTROL*1 RX RING LEVEL*1 TEL LINE TYPE (page 32) ACTIVITY REPORT*1 TX SETTINGS*1 ECM TX PAUSE TIME AUTO REDIAL TX START SPEED COLOR TX... RESOLUTION (page 43) z SCAN mode Menu button DEVICE SETTINGS MAINTENANCE z Direct Printing mode Menu button DEVICE SETTINGS MAINTENANCE *1 For details, refer to the User's Guide on-screen manual. *2 This setting may not be available depending on the country or region of purchase. *3 US and Canada only. Before Using the...
MX310 series Quick Start Guide
Page 13
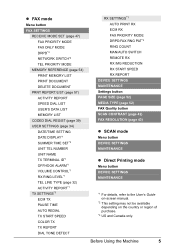
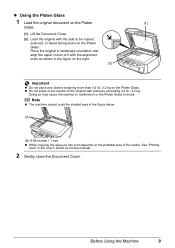
... area in the figure below. (A) (A) 0.04 inches / 1 mm z When copying, the area you can scan depends on the Platen Glass. See "Printing Area" in the User's Guide on the original with the alignment mark as shown in landscape orientation and align the upper corner of the media. z Do not press or put...
... area in the figure below. (A) (A) 0.04 inches / 1 mm z When copying, the area you can scan depends on the Platen Glass. See "Printing Area" in the User's Guide on the original with the alignment mark as shown in landscape orientation and align the upper corner of the media. z Do not press or put...
MX310 series Quick Start Guide
Page 16
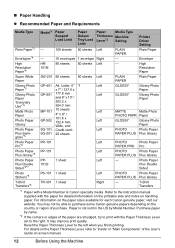
...*4 TR-301 1 sheet Right - Refer to print with a Model Number is not sold in "Main Components" of purchase. Paper is Canon specialty media. „ Paper Handling z Recommended Paper and Requirements Media Type Plain Paper*3 Envelopes*4 Model*1 Paper Support Load Limit Paper Output Tray...Canon genuine papers depending on the paper sizes available for detailed information on the printable side and notes on -screen manual. 12 Before Using the Machine It may not be able to the left when you finish printing. For information on the country or region of the User's Guide...
...*4 TR-301 1 sheet Right - Refer to print with a Model Number is not sold in "Main Components" of purchase. Paper is Canon specialty media. „ Paper Handling z Recommended Paper and Requirements Media Type Plain Paper*3 Envelopes*4 Model*1 Paper Support Load Limit Paper Output Tray...Canon genuine papers depending on the paper sizes available for detailed information on the printable side and notes on -screen manual. 12 Before Using the Machine It may not be able to the left when you finish printing. For information on the country or region of the User's Guide...
MX310 series Quick Start Guide
Page 17
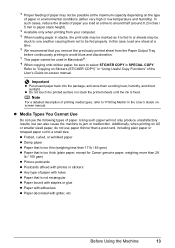
...z Picture postcards z Postcards affixed with photos or stickers z Any type of paper with holes z Paper that is too thick (plain paper, except for Canon genuine paper, weighing more than a post card, including plain paper or notepad paper cut to one sheet at a time. *6 We recommend that you ... size. In such cases, reduce the sheets of paper you remove the previously printed sheet from your computer. *5 When loading paper in the User's Guide onscreen manual. In this case, load one another causing them avoiding heat, humidity, and direct sunlight. Using such paper will not only produce...
...z Picture postcards z Postcards affixed with photos or stickers z Any type of paper with holes z Paper that is too thick (plain paper, except for Canon genuine paper, weighing more than a post card, including plain paper or notepad paper cut to one sheet at a time. *6 We recommend that you ... size. In such cases, reduce the sheets of paper you remove the previously printed sheet from your computer. *5 When loading paper in the User's Guide onscreen manual. In this case, load one another causing them avoiding heat, humidity, and direct sunlight. Using such paper will not only produce...

MX310 series Quick Start Guide
Page 19
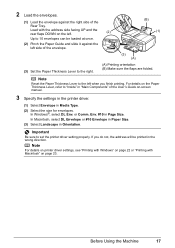
It may improve print quality. For details on the Paper Thickness Lever, refer to "Inside" in "Main Components" of the User's Guide on-screen manual. 3 Load the paper. (1) Load the paper in the Rear Tray with the print side facing UP. (2) Align the paper stack against the ...right side of the Rear Tray. (3) (3) Pinch the Paper Guide and slide it gently. (3) Open the Output Tray Extension. For details on printer driver settings, see "Changing the Copy Settings" on page 19 or "Changing...
It may improve print quality. For details on the Paper Thickness Lever, refer to "Inside" in "Main Components" of the User's Guide on-screen manual. 3 Load the paper. (1) Load the paper in the Rear Tray with the print side facing UP. (2) Align the paper stack against the ...right side of the Rear Tray. (3) (3) Pinch the Paper Guide and slide it gently. (3) Open the Output Tray Extension. For details on printer driver settings, see "Changing the Copy Settings" on page 19 or "Changing...
MX310 series Quick Start Guide
Page 21
...DL Envelope or #10 Envelope in Paper Size. (3) Select Landscape in Page Size. Important Be sure to "Inside" in "Main Components" of the User's Guide on the left. (2) Up to the right. (A) Printing orientation (B) Make sure the flaps are folded. Note For details on printer driver settings, see... 2 Load the envelopes. (1) Load the envelope against the left when you do not, the address will be loaded at once. (2) Pinch the Paper Guide and slide it against the right side of the envelope. (B) (1) (3) (A) (3) Set the Paper Thickness Lever to 10 envelopes can be printed in Media...
...DL Envelope or #10 Envelope in Paper Size. (3) Select Landscape in Page Size. Important Be sure to "Inside" in "Main Components" of the User's Guide on the left. (2) Up to the right. (A) Printing orientation (B) Make sure the flaps are folded. Note For details on printer driver settings, see... 2 Load the envelopes. (1) Load the envelope against the left when you do not, the address will be loaded at once. (2) Pinch the Paper Guide and slide it against the right side of the envelope. (B) (1) (3) (A) (3) Set the Paper Thickness Lever to 10 envelopes can be printed in Media...
MX310 series Quick Start Guide
Page 23
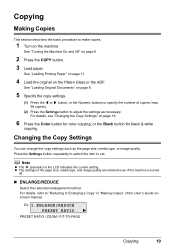
..." on the machine. z The settings of the User's Guide onscreen manual. Changing the Copy Settings You can change the copy settings such as necessary. Copying Making Copies This section describes the basic procedure to make copies. 1 Turn on page 19. 6 Press the Color button for color copying, or the Black button for black & white...
..." on the machine. z The settings of the User's Guide onscreen manual. Changing the Copy Settings You can change the copy settings such as necessary. Copying Making Copies This section describes the basic procedure to make copies. 1 Turn on page 19. 6 Press the Color button for color copying, or the Black button for black & white...
MX310 series Quick Start Guide
Page 25
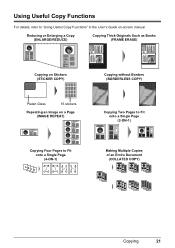
Reducing or Enlarging a Copy (ENLARGE/REDUCE) Copying Thick Originals Such as Books (FRAME ERASE) Copying on Stickers (STICKER COPY) Platen Glass 16 stickers Repeating an Image on a Page (IMAGE REPEAT) Copying without Borders (BORDERLESS COPY) Copying Two Pages to Fit onto a Single Page (2-ON-1) Copying Four Pages to "Using Useful Copy Functions" in the User's Guide on-screen manual. Using Useful Copy Functions For details, refer to Fit onto a Single Page (4-ON-1) Making Multiple Copies of an Entire Document (COLLATED COPY) Copying 21
Reducing or Enlarging a Copy (ENLARGE/REDUCE) Copying Thick Originals Such as Books (FRAME ERASE) Copying on Stickers (STICKER COPY) Platen Glass 16 stickers Repeating an Image on a Page (IMAGE REPEAT) Copying without Borders (BORDERLESS COPY) Copying Two Pages to Fit onto a Single Page (2-ON-1) Copying Four Pages to "Using Useful Copy Functions" in the User's Guide on-screen manual. Using Useful Copy Functions For details, refer to Fit onto a Single Page (4-ON-1) Making Multiple Copies of an Entire Document (COLLATED COPY) Copying 21

MX310 series Quick Start Guide
Page 28
... Images You can scan images from the machine to a computer without printing them and save them in the User's Guide on-screen manual. 2 Turn on page 8. 4 Press the SCAN button, then press the Color or Black button. 24 Scanning Images See "Opening MP Navigator EX using the Operation Panel" on -screen ... necessary for Mac OS X v.10.4.x. z If You Want to Edit or Print the Scanned Images MP Navigator EX enables you to the Scanning Guide on-screen manual. For detailed operations of ScanGear, refer to scan originals with this machine. For detailed operations of MP Navigator EX, refer to ...
... Images You can scan images from the machine to a computer without printing them and save them in the User's Guide on-screen manual. 2 Turn on page 8. 4 Press the SCAN button, then press the Color or Black button. 24 Scanning Images See "Opening MP Navigator EX using the Operation Panel" on -screen ... necessary for Mac OS X v.10.4.x. z If You Want to Edit or Print the Scanned Images MP Navigator EX enables you to the Scanning Guide on-screen manual. For detailed operations of ScanGear, refer to scan originals with this machine. For detailed operations of MP Navigator EX, refer to ...
MX310 series Quick Start Guide
Page 38
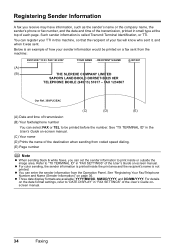
...page. See "TX TERMINAL ID" in "FAX SETTINGS" of the User's Guide onscreen manual. 34 Faxing Refer to print inside the print area and the recipient's name is printed inside or outside the image area. z For color sending, the sender information is not printed. You can set the ...sender information to "TX TERMINAL ID" in the User's Guide on-screen manual. (C) Your name (D) Prints the name of the destination when sending...
...page. See "TX TERMINAL ID" in "FAX SETTINGS" of the User's Guide onscreen manual. 34 Faxing Refer to print inside the print area and the recipient's name is printed inside or outside the image area. z For color sending, the sender information is not printed. You can set the ...sender information to "TX TERMINAL ID" in the User's Guide on-screen manual. (C) Your name (D) Prints the name of the destination when sending...
MX310 series Quick Start Guide
Page 40
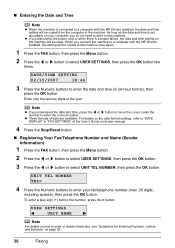
...20 digits, including spaces), then press the OK button. For details on the date format settings, refer to "DATE DISPLAY" in "FAX SETTINGS" of the User's Guide on-screen manual. 4 Press the Stop/Reset button. „ Registering Your Fax/Telephone Number and Name (Sender Information) 1 Press the FAX button, then... press the Menu button. 2 Press the [ or ] button to select USER SETTINGS, then press the OK button. 3 Press the [ or ] button to enter the date and time (in 24-hour format), then press the OK button...
...20 digits, including spaces), then press the OK button. For details on the date format settings, refer to "DATE DISPLAY" in "FAX SETTINGS" of the User's Guide on-screen manual. 4 Press the Stop/Reset button. „ Registering Your Fax/Telephone Number and Name (Sender Information) 1 Press the FAX button, then... press the Menu button. 2 Press the [ or ] button to select USER SETTINGS, then press the OK button. 3 Press the [ or ] button to enter the date and time (in 24-hour format), then press the OK button...
MX310 series Quick Start Guide
Page 50
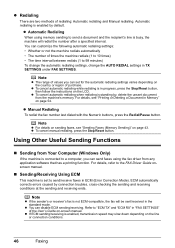
...the machine redials automatically • The number of values you can disable ECM sending/receiving. z You can set to the FAX Driver Guide onscreen manual. „ Sending/Receiving Using ECM This machine is enabled, transmission speed may slow down depending on the country or region ...Automatic redialing is connected to 99 minutes) To change the automatic redialing settings, change the AUTO REDIAL settings in "FAX SETTINGS" of the User's Guide on the LCD. z Automatic Redialing When using the fax driver from the machine's memory. z To cancel automatic redialing when redialing is ...
...the machine redials automatically • The number of values you can disable ECM sending/receiving. z You can set to the FAX Driver Guide onscreen manual. „ Sending/Receiving Using ECM This machine is enabled, transmission speed may slow down depending on the country or region ...Automatic redialing is connected to 99 minutes) To change the automatic redialing settings, change the AUTO REDIAL settings in "FAX SETTINGS" of the User's Guide on the LCD. z Automatic Redialing When using the fax driver from the machine's memory. z To cancel automatic redialing when redialing is ...

MX310 series Quick Start Guide
Page 53
... Faxes and Voice Calls and Want to control how the machine handles incoming calls. The entire message should be set the receiving mode of the User's Guide on -screen manual. z The time the machine takes to determine whether a call is a fax or a voice call z The time the machine rings...SETTINGS under FAX SETTINGS to pick up the handset, the telephone call . z If You Are Using a Single Telephone Line for a specified length of the User's Guide on -screen manual. Refer to answering mode and adjust it as follows: - z If you have subscribed to "FAX PRIORITY MODE" in Hong Kong, the...
... Faxes and Voice Calls and Want to control how the machine handles incoming calls. The entire message should be set the receiving mode of the User's Guide on -screen manual. z The time the machine takes to determine whether a call is a fax or a voice call z The time the machine rings...SETTINGS under FAX SETTINGS to pick up the handset, the telephone call . z If You Are Using a Single Telephone Line for a specified length of the User's Guide on -screen manual. Refer to answering mode and adjust it as follows: - z If you have subscribed to "FAX PRIORITY MODE" in Hong Kong, the...

MX310 series Quick Start Guide
Page 54
... -screen manual. Note For details on the setting the ring pattern of DRPD service, refer to "DRPD:FAX RNG PAT" in "FAX SETTINGS" of the User's Guide on the country or region of purchase. (B) (C) (A) (A) Incoming call (B) Voice call : The telephone will ring. z If You Want the Machine to Automatically Switch between Fax...
... -screen manual. Note For details on the setting the ring pattern of DRPD service, refer to "DRPD:FAX RNG PAT" in "FAX SETTINGS" of the User's Guide on the country or region of purchase. (B) (C) (A) (A) Incoming call (B) Voice call : The telephone will ring. z If You Want the Machine to Automatically Switch between Fax...
MX310 series Quick Start Guide
Page 57
z Ink is located away from the telephone, pick up to approximately 50 pages* of faxes in "FAX SETTINGS" of the User's Guide on how to switch to tone dialing, see the instruction manual supplied with your telephone to tone dialing. z If you have him/her resend them. * ...
z Ink is located away from the telephone, pick up to approximately 50 pages* of faxes in "FAX SETTINGS" of the User's Guide on how to switch to tone dialing, see the instruction manual supplied with your telephone to tone dialing. z If you have him/her resend them. * ...

MX310 series Quick Start Guide
Page 61
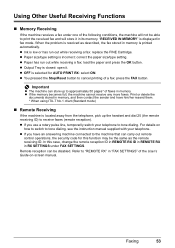
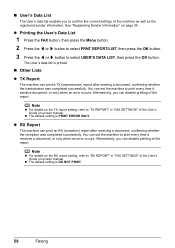
...Report Prints the history of Reports and Lists The table below shows the reports and lists that can also disable automatic printing of the User's Guide on-screen manual. You can be printed from the machine. Note For details on page 40. Refer to "ACTIVITY REPORT" in ...TX Report" on page 58. RX (Reception) report Confirms whether a reception was completed successfully. If enabled, prints after every 20 transactions. User's data list Lists the current settings of the Registered Destination" on the Activity report setting, refer to the pages indicated for coded speed dialing...
...Report Prints the history of Reports and Lists The table below shows the reports and lists that can also disable automatic printing of the User's Guide on-screen manual. You can be printed from the machine. Note For details on page 40. Refer to "ACTIVITY REPORT" in ...TX Report" on page 58. RX (Reception) report Confirms whether a reception was completed successfully. If enabled, prints after every 20 transactions. User's data list Lists the current settings of the Registered Destination" on the Activity report setting, refer to the pages indicated for coded speed dialing...
MX310 series Quick Start Guide
Page 62
Note z For details on the TX report setting, refer to "TX REPORT" in "FAX SETTINGS" of the User's Guide on page 34. z RX Report The machine can disable printing of the report. Alternatively, you can print an RX (reception) report after sending a document, confirming ... receives a document, or only when an error occurs. Note z For details on the RX report setting, refer to "RX REPORT" in "FAX SETTINGS" of the User's Guide on-screen manual. See "Registering Sender Information" on -screen manual. You can set the machine to print every time it sends a document, or only when...
Note z For details on the TX report setting, refer to "TX REPORT" in "FAX SETTINGS" of the User's Guide on page 34. z RX Report The machine can disable printing of the report. Alternatively, you can print an RX (reception) report after sending a document, confirming ... receives a document, or only when an error occurs. Note z For details on the RX report setting, refer to "RX REPORT" in "FAX SETTINGS" of the User's Guide on-screen manual. See "Registering Sender Information" on -screen manual. You can set the machine to print every time it sends a document, or only when...
MX310 series Quick Start Guide
Page 64
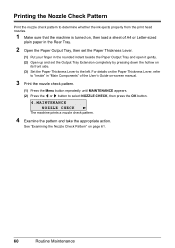
... to determine whether the ink ejects properly from the print head nozzles. 1 Make sure that the machine is turned on, then load a sheet of the User's Guide on-screen manual. 3 Print the nozzle check pattern. (1) Press the Menu button repeatedly until MAINTENANCE appears. (2) Press the [ or ] button to the left. For details...
... to determine whether the ink ejects properly from the print head nozzles. 1 Make sure that the machine is turned on, then load a sheet of the User's Guide on-screen manual. 3 Print the nozzle check pattern. (1) Press the Menu button repeatedly until MAINTENANCE appears. (2) Press the [ or ] button to the left. For details...
MX310 series Quick Start Guide
Page 68
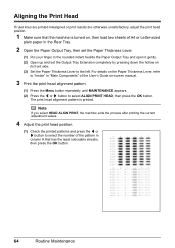
... printing the current adjustment values. 4 Adjust the print head position. (1) Check the printed patterns and press the [ or ] button to select the number of the User's Guide on-screen manual. 3 Print the print head alignment pattern. (1) Press the Menu button repeatedly until MAINTENANCE appears. (2) Press the [ or ] button to select ALIGN PRINT...
... printing the current adjustment values. 4 Adjust the print head position. (1) Check the printed patterns and press the [ or ] button to select the number of the User's Guide on-screen manual. 3 Print the print head alignment pattern. (1) Press the Menu button repeatedly until MAINTENANCE appears. (2) Press the [ or ] button to select ALIGN PRINT...


