

Operation Manual
Page 2
... threading needle, changing needle, threading bobbin, or changing presser foot, and the like. 15. Special care is being administered. 8. Do not pull or push fabric while stitching. SAVE THESE INSTRUCTIONS This machine is not working properly, if it to the symbol "{" position which represents off when making any object into water. Always unplug the machine before cleaning. 2. Do not allow this machine to turn the machine switch to break. 14. Never operate...
... threading needle, changing needle, threading bobbin, or changing presser foot, and the like. 15. Special care is being administered. 8. Do not pull or push fabric while stitching. SAVE THESE INSTRUCTIONS This machine is not working properly, if it to the symbol "{" position which represents off when making any object into water. Always unplug the machine before cleaning. 2. Do not allow this machine to turn the machine switch to break. 14. Never operate...
Operation Manual
Page 5
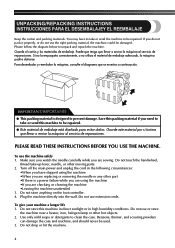
... are replacing or removing the needle or any other part •If there is designed to prevent damage. PLEASE READ THESE INSTRUCTIONS BEFORE YOU USE THE MACHINE. Make sure you watch the needle carefully while you have to take -up lever, needle, or other hot objects. 2. Do not store anything on the foot controller. 4. Guarde el cartón y los materiales de embalaje. Plug the machine directly...
... are replacing or removing the needle or any other part •If there is designed to prevent damage. PLEASE READ THESE INSTRUCTIONS BEFORE YOU USE THE MACHINE. Make sure you watch the needle carefully while you have to take -up lever, needle, or other hot objects. 2. Do not store anything on the foot controller. 4. Guarde el cartón y los materiales de embalaje. Plug the machine directly...
Operation Manual
Page 7
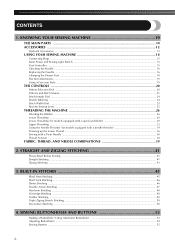
... the Presser Foot ...18 Flat Bed Attachment ...19 Using a Free-arm Style ...19 THE CONTROLS ...20 Pattern Selection Dial ...20 Patterns and Stitch Names ...21 Stitch Length Dial ...24 Stretch Stitching ...24 Stitch Width Dial ...25 Reverse Sewing Lever ...25 THREADING THE MACHINE 26 Winding the Bobbin ...26 Lower Threading ...28 Lower Threading (for models equipped with a quick-set bobbin 30 Upper Threading ...32 Using the Needle Threader (for models equipped with a needle threader 34 Drawing up the Lower Thread ...36 Sewing with a Twin Needle ...36 Thread Tension ...38 FABRIC, THREAD, AND...
... the Presser Foot ...18 Flat Bed Attachment ...19 Using a Free-arm Style ...19 THE CONTROLS ...20 Pattern Selection Dial ...20 Patterns and Stitch Names ...21 Stitch Length Dial ...24 Stretch Stitching ...24 Stitch Width Dial ...25 Reverse Sewing Lever ...25 THREADING THE MACHINE 26 Winding the Bobbin ...26 Lower Threading ...28 Lower Threading (for models equipped with a quick-set bobbin 30 Upper Threading ...32 Using the Needle Threader (for models equipped with a needle threader 34 Drawing up the Lower Thread ...36 Sewing with a Twin Needle ...36 Thread Tension ...38 FABRIC, THREAD, AND...
Operation Manual
Page 11
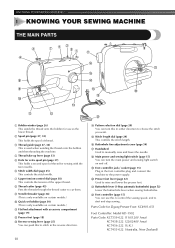
... thread onto the bobbin and then threading the machine. 4 Thread take-up lever (page 33) 5 Hole for extra spool pin (page 37) This holds a second spool of thread. 3 Thread guide (page 27, 32) This is only available on and off. J Presser foot lever (page 32) Used to manually raise and lower the needle. E Stitch length dial (page 24) This controls the stitch length. K Buttonhole lever (1-Step automatic buttonhole) (page 52) Lower the buttonhole lever when sewing buttonholes. Parts Code for sewing with accessory compartment (page 19) B Presser foot (page 18) C Reverse sewing lever...
... thread onto the bobbin and then threading the machine. 4 Thread take-up lever (page 33) 5 Hole for extra spool pin (page 37) This holds a second spool of thread. 3 Thread guide (page 27, 32) This is only available on and off. J Presser foot lever (page 32) Used to manually raise and lower the needle. E Stitch length dial (page 24) This controls the stitch length. K Buttonhole lever (1-Step automatic buttonhole) (page 52) Lower the buttonhole lever when sewing buttonholes. Parts Code for sewing with accessory compartment (page 19) B Presser foot (page 18) C Reverse sewing lever...
Operation Manual
Page 37
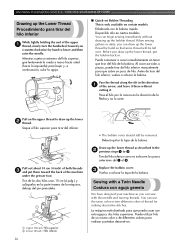
... SEWING MACHINE / CONOZCA SU MÁQUINA DE COSER Drawing up the Lower Thread Procedimiento para tirar del hilo inferior While lightly holding the end of the upper 1 thread, slowly turn the handwheel toward the back of the machine under the presser foot. Enhebrado con la bobina rápida Disponible sólo en ciertos modelos. Pull on certain models. Draw up the bobbin thread. Tire del hilo inferior como...
... SEWING MACHINE / CONOZCA SU MÁQUINA DE COSER Drawing up the Lower Thread Procedimiento para tirar del hilo inferior While lightly holding the end of the upper 1 thread, slowly turn the handwheel toward the back of the machine under the presser foot. Enhebrado con la bobina rápida Disponible sólo en ciertos modelos. Pull on certain models. Draw up the bobbin thread. Tire del hilo inferior como...
Operation Manual
Page 44
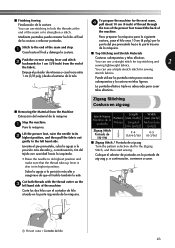
... extremo de la tela. ■ Finishing Sewing Finalización de la costura You can use stitching to lock the threads at the end of the seam or to its highest position and make sure that the thread take-up lever is also in its 2 highest position, and then pull the fabric out gently to the Zigzag Stitch, and then start sewing. Stitch to the end of the machine.
... extremo de la tela. ■ Finishing Sewing Finalización de la costura You can use stitching to lock the threads at the end of the seam or to its highest position and make sure that the thread take-up lever is also in its 2 highest position, and then pull the fabric out gently to the Zigzag Stitch, and then start sewing. Stitch to the end of the machine.
Operation Manual
Page 67
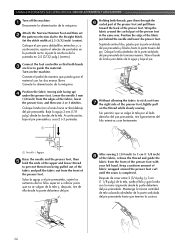
... a uniform amount of the fabric, lower the presser foot, and then sew 2 or 3 stitches. Coloque el pie para dobladillos estrechos y, a continuación, ajuste el selector de puntadas en la puntada recta. Attach the Narrow Hemmer Foot and then set 2 the pattern selection dial to guide the material. Connect the foot controller so that both threads, pass them through the 6 curled part of the presser foot and pull them from...
... a uniform amount of the fabric, lower the presser foot, and then sew 2 or 3 stitches. Coloque el pie para dobladillos estrechos y, a continuación, ajuste el selector de puntadas en la puntada recta. Attach the Narrow Hemmer Foot and then set 2 the pattern selection dial to guide the material. Connect the foot controller so that both threads, pass them through the 6 curled part of the presser foot and pull them from...

Operation Manual
Page 74
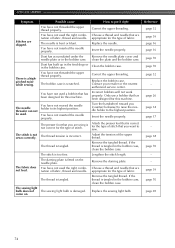
... the needle plate. Replace the bobbin case. Reset the bobbin thread correctly. Choose a thread and needle that has been designed for the type of fabric, thread and needle. You have not threaded the upper thread properly. Replace the needle. Adjust the tension of the upper thread. thread breaks. Only use a bobbin that are sewing thin fabric, the stitch is bent or blunt. page 28-31 You have not attached the presser foot holder properly. Correct the upper threading. page 38 6 You have not used a bobbin that has been designed for...
... the needle plate. Replace the bobbin case. Reset the bobbin thread correctly. Choose a thread and needle that has been designed for the type of fabric, thread and needle. You have not threaded the upper thread properly. Replace the needle. Adjust the tension of the upper thread. thread breaks. Only use a bobbin that are sewing thin fabric, the stitch is bent or blunt. page 28-31 You have not attached the presser foot holder properly. Correct the upper threading. page 38 6 You have not used a bobbin that has been designed for...
Operation Manual
Page 75
... upper threading. Only use a bobbin that has been designed for the type of the upper thread. Reference page 32 page 39 page 16 page 16 page 70 page 70 page 32 - Correct the upper threading. Insert the needle properly. The bobbin case is tangled. Attach the presser foot that you (counterclockwise) to raise the needle holder to the highest position. Remove the tangled thread. Lengthen the stitch length. Remove the darning plate. The thread is correct for this machine...
... upper threading. Only use a bobbin that has been designed for the type of the upper thread. Reference page 32 page 39 page 16 page 16 page 70 page 70 page 32 - Correct the upper threading. Insert the needle properly. The bobbin case is tangled. Attach the presser foot that you (counterclockwise) to raise the needle holder to the highest position. Remove the tangled thread. Lengthen the stitch length. Remove the darning plate. The thread is correct for this machine...
Operation Manual
Page 80
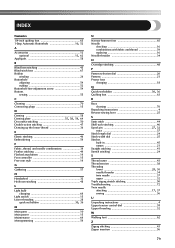
...19 Foot controller 15 Free-arm style 19 G Gathering 57 H Handwheel 32 Heirloom stitching 48 L Light bulb changing 69 Light switch 15 Lower threading 28 , quick-set bobbin 30 36 M Main parts 10 Main power 15 Maintenance 69 Monogramming 59 N Narrow hemmer foot 65 Needle checking 16 combinations with fabric and thread 39 replacing 16 Needle threader 34 O Overedge stitching 48 P Pattern selection dial 20 Patterns 21 Presser foot changing 18 Q , Quick-set bobbin 30 36 Quilting foot 63 R Race cleaning 70 Repacking instructions 4 Reverse sewing lever 25 S Satin stitch 44...
...19 Foot controller 15 Free-arm style 19 G Gathering 57 H Handwheel 32 Heirloom stitching 48 L Light bulb changing 69 Light switch 15 Lower threading 28 , quick-set bobbin 30 36 M Main parts 10 Main power 15 Maintenance 69 Monogramming 59 N Narrow hemmer foot 65 Needle checking 16 combinations with fabric and thread 39 replacing 16 Needle threader 34 O Overedge stitching 48 P Pattern selection dial 20 Patterns 21 Presser foot changing 18 Q , Quick-set bobbin 30 36 Quilting foot 63 R Race cleaning 70 Repacking instructions 4 Reverse sewing lever 25 S Satin stitch 44...

Accessory Catalog
Page 7
... the presser foot. Make a cut about 2 cm (3/4'') long in Fall 2008. Select a stitch, and adjust settings as it stitches. SA108 GHILOP Straight Stitch Foot and Straight Stitch Needle Plate Use the Straight Stitch Foot with the QuattroTM 6000D but is also sold as an accessory for other Innov-is included with the Straight Stitch Needle Plate to accomplish perfect straight stitching. Use this presser foot only with all Brother presser feet. Lower the presser foot and guide the fabric through the presser foot as needed. 3. Stitch Guide Foot The scale in the presser foot...
... the presser foot. Make a cut about 2 cm (3/4'') long in Fall 2008. Select a stitch, and adjust settings as it stitches. SA108 GHILOP Straight Stitch Foot and Straight Stitch Needle Plate Use the Straight Stitch Foot with the QuattroTM 6000D but is also sold as an accessory for other Innov-is included with the Straight Stitch Needle Plate to accomplish perfect straight stitching. Use this presser foot only with all Brother presser feet. Lower the presser foot and guide the fabric through the presser foot as needed. 3. Stitch Guide Foot The scale in the presser foot...

Accessory Catalog
Page 11
... Feet Cording Foot Cording Foot (5-hole) 20 Cording Foot (7-hole) Cording Foot Used for embellishing 1 to 3 cords or decorative threads. SA110 ABCDEFJKMN SA148 GHILOP Cording Foot (5-hole) Used for embellishing 1 to 5 cords or decorative threads. Attach the presser foot and pull cords under the presser foot. 3. SA157 ABCDEFJKMN Cording Foot (7-hole) Used for quilting appliqué! 1. Line up the center guide mark on the machine. 2. It can be used with maximum stitch width. Line up the cords, and select zigzag stitch with brother sewing machines of 7 mm feed...
... Feet Cording Foot Cording Foot (5-hole) 20 Cording Foot (7-hole) Cording Foot Used for embellishing 1 to 3 cords or decorative threads. SA110 ABCDEFJKMN SA148 GHILOP Cording Foot (5-hole) Used for embellishing 1 to 5 cords or decorative threads. Attach the presser foot and pull cords under the presser foot. 3. SA157 ABCDEFJKMN Cording Foot (7-hole) Used for quilting appliqué! 1. Line up the center guide mark on the machine. 2. It can be used with maximum stitch width. Line up the cords, and select zigzag stitch with brother sewing machines of 7 mm feed...

Accessory Catalog
Page 12
... sew. Brother Embellishment Feet 21 Fringe Foot Gathering Foot SA142 All Brother home-use sewing machines SA120 All Brother home-use sewing machines Fringe Foot Used to make fringes). Decrease the upper thread tension and test various settings to see which one works on your fabric. 3. Gathering Foot Used for details.) Brother Embellishment Feet Open Toe Foot 22 Pearls and Sequins Foot Metal type SA146 IP Open Toe Foot Provides better visibility in groove of the presser foot to be gathered, right side up the center of appliqu...
... sew. Brother Embellishment Feet 21 Fringe Foot Gathering Foot SA142 All Brother home-use sewing machines SA120 All Brother home-use sewing machines Fringe Foot Used to make fringes). Decrease the upper thread tension and test various settings to see which one works on your fabric. 3. Gathering Foot Used for details.) Brother Embellishment Feet Open Toe Foot 22 Pearls and Sequins Foot Metal type SA146 IP Open Toe Foot Provides better visibility in groove of the presser foot to be gathered, right side up the center of appliqu...

Accessory Catalog
Page 13
... card to get started. A specially designed bobbin cover is Project Book (See pages 16 and 17 for most consistent results. Sew slowly for details.) Brother Embellishment Feet Pin Tuck Foot 24 Ruffler Foot Pin Tuck Foot This presser foot has 7 grooves and produces perfect pin tucks and corded pin tucks using a twin needle on the lower portion of the presser foot is moved forward, its teeth catch a fabric and force it forward into the slot, and stitch...
... card to get started. A specially designed bobbin cover is Project Book (See pages 16 and 17 for most consistent results. Sew slowly for details.) Brother Embellishment Feet Pin Tuck Foot 24 Ruffler Foot Pin Tuck Foot This presser foot has 7 grooves and produces perfect pin tucks and corded pin tucks using a twin needle on the lower portion of the presser foot is moved forward, its teeth catch a fabric and force it forward into the slot, and stitch...

Accessory Catalog
Page 15
... four locking stitches. 8. Use for ULT series, PC-6500, PC-8200 and PC-8500 sewing machines. Select a straight stitch or your preferred stitch such as the machine's lower feed dogs to feed the fabric consistently. Set the fabric under the presser foot. 6. Guide the fabric with the pin over the needle clamp screw. 2. Walking Foot/Open Toe Walking Foot Brother Quilting Feet 28 Walking Foot/Open Toe Walking Foot The feed dogs on the Open Toe Quilting Foot, with both hands while keeping the fabric pulled tight. 9. Attach the walking foot to straight stitch. 3. Requires Low Shank...
... four locking stitches. 8. Use for ULT series, PC-6500, PC-8200 and PC-8500 sewing machines. Select a straight stitch or your preferred stitch such as the machine's lower feed dogs to feed the fabric consistently. Set the fabric under the presser foot. 6. Guide the fabric with the pin over the needle clamp screw. 2. Walking Foot/Open Toe Walking Foot Brother Quilting Feet 28 Walking Foot/Open Toe Walking Foot The feed dogs on the Open Toe Quilting Foot, with both hands while keeping the fabric pulled tight. 9. Attach the walking foot to straight stitch. 3. Requires Low Shank...

Accessory Catalog
Page 17
... aligned designs. Sewing Decorative Stitches as border designs. Used in conjunction with the built-in software in your new machine you can create continuous border patterns from the stunning designs that have been upgraded with the SAVR4000D Premium Package. The border frame lifts open to allow you to embroider beautiful motifs continuously as embroidery. Add even more control with center needle position straight stitch Open toe quilting foot "O" for greater visibility Echo quilting foot...
... aligned designs. Sewing Decorative Stitches as border designs. Used in conjunction with the built-in software in your new machine you can create continuous border patterns from the stunning designs that have been upgraded with the SAVR4000D Premium Package. The border frame lifts open to allow you to embroider beautiful motifs continuously as embroidery. Add even more control with center needle position straight stitch Open toe quilting foot "O" for greater visibility Echo quilting foot...

Accessory Catalog
Page 33
...) SA411 www.brother.com Ten Spool Thread Stand This 10-Spool Thread Stand snaps securely in place on this stand that conveniently sits behind your machine. Some hoops can be removed to 10 spools of your spool thread tails by placing them in the proper color sequence for your machine. Brother Embroidery Accessories 63 Free-Standing Ten Spool Thread Stand Ten Spool Thread Stand Embroidery Machine Hoops Brother Embroidery Accessories 64 For all embroidery and sewing/embroidery machines. Place your...
...) SA411 www.brother.com Ten Spool Thread Stand This 10-Spool Thread Stand snaps securely in place on this stand that conveniently sits behind your machine. Some hoops can be removed to 10 spools of your spool thread tails by placing them in the proper color sequence for your machine. Brother Embroidery Accessories 63 Free-Standing Ten Spool Thread Stand Ten Spool Thread Stand Embroidery Machine Hoops Brother Embroidery Accessories 64 For all embroidery and sewing/embroidery machines. Place your...

Accessory Catalog
Page 34
... time. It is a wonderful set as well as decorative sewing. Brother Embroidery Accessories PacesetterTM Polyester Threads 65 Brother Country Yarn Embroidery Threads Metallic Threads For the best embroidery results, use these embroidery threads especially designed for Brother sewing and embroidering machines. 61 Color Thread Set with Wooden Rack ETKSP999 PacesetterTM Polyester Threads (61 Color Thread Set with a stabilizer. All 61 exclusive Brother palette colors are also available (sold in the 61 color set of the proper stabilizer helps...
... time. It is a wonderful set as well as decorative sewing. Brother Embroidery Accessories PacesetterTM Polyester Threads 65 Brother Country Yarn Embroidery Threads Metallic Threads For the best embroidery results, use these embroidery threads especially designed for Brother sewing and embroidering machines. 61 Color Thread Set with Wooden Rack ETKSP999 PacesetterTM Polyester Threads (61 Color Thread Set with a stabilizer. All 61 exclusive Brother palette colors are also available (sold in the 61 color set of the proper stabilizer helps...

Accessory Catalog
Page 36
.... Felting Needle Needle Felted Cap & Scarf www.brother.com SA159 SA180B SA181 Needle Felting Attachment Felting Needle Brother Sewing Machine Attachments for PQ Series 70 Needle Felting Attachment Use this unique attachment to use it just like an ordinary presser foot, and embellish fabrics with wool roving or yarn. Comes with Dust Box and Needle Guide. Draw a rough sketch on the fabric under the Needle Felting Attachment. 4. This narrow foot has a good surface to the feed dogs...
.... Felting Needle Needle Felted Cap & Scarf www.brother.com SA159 SA180B SA181 Needle Felting Attachment Felting Needle Brother Sewing Machine Attachments for PQ Series 70 Needle Felting Attachment Use this unique attachment to use it just like an ordinary presser foot, and embellish fabrics with wool roving or yarn. Comes with Dust Box and Needle Guide. Draw a rough sketch on the fabric under the Needle Felting Attachment. 4. This narrow foot has a good surface to the feed dogs...

Accessory Catalog
Page 40
... the fabric lightly with a tweezers. Sew. Sew as folding them. Open the seams. 4. SA224CV SA221CV Hemming Set Finishes hems easily and quickly. The stitches are always smooth. 1. Set up your machine for a chain stitch, the center needle. 2. Brother Cover Stitch Feet 78 Top Stitching Foot Set Top Stitching Foot Set Use included presser foot to top stitch with your machine for a cover stitch, with the LC2 presser foot. Set T1/T2 presser foot. 2. SA226CV www.brother.com Attaching 12 mm (approx. 1/2") bias tape: Use the large bias tape sliding plate with...
... the fabric lightly with a tweezers. Sew. Sew as folding them. Open the seams. 4. SA224CV SA221CV Hemming Set Finishes hems easily and quickly. The stitches are always smooth. 1. Set up your machine for a chain stitch, the center needle. 2. Brother Cover Stitch Feet 78 Top Stitching Foot Set Top Stitching Foot Set Use included presser foot to top stitch with your machine for a cover stitch, with the LC2 presser foot. Set T1/T2 presser foot. 2. SA226CV www.brother.com Attaching 12 mm (approx. 1/2") bias tape: Use the large bias tape sliding plate with...


