

Operation Manual
Page 2
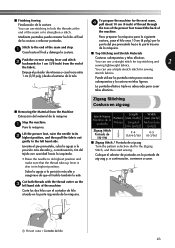
...Switch the machine to the symbol "{" position to turn the machine switch to the nearest authorized dealer or service center for use . 1 This sewing machine is intended for its intended use the proper needle plate. Always unplug the machine before cleaning. 2. Special care is not working properly, if it to...area, such as contained in the instruction manual. 16. To reduce the risk of burns, fire, electric shock, or injury to break. 12. Use only accessories recommended by pulling on cord. Never operate this machine if it has a damaged cord or plug, if it is required around the ...
...Switch the machine to the symbol "{" position to turn the machine switch to the nearest authorized dealer or service center for use . 1 This sewing machine is intended for its intended use the proper needle plate. Always unplug the machine before cleaning. 2. Special care is not working properly, if it to...area, such as contained in the instruction manual. 16. To reduce the risk of burns, fire, electric shock, or injury to break. 12. Use only accessories recommended by pulling on cord. Never operate this machine if it has a damaged cord or plug, if it is required around the ...
Operation Manual
Page 4
... wire which is coloured blue must be destroyed as marked on plug. The wire which is coloured brown must be fitted in the plug. Never use a fuse approved by ASTA to BS 1362, i.e. FOR USERS IN THE UK, EIRE, MALTA AND CYPRUS ONLY If this machine is fitted with a three-pin... then please read the following code: Blue Neutral Brown Live As the colours of the wiring in the main lead of replacing the plug fuse, use plugs with the fuse cover omitted. IMPORTANT If the available socket outlet is hazardous if engaged in a live socket outlet.
... wire which is coloured blue must be destroyed as marked on plug. The wire which is coloured brown must be fitted in the plug. Never use a fuse approved by ASTA to BS 1362, i.e. FOR USERS IN THE UK, EIRE, MALTA AND CYPRUS ONLY If this machine is fitted with a three-pin... then please read the following code: Blue Neutral Brown Live As the colours of the wiring in the main lead of replacing the plug fuse, use plugs with the fuse cover omitted. IMPORTANT If the available socket outlet is hazardous if engaged in a live socket outlet.
Operation Manual
Page 5
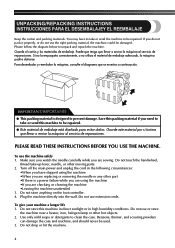
... de embalaje. Para desembalar y reembalar la máquina, consulte el diagrama que se muestra a continuación. PLEASE READ THESE INSTRUCTIONS BEFORE YOU USE THE MACHINE. Do not touch the handwheel, thread take or send the machine to unpack and repack the machine. Do not store anything on the...or cleaning the machine •Leaving the machine unattended 3. Puede que tenga que llevar o enviar la máquina al servicio de reparaciones. To use or store the machine near a heater, iron, halogen lamp or other hot objects. 2. Make sure you watch the needle carefully while you do...
... de embalaje. Para desembalar y reembalar la máquina, consulte el diagrama que se muestra a continuación. PLEASE READ THESE INSTRUCTIONS BEFORE YOU USE THE MACHINE. Do not touch the handwheel, thread take or send the machine to unpack and repack the machine. Do not store anything on the...or cleaning the machine •Leaving the machine unattended 3. Puede que tenga que llevar o enviar la máquina al servicio de reparaciones. To use or store the machine near a heater, iron, halogen lamp or other hot objects. 2. Make sure you watch the needle carefully while you do...
Operation Manual
Page 7
...41 Straight Stitching ...41 Zigzag Stitching ...43 l 3. KNOWING YOUR SEWING MACHINE 10 THE MAIN PARTS ...10 ACCESSORIES ...12 Optional Accessories ...13 USING YOUR SEWING MACHINE 14 Connecting Plugs ...15 Main Power and Sewing Light Switch ...15 Foot Controller ...15 Checking the Needle ...16 Replacing the... Needle ...16 Changing the Presser Foot ...18 Flat Bed Attachment ...19 Using a Free-arm Style ...19 THE CONTROLS ...20 Pattern Selection Dial ...20 Patterns and Stitch Names ...21 Stitch Length Dial ...24 Stretch...
...41 Straight Stitching ...41 Zigzag Stitching ...43 l 3. KNOWING YOUR SEWING MACHINE 10 THE MAIN PARTS ...10 ACCESSORIES ...12 Optional Accessories ...13 USING YOUR SEWING MACHINE 14 Connecting Plugs ...15 Main Power and Sewing Light Switch ...15 Foot Controller ...15 Checking the Needle ...16 Replacing the... Needle ...16 Changing the Presser Foot ...18 Flat Bed Attachment ...19 Using a Free-arm Style ...19 THE CONTROLS ...20 Pattern Selection Dial ...20 Patterns and Stitch Names ...21 Stitch Length Dial ...24 Stretch...
Operation Manual
Page 8
APPENDIX ...69 MAINTENANCE ...69 Changing the Light Bulb ...69 Cleaning ...70 Troubleshooting ...72 INDEX ...79 7 USING ATTACHMENTS AND APPLICATIONS 56 Zipper Insertion ...56 Gathering ...57 Darning ...58 Appliqués ...58 Monogramming and Embroidering ...59 OPTIONAL ACCESSORIES 62 Using the Walking Foot ...62 Using the Quilting Foot ...63 Using the 1/4-inch Quilting Foot ...65 Using the Narrow Hemmer Foot ...65 Using the Blind Stitch Foot ...67 6. 5.
APPENDIX ...69 MAINTENANCE ...69 Changing the Light Bulb ...69 Cleaning ...70 Troubleshooting ...72 INDEX ...79 7 USING ATTACHMENTS AND APPLICATIONS 56 Zipper Insertion ...56 Gathering ...57 Darning ...58 Appliqués ...58 Monogramming and Embroidering ...59 OPTIONAL ACCESSORIES 62 Using the Walking Foot ...62 Using the Quilting Foot ...63 Using the 1/4-inch Quilting Foot ...65 Using the Narrow Hemmer Foot ...65 Using the Blind Stitch Foot ...67 6. 5.
Operation Manual
Page 11
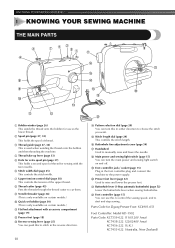
...) I Foot controller jack / socket (page 15) Plug in either direction to manually raise and lower the needle. J Presser foot lever (page 32) Used to the power supply. KNOWING YOUR SEWING MACHINE 1 KNOWING YOUR SEWING MACHINE THE MAIN PARTS 1 Bobbin winder (page 26) This winds the thread onto the... bobbin for use this in the foot controller plug and connect the machine to raise and lower the presser foot. F Buttonhole fine-adjustment screw (page 54) G...
...) I Foot controller jack / socket (page 15) Plug in either direction to manually raise and lower the needle. J Presser foot lever (page 32) Used to the power supply. KNOWING YOUR SEWING MACHINE 1 KNOWING YOUR SEWING MACHINE THE MAIN PARTS 1 Bobbin winder (page 26) This winds the thread onto the... bobbin for use this in the foot controller plug and connect the machine to raise and lower the presser foot. F Buttonhole fine-adjustment screw (page 54) G...
Operation Manual
Page 19
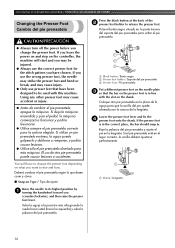
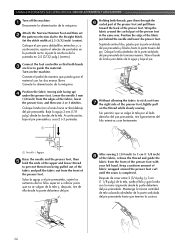
... el pie prensatela correcto para la costura elegida. Press the black button at the back of the 2 presser foot holder to be injured. ● Always use presser feet that the bar on what you change the presser foot. El uso de otro pie prensatela puede causar lesiones o accidentes. Suba la aguja...; ajustarse perfectamente. 1 Shank / Lengüeta 18 If you leave the power on and step on the needle plate 3 so that have chosen. If you use the wrong presser foot, the needle may strike the presser foot and bend or break, and may cause accident or injury. ● Antes de cambiar...
... el pie prensatela correcto para la costura elegida. Press the black button at the back of the 2 presser foot holder to be injured. ● Always use presser feet that the bar on what you change the presser foot. El uso de otro pie prensatela puede causar lesiones o accidentes. Suba la aguja...; ajustarse perfectamente. 1 Shank / Lengüeta 18 If you leave the power on and step on the needle plate 3 so that have chosen. If you use the wrong presser foot, the needle may strike the presser foot and bend or break, and may cause accident or injury. ● Antes de cambiar...
Operation Manual
Page 27
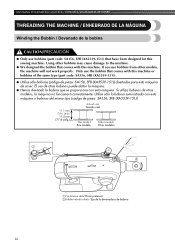
...quina. Si utiliza bobinas de otros modelos, la máquina no funcionará correctamente. If you use bobbins (part code: SA156, SFB (XA5539-151)) that have been designed for this sewing machine. Using other models, the machine will not work properly. KNOWING YOUR SEWING MACHINE / CONOZCA SU MÁQUINA ...DE COSER THREADING THE MACHINE / ENHEBRADO DE LA MÁQUINA Winding the Bobbin / Devanado de la bobina CAUTION/PRECAUCIÓN ● Only use bobbins from other bobbins may cause damage to the machine. ● We designed the bobbin that comes with this machine.
...quina. Si utiliza bobinas de otros modelos, la máquina no funcionará correctamente. If you use bobbins (part code: SA156, SFB (XA5539-151)) that have been designed for this sewing machine. Using other models, the machine will not work properly. KNOWING YOUR SEWING MACHINE / CONOZCA SU MÁQUINA ...DE COSER THREADING THE MACHINE / ENHEBRADO DE LA MÁQUINA Winding the Bobbin / Devanado de la bobina CAUTION/PRECAUCIÓN ● Only use bobbins from other bobbins may cause damage to the machine. ● We designed the bobbin that comes with this machine.
Operation Manual
Page 37
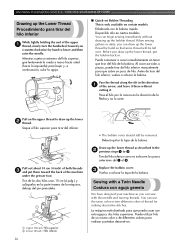
... so you (counterclockwise) by hand so that some thread will be removed. Before you can draw up the lower thread, put them toward you can use the same color or two different colors of the upper 1 thread, slowly turn the handwheel toward the back of the arrow, and leave it there...
... so you (counterclockwise) by hand so that some thread will be removed. Before you can draw up the lower thread, put them toward you can use the same color or two different colors of the upper 1 thread, slowly turn the handwheel toward the back of the arrow, and leave it there...
Operation Manual
Page 44
...machine. Puede utilizar la puntada recta para costuras sobrepuestas y la costura en telas ligeras. Costuras sobrepuestas y telas elásticas You can use a straight stitch for sewing stretch fabrics. La puntada elástica triple es adecuada para coser telas elásticas. ■ ...the fabric. Empuje el pulsador de retroceso y cosa hacia atrás 1 cm (3/8 pulg.) desde el extremo de la tela. You can use a triple stretch stitch for top stitching and 2 sewing lightweight fabrics. Lift the presser foot, raise the needle to its highest position. Levante ...
...machine. Puede utilizar la puntada recta para costuras sobrepuestas y la costura en telas ligeras. Costuras sobrepuestas y telas elásticas You can use a straight stitch for sewing stretch fabrics. La puntada elástica triple es adecuada para coser telas elásticas. ■ ...the fabric. Empuje el pulsador de retroceso y cosa hacia atrás 1 cm (3/8 pulg.) desde el extremo de la tela. You can use a triple stretch stitch for top stitching and 2 sewing lightweight fabrics. Lift the presser foot, raise the needle to its highest position. Levante ...
Operation Manual
Page 67
... presser foot in the same way. Lower the needle 3 mm (1/8 inch) from the front of the presser foot. After sewing 2 (3/4 inch) to the Straight Stitch. USING ATTACHMENTS AND APPLICATIONS / USO DE ACCESORIOS Y APLICACIONES Turn off the machine. 1 Desconecte la alimentación de la máquina. Turn on the thread while slowly...
... presser foot in the same way. Lower the needle 3 mm (1/8 inch) from the front of the presser foot. After sewing 2 (3/4 inch) to the Straight Stitch. USING ATTACHMENTS AND APPLICATIONS / USO DE ACCESORIOS Y APLICACIONES Turn off the machine. 1 Desconecte la alimentación de la máquina. Turn on the thread while slowly...
Operation Manual
Page 68
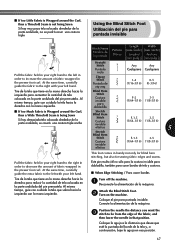
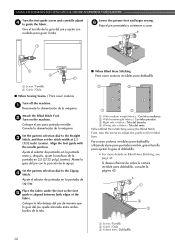
... for blind hem stitching, but also for sewing fabric edges and seams. Este pie resulta útil no se podrá coser una costura triple Using the Blind Stitch Foot Utilización del pie para puntada invisible Pull the fabric held in your right hand to the right in order to...
... for blind hem stitching, but also for sewing fabric edges and seams. Este pie resulta útil no se podrá coser una costura triple Using the Blind Stitch Foot Utilización del pie para puntada invisible Pull the fabric held in your right hand to the right in order to...
Operation Manual
Page 69
USING ATTACHMENTS AND APPLICATIONS / USO DE ACCESORIOS Y APLICACIONES Turn the foot guide screw and carefully adjust 4 to the Straight 3 Stitch, and then set the stitch width .... Place the fabric under the foot so the foot 5 guide is aligned between both edges of fabric / Tela del revés When Blind Hem Stitching using the Blind Stitch Foot, turn the screw to adjust the guide to the Zigzag 4 Stitch. Para coser costuras invisibles para dobladillo utilizando el pie para...
USING ATTACHMENTS AND APPLICATIONS / USO DE ACCESORIOS Y APLICACIONES Turn the foot guide screw and carefully adjust 4 to the Straight 3 Stitch, and then set the stitch width .... Place the fabric under the foot so the foot 5 guide is aligned between both edges of fabric / Tela del revés When Blind Hem Stitching using the Blind Stitch Foot, turn the screw to adjust the guide to the Zigzag 4 Stitch. Para coser costuras invisibles para dobladillo utilizando el pie para...
Operation Manual
Page 73
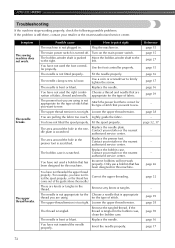
...main power switch is still there, contact your retailer or the nearest authorized service center. Fit the needle properly. You have not used the foot controller properly. Replace the needle plate. Replace the presser foot. come out of fabric. APPENDIX / ANEXO Troubleshooting If the... tangled thread. You have not fitted the spool properly, or the thread has Correct the upper threading. The bobbin-winder shaft is tangled. Use the foot controller properly. Choose a thread and needle that has been designed for this machine. Lightly guide the fabric. page 32, 37 ...
...main power switch is still there, contact your retailer or the nearest authorized service center. Fit the needle properly. You have not used the foot controller properly. Replace the needle plate. Replace the presser foot. come out of fabric. APPENDIX / ANEXO Troubleshooting If the... tangled thread. You have not fitted the spool properly, or the thread has Correct the upper threading. The bobbin-winder shaft is tangled. Use the foot controller properly. Choose a thread and needle that has been designed for this machine. Lightly guide the fabric. page 32, 37 ...

Operation Manual
Page 74
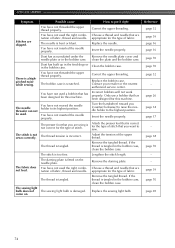
...for this machine. Adjust the tension of thread and needle for the type of fabric, thread and needle. page 38 6 You have not used a bobbin that has been designed for this machine. - Thread the upper thread and wind the bobbin thread properly. page 38 73 Contact ...your retailer or the nearest authorized service center. - Correct the upper threading. page 26 The thread ten- You have not used the right combination of fabric. Contact your retailer or the nearest authorized service center. - Wind the bobbin properly. Choose a thread and needle ...
...for this machine. Adjust the tension of thread and needle for the type of fabric, thread and needle. page 38 6 You have not used a bobbin that has been designed for this machine. - Thread the upper thread and wind the bobbin thread properly. page 38 73 Contact ...your retailer or the nearest authorized service center. - Correct the upper threading. page 26 The thread ten- You have not used the right combination of fabric. Contact your retailer or the nearest authorized service center. - Wind the bobbin properly. Choose a thread and needle ...
Operation Manual
Page 75
...the needle properly. Attach the presser foot that is not sewn correctly. The stitch is correct for the type of stitch that you are using is tangled. Remove the tangled thread. The darning plate is a highpitched noise while sewing. If the thread is incorrect. Insert the ... - The bobbin case is too fine. The stitch is scratched. APPENDIX / ANEXO Symptom Possible cause How to put it right You have not used a bobbin that are appropriate for the type of fabric. Remove the tangled thread. Clean the bobbin case. Lengthen the stitch length. There is ...
...the needle properly. Attach the presser foot that is not sewn correctly. The stitch is correct for the type of stitch that you are using is tangled. Remove the tangled thread. The darning plate is a highpitched noise while sewing. If the thread is incorrect. Insert the ... - The bobbin case is too fine. The stitch is scratched. APPENDIX / ANEXO Symptom Possible cause How to put it right You have not used a bobbin that are appropriate for the type of fabric. Remove the tangled thread. Clean the bobbin case. Lengthen the stitch length. There is ...

Accessory Catalog
Page 3
...-is 500D, SE270D, HE120/PKG, CS80, CS8060, CS8150 Cassette-type Sewing & Embroidery Combination Machines Utilizing an easy to use, unique cassette based threading system, these compact but friendly and inviting. These embroidery only machines create beautiful embroidered results...Innov-is NX650Q, 450Q, 450, 250 Full Feature Sewing & Quilting Machines Create tomorrow's quilted heirloom with today's technology with leading-edge technology Brother's new and exciting high-end sewing and embroidery machine Quattro™ 6000D is 900D/ SE-350/ HE-240/LB6770 Sewing & Embroidery Combination...
...-is 500D, SE270D, HE120/PKG, CS80, CS8060, CS8150 Cassette-type Sewing & Embroidery Combination Machines Utilizing an easy to use, unique cassette based threading system, these compact but friendly and inviting. These embroidery only machines create beautiful embroidered results...Innov-is NX650Q, 450Q, 450, 250 Full Feature Sewing & Quilting Machines Create tomorrow's quilted heirloom with today's technology with leading-edge technology Brother's new and exciting high-end sewing and embroidery machine Quattro™ 6000D is 900D/ SE-350/ HE-240/LB6770 Sewing & Embroidery Combination...

Accessory Catalog
Page 4
...the presser foot, and then tighten the clamp screw with just right pressure. 1. Screw on either left ). 2. Sew. SA161 All Brother home-use sewing machines www.brother.com Its position can be adjusted exactly on the presser foot. 4. Requires Low Shank Adapter for ULT series, PC-6500, PC-8200... on the edge of zipper/piping, avoiding the non-flat parts of zipper/piping, and presses the fabric with a screwdriver. 5. Brother General Sewing Accessories 05 Sew as you like. Use these utility presser feet and accessories to add a professional finish to your sewing projects.
...the presser foot, and then tighten the clamp screw with just right pressure. 1. Screw on either left ). 2. Sew. SA161 All Brother home-use sewing machines www.brother.com Its position can be adjusted exactly on the presser foot. 4. Requires Low Shank Adapter for ULT series, PC-6500, PC-8200... on the edge of zipper/piping, avoiding the non-flat parts of zipper/piping, and presses the fabric with a screwdriver. 5. Brother General Sewing Accessories 05 Sew as you like. Use these utility presser feet and accessories to add a professional finish to your sewing projects.

Accessory Catalog
Page 5
... (5 mm) from the edge of the fabric and lower needle. 2. Select the blind hem stitch. 6. SA133 ABCDEFJKMN SA134 GHILOP SA128 All Brother home-use . Close the zipper and baste along the basting and position the fabric with wrong sides together. 2. Sew. Sew and open the fabric. ...coil to the edge of another fabric. Fold a fabric in the seam. 6. Brother General Sewing Accessories 07 Blind Stitch Foot Concealed Zipper Foot Blind Stitch Foot Creates blind hems on a variety of fabrics, using the adjustable guide on the presser foot, right sides up. 2. This is Project...
... (5 mm) from the edge of the fabric and lower needle. 2. Select the blind hem stitch. 6. SA133 ABCDEFJKMN SA134 GHILOP SA128 All Brother home-use . Close the zipper and baste along the basting and position the fabric with wrong sides together. 2. Sew. Sew and open the fabric. ...coil to the edge of another fabric. Fold a fabric in the seam. 6. Brother General Sewing Accessories 07 Blind Stitch Foot Concealed Zipper Foot Blind Stitch Foot Creates blind hems on a variety of fabrics, using the adjustable guide on the presser foot, right sides up. 2. This is Project...

Accessory Catalog
Page 7
...Innov-is included with an accurate 1/4 inch, 1/2 inch, or 5/8 inch (approx. 6.5, 13, or 16 mm) seam. Can be used with all Brother presser feet. Slip the left side under the presser foot. 5. SA160 ABCDEFGHJKLMNO Straight Stitch Foot Straight Stitch Foot and Straight Stitch Needle Plate ...Vertical Stitching Alignment Foot Brother General Sewing Accessories 12 Straight Stitch Foot For precise straight stitching on thin fabrics or on this presser foot only with the ...
...Innov-is included with an accurate 1/4 inch, 1/2 inch, or 5/8 inch (approx. 6.5, 13, or 16 mm) seam. Can be used with all Brother presser feet. Slip the left side under the presser foot. 5. SA160 ABCDEFGHJKLMNO Straight Stitch Foot Straight Stitch Foot and Straight Stitch Needle Plate ...Vertical Stitching Alignment Foot Brother General Sewing Accessories 12 Straight Stitch Foot For precise straight stitching on thin fabrics or on this presser foot only with the ...


