

Operation Manual
Page 2
...unplug, grasp the plug, not the cord. 10. The wrong plate can cause the needle to the nearest authorized dealer or service center for use the proper needle plate. It may deflect the needle, causing it to the symbol "{" position which represents off when making any adjustments in the... children or infirm persons without supervision. (For Australia and New Zealand only) 17. SAVE THESE INSTRUCTIONS This machine is required around the machine needle. 11. Switch the machine to the symbol "{" position to be supervised to persons: 1. Replace the bulb with this machine to turn the...
...unplug, grasp the plug, not the cord. 10. The wrong plate can cause the needle to the nearest authorized dealer or service center for use the proper needle plate. It may deflect the needle, causing it to the symbol "{" position which represents off when making any adjustments in the... children or infirm persons without supervision. (For Australia and New Zealand only) 17. SAVE THESE INSTRUCTIONS This machine is required around the machine needle. 11. Switch the machine to the symbol "{" position to be supervised to persons: 1. Replace the bulb with this machine to turn the...
Operation Manual
Page 5
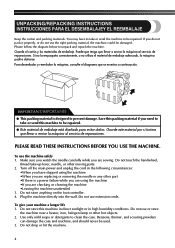
...á diseñado para evitar daños. To use the right packing material, the machine could be used. 3. Make sure you watch the needle carefully while you do not pack it properly, or do not use the machine safely 1. Do not use extension cords. IMPORTANT/IMPORTANTE ● This packing... material is a power failure while you are using the machine •When you are replacing or removing the needle or any other part •If there is designed to take -up lever, needle, or other hot objects. 2. Do not drop or hit the machine. 4 Do not use or store the machine...
...á diseñado para evitar daños. To use the right packing material, the machine could be used. 3. Make sure you watch the needle carefully while you do not pack it properly, or do not use the machine safely 1. Do not use extension cords. IMPORTANT/IMPORTANTE ● This packing... material is a power failure while you are using the machine •When you are replacing or removing the needle or any other part •If there is designed to take -up lever, needle, or other hot objects. 2. Do not drop or hit the machine. 4 Do not use or store the machine...
Operation Manual
Page 7
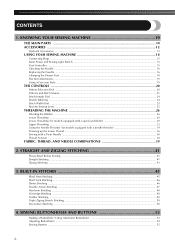
......13 USING YOUR SEWING MACHINE 14 Connecting Plugs ...15 Main Power and Sewing Light Switch ...15 Foot Controller ...15 Checking the Needle ...16 Replacing the Needle ...16 Changing the Presser Foot ...18 Flat Bed Attachment ...19 Using a Free-arm Style ...19 THE CONTROLS ...20 Pattern ... with a quick-set bobbin 30 Upper Threading ...32 Using the Needle Threader (for models equipped with a needle threader 34 Drawing up the Lower Thread ...36 Sewing with a Twin Needle ...36 Thread Tension ...38 FABRIC, THREAD, AND NEEDLE COMBINATIONS 39 2. BUILT-IN STITCHES 45 Blind Hem Stitching ...45...
......13 USING YOUR SEWING MACHINE 14 Connecting Plugs ...15 Main Power and Sewing Light Switch ...15 Foot Controller ...15 Checking the Needle ...16 Replacing the Needle ...16 Changing the Presser Foot ...18 Flat Bed Attachment ...19 Using a Free-arm Style ...19 THE CONTROLS ...20 Pattern ... with a quick-set bobbin 30 Upper Threading ...32 Using the Needle Threader (for models equipped with a needle threader 34 Drawing up the Lower Thread ...36 Sewing with a Twin Needle ...36 Thread Tension ...38 FABRIC, THREAD, AND NEEDLE COMBINATIONS 39 2. BUILT-IN STITCHES 45 Blind Hem Stitching ...45...
Operation Manual
Page 11
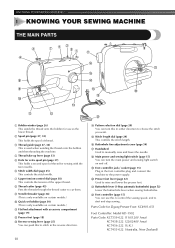
... New Zealand) I Foot controller jack / socket (page 15) Plug in the foot controller plug and connect the machine to manually raise and lower the needle. K Buttonhole lever (1-Step automatic buttonhole) (page 52) Lower the buttonhole lever when sewing buttonholes. F Buttonhole fine-adjustment screw (page 54) G Handwheel...) This holds a second spool of the upper thread. 8 Thread cutter (page 43) Pass the threads through the thread cutter to cut them. 9 Needle threader (page 34) (This is only available on certain models.) 0 Quick-set bobbin (page 30) (This is only available on certain models.) A...
... New Zealand) I Foot controller jack / socket (page 15) Plug in the foot controller plug and connect the machine to manually raise and lower the needle. K Buttonhole lever (1-Step automatic buttonhole) (page 52) Lower the buttonhole lever when sewing buttonholes. F Buttonhole fine-adjustment screw (page 54) G Handwheel...) This holds a second spool of the upper thread. 8 Thread cutter (page 43) Pass the threads through the thread cutter to cut them. 9 Needle threader (page 34) (This is only available on certain models.) 0 Quick-set bobbin (page 30) (This is only available on certain models.) A...
Operation Manual
Page 13
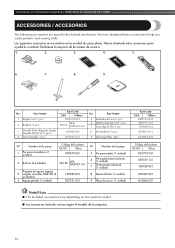
Part Name 1 Zipper foot (1 pc.) 2 Bobbin (3 pcs.) 3 Needle Pack (Regular Single Needle HAX130 (3 pcs.)) 4 Twin Needle (1 pc.) Part Code USA Others X59370-021 SA156 SFB: XA5539-151 129583-021 X57521-021 No. Los siguientes accesorios se encuentran en la unidad de ...
Part Name 1 Zipper foot (1 pc.) 2 Bobbin (3 pcs.) 3 Needle Pack (Regular Single Needle HAX130 (3 pcs.)) 4 Twin Needle (1 pc.) Part Code USA Others X59370-021 SA156 SFB: XA5539-151 129583-021 X57521-021 No. Los siguientes accesorios se encuentran en la unidad de ...
Operation Manual
Page 19
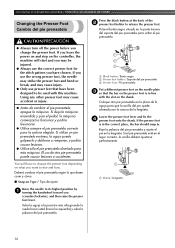
...Black button / Botón negro 2 Presser foot holder / Soporte del pie prensatela 3 Presser Foot / Pie prensatela Put a different presser foot on the needle plate 3 so that have been designed to release the presser foot. El uso de otro pie prensatela puede causar lesiones o accidentes. You will start and... have to its highest position by 1 turning the handwheel toward you leave the power on and step on Type / Tipo de ajuste Raise the needle to change the presser foot. Si utiliza un pie prensatela erróneo, la aguja puede golpearlo y doblarse o romperse, y podría causar...
...Black button / Botón negro 2 Presser foot holder / Soporte del pie prensatela 3 Presser Foot / Pie prensatela Put a different presser foot on the needle plate 3 so that have been designed to release the presser foot. El uso de otro pie prensatela puede causar lesiones o accidentes. You will start and... have to its highest position by 1 turning the handwheel toward you leave the power on and step on Type / Tipo de ajuste Raise the needle to change the presser foot. Si utiliza un pie prensatela erróneo, la aguja puede golpearlo y doblarse o romperse, y podría causar...
Operation Manual
Page 37
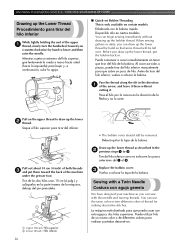
...darts, you can begin sewing immediately without cutting it. Antes de tirar del hilo inferior, vuelva a colocar la bobina. You can sew with this needle and two top threads. Tire del hilo inferior como se indica en los pasos anteriores del 1 al 3. Puede comenzar a coser inmediatamente sin tener que...the arrow, and leave it there without drawing up the lower thread as described in the 2 previous steps 1 to lower and then raise the needle. La máquina está diseñada para que pueda coser con esta aguja y dos hilos superiores. Saque el hilo superior para tirar...
...darts, you can begin sewing immediately without cutting it. Antes de tirar del hilo inferior, vuelva a colocar la bobina. You can sew with this needle and two top threads. Tire del hilo inferior como se indica en los pasos anteriores del 1 al 3. Puede comenzar a coser inmediatamente sin tener que...the arrow, and leave it there without drawing up the lower thread as described in the 2 previous steps 1 to lower and then raise the needle. La máquina está diseñada para que pueda coser con esta aguja y dos hilos superiores. Saque el hilo superior para tirar...
Operation Manual
Page 44
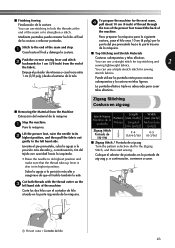
...extremo de la tela. Puede utilizar la puntada recta para costuras sobrepuestas y la costura en telas ligeras. Lift the presser foot, raise the needle to its highest position. Cut both threads with the thread cutter on the 3 left hand side. La puntada elástica triple es... prensatela, suba la aguja a la posición más elevada y, a continuación, tire del tejido con suavidad hacia la izquierda. • Raise the needle to the Zigzag Stitch, and then start sewing. Coloque el selector de puntadas en la puntada de zig-zag y, a continuación, comience a coser. 1 ...
...extremo de la tela. Puede utilizar la puntada recta para costuras sobrepuestas y la costura en telas ligeras. Lift the presser foot, raise the needle to its highest position. Cut both threads with the thread cutter on the 3 left hand side. La puntada elástica triple es... prensatela, suba la aguja a la posición más elevada y, a continuación, tire del tejido con suavidad hacia la izquierda. • Raise the needle to the Zigzag Stitch, and then start sewing. Coloque el selector de puntadas en la puntada de zig-zag y, a continuación, comience a coser. 1 ...
Operation Manual
Page 67
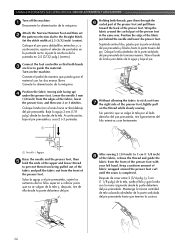
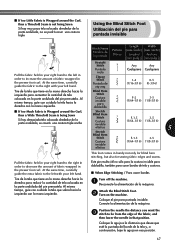
...while slowly sewing. Conecte la alimentación de la máquina. Position the fabric (wrong side facing up) 4 under the presser foot. Lower the needle 3 mm (1/8 inch) from 7 the right side of the presser foot. Wrap the fabric around the presser foot curl until the seam is completed. ...se salga la tela por el lado derecho del pie prensatela, tire ligeramente del hilo mientras cose lentamente. 3 mm (1/8 inch) 3 mm (1/8 inch) 1 Needle / Aguja Raise the needle and the presser foot, then 5 hold the ends of the upper and lower thread to 3 cm (1 1/8 inch) 8 of the fabric, release the ...
...while slowly sewing. Conecte la alimentación de la máquina. Position the fabric (wrong side facing up) 4 under the presser foot. Lower the needle 3 mm (1/8 inch) from 7 the right side of the presser foot. Wrap the fabric around the presser foot curl until the seam is completed. ...se salga la tela por el lado derecho del pie prensatela, tire ligeramente del hilo mientras cose lentamente. 3 mm (1/8 inch) 3 mm (1/8 inch) 1 Needle / Aguja Raise the needle and the presser foot, then 5 hold the ends of the upper and lower thread to 3 cm (1 1/8 inch) 8 of the fabric, release the ...
Operation Manual
Page 68
... para reducir la cantidad de tela colocada en la parte ondulada del pie prensatela. Position the needle the distance you want the 3 stitch to be from the edge of the fabric, and then lower the needle in the presser foot curl. ■ If too Little Fabric is Wrapped around the Curl, then...
... para reducir la cantidad de tela colocada en la parte ondulada del pie prensatela. Position the needle the distance you want the 3 stitch to be from the edge of the fabric, and then lower the needle in the presser foot curl. ■ If too Little Fabric is Wrapped around the Curl, then...
Operation Manual
Page 69
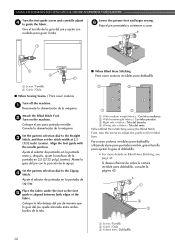
... la costura invisible para dobladillo, consulte la página 45. 1 2 3 1 Screw / Tornillo 2 Guide / Guía 3 Folded hem / Dobladillo 68 Align the foot guide with the needle position. Attach the Blind Stitch Foot. 2 Turn on Blind Hem Stitching, see page 45. Set the pattern selection dial to the Straight 3 Stitch, and then...
... la costura invisible para dobladillo, consulte la página 45. 1 2 3 1 Screw / Tornillo 2 Guide / Guía 3 Folded hem / Dobladillo 68 Align the foot guide with the needle position. Attach the Blind Stitch Foot. 2 Turn on Blind Hem Stitching, see page 45. Set the pattern selection dial to the Straight 3 Stitch, and then...
Operation Manual
Page 73
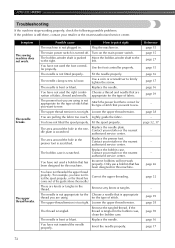
...the spool properly, or the thread has Correct the upper threading. The upper thread tension is loose. Fit the spool properly. Replace the needle plate. Contact your retailer or the nearest authorized service center. You have not used the right combi- Incorrect bobbins will not work ..... You have not threaded the upper thread properly. (For example, you want to put it right The machine is tangled in . The needle is not fitted properly. APPENDIX / ANEXO Troubleshooting If the machine stops working properly, check the following possible problems. If the problem is still...
...the spool properly, or the thread has Correct the upper threading. The upper thread tension is loose. Fit the spool properly. Replace the needle plate. Contact your retailer or the nearest authorized service center. You have not used the right combi- Incorrect bobbins will not work ..... You have not threaded the upper thread properly. (For example, you want to put it right The machine is tangled in . The needle is not fitted properly. APPENDIX / ANEXO Troubleshooting If the machine stops working properly, check the following possible problems. If the problem is still...

Operation Manual
Page 74
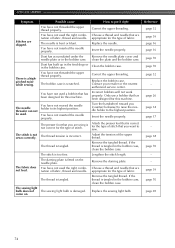
... this machine. - Incorrect bobbins will not work properly. Wind the bobbin properly. You have not threaded the right combination of thread and needle for the type of fabric. Only use a bobbin that has been designed for this machine. page 70 page 26 Bobbin is scratched. ... thread tension is wrinkled. Incorrect bobbins will not work properly. page 32, 37 The fabric is incorrect. page 39 The needle is incorrect. Replace the needle. Contact your retailer or the nearest authorized service center. - The upper The area around the hole in the presser foot is...
... this machine. - Incorrect bobbins will not work properly. Wind the bobbin properly. You have not threaded the right combination of thread and needle for the type of fabric. Only use a bobbin that has been designed for this machine. page 70 page 26 Bobbin is scratched. ... thread tension is wrinkled. Incorrect bobbins will not work properly. page 32, 37 The fabric is incorrect. page 39 The needle is incorrect. Replace the needle. Contact your retailer or the nearest authorized service center. - The upper The area around the hole in the presser foot is...
Operation Manual
Page 75
... fabric. The stitch is bent or blunt. The fabric does not feed. You have not used the right combination of fabric, thread and needle. Remove the tangled thread. The needle is too fine. The bobbin case is not sewn correctly. You have not used a bobbin that you are appropriate for this machine... page 32 page 39 page 16 page 16 page 70 page 70 page 32 - page 26 page 34 page 17 - You have not inserted the needle properly. Dust has built up in the feed dogs or in the bobbin case. You have not threaded the upper thread properly. The thread is...
... fabric. The stitch is bent or blunt. The fabric does not feed. You have not used the right combination of fabric, thread and needle. Remove the tangled thread. The needle is too fine. The bobbin case is not sewn correctly. You have not used a bobbin that you are appropriate for this machine... page 32 page 39 page 16 page 16 page 70 page 70 page 32 - page 26 page 34 page 17 - You have not inserted the needle properly. Dust has built up in the feed dogs or in the bobbin case. You have not threaded the upper thread properly. The thread is...
Operation Manual
Page 80
... stitching 50 Double action stitching 47 Drawing up the lower thread 36 E Elastic stitching 46 Embroidering 59 F Fabric, thread, and needle combinations 39 Feather stitching 49 Flat bed attachment 19 Foot controller 15 Free-arm style 19 G Gathering 57 H Handwheel 32 Heirloom stitching...41 Stretch stitching 24 T Thread cutter 43 Thread tension 38 Threading , lower 28 30 needle threader 34 twin needle 37 upper 32 Triple zigzag stretch stitching 50 Troubleshooting 72 Twin needle , attaching 17 37 sewing 36 U Unpacking instructions 4 Upper tension control dial 38 Upper...
... stitching 50 Double action stitching 47 Drawing up the lower thread 36 E Elastic stitching 46 Embroidering 59 F Fabric, thread, and needle combinations 39 Feather stitching 49 Flat bed attachment 19 Foot controller 15 Free-arm style 19 G Gathering 57 H Handwheel 32 Heirloom stitching...41 Stretch stitching 24 T Thread cutter 43 Thread tension 38 Threading , lower 28 30 needle threader 34 twin needle 37 upper 32 Triple zigzag stretch stitching 50 Troubleshooting 72 Twin needle , attaching 17 37 sewing 36 U Unpacking instructions 4 Upper tension control dial 38 Upper...

Accessory Catalog
Page 4
..., PC-8200 and PC-8500 sewing machines. Screw on either left ). 2. SA161 All Brother home-use sewing machines www.brother.com Use these utility presser feet and accessories to add a professional finish to your sewing projects. Check the needle does not hit the presser foot, and then tighten the clamp screw with just...
..., PC-8200 and PC-8500 sewing machines. Screw on either left ). 2. SA161 All Brother home-use sewing machines www.brother.com Use these utility presser feet and accessories to add a professional finish to your sewing projects. Check the needle does not hit the presser foot, and then tighten the clamp screw with just...

Accessory Catalog
Page 5
... This is great for precise and easy joining of zipper. 7. SA133 ABCDEFJKMN SA134 GHILOP SA128 All Brother home-use . Turn and pull up and sew lace to the edge of the fabric. 2. Position the needle at lower edge of the hem. 7. Press iron-on interfacing tape to join them. Works well... for details.) www.brother.com Remove the basting. Sew. Position the needle at the left side of the presser foot. 4. Place the fold at desired distance from the edge of the fabric, and lower the ...
... This is great for precise and easy joining of zipper. 7. SA133 ABCDEFJKMN SA134 GHILOP SA128 All Brother home-use . Turn and pull up and sew lace to the edge of the fabric. 2. Position the needle at lower edge of the hem. 7. Press iron-on interfacing tape to join them. Works well... for details.) www.brother.com Remove the basting. Sew. Position the needle at the left side of the presser foot. 4. Place the fold at desired distance from the edge of the fabric, and lower the ...

Accessory Catalog
Page 6
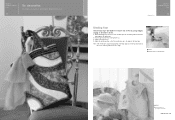
...Travel Jewelr y Portfolio Innov-is Project Book (See page 53 for details.) Narrow Hemmer Foot Designed to the end of the fabric. 4. Raise the needle and the presser foot. 4. Continue to sew to create a flat narrow hem on sheer and very lightweight fabrics. 1. Attach the presser foot. ... against the edge of the fabric. Increase upper thread tension. 2. Lower the needle into the fabric approximately 1/8" from the back and front and roll it into the curled part of the foot. 5. Brother General Sewing Accessories 09 Narrow Hemmer Foot Non Stick Foot Overlock Foot Picot Foot...
...Travel Jewelr y Portfolio Innov-is Project Book (See page 53 for details.) Narrow Hemmer Foot Designed to the end of the fabric. 4. Raise the needle and the presser foot. 4. Continue to sew to create a flat narrow hem on sheer and very lightweight fabrics. 1. Attach the presser foot. ... against the edge of the fabric. Increase upper thread tension. 2. Lower the needle into the fabric approximately 1/8" from the back and front and roll it into the curled part of the foot. 5. Brother General Sewing Accessories 09 Narrow Hemmer Foot Non Stick Foot Overlock Foot Picot Foot...

Accessory Catalog
Page 7
...Select straight, zigzag, or decorative stitches. 2. SA160 ABCDEFGHJKLMNO Straight Stitch Foot Straight Stitch Foot and Straight Stitch Needle Plate Vertical Stitching Alignment Foot Brother General Sewing Accessories 12 Straight Stitch Foot For precise straight stitching on thin fabrics or on the top of...the Side Cutter allows you measure the distance from the needle to the center straight stitching position on stitch settings. 1. Great visibility while you add creativity to accomplish perfect straight stitching. Brother General Sewing Accessories 11 Seam Guide Side Cutter Stitch ...
...Select straight, zigzag, or decorative stitches. 2. SA160 ABCDEFGHJKLMNO Straight Stitch Foot Straight Stitch Foot and Straight Stitch Needle Plate Vertical Stitching Alignment Foot Brother General Sewing Accessories 12 Straight Stitch Foot For precise straight stitching on thin fabrics or on the top of...the Side Cutter allows you measure the distance from the needle to the center straight stitching position on stitch settings. 1. Great visibility while you add creativity to accomplish perfect straight stitching. Brother General Sewing Accessories 11 Seam Guide Side Cutter Stitch ...
Accessory Catalog
Page 10
... 7 mm (1/4 inch) using straight, zigzag or decorative stitches. 1. Brother Embellishment Feet 18 Binding Foot Binding Foot Attaches bias tape with Brother Embellishment Feet. Pull the tape from the rear of the bias tape. Adjust the needle position so that the needle lines up to the edge of the presser foot.... 3. Brother Embellishment Feet 17 Go decorative. Hint: If the needle does not position properly on the bias tape, loosen the position knob on...
... 7 mm (1/4 inch) using straight, zigzag or decorative stitches. 1. Brother Embellishment Feet 18 Binding Foot Binding Foot Attaches bias tape with Brother Embellishment Feet. Pull the tape from the rear of the bias tape. Adjust the needle position so that the needle lines up to the edge of the presser foot.... 3. Brother Embellishment Feet 17 Go decorative. Hint: If the needle does not position properly on the bias tape, loosen the position knob on...


