

Operation Manual
Page 2
... the symbol "{" position which represents off when making any other user servicing adjustments mentioned in the instruction manual. 16. Do not use bent needles. 13. This sewing machine is not intended for examination, repair, electrical or mechanical adjustment. 4. WARNING - Keep fingers away from the electrical outlet immediately after using and before cleaning. 2. It...
... the symbol "{" position which represents off when making any other user servicing adjustments mentioned in the instruction manual. 16. Do not use bent needles. 13. This sewing machine is not intended for examination, repair, electrical or mechanical adjustment. 4. WARNING - Keep fingers away from the electrical outlet immediately after using and before cleaning. 2. It...
Operation Manual
Page 5
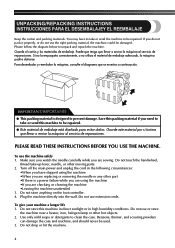
... circumstances: •When you have to take -up lever, needle, or other hot objects. 2. Do not touch the handwheel, thread take or send the machine to be damaged. Do not use the right packing material, the machine could be repaired. UNPACKING/REPACKING INSTRUCTIONS INSTRUCCIONES PARA EL DESEMBALAJEY EL...daños. If you are replacing or removing the needle or any other part •If there is designed to be used. 3. Do not use the machine safely 1. You may have stopped using the machine •If you are sewing. Puede que tenga que llevar o enviar la máquina...
... circumstances: •When you have to take -up lever, needle, or other hot objects. 2. Do not touch the handwheel, thread take or send the machine to be damaged. Do not use the right packing material, the machine could be repaired. UNPACKING/REPACKING INSTRUCTIONS INSTRUCCIONES PARA EL DESEMBALAJEY EL...daños. If you are replacing or removing the needle or any other part •If there is designed to be used. 3. Do not use the machine safely 1. You may have stopped using the machine •If you are sewing. Puede que tenga que llevar o enviar la máquina...
Operation Manual
Page 7
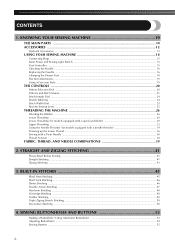
... THE MAIN PARTS ...10 ACCESSORIES ...12 Optional Accessories ...13 USING YOUR SEWING MACHINE 14 Connecting Plugs ...15 Main Power and Sewing Light Switch ...15 Foot Controller ...15 Checking the Needle ...16 Replacing the Needle ...16 Changing the Presser Foot ...18 Flat Bed Attachment ...19 Using a Free-arm Style ...19 THE CONTROLS ...20 Pattern Selection Dial...
... THE MAIN PARTS ...10 ACCESSORIES ...12 Optional Accessories ...13 USING YOUR SEWING MACHINE 14 Connecting Plugs ...15 Main Power and Sewing Light Switch ...15 Foot Controller ...15 Checking the Needle ...16 Replacing the Needle ...16 Changing the Presser Foot ...18 Flat Bed Attachment ...19 Using a Free-arm Style ...19 THE CONTROLS ...20 Pattern Selection Dial...
Operation Manual
Page 11
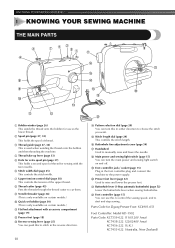
KNOWING YOUR SEWING MACHINE 1 KNOWING YOUR SEWING MACHINE THE MAIN PARTS 1 Bobbin winder (page 26) This winds the thread onto the bobbin for use this in the foot controller plug and connect the machine to choose the stitch you want. F Buttonhole fine-adjustment screw (page 54) G Handwheel Used to raise...length dial (page 24) This controls the stitch length. H Main power and sewing light switch (page 15) You can turn the main power and sewing light switch on certain models.) A Flat bed attachment with the twin needle. 6 Stitch width dial (page 25) This controls the stitch width. 7 ...
KNOWING YOUR SEWING MACHINE 1 KNOWING YOUR SEWING MACHINE THE MAIN PARTS 1 Bobbin winder (page 26) This winds the thread onto the bobbin for use this in the foot controller plug and connect the machine to choose the stitch you want. F Buttonhole fine-adjustment screw (page 54) G Handwheel Used to raise...length dial (page 24) This controls the stitch length. H Main power and sewing light switch (page 15) You can turn the main power and sewing light switch on certain models.) A Flat bed attachment with the twin needle. 6 Stitch width dial (page 25) This controls the stitch width. 7 ...
Operation Manual
Page 13
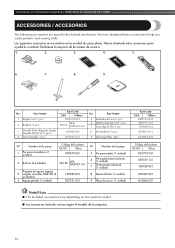
.... ● Los accesorios incluidos varían según el modelo de la máquina. 12 KNOWING YOUR SEWING MACHINE / CONOZCA SU MÁQUINA DE COSER ACCESSORIES / ACCESORIOS The following accessories are stored in the flat bed attachment. Hemos diseñado... en la unidad de cama plana. We have designed these accessories to help you easily perform most sewing tasks. Part Name 1 Zipper foot (1 pc.) 2 Bobbin (3 pcs.) 3 Needle Pack (Regular Single Needle HAX130 (3 pcs.)) 4 Twin Needle (1 pc.) Part Code USA Others X59370-021 SA156 SFB: XA5539-151 129583-021 X57521-021 No...
.... ● Los accesorios incluidos varían según el modelo de la máquina. 12 KNOWING YOUR SEWING MACHINE / CONOZCA SU MÁQUINA DE COSER ACCESSORIES / ACCESORIOS The following accessories are stored in the flat bed attachment. Hemos diseñado... en la unidad de cama plana. We have designed these accessories to help you easily perform most sewing tasks. Part Name 1 Zipper foot (1 pc.) 2 Bobbin (3 pcs.) 3 Needle Pack (Regular Single Needle HAX130 (3 pcs.)) 4 Twin Needle (1 pc.) Part Code USA Others X59370-021 SA156 SFB: XA5539-151 129583-021 X57521-021 No...
Operation Manual
Page 19
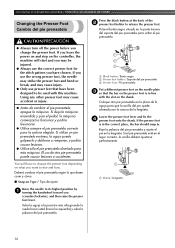
.... 1 Black button / Botón negro 2 Presser foot holder / Soporte del pie prensatela 3 Presser Foot / Pie prensatela Put a different presser foot on the needle plate 3 so that have chosen. Baje la palanca del pie prensatela y ajuste el pie en la lengüeta. If you use the wrong presser...aguja para que la varilla del pie quede alineada con la ranura de la lengüeta. If the presser foot is in . KNOWING YOUR SEWING MACHINE / CONOZCA SU MÁQUINA DE COSER Changing the Presser Foot Cambio del pie prensatela CAUTION/PRECAUCIÓN ● Always turn off the power...
.... 1 Black button / Botón negro 2 Presser foot holder / Soporte del pie prensatela 3 Presser Foot / Pie prensatela Put a different presser foot on the needle plate 3 so that have chosen. Baje la palanca del pie prensatela y ajuste el pie en la lengüeta. If you use the wrong presser...aguja para que la varilla del pie quede alineada con la ranura de la lengüeta. If the presser foot is in . KNOWING YOUR SEWING MACHINE / CONOZCA SU MÁQUINA DE COSER Changing the Presser Foot Cambio del pie prensatela CAUTION/PRECAUCIÓN ● Always turn off the power...
Operation Manual
Page 37
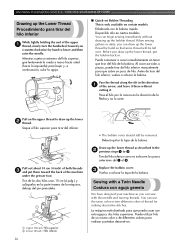
...en ciertos modelos. When sewing gathers or darts, you can begin sewing immediately without cutting it there without drawing up the bobbin thread. Saque el hilo superior para tirar del inferior. Sewing with a Twin Needle Costura con aguja gemela We have designed your machine so you (counterclockwise) by... hand so that some thread will be removed. You can sew with this needle and two top threads. Before you draw up the...
...en ciertos modelos. When sewing gathers or darts, you can begin sewing immediately without cutting it there without drawing up the bobbin thread. Saque el hilo superior para tirar del inferior. Sewing with a Twin Needle Costura con aguja gemela We have designed your machine so you (counterclockwise) by... hand so that some thread will be removed. You can sew with this needle and two top threads. Before you draw up the...
Operation Manual
Page 44
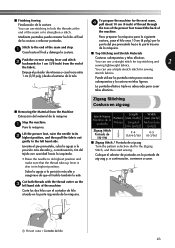
...prensatela, suba la aguja a la posición más elevada y, a continuación, tire del tejido con suavidad hacia la izquierda. • Raise the needle to strengthen a stitch. Coloque el selector de puntadas en la puntada de zig-zag y, a continuación, comience a coser. 1 Thread cutter / Cortador ... in its 2 highest position, and then pull the fabric out gently to the Zigzag Stitch, and then start sewing. To prepare the machine for top stitching and 2 sewing lightweight fabrics. Mediante puntadas puede rematar los hilos al final de la costura o reforzar puntadas. Stitch to the...
...prensatela, suba la aguja a la posición más elevada y, a continuación, tire del tejido con suavidad hacia la izquierda. • Raise the needle to strengthen a stitch. Coloque el selector de puntadas en la puntada de zig-zag y, a continuación, comience a coser. 1 Thread cutter / Cortador ... in its 2 highest position, and then pull the fabric out gently to the Zigzag Stitch, and then start sewing. To prepare the machine for top stitching and 2 sewing lightweight fabrics. Mediante puntadas puede rematar los hilos al final de la costura o reforzar puntadas. Stitch to the...
Operation Manual
Page 67
... inch) (center). Ajuste la anchura de la puntada en 2,5 (3/32 pulg.) (centro). Turn on the thread while slowly sewing. Lower the needle 3 mm (1/8 inch) from the front of the presser foot, lightly pull on the machine. Position the edge of the presser foot. Without allowing the fabric to 3 cm (1 1/8 inch) 8 of the fabric...
... inch) (center). Ajuste la anchura de la puntada en 2,5 (3/32 pulg.) (centro). Turn on the thread while slowly sewing. Lower the needle 3 mm (1/8 inch) from the front of the presser foot, lightly pull on the machine. Position the edge of the presser foot. Without allowing the fabric to 3 cm (1 1/8 inch) 8 of the fabric...
Operation Manual
Page 68
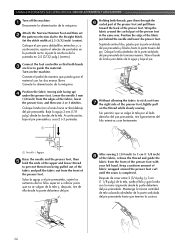
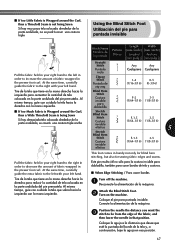
...in order to increase the amount of the fabric, and then lower the needle in the presser foot curl. Position the needle the distance you want the 3 stitch to be from the edge of... 3-5 (1/64-1/16) (1/8-3/16) This foot comes in handy not only for blind hem stitching, but also for sewing fabric edges and seams. Este pie resulta útil no se podrá coser una costura triple Using the ... coser bordes de tela y costuras. ■ When Edge Stitching / Para coser bordes Turn off the machine. 1 Desconecte la alimentación de la máquina. Tire de la tela que tiene en la...
...in order to increase the amount of the fabric, and then lower the needle in the presser foot curl. Position the needle the distance you want the 3 stitch to be from the edge of... 3-5 (1/64-1/16) (1/8-3/16) This foot comes in handy not only for blind hem stitching, but also for sewing fabric edges and seams. Este pie resulta útil no se podrá coser una costura triple Using the ... coser bordes de tela y costuras. ■ When Edge Stitching / Para coser bordes Turn off the machine. 1 Desconecte la alimentación de la máquina. Tire de la tela que tiene en la...
Operation Manual
Page 69
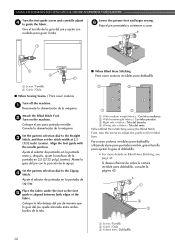
Align the foot guide with the needle position. Coloque la tela debajo del pie de manera que la gu&#...puntada invisible, gire el tornillo para ajustar la guía al dobladillo. • For more details on the machine. Set the pattern selection dial to the Zigzag 4 Stitch. Set the pattern selection dial to the Straight 3 Stitch...to the folded hem. Lower the presser foot and begin sewing. 6 Baje el pie prensatela y comience a coser. 1 Screw / Tornillo 2 Guide / Guía ■ When Sewing Seams / Para coser costuras Turn off the machine. 1 Desconecte la alimentación de la má...
Align the foot guide with the needle position. Coloque la tela debajo del pie de manera que la gu&#...puntada invisible, gire el tornillo para ajustar la guía al dobladillo. • For more details on the machine. Set the pattern selection dial to the Zigzag 4 Stitch. Set the pattern selection dial to the Straight 3 Stitch...to the folded hem. Lower the presser foot and begin sewing. 6 Baje el pie prensatela y comience a coser. 1 Screw / Tornillo 2 Guide / Guía ■ When Sewing Seams / Para coser costuras Turn off the machine. 1 Desconecte la alimentación de la má...
Operation Manual
Page 73
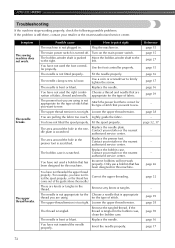
...For example, you have not fitted the spool properly. If the thread is loose. Insert the needle properly. page 39 page 38 page 70 page 16 page 17 72 Symptom The sewing machine does not work properly. Possible cause How to firmly tighten the screw. Turn on the main power... switch. Use the foot controller properly. Replace the needle. appropriate for the Choose a needle that you are using . Replace the needle plate. Contact your retailer or...
...For example, you have not fitted the spool properly. If the thread is loose. Insert the needle properly. page 39 page 38 page 70 page 16 page 17 72 Symptom The sewing machine does not work properly. Possible cause How to firmly tighten the screw. Turn on the main power... switch. Use the foot controller properly. Replace the needle. appropriate for the Choose a needle that you are using . Replace the needle plate. Contact your retailer or...

Operation Manual
Page 74
...used a bobbin that are sewing thin fabric, the stitch is set incorrectly. Reset the bobbin thread correctly. Remove the tangled thread and clean the bobbin case. Choose a thread and needle that has been designed for the fabric you are appropriate for this machine. Attach the presser foot... of fabric. Wind the bobbin thread properly. Only use a bobbin that has been designed for the type of thread and needle for this machine. page 26 Bobbin is too thick. Only use a bobbin that has been designed for the type of the upper thread....
...used a bobbin that are sewing thin fabric, the stitch is set incorrectly. Reset the bobbin thread correctly. Remove the tangled thread and clean the bobbin case. Choose a thread and needle that has been designed for the fabric you are appropriate for this machine. Attach the presser foot... of fabric. Wind the bobbin thread properly. Only use a bobbin that has been designed for the type of thread and needle for this machine. page 26 Bobbin is too thick. Only use a bobbin that has been designed for the type of the upper thread....

Accessory Catalog
Page 4
... or right. 3. Its position can be adjusted exactly on either left ). 2. Sew. SA161 All Brother home-use sewing machines www.brother.com Check the needle does not hit the presser foot, and then tighten the clamp screw with just right pressure. 1. Brother General Sewing Accessories 05 Sew as you like. Requires Low Shank Adapter for ULT series, PC-6500...
... or right. 3. Its position can be adjusted exactly on either left ). 2. Sew. SA161 All Brother home-use sewing machines www.brother.com Check the needle does not hit the presser foot, and then tighten the clamp screw with just right pressure. 1. Brother General Sewing Accessories 05 Sew as you like. Requires Low Shank Adapter for ULT series, PC-6500...

Accessory Catalog
Page 5
... Baste the zipper along the guide on both embellishing and utility use sewing machines Ring Bearer Pillow & Hankerchief Innov-is perfect for both sides of the zipper opening. 5. Brother General Sewing Accessories 07 Blind Stitch Foot Concealed Zipper Foot Blind Stitch Foot Creates ... until the needle slightly catches the fold of zipper. Edge stitching: 1. Position the needle at desired distance from the edge of the fabric and lower the needle and the presser foot. 3. SA133 ABCDEFJKMN SA134 GHILOP SA128 All Brother home-use sewing machines Concealed Zipper ...
... Baste the zipper along the guide on both embellishing and utility use sewing machines Ring Bearer Pillow & Hankerchief Innov-is perfect for both sides of the zipper opening. 5. Brother General Sewing Accessories 07 Blind Stitch Foot Concealed Zipper Foot Blind Stitch Foot Creates ... until the needle slightly catches the fold of zipper. Edge stitching: 1. Position the needle at desired distance from the edge of the fabric and lower the needle and the presser foot. 3. SA133 ABCDEFJKMN SA134 GHILOP SA128 All Brother home-use sewing machines Concealed Zipper ...
Accessory Catalog
Page 10
...3. Snap on the foot to slide the guide to the left or right. Adjust the needle position so that the needle lines up to the guide side. 2. Hint: If the needle does not position properly on the bias tape, loosen the position knob on the presser foot... than 7 mm (1/4 inch) using straight, zigzag or decorative stitches. 1. Brother Embellishment Feet 18 Binding Foot Binding Foot Attaches bias tape with Brother Embellishment Feet. Brother Embellishment Feet 17 Go decorative. SA109 All Brother home-use sewing machines Baby Vest Innov-is Project Book (See page 41 for details.) www...
...3. Snap on the foot to slide the guide to the left or right. Adjust the needle position so that the needle lines up to the guide side. 2. Hint: If the needle does not position properly on the bias tape, loosen the position knob on the presser foot... than 7 mm (1/4 inch) using straight, zigzag or decorative stitches. 1. Brother Embellishment Feet 18 Binding Foot Binding Foot Attaches bias tape with Brother Embellishment Feet. Brother Embellishment Feet 17 Go decorative. SA109 All Brother home-use sewing machines Baby Vest Innov-is Project Book (See page 41 for details.) www...

Accessory Catalog
Page 12
... used for ULT series, PC-6500, PC-8200 and PC-8500 sewing machines. SA150 ABCDEFJKMN www.brother.com Create 3-D loops and fringe with the guideline and sew. Select a straight stitch, left needle position. 2. Ideal for gathering fabrics. Its wide groove also helps you... in size. Mark construction details by creating tailor tacks. Zigzag-sew with transparent thread. Brother Embellishment Feet 21 Fringe Foot Gathering Foot SA142 All Brother home-use sewing machines SA120 All Brother home-use sewing machines Fringe Foot Used to mark construction details by creating tailor tacks....
... used for ULT series, PC-6500, PC-8200 and PC-8500 sewing machines. SA150 ABCDEFJKMN www.brother.com Create 3-D loops and fringe with the guideline and sew. Select a straight stitch, left needle position. 2. Ideal for gathering fabrics. Its wide groove also helps you... in size. Mark construction details by creating tailor tacks. Zigzag-sew with transparent thread. Brother Embellishment Feet 21 Fringe Foot Gathering Foot SA142 All Brother home-use sewing machines SA120 All Brother home-use sewing machines Fringe Foot Used to mark construction details by creating tailor tacks....

Accessory Catalog
Page 14
...Quilting Guide Brother Quilting Feet 26 SA125 All Brother home-use sewing machines SA185 All Brother home-use sewing machines SA132 All Brother home-use sewing machines 1/4" Piecing Foot Best for easy reference. 1. Select the center needle position for your sewing machine and the single hole matches perfectly to the needle drop ... 2. Snap on the walking foot. 3. Snap on fabrics. 1. Stitch the first straight row. 2. Its back and small needle opening are designed to the fabric guide of the quilting guide so that rests against the fabrics as the straight stitch is sewn...
...Quilting Guide Brother Quilting Feet 26 SA125 All Brother home-use sewing machines SA185 All Brother home-use sewing machines SA132 All Brother home-use sewing machines 1/4" Piecing Foot Best for easy reference. 1. Select the center needle position for your sewing machine and the single hole matches perfectly to the needle drop ... 2. Snap on the walking foot. 3. Snap on fabrics. 1. Stitch the first straight row. 2. Its back and small needle opening are designed to the fabric guide of the quilting guide so that rests against the fabrics as the straight stitch is sewn...

Accessory Catalog
Page 15
...or your preferred stitch such as the machine's lower feed dogs to sew uniform stitches roughly 1/16" - 3/32" (2.0 - 2.5 mm) in the needle area. Use the walking foot with the closed front for ULT series, PC-6500, PC-8200 and PC-8500 sewing machines. Requires Low Shank Adapter for ULT ...to straight stitch. 3. Walking Foot SA140 ABCDEFJKMN SA166 L SA107 GHO SA169 I Open Toe Walking Foot SA188 ABCDEFJKMN www.brother.com While starting to sew, press the needle position button twice to pull the bobbin thread to be easily sewn. Lower the feed dogs. 3. When quilting is needed...
...or your preferred stitch such as the machine's lower feed dogs to sew uniform stitches roughly 1/16" - 3/32" (2.0 - 2.5 mm) in the needle area. Use the walking foot with the closed front for ULT series, PC-6500, PC-8200 and PC-8500 sewing machines. Requires Low Shank Adapter for ULT ...to straight stitch. 3. Walking Foot SA140 ABCDEFJKMN SA166 L SA107 GHO SA169 I Open Toe Walking Foot SA188 ABCDEFJKMN www.brother.com While starting to sew, press the needle position button twice to pull the bobbin thread to be easily sewn. Lower the feed dogs. 3. When quilting is needed...

Accessory Catalog
Page 36
... Foot An improved larger foot print assures better contact of wool roving or yarn on the fabric under the Needle Felting Attachment. 4. SA159 SA180B SA181 Needle Felting Attachment Felting Needle Brother Sewing Machine Attachments for PQ Series 70 Needle Felting Attachment Use this unique attachment to the feed dogs, aiding in the proper feed on heavy weight...
... Foot An improved larger foot print assures better contact of wool roving or yarn on the fabric under the Needle Felting Attachment. 4. SA159 SA180B SA181 Needle Felting Attachment Felting Needle Brother Sewing Machine Attachments for PQ Series 70 Needle Felting Attachment Use this unique attachment to the feed dogs, aiding in the proper feed on heavy weight...


