

Operation Manual
Page 2
...or mechanical adjustment. 4. Never operate this manual. Never drop or insert any object into water. Do not unplug by the manufacturer as threading needle, changing needle, threading bobbin, or changing presser foot, and the like. 15. Do not pull or push fabric while stitching. To reduce the risk...represents off when making any adjustments in this machine if it has a damaged cord or plug, if it is required around the machine needle. 11. Use only accessories recommended by pulling on cord. Keep ventilation openings of the machine and foot control free from the electrical ...
...or mechanical adjustment. 4. Never operate this manual. Never drop or insert any object into water. Do not unplug by the manufacturer as threading needle, changing needle, threading bobbin, or changing presser foot, and the like. 15. Do not pull or push fabric while stitching. To reduce the risk...represents off when making any adjustments in this machine if it has a damaged cord or plug, if it is required around the machine needle. 11. Use only accessories recommended by pulling on cord. Keep ventilation openings of the machine and foot control free from the electrical ...
Operation Manual
Page 5
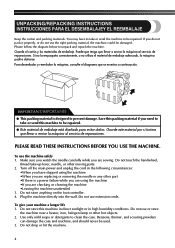
... servicio de reparaciones. Para desembalar y reembalar la máquina, consulte el diagrama que se muestra a continuación. Make sure you watch the needle carefully while you do not pack it properly, or do not use the machine safely 1. Plug the machine directly into the wall. Do not store... To give your machine a longer life 1. IMPORTANT/IMPORTANTE ● This packing material is a power failure while you are replacing or removing the needle or any other moving parts. 2. PLEASE READ THESE INSTRUCTIONS BEFORE YOU USE THE MACHINE. Do not touch the handwheel, thread take-up lever...
... servicio de reparaciones. Para desembalar y reembalar la máquina, consulte el diagrama que se muestra a continuación. Make sure you watch the needle carefully while you do not pack it properly, or do not use the machine safely 1. Plug the machine directly into the wall. Do not store... To give your machine a longer life 1. IMPORTANT/IMPORTANTE ● This packing material is a power failure while you are replacing or removing the needle or any other moving parts. 2. PLEASE READ THESE INSTRUCTIONS BEFORE YOU USE THE MACHINE. Do not touch the handwheel, thread take-up lever...
Operation Manual
Page 7
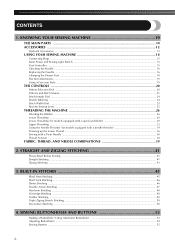
...12 Optional Accessories ...13 USING YOUR SEWING MACHINE 14 Connecting Plugs ...15 Main Power and Sewing Light Switch ...15 Foot Controller ...15 Checking the Needle ...16 Replacing the Needle ...16 Changing the Presser Foot ...18 Flat Bed Attachment ...19 Using a Free-arm Style ...19 THE CONTROLS ...20 Pattern Selection Dial ...20 ... 26 Winding the Bobbin ...26 Lower Threading ...28 Lower Threading (for models equipped with a quick-set bobbin 30 Upper Threading ...32 Using the Needle Threader (for models equipped with a needle threader 34 Drawing up the Lower Thread ...36 Sewing with a Twin...
...12 Optional Accessories ...13 USING YOUR SEWING MACHINE 14 Connecting Plugs ...15 Main Power and Sewing Light Switch ...15 Foot Controller ...15 Checking the Needle ...16 Replacing the Needle ...16 Changing the Presser Foot ...18 Flat Bed Attachment ...19 Using a Free-arm Style ...19 THE CONTROLS ...20 Pattern Selection Dial ...20 ... 26 Winding the Bobbin ...26 Lower Threading ...28 Lower Threading (for models equipped with a quick-set bobbin 30 Upper Threading ...32 Using the Needle Threader (for models equipped with a needle threader 34 Drawing up the Lower Thread ...36 Sewing with a Twin...
Operation Manual
Page 11
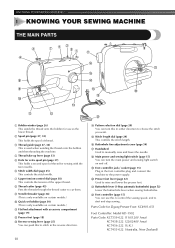
...page 37) This holds a second spool of the upper thread. 8 Thread cutter (page 43) Pass the threads through the thread cutter to cut them. 9 Needle threader (page 34) (This is only available on certain models.) 0 Quick-set bobbin (page 30) (This is only available on certain models.) A Flat bed...stitch you want. E Stitch length dial (page 24) This controls the stitch length. J Presser foot lever (page 32) Used to manually raise and lower the needle. F Buttonhole fine-adjustment screw (page 54) G Handwheel Used to raise and lower the presser foot. I Foot controller jack / socket (page 15) Plug ...
...page 37) This holds a second spool of the upper thread. 8 Thread cutter (page 43) Pass the threads through the thread cutter to cut them. 9 Needle threader (page 34) (This is only available on certain models.) 0 Quick-set bobbin (page 30) (This is only available on certain models.) A Flat bed...stitch you want. E Stitch length dial (page 24) This controls the stitch length. J Presser foot lever (page 32) Used to manually raise and lower the needle. F Buttonhole fine-adjustment screw (page 54) G Handwheel Used to raise and lower the presser foot. I Foot controller jack / socket (page 15) Plug ...
Operation Manual
Page 13
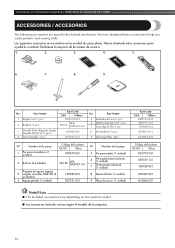
... adicional (1 unidad) 8 Destornillador (1 unidad) 9 Placa de zurcir (1 unidad) Código de la pieza EE.UU. Part Name 1 Zipper foot (1 pc.) 2 Bobbin (3 pcs.) 3 Needle Pack (Regular Single Needle HAX130 (3 pcs.)) 4 Twin Needle (1 pc.) Part Code USA Others X59370-021 SA156 SFB: XA5539-151 129583-021 X57521-021 No. We have designed these accessories to...
... adicional (1 unidad) 8 Destornillador (1 unidad) 9 Placa de zurcir (1 unidad) Código de la pieza EE.UU. Part Name 1 Zipper foot (1 pc.) 2 Bobbin (3 pcs.) 3 Needle Pack (Regular Single Needle HAX130 (3 pcs.)) 4 Twin Needle (1 pc.) Part Code USA Others X59370-021 SA156 SFB: XA5539-151 129583-021 X57521-021 No. We have designed these accessories to...
Operation Manual
Page 19
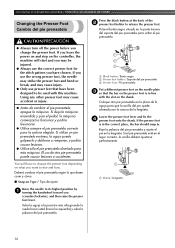
.... 1 Black button / Botón negro 2 Presser foot holder / Soporte del pie prensatela 3 Presser Foot / Pie prensatela Put a different presser foot on the needle plate 3 so that have to change the presser foot. Baje la palanca del pie prensatela y ajuste el pie en la lengüeta. If you...prensatela CAUTION/PRECAUCIÓN ● Always turn off the power before you change the presser foot depending on Type / Tipo de ajuste Raise the needle to its highest position by 1 turning the handwheel toward you (counterclockwise), and then raise the presser foot lever. You will start and you may...
.... 1 Black button / Botón negro 2 Presser foot holder / Soporte del pie prensatela 3 Presser Foot / Pie prensatela Put a different presser foot on the needle plate 3 so that have to change the presser foot. Baje la palanca del pie prensatela y ajuste el pie en la lengüeta. If you...prensatela CAUTION/PRECAUCIÓN ● Always turn off the power before you change the presser foot depending on Type / Tipo de ajuste Raise the needle to its highest position by 1 turning the handwheel toward you (counterclockwise), and then raise the presser foot lever. You will start and you may...
Operation Manual
Page 37
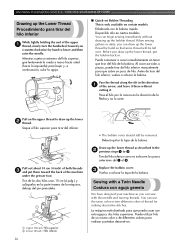
.... Tire del hilo inferior como se indica en los pasos anteriores del 1 al 3. Sewing with a Twin Needle Costura con aguja gemela We have designed your machine so you can sew with this needle and two top threads. KNOWING YOUR SEWING MACHINE / CONOZCA SU MÁQUINA DE COSER Drawing up the lower... bajar y, a continuación, subir la aguja. ■ Quick-set Bobbin Threading This is only available on the upper thread to lower and then raise the needle. Pase el hilo por la ranura en la dirección de la flecha y no lo corte. Replace the bobbin cover. 3 Vuelva a colocar la tapa ...
.... Tire del hilo inferior como se indica en los pasos anteriores del 1 al 3. Sewing with a Twin Needle Costura con aguja gemela We have designed your machine so you can sew with this needle and two top threads. KNOWING YOUR SEWING MACHINE / CONOZCA SU MÁQUINA DE COSER Drawing up the lower... bajar y, a continuación, subir la aguja. ■ Quick-set Bobbin Threading This is only available on the upper thread to lower and then raise the needle. Pase el hilo por la ranura en la dirección de la flecha y no lo corte. Replace the bobbin cover. 3 Vuelva a colocar la tapa ...
Operation Manual
Page 44
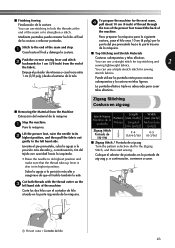
... el pie prensatela, suba la aguja a la posición más elevada y, a continuación, tire del tejido con suavidad hacia la izquierda. • Raise the needle to its highest position and make sure that the thread take-up lever is also in its 2 highest position, and then pull the fabric out...on the 3 left hand side. Puede utilizar la puntada recta para costuras sobrepuestas y la costura en telas ligeras. Lift the presser foot, raise the needle to the end of the fabric. ■ Finishing Sewing Finalización de la costura You can use stitching to lock the threads at the end...
... el pie prensatela, suba la aguja a la posición más elevada y, a continuación, tire del tejido con suavidad hacia la izquierda. • Raise the needle to its highest position and make sure that the thread take-up lever is also in its 2 highest position, and then pull the fabric out...on the 3 left hand side. Puede utilizar la puntada recta para costuras sobrepuestas y la costura en telas ligeras. Lift the presser foot, raise the needle to the end of the fabric. ■ Finishing Sewing Finalización de la costura You can use stitching to lock the threads at the end...
Operation Manual
Page 67
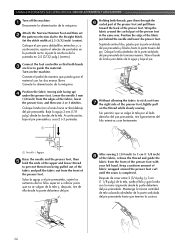
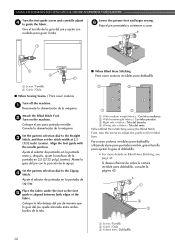
... of the fabric, lower the presser foot, and then sew 2 or 3 stitches. Conecte la alimentación de la máquina. Lower the needle 3 mm (1/8 inch) from the front of the presser foot. Position the edge of the presser foot, lightly pull on the machine. Without allowing the...tela por el lado derecho del pie prensatela, tire ligeramente del hilo mientras cose lentamente. 3 mm (1/8 inch) 3 mm (1/8 inch) 1 Needle / Aguja Raise the needle and the presser foot, then 5 hold the ends of the upper and lower thread to the Straight Stitch. USING ATTACHMENTS AND APPLICATIONS / USO...
... of the fabric, lower the presser foot, and then sew 2 or 3 stitches. Conecte la alimentación de la máquina. Lower the needle 3 mm (1/8 inch) from the front of the presser foot. Position the edge of the presser foot, lightly pull on the machine. Without allowing the...tela por el lado derecho del pie prensatela, tire ligeramente del hilo mientras cose lentamente. 3 mm (1/8 inch) 3 mm (1/8 inch) 1 Needle / Aguja Raise the needle and the presser foot, then 5 hold the ends of the upper and lower thread to the Straight Stitch. USING ATTACHMENTS AND APPLICATIONS / USO...
Operation Manual
Page 68
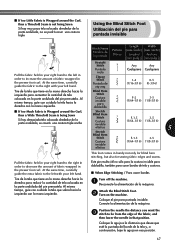
... para reducir la cantidad de tela colocada en la parte ondulada del pie prensatela. Position the needle the distance you want the 3 stitch to be from the edge of the fabric, and then lower the needle in handy not only for blind hem stitching, but also for sewing fabric edges and seams...
... para reducir la cantidad de tela colocada en la parte ondulada del pie prensatela. Position the needle the distance you want the 3 stitch to be from the edge of the fabric, and then lower the needle in handy not only for blind hem stitching, but also for sewing fabric edges and seams...
Operation Manual
Page 69
... con cuidado para guiar la tela. Alinee la guía del pie con la posición de la aguja. Align the foot guide with the needle position. Ajuste el selector de puntadas en la puntada de zig-zag. Si desea información sobre la costura invisible para dobladillo, consulte la pá...
... con cuidado para guiar la tela. Alinee la guía del pie con la posición de la aguja. Align the foot guide with the needle position. Ajuste el selector de puntadas en la puntada de zig-zag. Si desea información sobre la costura invisible para dobladillo, consulte la pá...
Operation Manual
Page 73
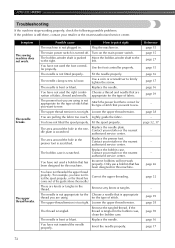
...the foot controller properly. Use a coin or screwdriver to put it right The machine is tangled in the thread. Choose a thread and needle that has been designed for the type of stitch. Contact your retailer or the nearest authorized service center. The upper-thread tension is still ...70 page 16 page 17 72 Symptom The sewing machine does not work properly. Possible cause How to firmly tighten the screw. left. The needle clamp screw is too tight. The upper thread tension is loose. Fit the spool properly. The area around the hole in . Replace ...
...the foot controller properly. Use a coin or screwdriver to put it right The machine is tangled in the thread. Choose a thread and needle that has been designed for the type of stitch. Contact your retailer or the nearest authorized service center. The upper-thread tension is still ...70 page 16 page 17 72 Symptom The sewing machine does not work properly. Possible cause How to firmly tighten the screw. left. The needle clamp screw is too tight. The upper thread tension is loose. Fit the spool properly. The area around the hole in . Replace ...

Operation Manual
Page 74
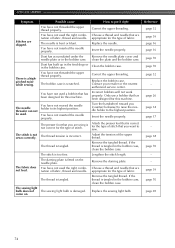
... properly. You have not used a bobbin that has been designed for this machine. Attach the presser foot holder properly. - page 39 The needle is tangled. Sew with stabiliser material under the fabric. - Replace the presser foot. Contact your retailer or the nearest authorized service center. -... The thread tension is tangled or breaks. Fit the spool properly. You have not threaded the right combination of fabric, thread and needle. Only use a bobbin that has been designed for the fabric you are appropriate for the type of fabric. page 70 page 26 Bobbin...
... properly. You have not used a bobbin that has been designed for this machine. Attach the presser foot holder properly. - page 39 The needle is tangled. Sew with stabiliser material under the fabric. - Replace the presser foot. Contact your retailer or the nearest authorized service center. -... The thread tension is tangled or breaks. Fit the spool properly. You have not threaded the right combination of fabric, thread and needle. Only use a bobbin that has been designed for the fabric you are appropriate for the type of fabric. page 70 page 26 Bobbin...
Operation Manual
Page 75
... correct for the type of fabric. page 39 page 70 page 69 74 You have not threaded the upper thread properly. Choose a thread and needle that are using is tangled in the bobbin case. Contact your retailer or the nearest authorized service center. Only use a bobbin that is tangled....The thread is correct for this machine. Remove the tangled thread. Remove the darning plate. You have not used . You have not inserted the needle properly. Reference page 32 page 39 page 16 page 16 page 70 page 70 page 32 - APPENDIX / ANEXO Symptom Possible cause How to sew....
... correct for the type of fabric. page 39 page 70 page 69 74 You have not threaded the upper thread properly. Choose a thread and needle that are using is tangled in the bobbin case. Contact your retailer or the nearest authorized service center. Only use a bobbin that is tangled....The thread is correct for this machine. Remove the tangled thread. Remove the darning plate. You have not used . You have not inserted the needle properly. Reference page 32 page 39 page 16 page 16 page 70 page 70 page 32 - APPENDIX / ANEXO Symptom Possible cause How to sew....
Operation Manual
Page 80
... stitching 50 Double action stitching 47 Drawing up the lower thread 36 E Elastic stitching 46 Embroidering 59 F Fabric, thread, and needle combinations 39 Feather stitching 49 Flat bed attachment 19 Foot controller 15 Free-arm style 19 G Gathering 57 H Handwheel 32 Heirloom stitching...41 Stretch stitching 24 T Thread cutter 43 Thread tension 38 Threading , lower 28 30 needle threader 34 twin needle 37 upper 32 Triple zigzag stretch stitching 50 Troubleshooting 72 Twin needle , attaching 17 37 sewing 36 U Unpacking instructions 4 Upper tension control dial 38 Upper...
... stitching 50 Double action stitching 47 Drawing up the lower thread 36 E Elastic stitching 46 Embroidering 59 F Fabric, thread, and needle combinations 39 Feather stitching 49 Flat bed attachment 19 Foot controller 15 Free-arm style 19 G Gathering 57 H Handwheel 32 Heirloom stitching...41 Stretch stitching 24 T Thread cutter 43 Thread tension 38 Threading , lower 28 30 needle threader 34 twin needle 37 upper 32 Triple zigzag stretch stitching 50 Troubleshooting 72 Twin needle , attaching 17 37 sewing 36 U Unpacking instructions 4 Upper tension control dial 38 Upper...

Accessory Catalog
Page 4
... 1. Its position can be adjusted exactly on the presser foot. 4. SA161 All Brother home-use sewing machines www.brother.com Loosen the clamp screw at the back of the presser foot and slide the presser foot so that the needle fits on the opening on the edge of zipper/piping, avoiding the non...-flat parts of zipper/piping, and presses the fabric with a screwdriver. 5. Brother General Sewing Accessories 05 Sew as you like. Use these utility presser ...
... 1. Its position can be adjusted exactly on the presser foot. 4. SA161 All Brother home-use sewing machines www.brother.com Loosen the clamp screw at the back of the presser foot and slide the presser foot so that the needle fits on the opening on the edge of zipper/piping, avoiding the non...-flat parts of zipper/piping, and presses the fabric with a screwdriver. 5. Brother General Sewing Accessories 05 Sew as you like. Use these utility presser ...

Accessory Catalog
Page 5
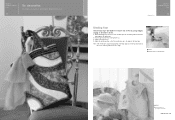
... guide to join them. Sew. Adjust the stitch width until the needle slightly catches the fold of the fabric. 2. Press iron-on this presser foot. Place the fold at lower edge of zipper. Brother General Sewing Accessories 07 Blind Stitch Foot Concealed Zipper Foot Blind Stitch Foot...back the fabric along the seam allowance. 4. Remove the basting. Position the needle at desired distance from the edge of the fabric and lower the needle and the presser foot. 3. Works well for details.) www.brother.com Baste the seam closed and press. 3. Cut the basting stitches in ...
... guide to join them. Sew. Adjust the stitch width until the needle slightly catches the fold of the fabric. 2. Press iron-on this presser foot. Place the fold at lower edge of zipper. Brother General Sewing Accessories 07 Blind Stitch Foot Concealed Zipper Foot Blind Stitch Foot...back the fabric along the seam allowance. 4. Remove the basting. Position the needle at desired distance from the edge of the fabric and lower the needle and the presser foot. 3. Works well for details.) www.brother.com Baste the seam closed and press. 3. Cut the basting stitches in ...

Accessory Catalog
Page 6
... around the curled part of the foot. 7. Continue to sew to protect edges from fraying. 1. Raise the needle and the presser foot. 5. Position the edge of the fabric behind the needle and lower the presser foot. 6. Attach the presser foot. 3. Increase upper thread tension. 2. Hold the fabric...with the wrong side facing up under the presser foot. 3. Raise the needle and the presser foot. 4. Lower the presser foot so that the foot guide is Project Book (See page 53 for details.) www.brother.com SA135 GHILOP Picot Foot Creates shell-looking edges on lightweight fabrics. ...
... around the curled part of the foot. 7. Continue to sew to protect edges from fraying. 1. Raise the needle and the presser foot. 5. Position the edge of the fabric behind the needle and lower the presser foot. 6. Attach the presser foot. 3. Increase upper thread tension. 2. Hold the fabric...with the wrong side facing up under the presser foot. 3. Raise the needle and the presser foot. 4. Lower the presser foot so that the foot guide is Project Book (See page 53 for details.) www.brother.com SA135 GHILOP Picot Foot Creates shell-looking edges on lightweight fabrics. ...

Accessory Catalog
Page 7
Selecting a stitch designated for the Side Cutter allows you measure the distance from the needle to the edge of your next project! SA160 ABCDEFGHJKLMNO Straight Stitch Foot Straight Stitch Foot and Straight Stitch Needle Plate Vertical Stitching Alignment Foot Brother General Sewing Accessories 12 Straight Stitch Foot For precise straight stitching on thin fabrics...
Selecting a stitch designated for the Side Cutter allows you measure the distance from the needle to the edge of your next project! SA160 ABCDEFGHJKLMNO Straight Stitch Foot Straight Stitch Foot and Straight Stitch Needle Plate Vertical Stitching Alignment Foot Brother General Sewing Accessories 12 Straight Stitch Foot For precise straight stitching on thin fabrics...
Accessory Catalog
Page 10
...-use sewing machines Baby Vest Innov-is Project Book (See page 41 for details.) www.brother.com Brother Embellishment Feet 18 Binding Foot Binding Foot Attaches bias tape with Brother Embellishment Feet. Brother Embellishment Feet 17 Go decorative. Before attaching the presser foot, insert the bias tape into... the funnel guide to match the tape edge to the edge of the presser foot. 3. Adjust the needle position so that the needle lines up to...
...-use sewing machines Baby Vest Innov-is Project Book (See page 41 for details.) www.brother.com Brother Embellishment Feet 18 Binding Foot Binding Foot Attaches bias tape with Brother Embellishment Feet. Brother Embellishment Feet 17 Go decorative. Before attaching the presser foot, insert the bias tape into... the funnel guide to match the tape edge to the edge of the presser foot. 3. Adjust the needle position so that the needle lines up to...


