

Operation Manual
Page 2
... to persons: 1. Always unplug the machine from the electrical outlet when removing covers, lubricating, or when making any other user servicing adjustments mentioned in . This sewing machine is required around the machine needle. 11.
... to persons: 1. Always unplug the machine from the electrical outlet when removing covers, lubricating, or when making any other user servicing adjustments mentioned in . This sewing machine is required around the machine needle. 11.
Operation Manual
Page 5
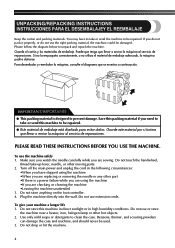
... case and machine, and should never be damaged. Do not store anything on the foot controller. 4. To give your machine a longer life 1. If you are sewing. Guarde el cartón y los materiales de embalaje. Do not drop or hit the machine. 4 To use extension cords. IMPORTANT/IMPORTANTE ● This packing material...
... case and machine, and should never be damaged. Do not store anything on the foot controller. 4. To give your machine a longer life 1. If you are sewing. Guarde el cartón y los materiales de embalaje. Do not drop or hit the machine. 4 To use extension cords. IMPORTANT/IMPORTANTE ● This packing material...
Operation Manual
Page 7
......20 Pattern Selection Dial ...20 Patterns and Stitch Names ...21 Stitch Length Dial ...24 Stretch Stitching ...24 Stitch Width Dial ...25 Reverse Sewing Lever ...25 THREADING THE MACHINE 26 Winding the Bobbin ...26 Lower Threading ...28 Lower Threading (for models equipped with a quick-set bobbin ...30 Upper Threading ...32 Using the Needle Threader (for models equipped with a needle threader 34 Drawing up the Lower Thread ...36 Sewing with a Twin Needle ...36 Thread Tension ...38 FABRIC, THREAD, AND NEEDLE COMBINATIONS 39 2. BUILT-IN STITCHES 45 Blind Hem Stitching ...45 ...
......20 Pattern Selection Dial ...20 Patterns and Stitch Names ...21 Stitch Length Dial ...24 Stretch Stitching ...24 Stitch Width Dial ...25 Reverse Sewing Lever ...25 THREADING THE MACHINE 26 Winding the Bobbin ...26 Lower Threading ...28 Lower Threading (for models equipped with a quick-set bobbin ...30 Upper Threading ...32 Using the Needle Threader (for models equipped with a needle threader 34 Drawing up the Lower Thread ...36 Sewing with a Twin Needle ...36 Thread Tension ...38 FABRIC, THREAD, AND NEEDLE COMBINATIONS 39 2. BUILT-IN STITCHES 45 Blind Hem Stitching ...45 ...
Operation Manual
Page 11
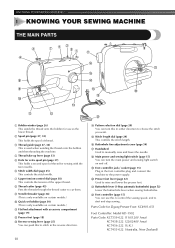
...Zealand) J Presser foot lever (page 32) Used to the power supply. L Foot controller (page 15) You can turn the main power and sewing light switch on certain models.) A Flat bed attachment with the twin needle. 6 Stitch width dial (page 25) This controls the stitch width. 7... manually raise and lower the needle. K Buttonhole lever (1-Step automatic buttonhole) (page 52) Lower the buttonhole lever when sewing buttonholes. KNOWING YOUR SEWING MACHINE 1 KNOWING YOUR SEWING MACHINE THE MAIN PARTS 1 Bobbin winder (page 26) This winds the thread onto the bobbin for use this in either...
...Zealand) J Presser foot lever (page 32) Used to the power supply. L Foot controller (page 15) You can turn the main power and sewing light switch on certain models.) A Flat bed attachment with the twin needle. 6 Stitch width dial (page 25) This controls the stitch width. 7... manually raise and lower the needle. K Buttonhole lever (1-Step automatic buttonhole) (page 52) Lower the buttonhole lever when sewing buttonholes. KNOWING YOUR SEWING MACHINE 1 KNOWING YOUR SEWING MACHINE THE MAIN PARTS 1 Bobbin winder (page 26) This winds the thread onto the bobbin for use this in either...
Operation Manual
Page 13
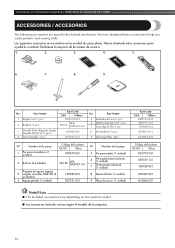
...9 Placa de zurcir (1 unidad) Código de la pieza EE.UU. We have designed these accessories to help you easily perform most sewing tasks. No. Otros XD1792-031 X59375-121 130920-021 X55467-021 XC6063-021 Note/Nota ● The included accessories vary depending on the machine... model. ● Los accesorios incluidos varían según el modelo de la máquina. 12 KNOWING YOUR SEWING MACHINE / CONOZCA SU MÁQUINA DE COSER ACCESSORIES / ACCESORIOS The following accessories are stored in the flat bed attachment. Part Name 5 Buttonhole...
...9 Placa de zurcir (1 unidad) Código de la pieza EE.UU. We have designed these accessories to help you easily perform most sewing tasks. No. Otros XD1792-031 X59375-121 130920-021 X55467-021 XC6063-021 Note/Nota ● The included accessories vary depending on the machine... model. ● Los accesorios incluidos varían según el modelo de la máquina. 12 KNOWING YOUR SEWING MACHINE / CONOZCA SU MÁQUINA DE COSER ACCESSORIES / ACCESORIOS The following accessories are stored in the flat bed attachment. Part Name 5 Buttonhole...
Operation Manual
Page 19
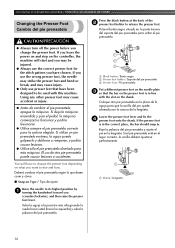
... foot holder / Soporte del pie prensatela 3 Presser Foot / Pie prensatela Put a different presser foot on the needle plate 3 so that have been designed to sew and how. Lower the presser foot lever and fix the 4 presser foot onto the shank. Press the black button at the back of the 2 presser...cómo. ■ Snap-on Type / Tipo de ajuste Raise the needle to release the presser foot. If the presser foot is in . KNOWING YOUR SEWING MACHINE / CONOZCA SU MÁQUINA DE COSER Changing the Presser Foot Cambio del pie prensatela CAUTION/PRECAUCIÓN ● Always turn off the power before...
... foot holder / Soporte del pie prensatela 3 Presser Foot / Pie prensatela Put a different presser foot on the needle plate 3 so that have been designed to sew and how. Lower the presser foot lever and fix the 4 presser foot onto the shank. Press the black button at the back of the 2 presser...cómo. ■ Snap-on Type / Tipo de ajuste Raise the needle to release the presser foot. If the presser foot is in . KNOWING YOUR SEWING MACHINE / CONOZCA SU MÁQUINA DE COSER Changing the Presser Foot Cambio del pie prensatela CAUTION/PRECAUCIÓN ● Always turn off the power before...
Operation Manual
Page 27
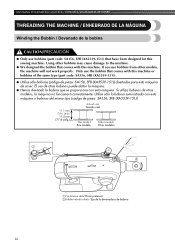
... properly. If you use bobbins (part code: SA156, SFB (XA5539-151)) that have been designed for this sewing machine. Si utiliza bobinas de otros modelos, la máquina no funcionará correctamente. KNOWING YOUR SEWING MACHINE / CONOZCA SU MÁQUINA DE COSER THREADING THE MACHINE / ENHEBRADO DE LA MÁQUINA Winding the...
... properly. If you use bobbins (part code: SA156, SFB (XA5539-151)) that have been designed for this sewing machine. Si utiliza bobinas de otros modelos, la máquina no funcionará correctamente. KNOWING YOUR SEWING MACHINE / CONOZCA SU MÁQUINA DE COSER THREADING THE MACHINE / ENHEBRADO DE LA MÁQUINA Winding the...
Operation Manual
Page 37
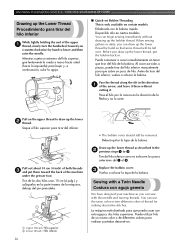
... del hilo inferior, vuelva a colocar la bobina. Replace the bobbin cover. 3 Vuelva a colocar la tapa de la bobina. You can begin sewing immediately without cutting it there without drawing up the bobbin thread. Pass the thread along the slit in . Mientras sujeta un extremo del hilo superior... y, a continuación, subir la aguja. ■ Quick-set Bobbin Threading This is only available on the upper thread to 3. KNOWING YOUR SEWING MACHINE / CONOZCA SU MÁQUINA DE COSER Drawing up the Lower Thread Procedimiento para tirar del hilo inferior While lightly holding the end of the...
... del hilo inferior, vuelva a colocar la bobina. Replace the bobbin cover. 3 Vuelva a colocar la tapa de la bobina. You can begin sewing immediately without cutting it there without drawing up the bobbin thread. Pass the thread along the slit in . Mientras sujeta un extremo del hilo superior... y, a continuación, subir la aguja. ■ Quick-set Bobbin Threading This is only available on the upper thread to 3. KNOWING YOUR SEWING MACHINE / CONOZCA SU MÁQUINA DE COSER Drawing up the Lower Thread Procedimiento para tirar del hilo inferior While lightly holding the end of the...
Operation Manual
Page 44
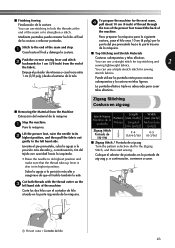
... y, a continuación, tire del tejido con suavidad hacia la izquierda. • Raise the needle to the Zigzag Stitch, and then start sewing. Zigzag Stitching Costura en zig-zag Stitch Name Nombre de la puntada Zigzag Stitch Puntada de zig-zag Pattern Dibujo Length [mm (inch)] Longitud... Empuje el pulsador de retroceso y cosa hacia atrás 1 cm (3/8 pulg.) desde el extremo de la tela. To prepare the machine for sewing stretch fabrics. Mediante puntadas puede rematar los hilos al final de la costura o reforzar puntadas. Costuras sobrepuestas y telas elásticas You can use...
... y, a continuación, tire del tejido con suavidad hacia la izquierda. • Raise the needle to the Zigzag Stitch, and then start sewing. Zigzag Stitching Costura en zig-zag Stitch Name Nombre de la puntada Zigzag Stitch Puntada de zig-zag Pattern Dibujo Length [mm (inch)] Longitud... Empuje el pulsador de retroceso y cosa hacia atrás 1 cm (3/8 pulg.) desde el extremo de la tela. To prepare the machine for sewing stretch fabrics. Mediante puntadas puede rematar los hilos al final de la costura o reforzar puntadas. Costuras sobrepuestas y telas elásticas You can use...
Operation Manual
Page 67
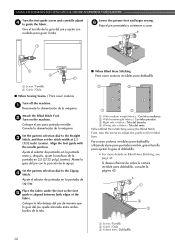
... the fabric to guide the material. Keep a uniform amount of fabric wrapped around the curled part of the fabric, lower the presser foot, and then sew 2 or 3 stitches. Después de coser entre 2 (3/4 pulg.) y 3 cm (1 1/8 pulg.) de la tela, suelte el hilo y guíe ...del pie prensatela. Set the stitch width at 2.5 (3/32 inch) (center). Position the fabric (wrong side facing up) 4 under the presser foot. After sewing 2 (3/4 inch) to the Straight Stitch. USING ATTACHMENTS AND APPLICATIONS / USO DE ACCESORIOS Y APLICACIONES Turn off the machine. 1 Desconecte la alimentación de...
... the fabric to guide the material. Keep a uniform amount of fabric wrapped around the curled part of the fabric, lower the presser foot, and then sew 2 or 3 stitches. Después de coser entre 2 (3/4 pulg.) y 3 cm (1 1/8 pulg.) de la tela, suelte el hilo y guíe ...del pie prensatela. Set the stitch width at 2.5 (3/32 inch) (center). Position the fabric (wrong side facing up) 4 under the presser foot. After sewing 2 (3/4 inch) to the Straight Stitch. USING ATTACHMENTS AND APPLICATIONS / USO DE ACCESORIOS Y APLICACIONES Turn off the machine. 1 Desconecte la alimentación de...
Operation Manual
Page 68
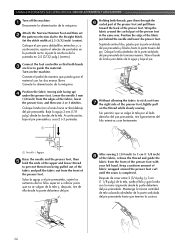
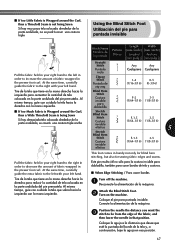
... Costura invisible elástica F-1.5 3-5 (1/64-1/16) (1/8-3/16) 5 F-1.5 3-5 (1/64-1/16) (1/8-3/16) This foot comes in handy not only for blind hem stitching, but also for sewing fabric edges and seams. Este pie resulta útil no se podrá coser una costura triple Using the Blind Stitch Foot Utilización del...
... Costura invisible elástica F-1.5 3-5 (1/64-1/16) (1/8-3/16) 5 F-1.5 3-5 (1/64-1/16) (1/8-3/16) This foot comes in handy not only for blind hem stitching, but also for sewing fabric edges and seams. Este pie resulta útil no se podrá coser una costura triple Using the Blind Stitch Foot Utilización del...
Operation Manual
Page 69
... Y APLICACIONES Turn the foot guide screw and carefully adjust 4 to the folded hem. Lower the presser foot and begin sewing. 6 Baje el pie prensatela y comience a coser. 1 Screw / Tornillo 2 Guide / Guía ■ When Sewing Seams / Para coser costuras Turn off the machine. 1 Desconecte la alimentación de la máquina. Coloque el...
... Y APLICACIONES Turn the foot guide screw and carefully adjust 4 to the folded hem. Lower the presser foot and begin sewing. 6 Baje el pie prensatela y comience a coser. 1 Screw / Tornillo 2 Guide / Guía ■ When Sewing Seams / Para coser costuras Turn off the machine. 1 Desconecte la alimentación de la máquina. Coloque el...
Operation Manual
Page 73
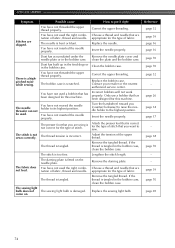
...You have not used the right combi- page 38 - page 32, 37 - - - page 39 page 38 page 70 page 16 page 17 72 Symptom The sewing machine does not work properly. The upper thread breaks. left. You have not threaded the upper thread properly. (For example, you want to... sew. Replace the needle plate. Incorrect bobbins will not work . Remove any knots or tangles. Loosen the upper thread tension. If the thread is tangled...
...You have not used the right combi- page 38 - page 32, 37 - - - page 39 page 38 page 70 page 16 page 17 72 Symptom The sewing machine does not work properly. The upper thread breaks. left. You have not threaded the upper thread properly. (For example, you want to... sew. Replace the needle plate. Incorrect bobbins will not work . Remove any knots or tangles. Loosen the upper thread tension. If the thread is tangled...

Operation Manual
Page 74
...Incorrect bobbins will not work properly. page 26 The lower thread is incorrect. Only use a bobbin that are appropriate for the fabric you are sewing thin fabric, the stitch is too thick. page 28-31 You have not used a bobbin that has been designed for this machine. page .... - page 38 6 You have not used the right combination of thread and needle for the type of fabric. Reset the bobbin thread correctly. Sew with stabiliser material under the fabric. - Symptom Possible cause How to put it . Choose a thread and needle that has been designed for the ...
...Incorrect bobbins will not work properly. page 26 The lower thread is incorrect. Only use a bobbin that are appropriate for the fabric you are sewing thin fabric, the stitch is too thick. page 28-31 You have not used a bobbin that has been designed for this machine. page .... - page 38 6 You have not used the right combination of thread and needle for the type of fabric. Reset the bobbin thread correctly. Sew with stabiliser material under the fabric. - Symptom Possible cause How to put it . Choose a thread and needle that has been designed for the ...
Operation Manual
Page 75
... raise the needle holder to put it right You have not used a bobbin that are using is correct for this machine. The sewing light bulb does not The sewing light bulb is scratched. The needle threader can not be used the right combination of fabric. Insert the needle properly. Attach the ... thread properly. The thread is tangled in the bobbin case, clean the bobbin case. The fabric does not feed. Remove the tangled thread. Replace the sewing light bulb. You have not inserted the needle properly. come on the needle plate. Reference page 32 page 39 page 16 page 16 page 70...
... raise the needle holder to put it right You have not used a bobbin that are using is correct for this machine. The sewing light bulb does not The sewing light bulb is scratched. The needle threader can not be used the right combination of fabric. Insert the needle properly. Attach the ... thread properly. The thread is tangled in the bobbin case, clean the bobbin case. The fabric does not feed. Remove the tangled thread. Replace the sewing light bulb. You have not inserted the needle properly. come on the needle plate. Reference page 32 page 39 page 16 page 16 page 70...
Operation Manual
Page 80
...233;s 58 B Blind hem stitching 45 Blind stitch foot 67 Bobbin winding 26 Buttonhole adjusting 54 making 52 Buttonhole fine-adjustment screw 54 Buttons sewing 55 C Cleaning 70 Connecting plugs 15 D Darning 58 Darning plate 55, 58, 59, 64 Decorative stitching 50 Double action stitching 47 ... dial 20 Patterns 21 Presser foot changing 18 Q , Quick-set bobbin 30 36 Quilting foot 63 R Race cleaning 70 Repacking instructions 4 Reverse sewing lever 25 S Satin stitch 44 Shell tuck stitching 46 , Spool pin 27 32 extra 37 Stitch length dial 24 Stitch width dial 25 Stitches...
...233;s 58 B Blind hem stitching 45 Blind stitch foot 67 Bobbin winding 26 Buttonhole adjusting 54 making 52 Buttonhole fine-adjustment screw 54 Buttons sewing 55 C Cleaning 70 Connecting plugs 15 D Darning 58 Darning plate 55, 58, 59, 64 Decorative stitching 50 Double action stitching 47 ... dial 20 Patterns 21 Presser foot changing 18 Q , Quick-set bobbin 30 36 Quilting foot 63 R Race cleaning 70 Repacking instructions 4 Reverse sewing lever 25 S Satin stitch 44 Shell tuck stitching 46 , Spool pin 27 32 extra 37 Stitch length dial 24 Stitch width dial 25 Stitches...

Accessory Catalog
Page 2
... straw hats Contents 02 FZ2-B1 Brother Sewing Machine Lineup 03-04 Brother General Sewing Accessories 05-16 Brother Embellishment Feet 17-24 Brother Quilting Feet 25-28 Brother Embroidery Accessories 29-66 Brother Sewing Machine Attachments for PQ Series 0637-0740 Brother Serger/Overlock Feet 71-74 Brother Cover Stitch Feet 75-78 More From Brother 79 Index 80 You can...
... straw hats Contents 02 FZ2-B1 Brother Sewing Machine Lineup 03-04 Brother General Sewing Accessories 05-16 Brother Embellishment Feet 17-24 Brother Quilting Feet 25-28 Brother Embroidery Accessories 29-66 Brother Sewing Machine Attachments for PQ Series 0637-0740 Brother Serger/Overlock Feet 71-74 Brother Cover Stitch Feet 75-78 More From Brother 79 Index 80 You can...

Accessory Catalog
Page 3
... x 6-1/4" embroidery, edit and size designs, and make your machine from the extensive Brother Embroidery Library. * Brother embroidery accessories are easily created from a variety of utility and decorative sewing stitches when you cannot find the correct model, please note the letter illustrated in the... Art machine with models in the "A" category.). Once you the best in sewing, quilting, embroidery and even crafting capability! Some models feature automatic machine embroidery as well. Brother Sewing Machine Lineup 04 A Quattro™ 6000D Duetta™ 4500D, Innov-is NX650Q...
... x 6-1/4" embroidery, edit and size designs, and make your machine from the extensive Brother Embroidery Library. * Brother embroidery accessories are easily created from a variety of utility and decorative sewing stitches when you cannot find the correct model, please note the letter illustrated in the... Art machine with models in the "A" category.). Once you the best in sewing, quilting, embroidery and even crafting capability! Some models feature automatic machine embroidery as well. Brother Sewing Machine Lineup 04 A Quattro™ 6000D Duetta™ 4500D, Innov-is NX650Q...

Accessory Catalog
Page 4
.... Position the presser foot over the long feed dogs on either left ). 2. Screw on the presser foot. 4. Sew. Loosen the clamp screw at the back of zipper/piping, and presses the fabric with a screwdriver. 5. Check the needle does not hit the... the presser foot and select a straight stitch (left or right. 3. Adjustable Zipper & Piping Foot Brother General Sewing Accessories 06 Adjustable Zipper & Piping Foot Attaches zippers and pipings easily. SA161 All Brother home-use sewing machines www.brother.com Requires Low Shank Adapter for ULT series, PC-6500, PC-8200 and PC-8500...
.... Position the presser foot over the long feed dogs on either left ). 2. Screw on the presser foot. 4. Sew. Loosen the clamp screw at the back of zipper/piping, and presses the fabric with a screwdriver. 5. Check the needle does not hit the... the presser foot and select a straight stitch (left or right. 3. Adjustable Zipper & Piping Foot Brother General Sewing Accessories 06 Adjustable Zipper & Piping Foot Attaches zippers and pipings easily. SA161 All Brother home-use sewing machines www.brother.com Requires Low Shank Adapter for ULT series, PC-6500, PC-8200 and PC-8500...

Accessory Catalog
Page 5
... edge of the fabric against the presser foot guide to the edge of another fabric. SA184 All Brother home-use sewing machines Ring Bearer Pillow & Hankerchief Innov-is perfect for details.) www.brother.com Position the fabric with the wrong side facing up . 2. Lower the presser foot lever. ...fabric along the guide on this presser foot. Fold a fabric in the seam. 6. Works well for both sides of zipper. 7. Sew. Brother General Sewing Accessories 07 Blind Stitch Foot Concealed Zipper Foot Blind Stitch Foot Creates blind hems on a variety of fabrics, using the adjustable guide on...
... edge of the fabric against the presser foot guide to the edge of another fabric. SA184 All Brother home-use sewing machines Ring Bearer Pillow & Hankerchief Innov-is perfect for details.) www.brother.com Position the fabric with the wrong side facing up . 2. Lower the presser foot lever. ...fabric along the guide on this presser foot. Fold a fabric in the seam. 6. Works well for both sides of zipper. 7. Sew. Brother General Sewing Accessories 07 Blind Stitch Foot Concealed Zipper Foot Blind Stitch Foot Creates blind hems on a variety of fabrics, using the adjustable guide on...


