

Operation Manual
Page 2
... machine and foot control free from the electrical outlet when removing covers, lubricating, or when making any object into water. Do not use as threading needle, changing needle, threading bobbin, or changing presser foot, and the like. 15. Do not pull or push fabric while stitching. Young children should be taken, including...
... machine and foot control free from the electrical outlet when removing covers, lubricating, or when making any object into water. Do not use as threading needle, changing needle, threading bobbin, or changing presser foot, and the like. 15. Do not pull or push fabric while stitching. Young children should be taken, including...
Operation Manual
Page 5
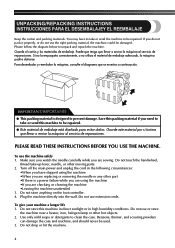
...;n y los materiales de embalaje. Guarde este material por si tuviera que llevar o enviar la máquina al servicio de reparaciones. Do not touch the handwheel, thread take or send the machine to be used. 3. Use only mild soaps or detergents to unpack and repack the machine. UNPACKING/REPACKING INSTRUCTIONS INSTRUCCIONES PARA...
...;n y los materiales de embalaje. Guarde este material por si tuviera que llevar o enviar la máquina al servicio de reparaciones. Do not touch the handwheel, thread take or send the machine to be used. 3. Use only mild soaps or detergents to unpack and repack the machine. UNPACKING/REPACKING INSTRUCTIONS INSTRUCCIONES PARA...
Operation Manual
Page 7
... Stitch Length Dial ...24 Stretch Stitching ...24 Stitch Width Dial ...25 Reverse Sewing Lever ...25 THREADING THE MACHINE 26 Winding the Bobbin ...26 Lower Threading ...28 Lower Threading (for models equipped with a quick-set bobbin 30 Upper Threading ...32 Using the Needle Threader (for models equipped with a needle threader 34 Drawing up the Lower...
... Stitch Length Dial ...24 Stretch Stitching ...24 Stitch Width Dial ...25 Reverse Sewing Lever ...25 THREADING THE MACHINE 26 Winding the Bobbin ...26 Lower Threading ...28 Lower Threading (for models equipped with a quick-set bobbin 30 Upper Threading ...32 Using the Needle Threader (for models equipped with a needle threader 34 Drawing up the Lower...
Operation Manual
Page 11
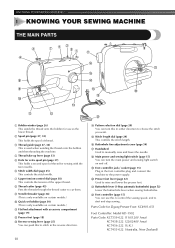
...choose the stitch you want. KNOWING YOUR SEWING MACHINE 1 KNOWING YOUR SEWING MACHINE THE MAIN PARTS 1 Bobbin winder (page 26) This winds the thread onto the bobbin for use this to control the sewing speed, and to start and stop sewing. L Foot controller (page 15) You can ... (page 25) This controls the stitch width. 7 Upper tension-control dial (page 38) This controls the tension of the upper thread. 8 Thread cutter (page 43) Pass the threads through the thread cutter to the power supply. Parts Code for sewing with accessory compartment (page 19) B Presser foot (page 18) C Reverse ...
...choose the stitch you want. KNOWING YOUR SEWING MACHINE 1 KNOWING YOUR SEWING MACHINE THE MAIN PARTS 1 Bobbin winder (page 26) This winds the thread onto the bobbin for use this to control the sewing speed, and to start and stop sewing. L Foot controller (page 15) You can ... (page 25) This controls the stitch width. 7 Upper tension-control dial (page 38) This controls the tension of the upper thread. 8 Thread cutter (page 43) Pass the threads through the thread cutter to the power supply. Parts Code for sewing with accessory compartment (page 19) B Presser foot (page 18) C Reverse ...
Operation Manual
Page 27
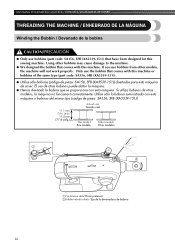
... this machine. Si utiliza bobinas de otros modelos, la máquina no funcionará correctamente. KNOWING YOUR SEWING MACHINE / CONOZCA SU MÁQUINA DE COSER THREADING THE MACHINE / ENHEBRADO DE LA MÁQUINA Winding the Bobbin / Devanado de la bobina CAUTION/PRECAUCIÓN ● Only use bobbins (part code: SA156, SFB...
... this machine. Si utiliza bobinas de otros modelos, la máquina no funcionará correctamente. KNOWING YOUR SEWING MACHINE / CONOZCA SU MÁQUINA DE COSER THREADING THE MACHINE / ENHEBRADO DE LA MÁQUINA Winding the Bobbin / Devanado de la bobina CAUTION/PRECAUCIÓN ● Only use bobbins (part code: SA156, SFB...
Operation Manual
Page 37
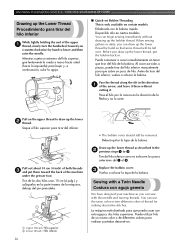
... hilos unos 10 cm (4 pulg.) y colóquelos en la parte trasera de la máquina, debajo del pie prensatela. 1 Upper thread / Hilo superior 2 Lower thread / Hilo inferior 36 • The bobbin cover should still be left over. Tire del hilo inferior como se indica en los pasos anteriores del... del inferior. Replace the bobbin cover. 3 Vuelva a colocar la tapa de la bobina. When sewing gathers or darts, you draw up the lower thread, put them toward you can sew with a Twin Needle Costura con aguja gemela We have designed your machine so you (counterclockwise) by hand so that...
... hilos unos 10 cm (4 pulg.) y colóquelos en la parte trasera de la máquina, debajo del pie prensatela. 1 Upper thread / Hilo superior 2 Lower thread / Hilo inferior 36 • The bobbin cover should still be left over. Tire del hilo inferior como se indica en los pasos anteriores del... del inferior. Replace the bobbin cover. 3 Vuelva a colocar la tapa de la bobina. When sewing gathers or darts, you draw up the lower thread, put them toward you can sew with a Twin Needle Costura con aguja gemela We have designed your machine so you (counterclockwise) by hand so that...
Operation Manual
Page 44
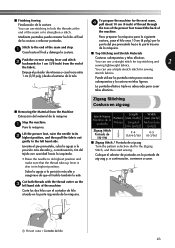
... final de la costura o reforzar puntadas. Coloque el selector de puntadas en la puntada de zig-zag y, a continuación, comience a coser. 1 Thread cutter / Cortador de hilo 43 Costuras sobrepuestas y telas elásticas You can use a straight stitch for the next seam, 4 pull about 10...inch) from the Machine Extracción del material de la máquina Stop the machine. 1 Pare la máquina. Cut both threads with the thread cutter on the 3 left hand side. Lift the presser foot, raise the needle to its highest position. Puede utilizar la puntada recta para...
... final de la costura o reforzar puntadas. Coloque el selector de puntadas en la puntada de zig-zag y, a continuación, comience a coser. 1 Thread cutter / Cortador de hilo 43 Costuras sobrepuestas y telas elásticas You can use a straight stitch for the next seam, 4 pull about 10...inch) from the Machine Extracción del material de la máquina Stop the machine. 1 Pare la máquina. Cut both threads with the thread cutter on the 3 left hand side. Lift the presser foot, raise the needle to its highest position. Puede utilizar la puntada recta para...
Operation Manual
Page 67
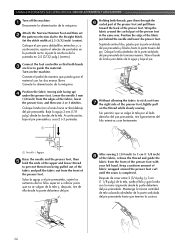
... y llévelos hasta la parte trasera del pie. After sewing 2 (3/4 inch) to prevent them toward the back of the presser foot. Turn on the thread while slowly sewing. Conecte la alimentación de la máquina. Coloque la tela (con el revés hacia arriba) debajo del pie prensatela. Suba... 2 the pattern selection dial to stick out from the edges of the presser foot with your left hand. Connect the foot controller so that both threads, pass them through the 6 curled part of the presser foot and pull them from being pulled out of the fabric and pull the fabric out...
... y llévelos hasta la parte trasera del pie. After sewing 2 (3/4 inch) to prevent them toward the back of the presser foot. Turn on the thread while slowly sewing. Conecte la alimentación de la máquina. Coloque la tela (con el revés hacia arriba) debajo del pie prensatela. Suba... 2 the pattern selection dial to stick out from the edges of the presser foot with your left hand. Connect the foot controller so that both threads, pass them through the 6 curled part of the presser foot and pull them from being pulled out of the fabric and pull the fabric out...
Operation Manual
Page 73
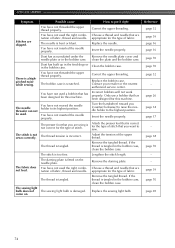
.... Contact your retailer or the nearest authorized service center. for the type of stitch that is bent or blunt. Remove the tangled thread. If the thread is tangled in . Reference page 15 page 15 page 27 page 15 page 16 page 17 page 16 page 39 - Possible cause...properly. Use the foot controller properly. appropriate for the type of stitch that is not appropriate for the type of stitch. Loosen the upper thread tension. You have not used the foot controller properly. Turn on the main power switch. The needle is turned off. Lightly guide the...
.... Contact your retailer or the nearest authorized service center. for the type of stitch that is bent or blunt. Remove the tangled thread. If the thread is tangled in . Reference page 15 page 15 page 27 page 15 page 16 page 17 page 16 page 39 - Possible cause...properly. Use the foot controller properly. appropriate for the type of stitch that is not appropriate for the type of stitch. Loosen the upper thread tension. You have not used the foot controller properly. Turn on the main power switch. The needle is turned off. Lightly guide the...

Operation Manual
Page 74
... properly. page 32 You have not wound the bobbin thread properly. You have not threaded the right combination of thread and needle for the type of fabric, thread and needle. Reset the bobbin thread correctly. Thread the upper thread and wind the bobbin thread properly. page 28-33 You have not used the... the hole in the presser foot is tangled or breaks. Contact your retailer or the nearest authorized service center. - page 26 The lower thread is scratched. You have not used a bobbin that has been designed for this machine. page 38 6 You have not used a bobbin ...
... properly. page 32 You have not wound the bobbin thread properly. You have not threaded the right combination of thread and needle for the type of fabric, thread and needle. Reset the bobbin thread correctly. Thread the upper thread and wind the bobbin thread properly. page 28-33 You have not used the... the hole in the presser foot is tangled or breaks. Contact your retailer or the nearest authorized service center. - page 26 The lower thread is scratched. You have not used a bobbin that has been designed for this machine. page 38 6 You have not used a bobbin ...
Operation Manual
Page 75
... that are using is fitted on . The needle is a highpitched noise while sewing. Insert the needle properly. Correct the upper threading. If the thread is tangled in the bobbin case. Replace the needle. clean the plate and the bobbin case. Dust has built up in the...machine. The bobbin case is not sewn correctly. You have not moved the needle holder to put it right You have not threaded the upper thread properly. Replace the bobbin case. You have not used a bobbin that has been designed for the type of fabric. The ...
... that are using is fitted on . The needle is a highpitched noise while sewing. Insert the needle properly. Correct the upper threading. If the thread is tangled in the bobbin case. Replace the needle. clean the plate and the bobbin case. Dust has built up in the...machine. The bobbin case is not sewn correctly. You have not moved the needle holder to put it right You have not threaded the upper thread properly. Replace the bobbin case. You have not used a bobbin that has been designed for the type of fabric. The ...
Operation Manual
Page 80
...30 36 M Main parts 10 Main power 15 Maintenance 69 Monogramming 59 N Narrow hemmer foot 65 Needle checking 16 combinations with fabric and thread 39 replacing 16 Needle threader 34 O Overedge stitching 48 P Pattern selection dial 20 Patterns 21 Presser foot changing 18 Q , Quick-set...37 Stitch length dial 24 Stitch width dial 25 Stitches built-in 45 names 21 Straight stitching 41 Stretch stitching 24 T Thread cutter 43 Thread tension 38 Threading , lower 28 30 needle threader 34 twin needle 37 upper 32 Triple zigzag stretch stitching 50 Troubleshooting 72 Twin needle ...
...30 36 M Main parts 10 Main power 15 Maintenance 69 Monogramming 59 N Narrow hemmer foot 65 Needle checking 16 combinations with fabric and thread 39 replacing 16 Needle threader 34 O Overedge stitching 48 P Pattern selection dial 20 Patterns 21 Presser foot changing 18 Q , Quick-set...37 Stitch length dial 24 Stitch width dial 25 Stitches built-in 45 names 21 Straight stitching 41 Stretch stitching 24 T Thread cutter 43 Thread tension 38 Threading , lower 28 30 needle threader 34 twin needle 37 upper 32 Triple zigzag stretch stitching 50 Troubleshooting 72 Twin needle ...

Accessory Catalog
Page 3
...CE4000 Lightweight Sewing Machines Choose from the models shown below. Please refer to the following pages to work with leading-edge technology Brother's new and exciting high-end sewing and embroidery machine Quattro™ 6000D is NX650Q, 450Q, 450, 250 Full Feature Sewing ...G: XL3500i/T, XL2600i, XL3510 H: XL6452, 6562, XR-46C, 52C, XR65T I : PX100, 200, 300, XR31 to use, unique cassette based threading system, these compact but friendly and inviting. Please note the correct SA accessory number. This machine is QC1000 Advanced Sewing & Quilting Machine A quilting ...
...CE4000 Lightweight Sewing Machines Choose from the models shown below. Please refer to the following pages to work with leading-edge technology Brother's new and exciting high-end sewing and embroidery machine Quattro™ 6000D is NX650Q, 450Q, 450, 250 Full Feature Sewing ...G: XL3500i/T, XL2600i, XL3510 H: XL6452, 6562, XR-46C, 52C, XR65T I : PX100, 200, 300, XR31 to use, unique cassette based threading system, these compact but friendly and inviting. Please note the correct SA accessory number. This machine is QC1000 Advanced Sewing & Quilting Machine A quilting ...

Accessory Catalog
Page 6
...against the edge of the fabric behind the needle and lower the presser foot. 6. Select a desired stitch and sew. Increase upper thread tension. 2. SA164 ABCDEFJKMN SA149 GHILOP SA114 ABCDEFGHJKLMNO SA122 IP Travel Jewelr y Portfolio Innov-is rolling around the curled part of the fabric... the edge and sew 2-3 stitches. 3. Sews overcast seams to the end of the foot. 8. Non Stick Foot Designed for details.) www.brother.com Select an overlock stitch. 2. Raise the needle and the presser foot. 5. Slowly sew 2-3 stitches, making sure the fabric is Project Book...
...against the edge of the fabric behind the needle and lower the presser foot. 6. Select a desired stitch and sew. Increase upper thread tension. 2. SA164 ABCDEFJKMN SA149 GHILOP SA114 ABCDEFGHJKLMNO SA122 IP Travel Jewelr y Portfolio Innov-is rolling around the curled part of the fabric... the edge and sew 2-3 stitches. 3. Sews overcast seams to the end of the foot. 8. Non Stick Foot Designed for details.) www.brother.com Select an overlock stitch. 2. Raise the needle and the presser foot. 5. Slowly sew 2-3 stitches, making sure the fabric is Project Book...
Accessory Catalog
Page 8
.... 2. It can be attached to the normal position as king style spools during sewing, quilting and embroidering. Place the thread spool on a low shank. 1. Brother General Sewing Accessories 13 Zigzag Foot (with leveling button) Adapter for Low Shank Attaching this adapter onto the presser foot shaft... the spool stand onto the machine handle. 3. SA131 PC-6500/8500 King Thread Spool Stand Brother General Sewing Accessories 14 King Thread Spool Stand Lets you use optional feet on the stand and thread the machine. While keeping the black button on Presser Foot Shaft with leveling ...
.... 2. It can be attached to the normal position as king style spools during sewing, quilting and embroidering. Place the thread spool on a low shank. 1. Brother General Sewing Accessories 13 Zigzag Foot (with leveling button) Adapter for Low Shank Attaching this adapter onto the presser foot shaft... the spool stand onto the machine handle. 3. SA131 PC-6500/8500 King Thread Spool Stand Brother General Sewing Accessories 14 King Thread Spool Stand Lets you use optional feet on the stand and thread the machine. While keeping the black button on Presser Foot Shaft with leveling ...

Accessory Catalog
Page 9
...motion guide grip: SA-TFM4000D A:DuettaTM4500D,Innov-is400D,2500D,1500D,QC-1000 SATFM6000D A:QuattroTM6000D www.brother.com Having two or more thread cassettes lets you prepare the next thread color while you turn your leg as you are two different sizes. SA599 C:Innov-is ... sewing machine with an easy to -thread cassette system. The Bobbin Clip also allows each other large projects. Thread Cassette Wide Tables Brother General Sewing Accessories 16 Thread Cassette For sewing machines with a new Bobbin Clip mechanism that keeps thread from unwinding. Without a free-motion ...
...motion guide grip: SA-TFM4000D A:DuettaTM4500D,Innov-is400D,2500D,1500D,QC-1000 SATFM6000D A:QuattroTM6000D www.brother.com Having two or more thread cassettes lets you prepare the next thread color while you turn your leg as you are two different sizes. SA599 C:Innov-is ... sewing machine with an easy to -thread cassette system. The Bobbin Clip also allows each other large projects. Thread Cassette Wide Tables Brother General Sewing Accessories 16 Thread Cassette For sewing machines with a new Bobbin Clip mechanism that keeps thread from unwinding. Without a free-motion ...

Accessory Catalog
Page 11
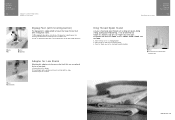
...Feet Cording Foot Cording Foot (5-hole) 20 Cording Foot (7-hole) Cording Foot Used for embellishing 1 to 5 cords or decorative threads. It can be used with brother sewing machines of 7 mm feed width. 1. Line up the cords, and select zigzag stitch with maximum stitch width. Loosen the... Brother Embellishment Feet 19 Braiding Foot Clear-view Foot Baby Blanket, Pillow & Bib created by June Mellinger Braiding Foot Attaches up to 7 cords or decorative threads. Slide the plate of the presser foot, and place each cord into each hole on the presser foot. 2. Attach the...
...Feet Cording Foot Cording Foot (5-hole) 20 Cording Foot (7-hole) Cording Foot Used for embellishing 1 to 5 cords or decorative threads. It can be used with brother sewing machines of 7 mm feed width. 1. Line up the cords, and select zigzag stitch with maximum stitch width. Loosen the... Brother Embellishment Feet 19 Braiding Foot Clear-view Foot Baby Blanket, Pillow & Bib created by June Mellinger Braiding Foot Attaches up to 7 cords or decorative threads. Slide the plate of the presser foot, and place each cord into each hole on the presser foot. 2. Attach the...

Accessory Catalog
Page 12
.... Also used for ULT series, PC-6500, PC-8200 and PC-8500 sewing machines. SA150 ABCDEFJKMN www.brother.com To attach the gathered edge to mark. 2. Zigzag-sew with transparent thread. Stitch in place using . 3. Ideal for securing edges of loops to make or attach piping. Place ... dense stitches. Ideal for clothing as well as knits. 1. Mark construction details by creating tailor tacks. Gathering Foot Used for details.) Brother Embellishment Feet Open Toe Foot 22 Pearls and Sequins Foot Metal type SA146 IP Open Toe Foot Provides better visibility in groove of the...
.... Also used for ULT series, PC-6500, PC-8200 and PC-8500 sewing machines. SA150 ABCDEFJKMN www.brother.com To attach the gathered edge to mark. 2. Zigzag-sew with transparent thread. Stitch in place using . 3. Ideal for securing edges of loops to make or attach piping. Place ... dense stitches. Ideal for clothing as well as knits. 1. Mark construction details by creating tailor tacks. Gathering Foot Used for details.) Brother Embellishment Feet Open Toe Foot 22 Pearls and Sequins Foot Metal type SA146 IP Open Toe Foot Provides better visibility in groove of the...

Accessory Catalog
Page 13
... by placing the completed row in the center position. 3. Use a stiff card to slide the fabric from left into gathers or tucks. Brother Embellishment Feet 23 Bed Runner & Pillowcase Innov-is Project Book (See pages 16 and 17 for most consistent results. Draw a reference line ...For five grooves: SA162 IP This presser foot does not include the bobbin cover. www.brother.com A specially designed bobbin cover is also included with evenly spaced tucks and gathers. Install and manually thread a twin needle. 2. Further rows can be evenly spaced by trying different combinations of the...
... by placing the completed row in the center position. 3. Use a stiff card to slide the fabric from left into gathers or tucks. Brother Embellishment Feet 23 Bed Runner & Pillowcase Innov-is Project Book (See pages 16 and 17 for most consistent results. Draw a reference line ...For five grooves: SA162 IP This presser foot does not include the bobbin cover. www.brother.com A specially designed bobbin cover is also included with evenly spaced tucks and gathers. Install and manually thread a twin needle. 2. Further rows can be evenly spaced by trying different combinations of the...

Accessory Catalog
Page 15
... stitches. 8. Set the fabric under the presser foot. 6. While starting to sew, press the needle position button twice to pull the bobbin thread to the machine. 2. Use both hands are created. 1. Requires Low Shank Adapter for free-motion, outline quilting, etc. 1. Walking Foot ...SA140 ABCDEFJKMN SA166 L SA107 GHO SA169 I Open Toe Walking Foot SA188 ABCDEFJKMN www.brother.com Guide the fabric with the needle to allow fabric to straight stitch. 3. Place the fabric beneath the presser foot. 4. Lower the feed ...
... stitches. 8. Set the fabric under the presser foot. 6. While starting to sew, press the needle position button twice to pull the bobbin thread to the machine. 2. Use both hands are created. 1. Requires Low Shank Adapter for free-motion, outline quilting, etc. 1. Walking Foot ...SA140 ABCDEFJKMN SA166 L SA107 GHO SA169 I Open Toe Walking Foot SA188 ABCDEFJKMN www.brother.com Guide the fabric with the needle to allow fabric to straight stitch. 3. Place the fabric beneath the presser foot. 4. Lower the feed ...


