

Operation Manual
Page 2
... authorized dealer or service center for its intended use bent needles. 13. Always unplug the machine before cleaning. 2. Do not pull or push fabric while stitching. To reduce the risk of lint, dust, and loose cloth. 5. Use this manual. 3. Do not use the proper needle plate. Never drop or insert any...
... authorized dealer or service center for its intended use bent needles. 13. Always unplug the machine before cleaning. 2. Do not pull or push fabric while stitching. To reduce the risk of lint, dust, and loose cloth. 5. Use this manual. 3. Do not use the proper needle plate. Never drop or insert any...
Operation Manual
Page 7
...STITCHING 41 Please Read Before Sewing ...41 Straight Stitching ...41 Zigzag Stitching ...43 l 3. BUILT-IN STITCHES 45 Blind Hem Stitching ...45 Shell Tuck Stitching ...46 Elastic Stitching ...46 Double Action Stitching ...47 Heirloom Stitching ...48 Overedge Stitching ...48 Feather Stitching ...49 Triple Zigzag Stretch Stitching ...50 Decorative Stitching...Free-arm Style ...19 THE CONTROLS ...20 Pattern Selection Dial ...20 Patterns and Stitch Names ...21 Stitch Length Dial ...24 Stretch Stitching ...24 Stitch Width Dial ...25 Reverse Sewing Lever ...25 THREADING THE MACHINE 26 Winding the ...
...STITCHING 41 Please Read Before Sewing ...41 Straight Stitching ...41 Zigzag Stitching ...43 l 3. BUILT-IN STITCHES 45 Blind Hem Stitching ...45 Shell Tuck Stitching ...46 Elastic Stitching ...46 Double Action Stitching ...47 Heirloom Stitching ...48 Overedge Stitching ...48 Feather Stitching ...49 Triple Zigzag Stretch Stitching ...50 Decorative Stitching...Free-arm Style ...19 THE CONTROLS ...20 Pattern Selection Dial ...20 Patterns and Stitch Names ...21 Stitch Length Dial ...24 Stretch Stitching ...24 Stitch Width Dial ...25 Reverse Sewing Lever ...25 THREADING THE MACHINE 26 Winding the ...
Operation Manual
Page 8
5. APPENDIX ...69 MAINTENANCE ...69 Changing the Light Bulb ...69 Cleaning ...70 Troubleshooting ...72 INDEX ...79 7 USING ATTACHMENTS AND APPLICATIONS 56 Zipper Insertion ...56 Gathering ...57 Darning ...58 Appliqués ...58 Monogramming and Embroidering ...59 OPTIONAL ACCESSORIES 62 Using the Walking Foot ...62 Using the Quilting Foot ...63 Using the 1/4-inch Quilting Foot ...65 Using the Narrow Hemmer Foot ...65 Using the Blind Stitch Foot ...67 6.
5. APPENDIX ...69 MAINTENANCE ...69 Changing the Light Bulb ...69 Cleaning ...70 Troubleshooting ...72 INDEX ...79 7 USING ATTACHMENTS AND APPLICATIONS 56 Zipper Insertion ...56 Gathering ...57 Darning ...58 Appliqués ...58 Monogramming and Embroidering ...59 OPTIONAL ACCESSORIES 62 Using the Walking Foot ...62 Using the Quilting Foot ...63 Using the 1/4-inch Quilting Foot ...65 Using the Narrow Hemmer Foot ...65 Using the Blind Stitch Foot ...67 6.
Operation Manual
Page 11
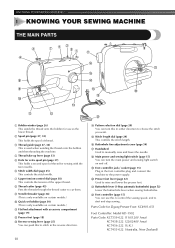
...page 33) 5 Hole for extra spool pin (page 37) This holds a second spool of thread for sewing with the twin needle. 6 Stitch width dial (page 25) This controls the stitch width. 7 Upper tension-control dial (page 38) This controls the tension of the upper thread. 8 Thread cutter (page 43) Pass the... models.) A Flat bed attachment with accessory compartment (page 19) B Presser foot (page 18) C Reverse sewing lever (page 25) You can push this to stitch in the reverse direction. 10 D Pattern selection dial (page 20) You can turn this to control the sewing speed, and to start and stop sewing...
...page 33) 5 Hole for extra spool pin (page 37) This holds a second spool of thread for sewing with the twin needle. 6 Stitch width dial (page 25) This controls the stitch width. 7 Upper tension-control dial (page 38) This controls the tension of the upper thread. 8 Thread cutter (page 43) Pass the... models.) A Flat bed attachment with accessory compartment (page 19) B Presser foot (page 18) C Reverse sewing lever (page 25) You can push this to stitch in the reverse direction. 10 D Pattern selection dial (page 20) You can turn this to control the sewing speed, and to start and stop sewing...
Operation Manual
Page 19
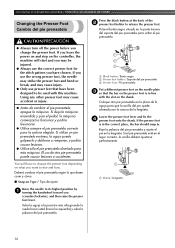
... toward you change the presser foot depending on what you have been designed to be injured. ● Always use the correct presser foot for the stitch pattern you want to release the presser foot. Coloque otro pie prensatela en la placa de la aguja para que la varilla del pie quede...
... toward you change the presser foot depending on what you have been designed to be injured. ● Always use the correct presser foot for the stitch pattern you want to release the presser foot. Coloque otro pie prensatela en la placa de la aguja para que la varilla del pie quede...
Operation Manual
Page 37
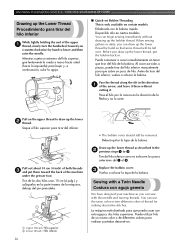
... MÁQUINA DE COSER Drawing up the Lower Thread Procedimiento para tirar del hilo inferior While lightly holding the end of thread for making decorative stitches. Puede comenzar a coser inmediatamente sin tener que tirar del hilo de la bobina. Pull on certain models. Tire del hilo inferior como se indica en...
... MÁQUINA DE COSER Drawing up the Lower Thread Procedimiento para tirar del hilo inferior While lightly holding the end of thread for making decorative stitches. Puede comenzar a coser inmediatamente sin tener que tirar del hilo de la bobina. Pull on certain models. Tire del hilo inferior como se indica en...
Operation Manual
Page 44
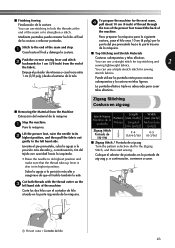
...zig-zag y, a continuación, comience a coser. 1 Thread cutter / Cortador de hilo 43 Costuras sobrepuestas y telas elásticas You can use a triple stretch stitch for 1 cm (3/8 inch) from the Machine Extracción del material de la máquina Stop the machine. 1 Pare la máquina. You can use a...through the toes of the presser foot toward the back of the seam and stop. 1 Cosa hasta el final y detenga la costura. Stitch to the Zigzag Stitch, and then start sewing. Lift the presser foot, raise the needle to its 2 highest position, and then pull the fabric out ...
...zig-zag y, a continuación, comience a coser. 1 Thread cutter / Cortador de hilo 43 Costuras sobrepuestas y telas elásticas You can use a triple stretch stitch for 1 cm (3/8 inch) from the Machine Extracción del material de la máquina Stop the machine. 1 Pare la máquina. You can use a...through the toes of the presser foot toward the back of the seam and stop. 1 Cosa hasta el final y detenga la costura. Stitch to the Zigzag Stitch, and then start sewing. Lift the presser foot, raise the needle to its 2 highest position, and then pull the fabric out ...
Operation Manual
Page 67
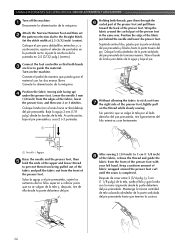
...of the fabric, release the thread and guide the fabric from the edges of the fabric, lower the presser foot, and then sew 2 or 3 stitches. Position the fabric (wrong side facing up) 4 under the presser foot. Ajuste la anchura de la puntada en 2,5 (3/32 pulg.) (centro). ...mm (1/8 inch) 1 Needle / Aguja Raise the needle and the presser foot, then 5 hold the ends of the upper and lower thread to the Straight Stitch. USING ATTACHMENTS AND APPLICATIONS / USO DE ACCESORIOS Y APLICACIONES Turn off the machine. 1 Desconecte la alimentación de la máquina. Baje la aguja...
...of the fabric, release the thread and guide the fabric from the edges of the fabric, lower the presser foot, and then sew 2 or 3 stitches. Position the fabric (wrong side facing up) 4 under the presser foot. Ajuste la anchura de la puntada en 2,5 (3/32 pulg.) (centro). ...mm (1/8 inch) 1 Needle / Aguja Raise the needle and the presser foot, then 5 hold the ends of the upper and lower thread to the Straight Stitch. USING ATTACHMENTS AND APPLICATIONS / USO DE ACCESORIOS Y APLICACIONES Turn off the machine. 1 Desconecte la alimentación de la máquina. Baje la aguja...
Operation Manual
Page 68
... alrededor de la parte ondulada, no sólo para la costura invisible para dobladillo, también para coser bordes de tela y costuras. ■ When Edge Stitching / Para coser bordes Turn off the machine. 1 Desconecte la alimentación de la máquina. Position the needle the distance you want the... also for sewing fabric edges and seams. Este pie resulta útil no se podrá coser una costura triple Using the Blind Stitch Foot Utilización del pie para puntada invisible Pull the fabric held in your right hand to the right in order to decrease the amount ...
... alrededor de la parte ondulada, no sólo para la costura invisible para dobladillo, también para coser bordes de tela y costuras. ■ When Edge Stitching / Para coser bordes Turn off the machine. 1 Desconecte la alimentación de la máquina. Position the needle the distance you want the... also for sewing fabric edges and seams. Este pie resulta útil no se podrá coser una costura triple Using the Blind Stitch Foot Utilización del pie para puntada invisible Pull the fabric held in your right hand to the right in order to decrease the amount ...
Operation Manual
Page 69
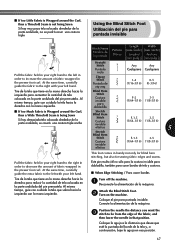
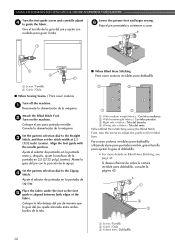
...AND APPLICATIONS / USO DE ACCESORIOS Y APLICACIONES Turn the foot guide screw and carefully adjust 4 to the Zigzag 4 Stitch. Attach the Blind Stitch Foot. 2 Turn on Blind Hem Stitching, see page 45. Coloque la tela debajo del pie de manera que la guía del pie quede alineada entre... ambos bordes de la tela. ■ When Blind Hem Stitching Para coser costuras invisibles para dobladillo 3 3 4 4 1 2 1 With medium weight fabrics / Con telas medianas 2 With heavyweight fabrics / Con telas pesadas 3 ...
...AND APPLICATIONS / USO DE ACCESORIOS Y APLICACIONES Turn the foot guide screw and carefully adjust 4 to the Zigzag 4 Stitch. Attach the Blind Stitch Foot. 2 Turn on Blind Hem Stitching, see page 45. Coloque la tela debajo del pie de manera que la guía del pie quede alineada entre... ambos bordes de la tela. ■ When Blind Hem Stitching Para coser costuras invisibles para dobladillo 3 3 4 4 1 2 1 With medium weight fabrics / Con telas medianas 2 With heavyweight fabrics / Con telas pesadas 3 ...
Operation Manual
Page 73
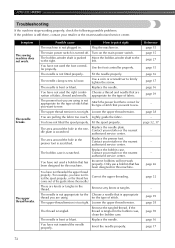
... the thread has Correct the upper threading. Choose a thread and needle that has been designed for this machine. You are nation of stitch that is appropriate thread you want to put it right The machine is not plugged in the thread. Replace the presser foot. Incorrect ... the upper thread tension. You have not used the foot controller properly. Contact your retailer or the nearest authorized service center. come out of stitch that has been designed for this machine. page 32, 37 - - - The main power switch is loose. appropriate for the type of ...
... the thread has Correct the upper threading. Choose a thread and needle that has been designed for this machine. You are nation of stitch that is appropriate thread you want to put it right The machine is not plugged in the thread. Replace the presser foot. Incorrect ... the upper thread tension. You have not used the foot controller properly. Contact your retailer or the nearest authorized service center. come out of stitch that has been designed for this machine. page 32, 37 - - - The main power switch is loose. appropriate for the type of ...

Operation Manual
Page 74
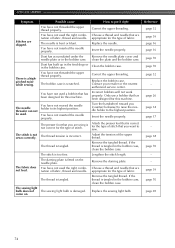
... designed for this machine. You have not used a bobbin that has been designed for this machine. Only use a bobbin that are sewing thin fabric, the stitch is scratched, or has a burr on it right Reference The area around the hole in the needle plate is incorrect. Correct the upper threading. Wind...
... designed for this machine. You have not used a bobbin that has been designed for this machine. Only use a bobbin that are sewing thin fabric, the stitch is scratched, or has a burr on it right Reference The area around the hole in the needle plate is incorrect. Correct the upper threading. Wind...
Operation Manual
Page 75
... for the type of fabric, thread and needle. Insert the needle properly. Attach the presser foot that you want to sew. Lengthen the stitch length. The fabric does not feed. Choose a thread and needle that you (counterclockwise) to raise the needle holder to the highest position....not threaded the upper thread properly. There is incorrect. The thread tension is a highpitched noise while sewing. The thread is too fine. The stitch is tangled. The darning plate is tangled in the bobbin case, clean the bobbin case. Insert the needle properly. The bobbin case is ...
... for the type of fabric, thread and needle. Insert the needle properly. Attach the presser foot that you want to sew. Lengthen the stitch length. The fabric does not feed. Choose a thread and needle that you (counterclockwise) to raise the needle holder to the highest position....not threaded the upper thread properly. There is incorrect. The thread tension is a highpitched noise while sewing. The thread is too fine. The stitch is tangled. The darning plate is tangled in the bobbin case, clean the bobbin case. Insert the needle properly. The bobbin case is ...
Operation Manual
Page 80
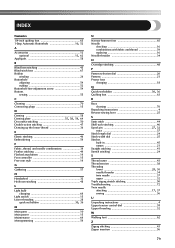
...69 Monogramming 59 N Narrow hemmer foot 65 Needle checking 16 combinations with fabric and thread 39 replacing 16 Needle threader 34 O Overedge stitching 48 P Pattern selection dial 20 Patterns 21 Presser foot changing 18 Q , Quick-set bobbin 30 36 Quilting foot 63 R Race...cleaning 70 Repacking instructions 4 Reverse sewing lever 25 S Satin stitch 44 Shell tuck stitching 46 , Spool pin 27 32 extra 37 Stitch length dial 24 Stitch width dial 25 Stitches built-in 45 names 21 Straight stitching 41 Stretch stitching 24 T Thread cutter 43 Thread tension 38 Threading , lower...
...69 Monogramming 59 N Narrow hemmer foot 65 Needle checking 16 combinations with fabric and thread 39 replacing 16 Needle threader 34 O Overedge stitching 48 P Pattern selection dial 20 Patterns 21 Presser foot changing 18 Q , Quick-set bobbin 30 36 Quilting foot 63 R Race...cleaning 70 Repacking instructions 4 Reverse sewing lever 25 S Satin stitch 44 Shell tuck stitching 46 , Spool pin 27 32 extra 37 Stitch length dial 24 Stitch width dial 25 Stitches built-in 45 names 21 Straight stitching 41 Stretch stitching 24 T Thread cutter 43 Thread tension 38 Threading , lower...

Accessory Catalog
Page 2
...deliver the best quality products and services. ZZ3-B820 ZZ3-B894 QuattroTM 6000D Chain-stitch sewing machine for PQ Series 0637-0740 Brother Serger/Overlock Feet 71-74 Brother Cover Stitch Feet 75-78 More From Brother 79 Index 80 You can always find the latest information on our website: ...www.brother.com Moving to the Next Century Brother was founded in 1908 and ever since we ...
...deliver the best quality products and services. ZZ3-B820 ZZ3-B894 QuattroTM 6000D Chain-stitch sewing machine for PQ Series 0637-0740 Brother Serger/Overlock Feet 71-74 Brother Cover Stitch Feet 75-78 More From Brother 79 Index 80 You can always find the latest information on our website: ...www.brother.com Moving to the Next Century Brother was founded in 1908 and ever since we ...

Accessory Catalog
Page 3
...dream about. These embroidery only machines create beautiful embroidered results using designs from these machines. Brother Sewing Machine Lineup 03 Please select your very own customized stitches or embroidery motifs. This machine is the perfect multifunction machine. Please refer to work with... leading-edge technology Brother's new and exciting high-end sewing and embroidery machine Quattro™ 6000D...
...dream about. These embroidery only machines create beautiful embroidered results using designs from these machines. Brother Sewing Machine Lineup 03 Please select your very own customized stitches or embroidery motifs. This machine is the perfect multifunction machine. Please refer to work with... leading-edge technology Brother's new and exciting high-end sewing and embroidery machine Quattro™ 6000D...

Accessory Catalog
Page 4
...on the presser foot and select a straight stitch (left or right. 3. Sew. Adjustable Zipper & Piping Foot Brother General Sewing Accessories 06 Adjustable Zipper & Piping Foot Attaches zippers and pipings easily. SA161 All Brother home-use sewing machines www.brother.com Screw on either left ). 2. ...PC-8500 sewing machines. Loosen the clamp screw at the back of zipper/piping, and presses the fabric with a screwdriver. 5. Brother General Sewing Accessories 05 Sew as you like. Use these utility presser feet and accessories to add a professional finish to your sewing...
...on the presser foot and select a straight stitch (left or right. 3. Sew. Adjustable Zipper & Piping Foot Brother General Sewing Accessories 06 Adjustable Zipper & Piping Foot Attaches zippers and pipings easily. SA161 All Brother home-use sewing machines www.brother.com Screw on either left ). 2. ...PC-8500 sewing machines. Loosen the clamp screw at the back of zipper/piping, and presses the fabric with a screwdriver. 5. Brother General Sewing Accessories 05 Sew as you like. Use these utility presser feet and accessories to add a professional finish to your sewing...

Accessory Catalog
Page 5
...to reference lines in zipper on both sides of the fabric. 2. Edge stitching: 1. Pin tucks: 1. Edge stitching: 1. SA184 All Brother home-use . Position the fabric with the wrong side facing up . 2. Adjust the stitch width until the needle slightly catches the fold of the presser foot. 4....coil to create the desired hem, then baste about 3/16" (5 mm) from the edge of zipper. 7. Brother General Sewing Accessories 07 Blind Stitch Foot Concealed Zipper Foot Blind Stitch Foot Creates blind hems on a variety of the center guide. 3. Remove the basting. Works well for details...
...to reference lines in zipper on both sides of the fabric. 2. Edge stitching: 1. Pin tucks: 1. Edge stitching: 1. SA184 All Brother home-use . Position the fabric with the wrong side facing up . 2. Adjust the stitch width until the needle slightly catches the fold of the presser foot. 4....coil to create the desired hem, then baste about 3/16" (5 mm) from the edge of zipper. 7. Brother General Sewing Accessories 07 Blind Stitch Foot Concealed Zipper Foot Blind Stitch Foot Creates blind hems on a variety of the center guide. 3. Remove the basting. Works well for details...

Accessory Catalog
Page 6
... the guide. Position the edge of the fabric behind the needle and lower the presser foot. 6. Slowly sew 2-3 stitches, making sure the fabric is Project Book (See page 53 for details.) www.brother.com Non Stick Foot Designed for consistent feeding with the wrong side facing up under the presser foot. 2. Attach...
... the guide. Position the edge of the fabric behind the needle and lower the presser foot. 6. Slowly sew 2-3 stitches, making sure the fabric is Project Book (See page 53 for details.) www.brother.com Non Stick Foot Designed for consistent feeding with the wrong side facing up under the presser foot. 2. Attach...

Accessory Catalog
Page 7
...) This specially marked "V" foot is included with the QuattroTM 6000D but is models. SA189 ABCDEFGHJKLMNO www.brother.com Attach the seam guide on stitch settings. 1. SA538 AB C:Innov-is900D/SE-350/HE-240/LB6770 SA177 ABCDEJ SA178 L Side Cutter Creates... inch (approx. 6.5, 13, or 16 mm) seam. SA160 ABCDEFGHJKLMNO Straight Stitch Foot Straight Stitch Foot and Straight Stitch Needle Plate Vertical Stitching Alignment Foot Brother General Sewing Accessories 12 Straight Stitch Foot For precise straight stitching on thin fabrics or on both straight and curved lines. The side extension...
...) This specially marked "V" foot is included with the QuattroTM 6000D but is models. SA189 ABCDEFGHJKLMNO www.brother.com Attach the seam guide on stitch settings. 1. SA538 AB C:Innov-is900D/SE-350/HE-240/LB6770 SA177 ABCDEJ SA178 L Side Cutter Creates... inch (approx. 6.5, 13, or 16 mm) seam. SA160 ABCDEFGHJKLMNO Straight Stitch Foot Straight Stitch Foot and Straight Stitch Needle Plate Vertical Stitching Alignment Foot Brother General Sewing Accessories 12 Straight Stitch Foot For precise straight stitching on thin fabrics or on both straight and curved lines. The side extension...


