
Operation Manual
Page 7
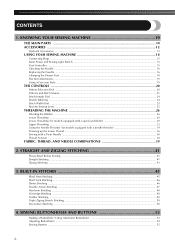
... Using the Needle Threader (for models equipped with a needle threader 34 Drawing up the Lower Thread ...36 Sewing with a Twin Needle ...36 Thread Tension ...38 FABRIC, THREAD, AND NEEDLE COMBINATIONS 39 2. BUILT-IN STITCHES 45 Blind Hem Stitching ...45 Shell Tuck Stitching ...46 Elastic Stitching ...46 Double Action Stitching ...47 Heirloom Stitching ......
... Using the Needle Threader (for models equipped with a needle threader 34 Drawing up the Lower Thread ...36 Sewing with a Twin Needle ...36 Thread Tension ...38 FABRIC, THREAD, AND NEEDLE COMBINATIONS 39 2. BUILT-IN STITCHES 45 Blind Hem Stitching ...45 Shell Tuck Stitching ...46 Elastic Stitching ...46 Double Action Stitching ...47 Heirloom Stitching ......
Operation Manual
Page 11
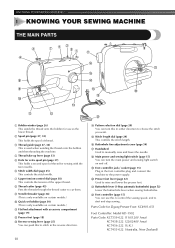
... bed attachment with the twin needle. 6 Stitch width dial (page 25) This controls the stitch width. 7 Upper tension-control dial (page 38) This controls the tension of the upper thread. 8 Thread cutter (page 43) Pass the threads through the thread cutter to cut them. 9 Needle threader (page 34) (This is only available on certain models.) 0 Quick...
... bed attachment with the twin needle. 6 Stitch width dial (page 25) This controls the stitch width. 7 Upper tension-control dial (page 38) This controls the tension of the upper thread. 8 Thread cutter (page 43) Pass the threads through the thread cutter to cut them. 9 Needle threader (page 34) (This is only available on certain models.) 0 Quick...
Operation Manual
Page 27
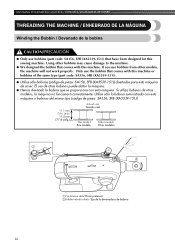
....5 mm (7/16 inch) 11,5 mm (7/16 pulg.) Actual size Tamaño real This model Este modelo Other models Otros modelos 1 2 1Pre-tension disk/ Disco pretensor 2Bobbin winder shaft / Eje de la devanadora de bobina 26 Only use the bobbin that comes with this machine. KNOWING YOUR SEWING... MACHINE / CONOZCA SU MÁQUINA DE COSER THREADING THE MACHINE / ENHEBRADO DE LA MÁQUINA Winding the Bobbin / Devanado de la bobina CAUTION/PRECAUCIÓN ● Only use bobbins (...
....5 mm (7/16 inch) 11,5 mm (7/16 pulg.) Actual size Tamaño real This model Este modelo Other models Otros modelos 1 2 1Pre-tension disk/ Disco pretensor 2Bobbin winder shaft / Eje de la devanadora de bobina 26 Only use the bobbin that comes with this machine. KNOWING YOUR SEWING... MACHINE / CONOZCA SU MÁQUINA DE COSER THREADING THE MACHINE / ENHEBRADO DE LA MÁQUINA Winding the Bobbin / Devanado de la bobina CAUTION/PRECAUCIÓN ● Only use bobbins (...
Operation Manual
Page 73
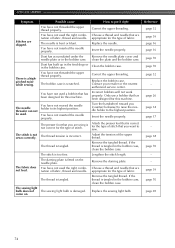
... work . Only use a bobbin that has been designed for this machine. Remove any knots or tangles. The upper-thread tension is scratched. Loosen the upper thread tension. If the thread is appropriate thread you have not inserted the needle properly. Insert the needle properly. page 26 page 32 - page 39 page 38 ...page 70 page 16 page 17 72 The needle clamp screw is tangled. Loosen the upper thread tension. Fit the spool properly. Replace the bobbin case. come out of the guide above the needle.) There are pulling the fabric too much....
... work . Only use a bobbin that has been designed for this machine. Remove any knots or tangles. The upper-thread tension is scratched. Loosen the upper thread tension. If the thread is appropriate thread you have not inserted the needle properly. Insert the needle properly. page 26 page 32 - page 39 page 38 ...page 70 page 16 page 17 72 The needle clamp screw is tangled. Loosen the upper thread tension. Fit the spool properly. Replace the bobbin case. come out of the guide above the needle.) There are pulling the fabric too much....

Operation Manual
Page 74
...have not used a bobbin that are using. Correct the upper threading. You have not used a bobbin that has been designed for this machine. - The thread tension is incorrect. Adjust the tension of the upper thread. Only use a bobbin that has been designed for the fabric ...you are appropriate for the type of fabric. Thread the upper thread and wind the bobbin thread properly. page 16 If you are appropriate for this machine. The thread tension is incorrect. thread breaks. Only use a bobbin that has been designed for this machine....
...have not used a bobbin that are using. Correct the upper threading. You have not used a bobbin that has been designed for this machine. - The thread tension is incorrect. Adjust the tension of the upper thread. Only use a bobbin that has been designed for the fabric ...you are appropriate for the type of fabric. Thread the upper thread and wind the bobbin thread properly. page 16 If you are appropriate for this machine. The thread tension is incorrect. thread breaks. Only use a bobbin that has been designed for this machine....
Operation Manual
Page 75
...be used. Turn the handwheel toward you are skipped. Adjust the tension of stitch that you want to sew. Lengthen the stitch length. Insert the needle properly. Clean the bobbin case. You have not threaded the upper thread properly. You have not used the right combination of fabric. Attach...case, clean the bobbin case. The presser foot that you (counterclockwise) to raise the needle holder to the highest position. The thread tension is not sewn correctly. Contact your retailer or the nearest authorized service center. The stitch is incorrect. Remove the tangled...
...be used. Turn the handwheel toward you are skipped. Adjust the tension of stitch that you want to sew. Lengthen the stitch length. Insert the needle properly. Clean the bobbin case. You have not threaded the upper thread properly. You have not used the right combination of fabric. Attach...case, clean the bobbin case. The presser foot that you (counterclockwise) to raise the needle holder to the highest position. The thread tension is not sewn correctly. Contact your retailer or the nearest authorized service center. The stitch is incorrect. Remove the tangled...
Operation Manual
Page 80
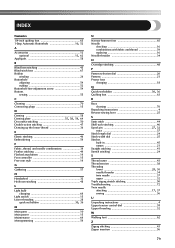
...30 36 M Main parts 10 Main power 15 Maintenance 69 Monogramming 59 N Narrow hemmer foot 65 Needle checking 16 combinations with fabric and thread 39 replacing 16 Needle threader 34 O Overedge stitching 48 P Pattern selection dial 20 Patterns 21 Presser foot changing 18 Q , Quick-...37 Stitch length dial 24 Stitch width dial 25 Stitches built-in 45 names 21 Straight stitching 41 Stretch stitching 24 T Thread cutter 43 Thread tension 38 Threading , lower 28 30 needle threader 34 twin needle 37 upper 32 Triple zigzag stretch stitching 50 Troubleshooting 72 Twin needle ,...
...30 36 M Main parts 10 Main power 15 Maintenance 69 Monogramming 59 N Narrow hemmer foot 65 Needle checking 16 combinations with fabric and thread 39 replacing 16 Needle threader 34 O Overedge stitching 48 P Pattern selection dial 20 Patterns 21 Presser foot changing 18 Q , Quick-...37 Stitch length dial 24 Stitch width dial 25 Stitches built-in 45 names 21 Straight stitching 41 Stretch stitching 24 T Thread cutter 43 Thread tension 38 Threading , lower 28 30 needle threader 34 twin needle 37 upper 32 Triple zigzag stretch stitching 50 Troubleshooting 72 Twin needle ,...

Accessory Catalog
Page 6
... the guide. Place the fabric with the wrong side facing up under the presser foot. 3. Brother General Sewing Accessories 09 Narrow Hemmer Foot Non Stick Foot Overlock Foot Picot Foot Brother General Sewing Accessories 10 SA126 ABCDEFJKMN SA127 GHILOP Skirt Innov-is Project Book (See page 53 for...of the fabric behind the needle and lower the presser foot. 6. Select a desired stitch and sew. Attach the presser foot. 3. Increase upper thread tension. 2. Position the edge of the fabric. 4. Continue to sew to protect edges from the back and front and roll it into the curled part...
... the guide. Place the fabric with the wrong side facing up under the presser foot. 3. Brother General Sewing Accessories 09 Narrow Hemmer Foot Non Stick Foot Overlock Foot Picot Foot Brother General Sewing Accessories 10 SA126 ABCDEFJKMN SA127 GHILOP Skirt Innov-is Project Book (See page 53 for...of the fabric behind the needle and lower the presser foot. 6. Select a desired stitch and sew. Attach the presser foot. 3. Increase upper thread tension. 2. Position the edge of the fabric. 4. Continue to sew to protect edges from the back and front and roll it into the curled part...

Accessory Catalog
Page 12
... 1. Creating tailor tacks: 1. Gathering Foot Used for ULT series, PC-6500, PC-8200 and PC-8500 sewing machines. Increase the upper thread tension. 3. Zigzag-sew with a single zigzag stitch. Select a straight stitch, left needle position. 2. To attach the gathered edge to mark.... thread tension and test various settings to see which one works on thin to more than 5 mm. 2. For appliqué: 1. For gathering: 1. Adjust the upper thread tension. 2. Place threaded beads in groove of the presser foot on your fabric. 3. SA150 ABCDEFJKMN www.brother.com...
... 1. Creating tailor tacks: 1. Gathering Foot Used for ULT series, PC-6500, PC-8200 and PC-8500 sewing machines. Increase the upper thread tension. 3. Zigzag-sew with a single zigzag stitch. Select a straight stitch, left needle position. 2. To attach the gathered edge to mark.... thread tension and test various settings to see which one works on thin to more than 5 mm. 2. For appliqué: 1. For gathering: 1. Adjust the upper thread tension. 2. Place threaded beads in groove of the presser foot on your fabric. 3. SA150 ABCDEFJKMN www.brother.com...

Accessory Catalog
Page 34
... used on how to last a long time. Stabilizers and Water Soluble Stabilizers When doing machine embroidery, the use the Brother Bobbin Thread designed specifically for greater utility and space saving. Dependable thread delivery through machine tensions. Made to be hung on Backing Stabilizer 11" x 1 yd. (3 Pieces) SA5810 Tear-Away Medium Weight Stabilizer 15" x 10...
... used on how to last a long time. Stabilizers and Water Soluble Stabilizers When doing machine embroidery, the use the Brother Bobbin Thread designed specifically for greater utility and space saving. Dependable thread delivery through machine tensions. Made to be hung on Backing Stabilizer 11" x 1 yd. (3 Pieces) SA5810 Tear-Away Medium Weight Stabilizer 15" x 10...

Accessory Catalog
Page 38
.... 2. Note: When the fabrics gather, tighten the thread tension. Adjust the guide so that the needle moves down at 3 mm, stitch length to stretch fabrics. 1. Set the machine setting: 3 thread overlock, stitch width at 5 mm, or 4 thread overlock, stitch width at the position of 1 to ... width to 1.5 mm from 5 mm, and adjust the tension. 3. Set the machine setting: 3/4 thread overlock, stitch length to 3 - 4mm for tape attaching, 4 - 5mm for string of 3 to the guide on the front of the foot. 5. www.brother.com Taping Foot Attaches tapes and elastic to 3. 2. Fold...
.... 2. Note: When the fabrics gather, tighten the thread tension. Adjust the guide so that the needle moves down at 3 mm, stitch length to stretch fabrics. 1. Set the machine setting: 3 thread overlock, stitch width at 5 mm, or 4 thread overlock, stitch width at the position of 1 to ... width to 1.5 mm from 5 mm, and adjust the tension. 3. Set the machine setting: 3/4 thread overlock, stitch length to 3 - 4mm for tape attaching, 4 - 5mm for string of 3 to the guide on the front of the foot. 5. www.brother.com Taping Foot Attaches tapes and elastic to 3. 2. Fold...


