

Operation Manual
Page 2
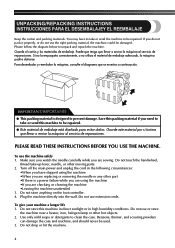
... fingers away from the electrical outlet when removing covers, lubricating, or when making any opening. 6. It may deflect the needle, causing it has been dropped or damaged, or dropped into any adjustments in this manual. 3. This sewing machine is being used by the manufacturer as described in . Close attention is necessary when the...
... fingers away from the electrical outlet when removing covers, lubricating, or when making any opening. 6. It may deflect the needle, causing it has been dropped or damaged, or dropped into any adjustments in this manual. 3. This sewing machine is being used by the manufacturer as described in . Close attention is necessary when the...
Operation Manual
Page 5
...241;arse. To use extension cords. Do not use the machine safely 1. Make sure you watch the needle carefully while you are checking or cleaning the machine •Leaving the machine unattended 3. Do not use the right packing material, the machine could be repaired. Guarde el cartón y los ...material if you need to take -up lever, needle, or other hot objects. 2. Do not touch the handwheel, thread take or send this machine in direct sunlight or in the following circumstances: •When you are sewing. Do not store this machine to be used. 3. Do not drop or ...
...241;arse. To use extension cords. Do not use the machine safely 1. Make sure you watch the needle carefully while you are checking or cleaning the machine •Leaving the machine unattended 3. Do not use the right packing material, the machine could be repaired. Guarde el cartón y los ...material if you need to take -up lever, needle, or other hot objects. 2. Do not touch the handwheel, thread take or send this machine in direct sunlight or in the following circumstances: •When you are sewing. Do not store this machine to be used. 3. Do not drop or ...
Operation Manual
Page 7
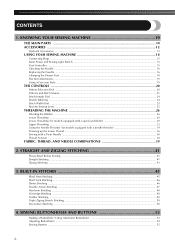
... THE MAIN PARTS ...10 ACCESSORIES ...12 Optional Accessories ...13 USING YOUR SEWING MACHINE 14 Connecting Plugs ...15 Main Power and Sewing Light Switch ...15 Foot Controller ...15 Checking the Needle ...16 Replacing the Needle ...16 Changing the Presser Foot ...18 Flat Bed Attachment ...19 Using a Free-arm Style ...19 THE CONTROLS ...20 Pattern Selection Dial...
... THE MAIN PARTS ...10 ACCESSORIES ...12 Optional Accessories ...13 USING YOUR SEWING MACHINE 14 Connecting Plugs ...15 Main Power and Sewing Light Switch ...15 Foot Controller ...15 Checking the Needle ...16 Replacing the Needle ...16 Changing the Presser Foot ...18 Flat Bed Attachment ...19 Using a Free-arm Style ...19 THE CONTROLS ...20 Pattern Selection Dial...
Operation Manual
Page 11
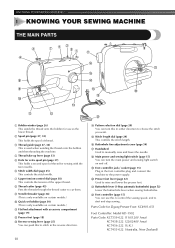
KNOWING YOUR SEWING MACHINE 1 KNOWING YOUR SEWING MACHINE THE MAIN PARTS 1 Bobbin winder (page 26) This winds the thread onto the bobbin for use this in the foot controller plug and connect the machine to the power supply. L Foot controller (page 15) You can use as the lower thread. 2 ... 32) Used to manually raise and lower the needle. K Buttonhole lever (1-Step automatic buttonhole) (page 52) Lower the buttonhole lever when sewing buttonholes. Parts Code for sewing with accessory compartment (page 19) B Presser foot (page 18) C Reverse sewing lever (page 25) You can push this to...
KNOWING YOUR SEWING MACHINE 1 KNOWING YOUR SEWING MACHINE THE MAIN PARTS 1 Bobbin winder (page 26) This winds the thread onto the bobbin for use this in the foot controller plug and connect the machine to the power supply. L Foot controller (page 15) You can use as the lower thread. 2 ... 32) Used to manually raise and lower the needle. K Buttonhole lever (1-Step automatic buttonhole) (page 52) Lower the buttonhole lever when sewing buttonholes. Parts Code for sewing with accessory compartment (page 19) B Presser foot (page 18) C Reverse sewing lever (page 25) You can push this to...
Operation Manual
Page 13
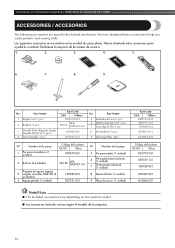
...(1 unidad) 9 Placa de zurcir (1 unidad) Código de la pieza EE.UU. Part Name 1 Zipper foot (1 pc.) 2 Bobbin (3 pcs.) 3 Needle Pack (Regular Single Needle HAX130 (3 pcs.)) 4 Twin Needle (1 pc.) Part Code USA Others X59370-021 SA156 SFB: XA5539-151 129583-021 X57521-021 No. Otros XD1792-031 X59375-121 130920.... ● Los accesorios incluidos varían según el modelo de la máquina. 12 KNOWING YOUR SEWING MACHINE / CONOZCA SU MÁQUINA DE COSER ACCESSORIES / ACCESORIOS The following accessories are stored in the flat bed attachment. Los ...
...(1 unidad) 9 Placa de zurcir (1 unidad) Código de la pieza EE.UU. Part Name 1 Zipper foot (1 pc.) 2 Bobbin (3 pcs.) 3 Needle Pack (Regular Single Needle HAX130 (3 pcs.)) 4 Twin Needle (1 pc.) Part Code USA Others X59370-021 SA156 SFB: XA5539-151 129583-021 X57521-021 No. Otros XD1792-031 X59375-121 130920.... ● Los accesorios incluidos varían según el modelo de la máquina. 12 KNOWING YOUR SEWING MACHINE / CONOZCA SU MÁQUINA DE COSER ACCESSORIES / ACCESORIOS The following accessories are stored in the flat bed attachment. Los ...
Operation Manual
Page 19
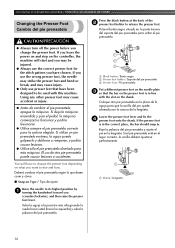
... button / Botón negro 2 Presser foot holder / Soporte del pie prensatela 3 Presser Foot / Pie prensatela Put a different presser foot on the needle plate 3 so that have been designed to release the presser foot. Baje la palanca del pie prensatela y ajuste el pie en la lengüeta... el pie prensatela está en el lugar correcto, la varilla deberá ajustarse perfectamente. 1 Shank / Lengüeta 18 KNOWING YOUR SEWING MACHINE / CONOZCA SU MÁQUINA DE COSER Changing the Presser Foot Cambio del pie prensatela CAUTION/PRECAUCIÓN ● Always turn off the power ...
... button / Botón negro 2 Presser foot holder / Soporte del pie prensatela 3 Presser Foot / Pie prensatela Put a different presser foot on the needle plate 3 so that have been designed to release the presser foot. Baje la palanca del pie prensatela y ajuste el pie en la lengüeta... el pie prensatela está en el lugar correcto, la varilla deberá ajustarse perfectamente. 1 Shank / Lengüeta 18 KNOWING YOUR SEWING MACHINE / CONOZCA SU MÁQUINA DE COSER Changing the Presser Foot Cambio del pie prensatela CAUTION/PRECAUCIÓN ● Always turn off the power ...
Operation Manual
Page 37
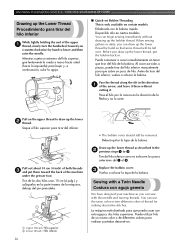
You can sew with a Twin Needle Costura con aguja gemela We have designed your machine so you can use the same color or two different colors of thread for making decorative stitches. When sewing gathers or darts, you can begin sewing immediately without cutting it there without drawing up the ...needle. You can draw up the lower thread by hand to draw up the lower thread as described in . Puede comenzar a coser inmediatamente sin tener que tirar del hilo de la bobina. Pase el hilo por la ranura en la dirección de la flecha y no lo corte. KNOWING YOUR SEWING MACHINE...
You can sew with a Twin Needle Costura con aguja gemela We have designed your machine so you can use the same color or two different colors of thread for making decorative stitches. When sewing gathers or darts, you can begin sewing immediately without cutting it there without drawing up the ...needle. You can draw up the lower thread by hand to draw up the lower thread as described in . Puede comenzar a coser inmediatamente sin tener que tirar del hilo de la bobina. Pase el hilo por la ranura en la dirección de la flecha y no lo corte. KNOWING YOUR SEWING MACHINE...
Operation Manual
Page 44
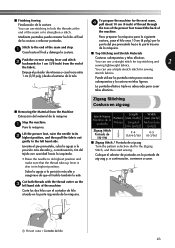
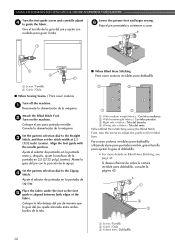
.... You can use stitching to lock the threads at the end of the machine Corte los dos hilos con el cortador de hilo situado en la parte izquierda de la máquina. . Lift the presser foot, raise the needle to the left hand side of the seam or to strengthen a stitch. Zigzag... cm (4 pulg.) por la punta del pie prensatela hacia la parte trasera de la máquina. ■ Top Stitching and Stretch Materials Push the reverse sewing lever and stitch 2 backwards for the next seam, 4 pull about 10 cm (4 inch) of thread through the toes of the presser foot toward the back...
.... You can use stitching to lock the threads at the end of the machine Corte los dos hilos con el cortador de hilo situado en la parte izquierda de la máquina. . Lift the presser foot, raise the needle to the left hand side of the seam or to strengthen a stitch. Zigzag... cm (4 pulg.) por la punta del pie prensatela hacia la parte trasera de la máquina. ■ Top Stitching and Stretch Materials Push the reverse sewing lever and stitch 2 backwards for the next seam, 4 pull about 10 cm (4 inch) of thread through the toes of the presser foot toward the back...
Operation Manual
Page 67
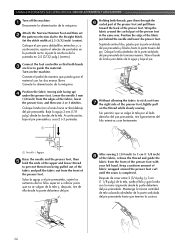
... parte trasera del pie. Coloque la tela alrededor de la parte ondulada del pie prensatela de la misma manera. Turn on the thread while slowly sewing. Sitúe el borde de la tela justo detrás de la aguja y baje el pie. Keep a uniform amount of fabric wrapped around the ... of the presser foot with your left hand. Conecte la alimentación de la máquina. Lower the needle 3 mm (1/8 inch) from the front of the presser foot, lightly pull on the machine. Without allowing the fabric to stick out from the front of the fabric, lower the presser foot, and then...
... parte trasera del pie. Coloque la tela alrededor de la parte ondulada del pie prensatela de la misma manera. Turn on the thread while slowly sewing. Sitúe el borde de la tela justo detrás de la aguja y baje el pie. Keep a uniform amount of fabric wrapped around the ... of the presser foot with your left hand. Conecte la alimentación de la máquina. Lower the needle 3 mm (1/8 inch) from the front of the presser foot, lightly pull on the machine. Without allowing the fabric to stick out from the front of the fabric, lower the presser foot, and then...
Operation Manual
Page 68
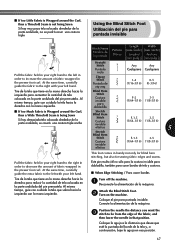
...;lo para la costura invisible para dobladillo, también para coser bordes de tela y costuras. ■ When Edge Stitching / Para coser bordes Turn off the machine. 1 Desconecte la alimentación de la máquina. At the same time, carefully guide the extra fabric to the left with your left hand. Attach... distance you want the 3 stitch to be from the edge of the fabric, and then lower the needle in handy not only for blind hem stitching, but also for sewing fabric edges and seams. Este pie resulta útil no se podrá coser una costura triple Using the Blind Stitch Foot...
...;lo para la costura invisible para dobladillo, también para coser bordes de tela y costuras. ■ When Edge Stitching / Para coser bordes Turn off the machine. 1 Desconecte la alimentación de la máquina. At the same time, carefully guide the extra fabric to the left with your left hand. Attach... distance you want the 3 stitch to be from the edge of the fabric, and then lower the needle in handy not only for blind hem stitching, but also for sewing fabric edges and seams. Este pie resulta útil no se podrá coser una costura triple Using the Blind Stitch Foot...
Operation Manual
Page 69
...stitch width at 2.5 (3/32 inch) (center). Lower the presser foot and begin sewing. 6 Baje el pie prensatela y comience a coser. 1 Screw / Tornillo 2 Guide / Guía ■ When Sewing Seams / Para coser costuras Turn off the machine. 1 Desconecte la alimentación de la máquina. Conecte la alimentaci&#...225;gina 45. 1 2 3 1 Screw / Tornillo 2 Guide / Guía 3 Folded hem / Dobladillo 68 Align the foot guide with the needle position. Coloque la tela debajo del pie de manera que la guía del pie quede alineada entre ambos bordes de la tela. ■ When...
...stitch width at 2.5 (3/32 inch) (center). Lower the presser foot and begin sewing. 6 Baje el pie prensatela y comience a coser. 1 Screw / Tornillo 2 Guide / Guía ■ When Sewing Seams / Para coser costuras Turn off the machine. 1 Desconecte la alimentación de la máquina. Conecte la alimentaci&#...225;gina 45. 1 2 3 1 Screw / Tornillo 2 Guide / Guía 3 Folded hem / Dobladillo 68 Align the foot guide with the needle position. Coloque la tela debajo del pie de manera que la guía del pie quede alineada entre ambos bordes de la tela. ■ When...
Operation Manual
Page 73
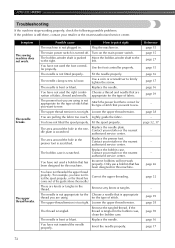
... that has been designed for the type of fabric. The needle is scratched. The needle clamp screw is bent or blunt. Loosen the upper thread tension. The needle is loose. appropriate for this machine. Replace the bobbin case. The upper thread breaks. Symptom The sewing machine does not work properly. You have not fitted the spool...
... that has been designed for the type of fabric. The needle is scratched. The needle clamp screw is bent or blunt. Loosen the upper thread tension. The needle is loose. appropriate for this machine. Replace the bobbin case. The upper thread breaks. Symptom The sewing machine does not work properly. You have not fitted the spool...

Operation Manual
Page 74
...not work properly. page 26 You have not attached the presser foot holder properly. Choose a thread and needle that has been designed for the type of fabric, thread and needle. Sew with stabiliser material under the fabric. - page 39 sion is scratched or does not turn smoothly. ... the bobbin thread properly. page 38 6 You have not used the right combination of fabric. page 16 If you are appropriate for this machine. - Contact your retailer or the nearest authorized service center. - Replace the bobbin case. Correct the upper threading. The upper The area...
...not work properly. page 26 You have not attached the presser foot holder properly. Choose a thread and needle that has been designed for the type of fabric, thread and needle. Sew with stabiliser material under the fabric. - page 39 sion is scratched or does not turn smoothly. ... the bobbin thread properly. page 38 6 You have not used the right combination of fabric. page 16 If you are appropriate for this machine. - Contact your retailer or the nearest authorized service center. - Replace the bobbin case. Correct the upper threading. The upper The area...

Accessory Catalog
Page 4
...on the presser foot. 4. Check the needle does not hit the presser foot, and then tighten the clamp screw with just right pressure. 1. SA161 All Brother home-use sewing machines www.brother.com Adjustable Zipper & Piping Foot Brother General Sewing Accessories 06 Adjustable Zipper & Piping Foot ...Adapter for ULT series, PC-6500, PC-8200 and PC-8500 sewing machines. Sew. Brother General Sewing Accessories 05 Sew as you like. Use these utility presser feet and accessories to add a professional finish to your sewing projects. Position the presser foot over the long feed dogs on ...
...on the presser foot. 4. Check the needle does not hit the presser foot, and then tighten the clamp screw with just right pressure. 1. SA161 All Brother home-use sewing machines www.brother.com Adjustable Zipper & Piping Foot Brother General Sewing Accessories 06 Adjustable Zipper & Piping Foot ...Adapter for ULT series, PC-6500, PC-8200 and PC-8500 sewing machines. Sew. Brother General Sewing Accessories 05 Sew as you like. Use these utility presser feet and accessories to add a professional finish to your sewing projects. Position the presser foot over the long feed dogs on ...

Accessory Catalog
Page 5
... foot. Adjust the stitch width until the needle slightly catches the fold of fabrics, even sheers and difficult fabrics. SA133 ABCDEFJKMN SA134 GHILOP SA128 All Brother home-use sewing machines Concealed Zipper Foot Allows you to join them. Sew holding coil to the edge of the fabric..., and lower the presser foot. 3. Position the needle at the left side of the center guide. 3. ...
... foot. Adjust the stitch width until the needle slightly catches the fold of fabrics, even sheers and difficult fabrics. SA133 ABCDEFJKMN SA134 GHILOP SA128 All Brother home-use sewing machines Concealed Zipper Foot Allows you to join them. Sew holding coil to the edge of the fabric..., and lower the presser foot. 3. Position the needle at the left side of the center guide. 3. ...
Accessory Catalog
Page 10
... the presser foot. 3. Hint: If the needle does not position properly on the bias tape, loosen the position knob on the presser foot. 4. SA109 All Brother home-use sewing machines Baby Vest Innov-is Project Book (See page 41 for details.) www.brother.com Brother Embellishment Feet 17 Go decorative. Personalize your projects...on the foot to slide the guide to the left or right. Pull the tape from the rear of the bias tape. Adjust the needle position so that the needle lines up to the guide side. 2. Brother Embellishment Feet 18 Binding Foot Binding Foot Attaches bias tape with...
... the presser foot. 3. Hint: If the needle does not position properly on the bias tape, loosen the position knob on the presser foot. 4. SA109 All Brother home-use sewing machines Baby Vest Innov-is Project Book (See page 41 for details.) www.brother.com Brother Embellishment Feet 17 Go decorative. Personalize your projects...on the foot to slide the guide to the left or right. Pull the tape from the rear of the bias tape. Adjust the needle position so that the needle lines up to the guide side. 2. Brother Embellishment Feet 18 Binding Foot Binding Foot Attaches bias tape with...

Accessory Catalog
Page 12
...Fringe Foot Gathering Foot SA142 All Brother home-use sewing machines SA120 All Brother home-use sewing machines Fringe Foot Used to mark construction details by creating tailor tacks. Making loops or fringes: 1. Creating tailor tacks: 1. Works best on a drawn pattern line and sew (cut the center of the ...See page 47 for gathering fabrics. Also used for securing edges of appliqué. 2. Stitch in the needle area. Gathering Foot Used for details.) Brother Embellishment Feet Open Toe Foot 22 Pearls and Sequins Foot Metal type SA146 IP Open Toe Foot Provides ...
...Fringe Foot Gathering Foot SA142 All Brother home-use sewing machines SA120 All Brother home-use sewing machines Fringe Foot Used to mark construction details by creating tailor tacks. Making loops or fringes: 1. Creating tailor tacks: 1. Works best on a drawn pattern line and sew (cut the center of the ...See page 47 for gathering fabrics. Also used for securing edges of appliqué. 2. Stitch in the needle area. Gathering Foot Used for details.) Brother Embellishment Feet Open Toe Foot 22 Pearls and Sequins Foot Metal type SA146 IP Open Toe Foot Provides ...

Accessory Catalog
Page 14
... quilting guide so that the guide aligns with Guide Quilting Guide Brother Quilting Feet 26 SA125 All Brother home-use sewing machines SA185 All Brother home-use sewing machines SA132 All Brother home-use sewing machines 1/4" Piecing Foot Best for your sewing machine and the single hole matches perfectly to the needle drop position and helps to expand the presser foot area that...
... quilting guide so that the guide aligns with Guide Quilting Guide Brother Quilting Feet 26 SA125 All Brother home-use sewing machines SA185 All Brother home-use sewing machines SA132 All Brother home-use sewing machines 1/4" Piecing Foot Best for your sewing machine and the single hole matches perfectly to the needle drop position and helps to expand the presser foot area that...

Accessory Catalog
Page 15
... foot. 4. Requires Low Shank Adapter for ULT series, PC-6500, PC-8200 and PC-8500 sewing machines. Lower the feed dogs. 3. Guide the fabric with the pin over the needle clamp screw. 2. Set the machine to the quilt top. 7. Brother Quilting Feet 27 Open Toe Quilting Foot Quilting Foot SA187 ABCDEFGHMNO SA129 ABCDEFGHMNO SA165 L Open...
... foot. 4. Requires Low Shank Adapter for ULT series, PC-6500, PC-8200 and PC-8500 sewing machines. Lower the feed dogs. 3. Guide the fabric with the pin over the needle clamp screw. 2. Set the machine to the quilt top. 7. Brother Quilting Feet 27 Open Toe Quilting Foot Quilting Foot SA187 ABCDEFGHMNO SA129 ABCDEFGHMNO SA165 L Open...

Accessory Catalog
Page 36
... Felting Needle Brother Sewing Machine Attachments for PQ Series 70 Needle Felting Attachment Use this unique attachment to the feed dogs, aiding in the proper feed on fabric or garment with Dust Box and Needle Guide. Draw a rough sketch on heavy weight materials such as canvas, polar fleece and fake fur. Move the fabric while sewing. Felting Needle Needle...
... Felting Needle Brother Sewing Machine Attachments for PQ Series 70 Needle Felting Attachment Use this unique attachment to the feed dogs, aiding in the proper feed on fabric or garment with Dust Box and Needle Guide. Draw a rough sketch on heavy weight materials such as canvas, polar fleece and fake fur. Move the fabric while sewing. Felting Needle Needle...


