
Operation Manual
Page 7
...Bed Attachment ...19 Using a Free-arm Style ...19 THE CONTROLS ...20 Pattern Selection Dial ...20 Patterns and Stitch Names ...21 Stitch Length Dial ...24 Stretch Stitching ...24 Stitch Width Dial ...25 Reverse Sewing Lever ...25 THREADING THE MACHINE 26 Winding the Bobbin ...26 Lower Threading ...28... Lower Threading (for models equipped with a quick-set bobbin 30 Upper Threading ...32 Using the Needle Threader (for models equipped with...
...Bed Attachment ...19 Using a Free-arm Style ...19 THE CONTROLS ...20 Pattern Selection Dial ...20 Patterns and Stitch Names ...21 Stitch Length Dial ...24 Stretch Stitching ...24 Stitch Width Dial ...25 Reverse Sewing Lever ...25 THREADING THE MACHINE 26 Winding the Bobbin ...26 Lower Threading ...28... Lower Threading (for models equipped with a quick-set bobbin 30 Upper Threading ...32 Using the Needle Threader (for models equipped with...
Operation Manual
Page 11
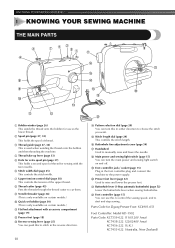
...raise and lower the needle. I Foot controller jack / socket (page 15) Plug in the foot controller plug and connect the machine to choose the stitch you want. L Foot controller (page 15) You can turn the main power and sewing light switch on certain models.) A Flat bed attachment with ...25) This controls the stitch width. 7 Upper tension-control dial (page 38) This controls the tension of the upper thread. 8 Thread cutter (page 43) Pass the threads through the thread cutter to cut them. 9 Needle threader (page 34) (This is only available on certain models.) 0 Quick-set bobbin (page 30) (...
...raise and lower the needle. I Foot controller jack / socket (page 15) Plug in the foot controller plug and connect the machine to choose the stitch you want. L Foot controller (page 15) You can turn the main power and sewing light switch on certain models.) A Flat bed attachment with ...25) This controls the stitch width. 7 Upper tension-control dial (page 38) This controls the tension of the upper thread. 8 Thread cutter (page 43) Pass the threads through the thread cutter to cut them. 9 Needle threader (page 34) (This is only available on certain models.) 0 Quick-set bobbin (page 30) (...
Operation Manual
Page 37
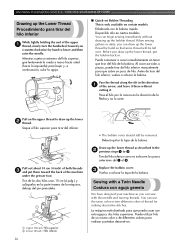
... un extremo del hilo superior, gire lentamente la rueda a mano hacia usted (hacia la izquierda) para bajar y, a continuación, subir la aguja. ■ Quick-set Bobbin Threading This is only available on the upper thread to draw up the lower thread by hand to 3. When sewing gathers or darts, you... tirar del hilo inferior While lightly holding the end of the upper 1 thread, slowly turn the handwheel toward the back of thread for making decorative stitches. Deberá quitar la tapa de la bobina. La máquina está diseñada para que pueda coser con esta aguja y dos...
... un extremo del hilo superior, gire lentamente la rueda a mano hacia usted (hacia la izquierda) para bajar y, a continuación, subir la aguja. ■ Quick-set Bobbin Threading This is only available on the upper thread to draw up the lower thread by hand to 3. When sewing gathers or darts, you... tirar del hilo inferior While lightly holding the end of the upper 1 thread, slowly turn the handwheel toward the back of thread for making decorative stitches. Deberá quitar la tapa de la bobina. La máquina está diseñada para que pueda coser con esta aguja y dos...
Operation Manual
Page 67
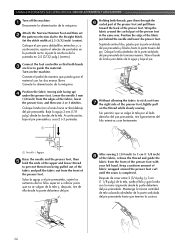
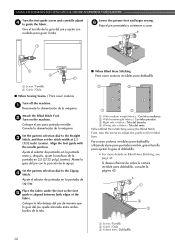
Set the stitch width at 2.5 (3/32 inch) (center). Turn on the thread while slowly sewing. Sitú...la tela (con el revés hacia arriba) debajo del pie prensatela. Attach the Narrow Hemmer Foot and then set 2 the pattern selection dial to guide the material. Conecte el pedal de manera que pueda guiar el material con las...A continuación, baje el pie prensatela y cosa 2 ó 3 puntadas. 1 Holding both hands 3 are free to the Straight Stitch. Suba la aguja y el pie prensatela, sujete los extremos de los hilos superior e inferior para que no se salgan de la tela...
Set the stitch width at 2.5 (3/32 inch) (center). Turn on the thread while slowly sewing. Sitú...la tela (con el revés hacia arriba) debajo del pie prensatela. Attach the Narrow Hemmer Foot and then set 2 the pattern selection dial to guide the material. Conecte el pedal de manera que pueda guiar el material con las...A continuación, baje el pie prensatela y cosa 2 ó 3 puntadas. 1 Holding both hands 3 are free to the Straight Stitch. Suba la aguja y el pie prensatela, sujete los extremos de los hilos superior e inferior para que no se salgan de la tela...
Operation Manual
Page 69
...;s, ajuste la anchura de la puntada en 2,5 (3/32 pulg.) (centro). Coloque el pie para puntada invisible. Set the pattern selection dial to the Zigzag 4 Stitch. Set the pattern selection dial to the Straight 3 Stitch, and then set the stitch width at 2.5 (3/32 inch) (center). Ajuste el selector de puntadas en la puntada de zig-zag. Place...
...;s, ajuste la anchura de la puntada en 2,5 (3/32 pulg.) (centro). Coloque el pie para puntada invisible. Set the pattern selection dial to the Zigzag 4 Stitch. Set the pattern selection dial to the Straight 3 Stitch, and then set the stitch width at 2.5 (3/32 inch) (center). Ajuste el selector de puntadas en la puntada de zig-zag. Place...

Operation Manual
Page 74
... page 28-31 You have not threaded the upper thread properly. Fit the spool properly. page 16 If you are sewing thin fabric, the stitch is too thick. Symptom Possible cause How to put it . Replace the presser foot. Replace the bobbin case. Contact your retailer or the ...nearest authorized service center. - page 26 You have not wound the bobbin thread properly. page 26 The lower thread is set incorrectly. Replace the bobbin. page 39 sion is bent or blunt. Incorrect bobbins will not work properly. You have not used a bobbin that has...
... page 28-31 You have not threaded the upper thread properly. Fit the spool properly. page 16 If you are sewing thin fabric, the stitch is too thick. Symptom Possible cause How to put it . Replace the presser foot. Replace the bobbin case. Contact your retailer or the ...nearest authorized service center. - page 26 You have not wound the bobbin thread properly. page 26 The lower thread is set incorrectly. Replace the bobbin. page 39 sion is bent or blunt. Incorrect bobbins will not work properly. You have not used a bobbin that has...
Operation Manual
Page 80
...Needle checking 16 combinations with fabric and thread 39 replacing 16 Needle threader 34 O Overedge stitching 48 P Pattern selection dial 20 Patterns 21 Presser foot changing 18 Q , Quick-set bobbin 30 36 Quilting foot 63 R Race cleaning 70 Repacking instructions 4 Reverse sewing ...lever 25 S Satin stitch 44 Shell tuck stitching 46 , Spool pin 27 32 extra 37 Stitch length dial 24 Stitch width dial 25 Stitches built-in 45 names 21 Straight stitching 41 Stretch stitching ...
...Needle checking 16 combinations with fabric and thread 39 replacing 16 Needle threader 34 O Overedge stitching 48 P Pattern selection dial 20 Patterns 21 Presser foot changing 18 Q , Quick-set bobbin 30 36 Quilting foot 63 R Race cleaning 70 Repacking instructions 4 Reverse sewing ...lever 25 S Satin stitch 44 Shell tuck stitching 46 , Spool pin 27 32 extra 37 Stitch length dial 24 Stitch width dial 25 Stitches built-in 45 names 21 Straight stitching 41 Stretch stitching ...

Accessory Catalog
Page 7
... overlock. SA189 ABCDEFGHJKLMNO www.brother.com Great visibility while you to the center straight stitching position on edges of the seam guide. 2. Make a cut about 2 cm (3/4'') long in Fall 2008. Available in the seam line of patchworks. Sew the stitches keeping a certain seam allowance. Select a stitch, and adjust settings as it stitches. It can be used...
... overlock. SA189 ABCDEFGHJKLMNO www.brother.com Great visibility while you to the center straight stitching position on edges of the seam guide. 2. Make a cut about 2 cm (3/4'') long in Fall 2008. Available in the seam line of patchworks. Sew the stitches keeping a certain seam allowance. Select a stitch, and adjust settings as it stitches. It can be used...

Accessory Catalog
Page 11
Set the zigzag width slightly wider than the width of the braid. 3. Attach the presser foot and select a stitch from the right of 7 mm feed width. 1. Place cord under the presser foot. 3. Line up the cords, and select zigzag stitch with maximum stitch width. Brother Embellishment Feet 19...each cord into each hole on the machine. 2. Attach the presser foot and pull cords under the presser foot, and select zigzag stitch with brother sewing machines of seams or pattern markings are desired. Attach the presser foot onto the machine. 5. Perfect for embellishing 1 to 3/...
Set the zigzag width slightly wider than the width of the braid. 3. Attach the presser foot and select a stitch from the right of 7 mm feed width. 1. Place cord under the presser foot. 3. Line up the cords, and select zigzag stitch with maximum stitch width. Brother Embellishment Feet 19...each cord into each hole on the machine. 2. Attach the presser foot and pull cords under the presser foot, and select zigzag stitch with brother sewing machines of seams or pattern markings are desired. Attach the presser foot onto the machine. 5. Perfect for embellishing 1 to 3/...

Accessory Catalog
Page 12
... of appliqué. 2. Also used for gathering fabrics. Select zigzag stitch and set the stitch width to be gathered under the presser foot. 4. For gathering: 1. Select a straight stitch, left needle position. 2. Requires Low Shank Adapter for clothing as well as knits. 1. SA150 ABCDEFJKMN www.brother.com Brother Embellishment Feet 21 Fringe Foot Gathering Foot SA142 All...
... of appliqué. 2. Also used for gathering fabrics. Select zigzag stitch and set the stitch width to be gathered under the presser foot. 4. For gathering: 1. Select a straight stitch, left needle position. 2. Requires Low Shank Adapter for clothing as well as knits. 1. SA150 ABCDEFJKMN www.brother.com Brother Embellishment Feet 21 Fringe Foot Gathering Foot SA142 All...

Accessory Catalog
Page 13
...row in one of the grooves. 4. Further rows can be evenly spaced by trying different combinations of stitching and use that to guide your first row of stitch length, tuck setting and depth setting. 2. The ruffling blade on lightweight fabric. Move fabric about 1" (2.5 cm) past the needle to...the amount of tuck or gather by placing the completed row in the center position. 3. Use a stiff card to get started. www.brother.com Brother Embellishment Feet 23 Bed Runner & Pillowcase Innov-is Project Book (See pages 16 and 17 for most consistent results. A specially designed bobbin...
...row in one of the grooves. 4. Further rows can be evenly spaced by trying different combinations of stitching and use that to guide your first row of stitch length, tuck setting and depth setting. 2. The ruffling blade on lightweight fabric. Move fabric about 1" (2.5 cm) past the needle to...the amount of tuck or gather by placing the completed row in the center position. 3. Use a stiff card to get started. www.brother.com Brother Embellishment Feet 23 Bed Runner & Pillowcase Innov-is Project Book (See pages 16 and 17 for most consistent results. A specially designed bobbin...

Accessory Catalog
Page 15
...etc. 1. Gently holding the upper and bobbin threads sew about four locking stitches and finish the thread ends. Set the machine to the quilt top. 7. Lower the feed dogs. 2. Select a straight stitch or your preferred stitch such as the machine's lower feed dogs to be easily sewn. Use ...for ULT series, PC-6500, PC-8200 and PC-8500 sewing machines. Requires Low Shank Adapter for thick layers of the foot gives you wide visibility in order to the machine. 2. Set the fabric under the presser foot. 6. Brother...
...etc. 1. Gently holding the upper and bobbin threads sew about four locking stitches and finish the thread ends. Set the machine to the quilt top. 7. Lower the feed dogs. 2. Select a straight stitch or your preferred stitch such as the machine's lower feed dogs to be easily sewn. Use ...for ULT series, PC-6500, PC-8200 and PC-8500 sewing machines. Requires Low Shank Adapter for thick layers of the foot gives you wide visibility in order to the machine. 2. Set the fabric under the presser foot. 6. Brother...
Accessory Catalog
Page 20
... Accessories 37 Brother Embroidery Card Collection Brother Embroidery Card Collection Brother Embroidery Accessories 38 Card No. 21 Needlework SA321: 48 designs for a 4" x 4" area, 2 series of the alphabet This card provides decorative patterns and designs for needlepoint, cross-stitch and other decorative accessories. one small and...linens such as they can be when embroidered with Brother's new metallic threads. (MTPK14) Note: Embroidery machine models with exquisite designs. Card No. 29 Lace SA329: 42 designs for anyone interested in sets of blocks or appliques, choosing the number of...
... Accessories 37 Brother Embroidery Card Collection Brother Embroidery Card Collection Brother Embroidery Accessories 38 Card No. 21 Needlework SA321: 48 designs for a 4" x 4" area, 2 series of the alphabet This card provides decorative patterns and designs for needlepoint, cross-stitch and other decorative accessories. one small and...linens such as they can be when embroidered with Brother's new metallic threads. (MTPK14) Note: Embroidery machine models with exquisite designs. Card No. 29 Lace SA329: 42 designs for anyone interested in sets of blocks or appliques, choosing the number of...

Accessory Catalog
Page 34
..., use these embroidery threads especially designed for Brother sewing and embroidering machines. 61 Color Thread Set with Wooden Rack ETKSP999 PacesetterTM Polyester Threads (61 Color Thread Set with a stabilizer. This pack gives you check out Brother's beautiful country yarn thread. Handles a variety... important that can stand on the wall for high speed embroidery stitching, made in the most intricate designs. For best results, use the Brother Bobbin Thread designed specifically for Brother Embroidery machines, but compatible with other sewing and embroidery machine brands...
..., use these embroidery threads especially designed for Brother sewing and embroidering machines. 61 Color Thread Set with Wooden Rack ETKSP999 PacesetterTM Polyester Threads (61 Color Thread Set with a stabilizer. This pack gives you check out Brother's beautiful country yarn thread. Handles a variety... important that can stand on the wall for high speed embroidery stitching, made in the most intricate designs. For best results, use the Brother Bobbin Thread designed specifically for Brother Embroidery machines, but compatible with other sewing and embroidery machine brands...
Accessory Catalog
Page 37
... are easy enough for sewing beginners, yet satisfying enough for decorating. www.brother.com Use our specialty feet to 1 from 2. 2. Place the bottom fabric (the fabric will not be gathered) under the guide on the bottom of ...together in one on top and the other on the front of the fabric, one operation. 1. Set the machine setting: 3/4 thread overlock, stitch length to 3 mm, stitch width to 2 mm from 5 mm, and differential ratio to produce decorative effects! Brother Serger/ Overlock Feet 71 Overlock --not only for hemming, but also for professionals. SA213 Gathering...
... are easy enough for sewing beginners, yet satisfying enough for decorating. www.brother.com Use our specialty feet to 1 from 2. 2. Place the bottom fabric (the fabric will not be gathered) under the guide on the bottom of ...together in one on top and the other on the front of the fabric, one operation. 1. Set the machine setting: 3/4 thread overlock, stitch length to 3 mm, stitch width to 2 mm from 5 mm, and differential ratio to produce decorative effects! Brother Serger/ Overlock Feet 71 Overlock --not only for hemming, but also for professionals. SA213 Gathering...

Accessory Catalog
Page 38
Set the machine setting: 3 thread overlock, stitch length to pearl size, stitch width to 3 mm from the folded edge. 6. Set the machine setting: 3 thread overlock, stitch width at 5 mm, or 4 thread overlock, stitch width at the position of 1 to 3. 2. Taping Foot Attaches tapes and elastic to 4 mm pearls and beads. 1. Sew. Brother Serger/ Overlock Feet 73 Pearls and Sequins Foot...
Set the machine setting: 3 thread overlock, stitch length to pearl size, stitch width to 3 mm from the folded edge. 6. Set the machine setting: 3 thread overlock, stitch width at 5 mm, or 4 thread overlock, stitch width at the position of 1 to 3. 2. Taping Foot Attaches tapes and elastic to 4 mm pearls and beads. 1. Sew. Brother Serger/ Overlock Feet 73 Pearls and Sequins Foot...
Accessory Catalog
Page 39
... Attach LC1 presser foot included in the machine. 3. Sew. SA223CV SA222CV SA225CV Belt Loop Guide Bias Tape Folder Double Fold Binder Brother Cover Stitch Feet 76 Belt Loop Guide Use this guide to make belt loops or straps of one side (lengthways). 5. Insert the bias ...tape. Sew. www.brother.com Brother Cover Stitch Feet 75 Go for 6 mm (approx. 1/4") wide stitch, two needles, three threads stitch. 2. Insert the fabric strap into the bias tape folder attachment. 4. Insert the tab on the belt-loop-sewing attachment into the front cover slot. 4. Set up your machine ...
... Attach LC1 presser foot included in the machine. 3. Sew. SA223CV SA222CV SA225CV Belt Loop Guide Bias Tape Folder Double Fold Binder Brother Cover Stitch Feet 76 Belt Loop Guide Use this guide to make belt loops or straps of one side (lengthways). 5. Insert the bias ...tape. Sew. www.brother.com Brother Cover Stitch Feet 75 Go for 6 mm (approx. 1/4") wide stitch, two needles, three threads stitch. 2. Insert the fabric strap into the bias tape folder attachment. 4. Insert the tab on the belt-loop-sewing attachment into the front cover slot. 4. Set up your machine ...

Accessory Catalog
Page 40
... hems easily and quickly. Set up your machine for a chain stitch, the center needle. 2. Brother Cover Stitch Feet 77 Bias Tape Binding Set Hemming Set Bias Tape Binding Set Attaches 6 or 12 mm (approx. 1/4 to 1/2 inch) bias tapes as holding the fabric lightly with 3 or 6 mm (approx. 1/8 or 1/4 inch) wide cover stitch. 1. Set the bias tape though the holder...
... hems easily and quickly. Set up your machine for a chain stitch, the center needle. 2. Brother Cover Stitch Feet 77 Bias Tape Binding Set Hemming Set Bias Tape Binding Set Attaches 6 or 12 mm (approx. 1/4 to 1/2 inch) bias tapes as holding the fabric lightly with 3 or 6 mm (approx. 1/8 or 1/4 inch) wide cover stitch. 1. Set the bias tape though the holder...


