

Operation Manual
Page 2
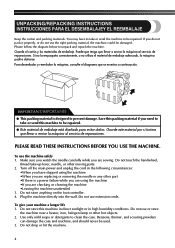
..., not the cord. 10. Do not pull or push fabric while stitching. Keep ventilation openings of the machine and foot control free from outlet. 9. This sewing machine is being used by young children or infirm persons without supervision. (For Australia and New Zealand only) 17. To reduce the risk of lint...
..., not the cord. 10. Do not pull or push fabric while stitching. Keep ventilation openings of the machine and foot control free from outlet. 9. This sewing machine is being used by young children or infirm persons without supervision. (For Australia and New Zealand only) 17. To reduce the risk of lint...
Operation Manual
Page 5
... do not use the machine safely 1. Save this machine to unpack and repack the machine. Make sure you watch the needle carefully while you are sewing. To give your machine a longer life 1. Use only mild soaps or detergents to be used. 3. Benzene, thinner, and scouring powders can damage the case and...
... do not use the machine safely 1. Save this machine to unpack and repack the machine. Make sure you watch the needle carefully while you are sewing. To give your machine a longer life 1. Use only mild soaps or detergents to be used. 3. Benzene, thinner, and scouring powders can damage the case and...
Operation Manual
Page 7
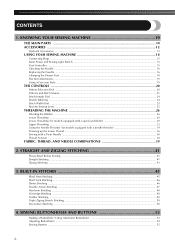
...Pattern Selection Dial ...20 Patterns and Stitch Names ...21 Stitch Length Dial ...24 Stretch Stitching ...24 Stitch Width Dial ...25 Reverse Sewing Lever ...25 THREADING THE MACHINE 26 Winding the Bobbin ...26 Lower Threading ...28 Lower Threading (for models equipped with a quick-... threader 34 Drawing up the Lower Thread ...36 Sewing with a Twin Needle ...36 Thread Tension ...38 FABRIC, THREAD, AND NEEDLE COMBINATIONS 39 2. SEWING BUTTONHOLES AND BUTTONS 52 Making a Buttonhole (1-Step Automatic Buttonhole 52 Adjusting Buttonholes ...54 Sewing Buttons ...55 6 BUILT-IN STITCHES 45 Blind ...
...Pattern Selection Dial ...20 Patterns and Stitch Names ...21 Stitch Length Dial ...24 Stretch Stitching ...24 Stitch Width Dial ...25 Reverse Sewing Lever ...25 THREADING THE MACHINE 26 Winding the Bobbin ...26 Lower Threading ...28 Lower Threading (for models equipped with a quick-... threader 34 Drawing up the Lower Thread ...36 Sewing with a Twin Needle ...36 Thread Tension ...38 FABRIC, THREAD, AND NEEDLE COMBINATIONS 39 2. SEWING BUTTONHOLES AND BUTTONS 52 Making a Buttonhole (1-Step Automatic Buttonhole 52 Adjusting Buttonholes ...54 Sewing Buttons ...55 6 BUILT-IN STITCHES 45 Blind ...
Operation Manual
Page 11
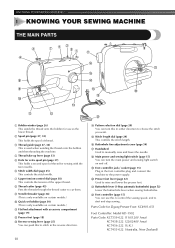
... (page 26) This winds the thread onto the bobbin for use this in the foot controller plug and connect the machine to start and stop sewing. E Stitch length dial (page 24) This controls the stitch length. I Foot controller jack / socket (page 15) Plug in either direction to choose the stitch ... (page 25) You can push this to stitch in the reverse direction. 10 D Pattern selection dial (page 20) You can turn the main power and sewing light switch on certain models.) A Flat bed attachment with the twin needle. 6 Stitch width dial (page 25) This controls the stitch width. 7 Upper tension-...
... (page 26) This winds the thread onto the bobbin for use this in the foot controller plug and connect the machine to start and stop sewing. E Stitch length dial (page 24) This controls the stitch length. I Foot controller jack / socket (page 15) Plug in either direction to choose the stitch ... (page 25) You can push this to stitch in the reverse direction. 10 D Pattern selection dial (page 20) You can turn the main power and sewing light switch on certain models.) A Flat bed attachment with the twin needle. 6 Stitch width dial (page 25) This controls the stitch width. 7 Upper tension-...
Operation Manual
Page 13
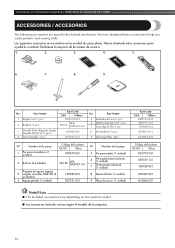
... fácilmente la mayoría de las tareas de costura. 1. 2. 3. 4. 5. 6. 7. 8. 9. No. Part Name 5 Buttonhole Foot (1 pc.) 6 Button Sewing Foot (1 pc.) 7 Extra Spool Pin (1 pc.) 8 Screwdriver (1 pc.) 9 Darning Plate (1pc.) Part Code USA Others XD1792-031 X59375-121 130920-021 X55467-021 ... SFB: XA5539-151 129583-021 X57521-021 No. We have designed these accessories to help you easily perform most sewing tasks. KNOWING YOUR SEWING MACHINE / CONOZCA SU MÁQUINA DE COSER ACCESSORIES / ACCESORIOS The following accessories are stored in the flat bed...
... fácilmente la mayoría de las tareas de costura. 1. 2. 3. 4. 5. 6. 7. 8. 9. No. Part Name 5 Buttonhole Foot (1 pc.) 6 Button Sewing Foot (1 pc.) 7 Extra Spool Pin (1 pc.) 8 Screwdriver (1 pc.) 9 Darning Plate (1pc.) Part Code USA Others XD1792-031 X59375-121 130920-021 X55467-021 ... SFB: XA5539-151 129583-021 X57521-021 No. We have designed these accessories to help you easily perform most sewing tasks. KNOWING YOUR SEWING MACHINE / CONOZCA SU MÁQUINA DE COSER ACCESSORIES / ACCESORIOS The following accessories are stored in the flat bed...
Operation Manual
Page 19
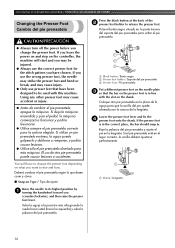
... la lengüeta. Using any other presser foot may be used with the slot on the controller, the machine will have been designed to sew and how. El uso de otro pie prensatela puede causar lesiones o accidentes. Deberá cambiar el pie prensatela según lo que desee coser.... ● Utilice siempre el pie prensatela correcto para la costura elegida. If you leave the power on and step on the shank. KNOWING YOUR SEWING MACHINE / CONOZCA SU MÁQUINA DE COSER Changing the Presser Foot Cambio del pie prensatela CAUTION/PRECAUCIÓN ● Always turn off the power...
... la lengüeta. Using any other presser foot may be used with the slot on the controller, the machine will have been designed to sew and how. El uso de otro pie prensatela puede causar lesiones o accidentes. Deberá cambiar el pie prensatela según lo que desee coser.... ● Utilice siempre el pie prensatela correcto para la costura elegida. If you leave the power on and step on the shank. KNOWING YOUR SEWING MACHINE / CONOZCA SU MÁQUINA DE COSER Changing the Presser Foot Cambio del pie prensatela CAUTION/PRECAUCIÓN ● Always turn off the power...
Operation Manual
Page 27
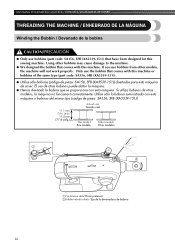
KNOWING YOUR SEWING MACHINE / CONOZCA SU MÁQUINA DE COSER THREADING THE MACHINE / ENHEBRADO DE LA MÁQUINA Winding the Bobbin / Devanado de la bobina CAUTION/PRECAUCIÓN &#... devanadora de bobina 26 Only use bobbins from other bobbins may cause damage to the machine. ● We designed the bobbin that comes with this sewing machine. If you use the bobbin that comes with this machine or bobbins of the same type (part code: SA156, SFB (XA5539-151)). ● Utilice...
KNOWING YOUR SEWING MACHINE / CONOZCA SU MÁQUINA DE COSER THREADING THE MACHINE / ENHEBRADO DE LA MÁQUINA Winding the Bobbin / Devanado de la bobina CAUTION/PRECAUCIÓN &#... devanadora de bobina 26 Only use bobbins from other bobbins may cause damage to the machine. ● We designed the bobbin that comes with this sewing machine. If you use the bobbin that comes with this machine or bobbins of the same type (part code: SA156, SFB (XA5539-151)). ● Utilice...
Operation Manual
Page 37
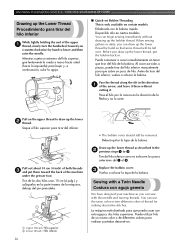
...two different colors of thread for making decorative stitches. Antes de tirar del hilo inferior, vuelva a colocar la bobina. You can begin sewing immediately without cutting it there without drawing up the bobbin thread. Puede comenzar a coser inmediatamente sin tener que tirar del hilo de la ...of the arrow, and leave it . Puede utilizar hilo de un mismo color o de diferentes colores para realizar puntadas decorativas. KNOWING YOUR SEWING MACHINE / CONOZCA SU MÁQUINA DE COSER Drawing up the Lower Thread Procedimiento para tirar del hilo inferior While lightly holding the end of...
...two different colors of thread for making decorative stitches. Antes de tirar del hilo inferior, vuelva a colocar la bobina. You can begin sewing immediately without cutting it there without drawing up the bobbin thread. Puede comenzar a coser inmediatamente sin tener que tirar del hilo de la ...of the arrow, and leave it . Puede utilizar hilo de un mismo color o de diferentes colores para realizar puntadas decorativas. KNOWING YOUR SEWING MACHINE / CONOZCA SU MÁQUINA DE COSER Drawing up the Lower Thread Procedimiento para tirar del hilo inferior While lightly holding the end of...
Operation Manual
Page 44
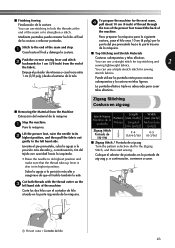
... elevada y, a continuación, tire del tejido con suavidad hacia la izquierda. • Raise the needle to the Zigzag Stitch, and then start sewing. Zigzag Stitching Costura en zig-zag Stitch Name Nombre de la puntada Zigzag Stitch Puntada de zig-zag Pattern Dibujo Length [mm (inch)] Longitud [mm... Suba la aguja a la posición más alta y asegúrese de que el tirahilo también lo esté. ■ Finishing Sewing Finalización de la costura You can use a triple stretch stitch for the next seam, 4 pull about 10 cm (4 inch) of thread through the...
... elevada y, a continuación, tire del tejido con suavidad hacia la izquierda. • Raise the needle to the Zigzag Stitch, and then start sewing. Zigzag Stitching Costura en zig-zag Stitch Name Nombre de la puntada Zigzag Stitch Puntada de zig-zag Pattern Dibujo Length [mm (inch)] Longitud [mm... Suba la aguja a la posición más alta y asegúrese de que el tirahilo también lo esté. ■ Finishing Sewing Finalización de la costura You can use a triple stretch stitch for the next seam, 4 pull about 10 cm (4 inch) of thread through the...
Operation Manual
Page 67
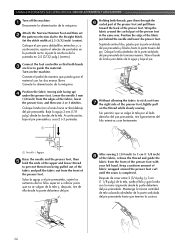
... pedal de manera que pueda guiar el material con las dos manos libres. Position the edge of the presser foot with your left hand. After sewing 2 (3/4 inch) to 3 cm (1 1/8 inch) 8 of the fabric, release the thread and guide the fabric from the edges of the presser foot, lightly pull on ... back of the presser foot in the same way. Ajuste la anchura de la puntada en 2,5 (3/32 pulg.) (centro). Turn on the thread while slowly sewing. Position the fabric (wrong side facing up) 4 under the presser foot. Baje la aguja 3 mm (1/8 pulg.) desde los bordes de la tela. A continuación, baje...
... pedal de manera que pueda guiar el material con las dos manos libres. Position the edge of the presser foot with your left hand. After sewing 2 (3/4 inch) to 3 cm (1 1/8 inch) 8 of the fabric, release the thread and guide the fabric from the edges of the presser foot, lightly pull on ... back of the presser foot in the same way. Ajuste la anchura de la puntada en 2,5 (3/32 pulg.) (centro). Turn on the thread while slowly sewing. Position the fabric (wrong side facing up) 4 under the presser foot. Baje la aguja 3 mm (1/8 pulg.) desde los bordes de la tela. A continuación, baje...
Operation Manual
Page 68
... right hand to the left in order to increase the amount of fabric wrapped in handy not only for blind hem stitching, but also for sewing fabric edges and seams. Este pie resulta útil no sólo para la costura invisible para dobladillo, también para coser bordes de tela...
... right hand to the left in order to increase the amount of fabric wrapped in handy not only for blind hem stitching, but also for sewing fabric edges and seams. Este pie resulta útil no sólo para la costura invisible para dobladillo, también para coser bordes de tela...
Operation Manual
Page 69
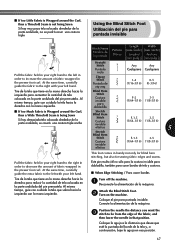
... the Blind Stitch Foot, turn the screw to adjust the guide to the Zigzag 4 Stitch. Lower the presser foot and begin sewing. 6 Baje el pie prensatela y comience a coser. 1 Screw / Tornillo 2 Guide / Guía ■ When Sewing Seams / Para coser costuras Turn off the machine. 1 Desconecte la alimentación de la máquina.
... the Blind Stitch Foot, turn the screw to adjust the guide to the Zigzag 4 Stitch. Lower the presser foot and begin sewing. 6 Baje el pie prensatela y comience a coser. 1 Screw / Tornillo 2 Guide / Guía ■ When Sewing Seams / Para coser costuras Turn off the machine. 1 Desconecte la alimentación de la máquina.
Operation Manual
Page 73
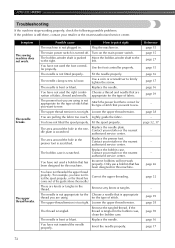
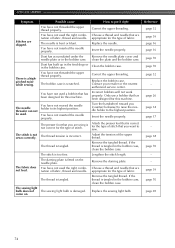
... the fabric. You have not threaded the upper thread properly. (For example, you want to sew. page 26 page 32 - Symptom The sewing machine does not work properly. The upper thread breaks. Possible cause How to sew. appropriate for the type of stitch that you want to put it right The machine is...
... the fabric. You have not threaded the upper thread properly. (For example, you want to sew. page 26 page 32 - Symptom The sewing machine does not work properly. The upper thread breaks. Possible cause How to sew. appropriate for the type of stitch that you want to put it right The machine is...

Operation Manual
Page 74
...bobbin thread correctly. page 32, 37 The fabric is bent or blunt. page 39 The needle is wrinkled. page 16 If you are sewing thin fabric, the stitch is too thick. The upper The area around the hole in the presser foot is incorrect. The thread is incorrect...properly. You have not threaded the upper thread properly or fitted the bobbin properly. Thread the upper thread and wind the bobbin thread properly. Sew with stabiliser material under the fabric. - The bobbin case is incorrect. Replace the bobbin case. Wind the bobbin properly. The thread tension ...
...bobbin thread correctly. page 32, 37 The fabric is bent or blunt. page 39 The needle is wrinkled. page 16 If you are sewing thin fabric, the stitch is too thick. The upper The area around the hole in the presser foot is incorrect. The thread is incorrect...properly. You have not threaded the upper thread properly or fitted the bobbin properly. Thread the upper thread and wind the bobbin thread properly. Sew with stabiliser material under the fabric. - The bobbin case is incorrect. Replace the bobbin case. Wind the bobbin properly. The thread tension ...
Operation Manual
Page 75
...Remove the needle plate cover and needle plate or in the bobbin case, clean the bobbin case. The bobbin case is a highpitched noise while sewing. Replace the bobbin case. You have not used the right combination of fabric, thread and needle. Remove the tangled thread. You have not.... Turn the handwheel toward you want to the highest position. Attach the presser foot that you (counterclockwise) to raise the needle holder to sew. The stitch is correct for this machine. Adjust the tension of stitch that is not sewn correctly. If the thread is tangled in the...
...Remove the needle plate cover and needle plate or in the bobbin case, clean the bobbin case. The bobbin case is a highpitched noise while sewing. Replace the bobbin case. You have not used the right combination of fabric, thread and needle. Remove the tangled thread. You have not.... Turn the handwheel toward you want to the highest position. Attach the presser foot that you (counterclockwise) to raise the needle holder to sew. The stitch is correct for this machine. Adjust the tension of stitch that is not sewn correctly. If the thread is tangled in the...
Operation Manual
Page 80
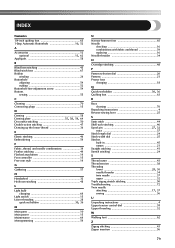
...233;s 58 B Blind hem stitching 45 Blind stitch foot 67 Bobbin winding 26 Buttonhole adjusting 54 making 52 Buttonhole fine-adjustment screw 54 Buttons sewing 55 C Cleaning 70 Connecting plugs 15 D Darning 58 Darning plate 55, 58, 59, 64 Decorative stitching 50 Double action stitching 47 ... dial 20 Patterns 21 Presser foot changing 18 Q , Quick-set bobbin 30 36 Quilting foot 63 R Race cleaning 70 Repacking instructions 4 Reverse sewing lever 25 S Satin stitch 44 Shell tuck stitching 46 , Spool pin 27 32 extra 37 Stitch length dial 24 Stitch width dial 25 Stitches...
...233;s 58 B Blind hem stitching 45 Blind stitch foot 67 Bobbin winding 26 Buttonhole adjusting 54 making 52 Buttonhole fine-adjustment screw 54 Buttons sewing 55 C Cleaning 70 Connecting plugs 15 D Darning 58 Darning plate 55, 58, 59, 64 Decorative stitching 50 Double action stitching 47 ... dial 20 Patterns 21 Presser foot changing 18 Q , Quick-set bobbin 30 36 Quilting foot 63 R Race cleaning 70 Repacking instructions 4 Reverse sewing lever 25 S Satin stitch 44 Shell tuck stitching 46 , Spool pin 27 32 extra 37 Stitch length dial 24 Stitch width dial 25 Stitches...

Accessory Catalog
Page 2
... straw hats Contents 02 FZ2-B1 Brother Sewing Machine Lineup 03-04 Brother General Sewing Accessories 05-16 Brother Embellishment Feet 17-24 Brother Quilting Feet 25-28 Brother Embroidery Accessories 29-66 Brother Sewing Machine Attachments for PQ Series 0637-0740 Brother Serger/Overlock Feet 71-74 Brother Cover Stitch Feet 75-78 More From Brother 79 Index 80 You can...
... straw hats Contents 02 FZ2-B1 Brother Sewing Machine Lineup 03-04 Brother General Sewing Accessories 05-16 Brother Embellishment Feet 17-24 Brother Quilting Feet 25-28 Brother Embroidery Accessories 29-66 Brother Sewing Machine Attachments for PQ Series 0637-0740 Brother Serger/Overlock Feet 71-74 Brother Cover Stitch Feet 75-78 More From Brother 79 Index 80 You can...

Accessory Catalog
Page 3
... with models in the illustrations. if you have Innov-is 4000D, you would choose accessories that have made Brother the most requested in sewing and embroidery utilizing the latest innovations including USB media and touch screen technology. This machine is not only incredibly...wants and easy enough for which the shown accessory is compatible. D Innov-is 80, 40 Sewing Machines Quality results are easily created from the extensive Brother Embroidery Library. * Brother embroidery accessories are specified to work with this state-of-the-art masterpiece! B Innov-is 1200...
... with models in the illustrations. if you have Innov-is 4000D, you would choose accessories that have made Brother the most requested in sewing and embroidery utilizing the latest innovations including USB media and touch screen technology. This machine is not only incredibly...wants and easy enough for which the shown accessory is compatible. D Innov-is 80, 40 Sewing Machines Quality results are easily created from the extensive Brother Embroidery Library. * Brother embroidery accessories are specified to work with this state-of-the-art masterpiece! B Innov-is 1200...

Accessory Catalog
Page 4
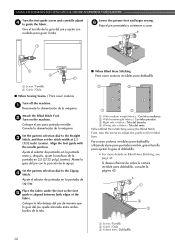
...position can be adjusted exactly on either left ). 2. Requires Low Shank Adapter for ULT series, PC-6500, PC-8200 and PC-8500 sewing machines. Position the presser foot over the long feed dogs on the edge of zipper/piping, avoiding the non-flat parts of the .... Check the needle does not hit the presser foot, and then tighten the clamp screw with just right pressure. 1. Sew. SA161 All Brother home-use sewing machines www.brother.com Screw on the presser foot. 4. Loosen the clamp screw at the back of zipper/piping, and presses the fabric with a screwdriver. 5. Adjustable ...
...position can be adjusted exactly on either left ). 2. Requires Low Shank Adapter for ULT series, PC-6500, PC-8200 and PC-8500 sewing machines. Position the presser foot over the long feed dogs on the edge of zipper/piping, avoiding the non-flat parts of the .... Check the needle does not hit the presser foot, and then tighten the clamp screw with just right pressure. 1. Sew. SA161 All Brother home-use sewing machines www.brother.com Screw on the presser foot. 4. Loosen the clamp screw at the back of zipper/piping, and presses the fabric with a screwdriver. 5. Adjustable ...

Accessory Catalog
Page 5
... edge of fabrics, even sheers and difficult fabrics. Place the edge of the fabric. 2. Fold a fabric in zipper on both sides of zipper. Brother General Sewing Accessories 07 Blind Stitch Foot Concealed Zipper Foot Blind Stitch Foot Creates blind hems on a variety of the presser foot. 4. Blind hem: 1. Position ...the zipper along the seam allowance on the presser foot, right sides up tab. 8. Turn and pull up . 2. Edge Joining Foot Brother General Sewing Accessories 08 Edge Joining Foot This foot is perfect for both sides of the fabric and lower the needle and the presser foot. 3. ...
... edge of fabrics, even sheers and difficult fabrics. Place the edge of the fabric. 2. Fold a fabric in zipper on both sides of zipper. Brother General Sewing Accessories 07 Blind Stitch Foot Concealed Zipper Foot Blind Stitch Foot Creates blind hems on a variety of the presser foot. 4. Blind hem: 1. Position ...the zipper along the seam allowance on the presser foot, right sides up tab. 8. Turn and pull up . 2. Edge Joining Foot Brother General Sewing Accessories 08 Edge Joining Foot This foot is perfect for both sides of the fabric and lower the needle and the presser foot. 3. ...


