Users Manual - English
Page 19
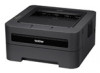
... the tray which you put in the next sheet of paper as in Step d above. Use this paper feed and output method when you want to print. f Send the print data to 16 in Chapter 2. Printing on the Manual Feed mode when you use , see Acceptable paper and other settings, see Driver and Software in .) You can use all paper sizes specified for each drop-down , the machine has a straight paper path from each page that...
... the tray which you put in the next sheet of paper as in Step d above. Use this paper feed and output method when you want to print. f Send the print data to 16 in Chapter 2. Printing on the Manual Feed mode when you use , see Acceptable paper and other settings, see Driver and Software in .) You can use all paper sizes specified for each drop-down , the machine has a straight paper path from each page that...
Users Manual - English
Page 49
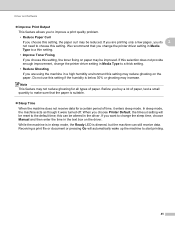
Before you buy a lot of paper, test a small quantity to make sure that you change the printer driver setting in the driver. Do not use this setting. this setting, the toner fixing on paper may be altered in Media Type to a thin setting. • Improve Toner Fixing If you choose this can still receive data. While the machine is in the text box on the driver. Receiving a print file or document or pressing Go will be...
Before you buy a lot of paper, test a small quantity to make sure that you change the printer driver setting in the driver. Do not use this setting. this setting, the toner fixing on paper may be altered in Media Type to a thin setting. • Improve Toner Fixing If you choose this can still receive data. While the machine is in the text box on the driver. Receiving a print file or document or pressing Go will be...
Users Manual - English
Page 104
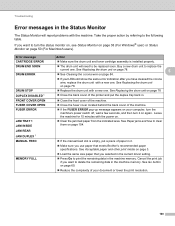
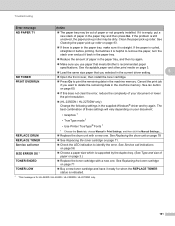
See Replacing the drum unit on page 78 Close the back cover of the printer and put a piece of paper in it on page 3. Load the same size paper that meets Brother's recommended paper specifications. Leave the machine for 15 minutes with the machine. See Acceptable paper and other print media on again. Error message CARTRIDGE ERROR DRUM END SOON DRUM ERROR DRUM STOP DUPLEX DISABLED 1 FRONT COVER OPEN FUSER COVER OPEN FUSER ERROR JAM TRAY 1 JAM INSIDE JAM REAR JAM DUPLEX 1 MANUAL FEED MEMORY FULL Action Make sure the drum unit and toner cartridge assembly is ...
See Replacing the drum unit on page 78 Close the back cover of the printer and put a piece of paper in it on page 3. Load the same size paper that meets Brother's recommended paper specifications. Leave the machine for 15 minutes with the machine. See Acceptable paper and other print media on again. Error message CARTRIDGE ERROR DRUM END SOON DRUM ERROR DRUM STOP DUPLEX DISABLED 1 FRONT COVER OPEN FUSER COVER OPEN FUSER ERROR JAM TRAY 1 JAM INSIDE JAM REAR JAM DUPLEX 1 MANUAL FEED MEMORY FULL Action Make sure the drum unit and toner cartridge assembly is ...
Users Manual - English
Page 105
... supported by the duplex tray. (See Type and size of paper on page 71 TONER LOW Buy a new toner cartridge and have it back in the paper tray. Reduce the amount of paper in Print Settings, and then click the Manual Settings.... Replace the drum unit with a new one . See Replacing the drum unit on page 78 REPLACE TONER See Replacing the toner cartridge on your document or lower the print resolution. (HL-2250DN / HL-2270DW only) Change the following settings in the supplied Windows...
... supported by the duplex tray. (See Type and size of paper on page 71 TONER LOW Buy a new toner cartridge and have it back in the paper tray. Reduce the amount of paper in Print Settings, and then click the Manual Settings.... Replace the drum unit with a new one . See Replacing the drum unit on page 78 REPLACE TONER See Replacing the toner cartridge on your document or lower the print resolution. (HL-2250DN / HL-2270DW only) Change the following settings in the supplied Windows...
Users Manual - English
Page 147
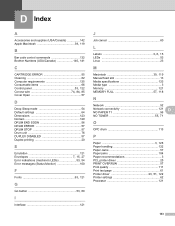
... G Go button 53, 60 I Interface 121 J Job cancel 60 L Labels 3, 8, 15 LEDs 53 Linux 23 M Macintosh 39, 119 Manual feed slot 13 Media specifications 123 Media type 3 Memory 121 MEMORY FULL 57, 118 N Network 52 Network connectivity 121 D NO PAPER T1 56 NO TONER 55, 71 O OPC drum 113 P Paper 3, 126 Paper handling 122 Paper Jams 57 Paper jams 104 Paper recommendations 3 PCL printer driver 25 PRINT OVERRUN 57 Print quality 111 Print test page 61 Printer driver 23, 51, 122 Printer settings 62...
... G Go button 53, 60 I Interface 121 J Job cancel 60 L Labels 3, 8, 15 LEDs 53 Linux 23 M Macintosh 39, 119 Manual feed slot 13 Media specifications 123 Media type 3 Memory 121 MEMORY FULL 57, 118 N Network 52 Network connectivity 121 D NO PAPER T1 56 NO TONER 55, 71 O OPC drum 113 P Paper 3, 126 Paper handling 122 Paper Jams 57 Paper jams 104 Paper recommendations 3 PCL printer driver 25 PRINT OVERRUN 57 Print quality 111 Print test page 61 Printer driver 23, 51, 122 Printer settings 62...
Network Users Manual - English
Page 3
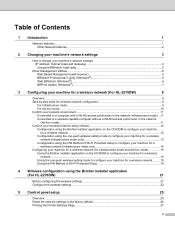
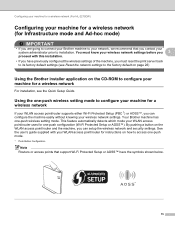
... mode and Ad-hoc mode 15 Using the Brother installer application on the CD-ROM to configure your machine for a wireless network ...15 Using the one-push wireless setting mode to configure your machine for a wireless network..........15 Using the PIN Method of Wi-Fi Protected Setup 18 4 Wireless configuration using the Brother installer application (For HL-2270DW) 21 Before configuring the wireless settings 21 Configure the wireless settings...22 5 Control panel setup 25 Overview...25 Reset the network settings to the factory default 26 Printing the Printer Settings Page...
... mode and Ad-hoc mode 15 Using the Brother installer application on the CD-ROM to configure your machine for a wireless network ...15 Using the one-push wireless setting mode to configure your machine for a wireless network..........15 Using the PIN Method of Wi-Fi Protected Setup 18 4 Wireless configuration using the Brother installer application (For HL-2270DW) 21 Before configuring the wireless settings 21 Configure the wireless settings...22 5 Control panel setup 25 Overview...25 Reset the network settings to the factory default 26 Printing the Printer Settings Page...
Network Users Manual - English
Page 7
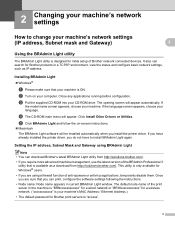
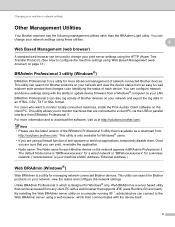
... Professional 3 utility that you are using a firewall function of the print server in the machine is "BRNxxxxxxxxxxxx" for a wired network or "BRWxxxxxxxxxxxx" for a wireless network. ("xxxxxxxxxxxx" is your machine's MAC Address / Ethernet Address.) • The default password for Brother products in current BRAdmin Light window. 2 Changing your machine's network settings 2 How to install BRAdmin Light again. Click Install Other Drivers or Utilities. If you have already installed the printer driver, you install the printer driver. This utility is available as...
... Professional 3 utility that you are using a firewall function of the print server in the machine is "BRNxxxxxxxxxxxx" for a wired network or "BRWxxxxxxxxxxxx" for a wireless network. ("xxxxxxxxxxxx" is your machine's MAC Address / Ethernet Address.) • The default password for Brother products in current BRAdmin Light window. 2 Changing your machine's network settings 2 How to install BRAdmin Light again. Click Install Other Drivers or Utilities. If you have already installed the printer driver, you install the printer driver. This utility is available as...
Network Users Manual - English
Page 10
... be accessed from a Windows® computer on a computer running IIS 1, administrators can be used to change your print server settings using the HTTP (Hyper Text Transfer Protocol). (See How to the Web BRAdmin server using Web Based Management (web browser) on your network and export the log data in BRAdmin Professional 3. The default Node name is "BRNxxxxxxxxxxxx" for a wired network or "BRWxxxxxxxxxxxx" for a wireless network. ("xxxxxxxxxxxx" is your machine's MAC Address / Ethernet Address.) Web BRAdmin (Windows®) 2 Web...
... be accessed from a Windows® computer on a computer running IIS 1, administrators can be used to change your print server settings using the HTTP (Hyper Text Transfer Protocol). (See How to the Web BRAdmin server using Web Based Management (web browser) on your network and export the log data in BRAdmin Professional 3. The default Node name is "BRNxxxxxxxxxxxx" for a wired network or "BRWxxxxxxxxxxxx" for a wireless network. ("xxxxxxxxxxxx" is your machine's MAC Address / Ethernet Address.) Web BRAdmin (Windows®) 2 Web...
Network Users Manual - English
Page 13
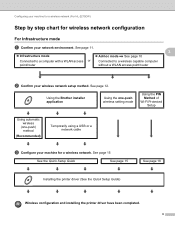
... Connected to a wireless capable computer without a WLAN access point/router 3 3 b Confirm your wireless network setup method. Using the Brother installer application Using the one-push wireless setting mode Using the PIN Method of Wi-Fi Protected Setup Using automatic wireless (one-push) method (Recommended) Temporarily using a USB or a network cable c Configure your machine for wireless network configuration 3 For Infrastructure mode a Confirm your network environment. See page 15 See the Quick Setup Guide See page 15 See page 18 Installing the printer driver (See the Quick...
... Connected to a wireless capable computer without a WLAN access point/router 3 3 b Confirm your wireless network setup method. Using the Brother installer application Using the one-push wireless setting mode Using the PIN Method of Wi-Fi Protected Setup Using automatic wireless (one-push) method (Recommended) Temporarily using a USB or a network cable c Configure your machine for wireless network configuration 3 For Infrastructure mode a Confirm your network environment. See page 15 See the Quick Setup Guide See page 15 See page 18 Installing the printer driver (See the Quick...
Network Users Manual - English
Page 19
... its factory default settings (see Reset the network settings to the factory default on page 26) Using the Brother installer application on how to access one-push mode. 1 Push Button Configuration Note Routers or access points that you contact your system administrator prior to installation. Your Brother machine has one -push configuration (Wi-Fi Protected Setup or AOSS™). By pushing a button on the WLAN access point/router and the machine, you must know your wireless network settings before...
... its factory default settings (see Reset the network settings to the factory default on page 26) Using the Brother installer application on how to access one-push mode. 1 Push Button Configuration Note Routers or access points that you contact your system administrator prior to installation. Your Brother machine has one -push configuration (Wi-Fi Protected Setup or AOSS™). By pushing a button on the WLAN access point/router and the machine, you must know your wireless network settings before...

Network Users Manual - English
Page 21
... resetting, 3 see Reset the network settings to the factory default on your machine in the Quick Setup Guide. If the LED indicates Connection Error (See the table below), the machine has detected more than 2 WLAN access points/routers on the printed report refer to its factory default settings and try again. You can now use your network. If the same message is an error code on your network that only one -push wireless setting mode LEDs Toner (Yellow) Drum (Yellow) Error...
... resetting, 3 see Reset the network settings to the factory default on your machine in the Quick Setup Guide. If the LED indicates Connection Error (See the table below), the machine has detected more than 2 WLAN access points/routers on the printed report refer to its factory default settings and try again. You can now use your network. If the same message is an error code on your network that only one -push wireless setting mode LEDs Toner (Yellow) Drum (Yellow) Error...
Network Users Manual - English
Page 23
..., you use a Windows Vista® or Windows® 7 computer as a Registrar, you need to register it to your network in Quick Setup Guide for a wireless network (For HL-2270DW) e Using a computer that is on the network, type http://access_point_ip_address/ into your WLAN access point/router. • If you can install the printer driver after the wireless configuration by following the on the brand of the device that you want to connect to...
..., you use a Windows Vista® or Windows® 7 computer as a Registrar, you need to register it to your network in Quick Setup Guide for a wireless network (For HL-2270DW) e Using a computer that is on the network, type http://access_point_ip_address/ into your WLAN access point/router. • If you can install the printer driver after the wireless configuration by following the on the brand of the device that you want to connect to...
Quick Setup Guide - English
Page 6
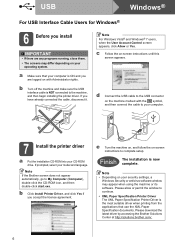
... then double-click start.exe. Finish The installation is ON and you are any programs running, close them. • The screens may appear when using the machine or its software. b Turn off the machine and make sure the USB interface cable is NOT connected to continue. • XML Paper Specification Printer Driver The XML Paper Specification Printer Driver is the most suitable driver when printing from the applications that your model and language...
... then double-click start.exe. Finish The installation is ON and you are any programs running, close them. • The screens may appear when using the machine or its software. b Turn off the machine and make sure the USB interface cable is NOT connected to continue. • XML Paper Specification Printer Driver The XML Paper Specification Printer Driver is the most suitable driver when printing from the applications that your model and language...
Quick Setup Guide - English
Page 12
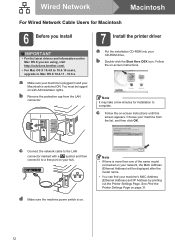
... of the same model connected on . a Make sure your machine is plugged in and your hub. b Remove the protective cap from the list, and then click OK. See Print the Printer Settings Page on the Mac OS X you install IMPORTANT • For the latest drivers and information on page 31. 12 b Double-click the Start Here OSX icon. Wired Network Macintosh For Wired Network Cable Users for installation to complete.
... of the same model connected on . a Make sure your machine is plugged in and your hub. b Remove the protective cap from the list, and then click OK. See Print the Printer Settings Page on the Mac OS X you install IMPORTANT • For the latest drivers and information on page 31. 12 b Double-click the Start Here OSX icon. Wired Network Macintosh For Wired Network Cable Users for installation to complete.
Quick Setup Guide - English
Page 16
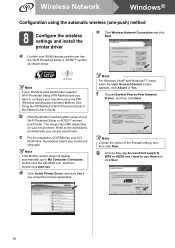
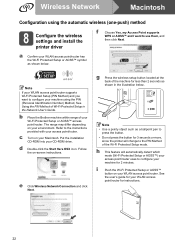
... Wi-Fi Protected Setup or AOSS™ symbol as shown below. a Confirm your model and language. g Choose Yes, my Access Point supports WPS or AOSS and I want to configure your access point/router. f Choose Brother Peer-to the instructions provided with your machine using the automatic wireless (one-push) method 8 Configure the wireless settings and install the printer driver e Click Wireless Network Connection and click Next. b Place the Brother machine within range of...
... Wi-Fi Protected Setup or AOSS™ symbol as shown below. a Confirm your model and language. g Choose Yes, my Access Point supports WPS or AOSS and I want to configure your access point/router. f Choose Brother Peer-to the instructions provided with your machine using the automatic wireless (one-push) method 8 Configure the wireless settings and install the printer driver e Click Wireless Network Connection and click Next. b Place the Brother machine within range of...
Quick Setup Guide - English
Page 17
... the connection results. Wireless Network h Press the wireless setup button located at http://solutions.brother.com/. 17 If the connection failed, check the error on the printed report and refer to Troubleshooting on page 28 m Check the box after you confirm that use a specified IP Address for less than 2 seconds as a ballpoint pen to press the button. • Do not press the button for 3 seconds or more information, See Changing your machine's network settings...
... the connection results. Wireless Network h Press the wireless setup button located at http://solutions.brother.com/. 17 If the connection failed, check the error on the printed report and refer to Troubleshooting on page 28 m Check the box after you confirm that use a specified IP Address for less than 2 seconds as a ballpoint pen to press the button. • Do not press the button for 3 seconds or more information, See Changing your machine's network settings...
Quick Setup Guide - English
Page 21
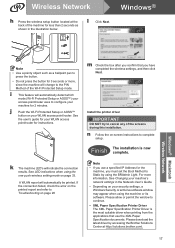
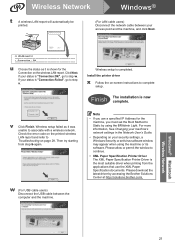
Wireless Network Windows® t A wireless LAN report will automatically be printed. (For LAN cable users) Disconnect the network cable between your access point and the machine, and click Next.
Wireless Network Windows® t A wireless LAN report will automatically be printed. (For LAN cable users) Disconnect the network cable between your access point and the machine, and click Next.
Quick Setup Guide - English
Page 22
... OSX icon. e Click Wireless Network Connection and click Next. Note If your WLAN access point/router supports Wi-Fi Protected Setup (PIN Method) and you want to the PIN Method of the Wi-Fi Protected Setup mode. b Place the Brother machine within range of your machine using the automatic wireless (one-push) method 8 Configure the wireless settings and install the printer driver f Choose Yes, my Access Point supports WPS or AOSS...
... OSX icon. e Click Wireless Network Connection and click Next. Note If your WLAN access point/router supports Wi-Fi Protected Setup (PIN Method) and you want to the PIN Method of the Wi-Fi Protected Setup mode. b Place the Brother machine within range of your machine using the automatic wireless (one-push) method 8 Configure the wireless settings and install the printer driver f Choose Yes, my Access Point supports WPS or AOSS...
Quick Setup Guide - English
Page 23
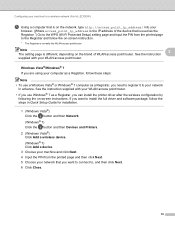
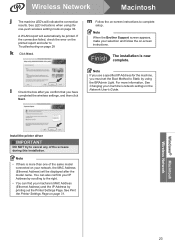
... also confirm your network, the MAC Address (Ethernet Address) will indicate the connection results. Note • If there is now complete. l Check the box after the model name. See LED indications when using the BRAdmin Light. Note When the Brother Support screen appears, make your machine's network settings in the Network User's Guide. See Print the Printer Settings Page on -screen instructions. Windows® Macintosh Wireless Network 23 Finish The installation is more information, See Changing your selection...
... also confirm your network, the MAC Address (Ethernet Address) will indicate the connection results. Note • If there is now complete. l Check the box after the model name. See LED indications when using the BRAdmin Light. Note When the Brother Support screen appears, make your machine's network settings in the Network User's Guide. See Print the Printer Settings Page on -screen instructions. Windows® Macintosh Wireless Network 23 Finish The installation is more information, See Changing your selection...
Quick Setup Guide - English
Page 27
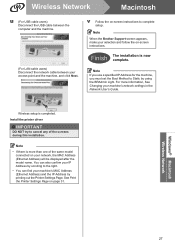
... Address) will be displayed after the model name. Note • If there is more information, See Changing your IP Address by scrolling to complete setup. You can also confirm your machine's network settings in the Network User's Guide. Wireless Network Macintosh u (For USB cable users) Disconnect the USB cable between the computer and the machine. (For LAN cable users) Disconnect the network cable between your machine's MAC Address (Ethernet Address) and the IP Address by using the BRAdmin Light. Finish The installation...
... Address) will be displayed after the model name. Note • If there is more information, See Changing your IP Address by scrolling to complete setup. You can also confirm your machine's network settings in the Network User's Guide. Wireless Network Macintosh u (For USB cable users) Disconnect the USB cable between the computer and the machine. (For LAN cable users) Disconnect the network cable between your machine's MAC Address (Ethernet Address) and the IP Address by using the BRAdmin Light. Finish The installation...


