Users Manual - English
Page 3
...or envelopes ...15 Duplex printing...20 Guidelines for printing on both sides of the paper 20 Automatic duplex printing (HL-2240D / HL-2242D / HL-2250DN / HL-2270DW only 21 Manual duplex printing ...22 2 Driver and Software 23 Printer driver ...23 Features in the printer driver...test page ...61 Print a Printer Settings page...62 Print Fonts (HL-2250DN / HL-2270DW only 63 Print a WLAN report (HL-2270DW only 64 Default settings...64 4 Routine Maintenance 66 Replacing consumable items...66 Consumables...66 Before replacing the consumable items 67 Toner cartridge ...70 Drum unit ...76 ii
...or envelopes ...15 Duplex printing...20 Guidelines for printing on both sides of the paper 20 Automatic duplex printing (HL-2240D / HL-2242D / HL-2250DN / HL-2270DW only 21 Manual duplex printing ...22 2 Driver and Software 23 Printer driver ...23 Features in the printer driver...test page ...61 Print a Printer Settings page...62 Print Fonts (HL-2250DN / HL-2270DW only 63 Print a WLAN report (HL-2270DW only 64 Default settings...64 4 Routine Maintenance 66 Replacing consumable items...66 Consumables...66 Before replacing the consumable items 67 Toner cartridge ...70 Drum unit ...76 ii

Users Manual - English
Page 57
.... 53 3 Control Panel 3 LEDs (Light Emitting Diodes) 3 This section refers to four LEDs Toner, Drum, Error, Ready and Go button on the control panel. 1 Toner LED 3 1 The Toner LED indicates that the Toner is low. 2 Drum LED 2 The Drum LED indicates that the Drum will flash depending on . or or or or LED is in this chapter. LED...
.... 53 3 Control Panel 3 LEDs (Light Emitting Diodes) 3 This section refers to four LEDs Toner, Drum, Error, Ready and Go button on the control panel. 1 Toner LED 3 1 The Toner LED indicates that the Toner is low. 2 Drum LED 2 The Drum LED indicates that the Drum will flash depending on . or or or or LED is in this chapter. LED...

Users Manual - English
Page 59
See REPLACE TONER on page 70. NO TONER Open the front cover, install the toner cartridge. CARTRIDGE ERROR The drum unit assembly is indicated. REPLACE TONER (Continue mode) The machine continues printing until the LED indicates TONER ENDED. See Toner cartridge on page 71. Buy a new toner cartridge and have it back in. See Replacing the toner cartridge on page...
See REPLACE TONER on page 70. NO TONER Open the front cover, install the toner cartridge. CARTRIDGE ERROR The drum unit assembly is indicated. REPLACE TONER (Continue mode) The machine continues printing until the LED indicates TONER ENDED. See Toner cartridge on page 71. Buy a new toner cartridge and have it back in. See Replacing the toner cartridge on page...
Users Manual - English
Page 62
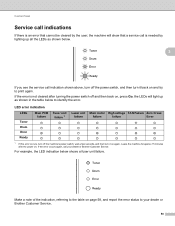
... fuser unit failure. Make a note of the indication, referring to the table on page 58, and report the error status to your dealer or Brother Customer Service. Control Panel Service call indications 3 If there is an error that a service call is not cleared after turning the power switch off...the machine will light up all the LEDs as shown in the table below to identify the error. LED error indication LEDs Main PCB failure Toner Drum Error Ready Fuser unit failure 1 Laser unit Main motor High voltage FAN Failure Zero Cross failure failure failure Error 1 If this error occurs,...
... fuser unit failure. Make a note of the indication, referring to the table on page 58, and report the error status to your dealer or Brother Customer Service. Control Panel Service call indications 3 If there is an error that a service call is not cleared after turning the power switch off...the machine will light up all the LEDs as shown in the table below to identify the error. LED error indication LEDs Main PCB failure Toner Drum Error Ready Fuser unit failure 1 Laser unit Main motor High voltage FAN Failure Zero Cross failure failure failure Error 1 If this error occurs,...
Users Manual - English
Page 65
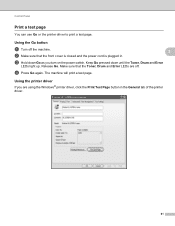
...of the printer driver. 61 Release Go. d Press Go again. Keep Go pressed down Go as you are off the machine. 3 b Make sure that the Toner, Drum and Error LEDs are using the Windows® printer driver, click the Print Test Page button in . The machine will print a test page. c Hold down... until the Toner, Drum and Error LEDs light up. Using the printer driver 3 If you turn on the power switch. Control Panel Print a test page 3 You can use Go...
...of the printer driver. 61 Release Go. d Press Go again. Keep Go pressed down Go as you are off the machine. 3 b Make sure that the Toner, Drum and Error LEDs are using the Windows® printer driver, click the Print Test Page button in . The machine will print a test page. c Hold down... until the Toner, Drum and Error LEDs light up. Using the printer driver 3 If you turn on the power switch. Control Panel Print a test page 3 You can use Go...
Users Manual - English
Page 67
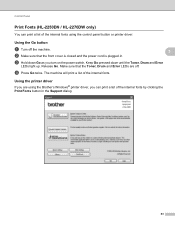
Control Panel Print Fonts (HL-2250DN / HL-2270DW only) 3 You can print a list of the internal fonts by clicking the Print Fonts button in . Release Go. Using the Go button 3 a Turn off . The machine will print a list of the internal fonts using the Brother's Windows® printer driver, you turn ...on the power switch. Using the printer driver 3 If you are off the machine. 3 b Make sure that the Toner, Drum and Error LEDs are using the control panel button or...
Control Panel Print Fonts (HL-2250DN / HL-2270DW only) 3 You can print a list of the internal fonts by clicking the Print Fonts button in . Release Go. Using the Go button 3 a Turn off . The machine will print a list of the internal fonts using the Brother's Windows® printer driver, you turn ...on the power switch. Using the printer driver 3 If you are off the machine. 3 b Make sure that the Toner, Drum and Error LEDs are using the control panel button or...

Users Manual - English
Page 70
4 Routine Maintenance 4 You will need to clean the machine regularly and replace the consumable items. Replacing consumable items 4 The machine will indicate when it is time to replace the consumable items. (See LEDs (Light Emitting Diodes) on page 53) 4 Consumables 4 Toner cartridge See Toner cartridge on page 70 Order No.TN-420, TN-450 Drum unit See Drum unit on page 76. Order No.DR-420 66
4 Routine Maintenance 4 You will need to clean the machine regularly and replace the consumable items. Replacing consumable items 4 The machine will indicate when it is time to replace the consumable items. (See LEDs (Light Emitting Diodes) on page 53) 4 Consumables 4 Toner cartridge See Toner cartridge on page 70 Order No.TN-420, TN-450 Drum unit See Drum unit on page 76. Order No.DR-420 66

Users Manual - English
Page 72
...8226; To prevent damage to the machine and/or may cause damage to the machine from the Brother machine, we strongly recommend the use of potentially incompatible toner and/or cartridges in the Brother machine may result in the illustrations. • We recommend that you replace the consumables. To... touch the shaded parts shown in unsatisfactory print quality. Use or attempted use of genuine Brother supplies. • We recommend that you clean the machine when you place the drum unit and toner cartridge assembly on page 82. 68 We also strongly recommend that you do not refill ...
...8226; To prevent damage to the machine and/or may cause damage to the machine from the Brother machine, we strongly recommend the use of potentially incompatible toner and/or cartridges in the Brother machine may result in the illustrations. • We recommend that you replace the consumables. To... touch the shaded parts shown in unsatisfactory print quality. Use or attempted use of genuine Brother supplies. • We recommend that you clean the machine when you place the drum unit and toner cartridge assembly on page 82. 68 We also strongly recommend that you do not refill ...

Users Manual - English
Page 73
...; DO NOT unpack a spare drum unit until immediately before you put it into the machine. When you use only genuine Brother toner cartridges. If you choose not to return your used toner cartridge, please discard the used toner cartridge according to buy toner cartridges, call your dealer. 69...may be damaged. • While removing the drum unit, handle it carefully because it separate from domestic waste. If drum unit is exposed to the brother collection program. Routine Maintenance • DO NOT unpack a spare toner cartridge until immediately before you put it into the...
...; DO NOT unpack a spare drum unit until immediately before you put it into the machine. When you use only genuine Brother toner cartridges. If you choose not to return your used toner cartridge, please discard the used toner cartridge according to buy toner cartridges, call your dealer. 69...may be damaged. • While removing the drum unit, handle it carefully because it separate from domestic waste. If drum unit is exposed to the brother collection program. Routine Maintenance • DO NOT unpack a spare toner cartridge until immediately before you put it into the...
Users Manual - English
Page 74
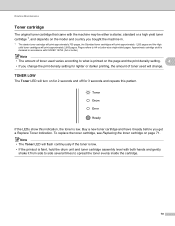
...200 pages and the High yield toner cartridges will print approximately 2,600 pages. If the LEDs show this pattern. Note • The Toner LED will flash continuously if the toner is low. • If the printout is faint, hold the drum unit and toner cartridge assembly level with ISO/IEC ...19752. (A4 or Letter) Note • The amount of toner used will change. To replace the toner cartridge, see Replacing the toner cartridge on page 71. TONER LOW 4 The Toner LED will turn on for 2 seconds...
...200 pages and the High yield toner cartridges will print approximately 2,600 pages. If the LEDs show this pattern. Note • The Toner LED will flash continuously if the toner is low. • If the printout is faint, hold the drum unit and toner cartridge assembly level with ISO/IEC ...19752. (A4 or Letter) Note • The amount of toner used will change. To replace the toner cartridge, see Replacing the toner cartridge on page 71. TONER LOW 4 The Toner LED will turn on for 2 seconds...
Users Manual - English
Page 75
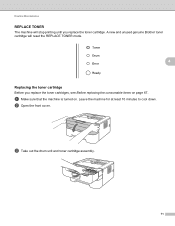
Routine Maintenance REPLACE TONER 4 The machine will reset the REPLACE TONER mode. 4 Replacing the toner cartridge 4 Before you replace the toner cartridge. b Open the front cover. A new and unused genuine Brother toner cartridge will stop printing until you replace the toner cartridges, see Before replacing the consumable items on . c Take out the drum unit and toner cartridge assembly. 71 Leave the machine for at least 10 minutes to cool down. a Make sure that the machine is turned on page 67.
Routine Maintenance REPLACE TONER 4 The machine will reset the REPLACE TONER mode. 4 Replacing the toner cartridge 4 Before you replace the toner cartridge. b Open the front cover. A new and unused genuine Brother toner cartridge will stop printing until you replace the toner cartridges, see Before replacing the consumable items on . c Take out the drum unit and toner cartridge assembly. 71 Leave the machine for at least 10 minutes to cool down. a Make sure that the machine is turned on page 67.

Users Manual - English
Page 76
Routine Maintenance d Push down the green lock lever and take the toner cartridge out of the drum unit. 4 e Unpack the new toner cartridge. Hold the cartridge level with both hands and gently shake it from side to side several times to spread the toner evenly inside the cartridge. 72
Routine Maintenance d Push down the green lock lever and take the toner cartridge out of the drum unit. 4 e Unpack the new toner cartridge. Hold the cartridge level with both hands and gently shake it from side to side several times to spread the toner evenly inside the cartridge. 72

Users Manual - English
Page 77
If you hear it in properly, the green lock lever will lift automatically. 73 Routine Maintenance f Pull off the protective cover. 4 g Put the new toner cartridge firmly into the drum unit until you put it lock into place.
If you hear it in properly, the green lock lever will lift automatically. 73 Routine Maintenance f Pull off the protective cover. 4 g Put the new toner cartridge firmly into the drum unit until you put it lock into place.

Users Manual - English
Page 78
Note DO NOT turn off the machine's power switch or open the front cover until the Ready LED lights up. 74 Close the front cover. i Put the drum unit and toner cartridge assembly back into the machine. Routine Maintenance h Clean the primary corona wire inside the drum unit by gently sliding the green tab from right to left and left to right several times. 4 1 Note Be sure to return the tab to the home position (a) (1). If you do not, printed pages may have a vertical stripe.
Note DO NOT turn off the machine's power switch or open the front cover until the Ready LED lights up. 74 Close the front cover. i Put the drum unit and toner cartridge assembly back into the machine. Routine Maintenance h Clean the primary corona wire inside the drum unit by gently sliding the green tab from right to left and left to right several times. 4 1 Note Be sure to return the tab to the home position (a) (1). If you do not, printed pages may have a vertical stripe.
Users Manual - English
Page 80
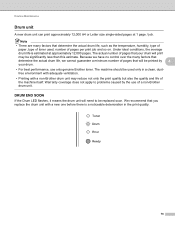
... is estimated at 1 page / job. Because we cannot guarantee a minimum number of the machine itself. The machine should be printed by the use only genuine Brother toner. The actual number of pages that determine the actual drum life, such as the temperature, humidity, type of paper, type of...
... is estimated at 1 page / job. Because we cannot guarantee a minimum number of the machine itself. The machine should be printed by the use only genuine Brother toner. The actual number of pages that determine the actual drum life, such as the temperature, humidity, type of paper, type of...

Users Manual - English
Page 82
b Open the front cover. 4 c Take out the drum unit and toner cartridge assembly. 78 Leave the machine for at least 10 minutes to reset the drum counter by completing the following steps: a Make sure that the machine is turned on page 67. When you replace the drum unit with a new one, you replace the drum unit, see Before replacing the consumable items on and the Drum LED is flashing. Routine Maintenance Replacing the drum unit 4 Before you need to cool down.
b Open the front cover. 4 c Take out the drum unit and toner cartridge assembly. 78 Leave the machine for at least 10 minutes to reset the drum counter by completing the following steps: a Make sure that the machine is turned on page 67. When you replace the drum unit with a new one, you replace the drum unit, see Before replacing the consumable items on and the Drum LED is flashing. Routine Maintenance Replacing the drum unit 4 Before you need to cool down.

Users Manual - English
Page 83
Routine Maintenance d Push down the green lock lever and take the toner cartridge out of the drum unit. 4 e Unpack the new drum unit. 79
Routine Maintenance d Push down the green lock lever and take the toner cartridge out of the drum unit. 4 e Unpack the new drum unit. 79

Users Manual - English
Page 84
If you hear it lock into the machine. Routine Maintenance f Put the toner cartridge firmly into the new drum unit until you put the cartridge in properly, the green lock lever will lift automatically. 4 g Put the drum unit and toner cartridge assembly back into place. Do not close the front cover yet. 80
If you hear it lock into the machine. Routine Maintenance f Put the toner cartridge firmly into the new drum unit until you put the cartridge in properly, the green lock lever will lift automatically. 4 g Put the drum unit and toner cartridge assembly back into place. Do not close the front cover yet. 80
Users Manual - English
Page 85
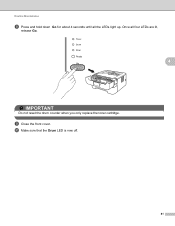
Routine Maintenance h Press and hold down Go for about 4 seconds until all four LEDs are lit, release Go. 4 IMPORTANT Do not reset the drum counter when you only replace the toner cartridge. i Close the front cover. j Make sure that the Drum LED is now off. 81 Once all the LEDs light up.
Routine Maintenance h Press and hold down Go for about 4 seconds until all four LEDs are lit, release Go. 4 IMPORTANT Do not reset the drum counter when you only replace the toner cartridge. i Close the front cover. j Make sure that the Drum LED is now off. 81 Once all the LEDs light up.
Quick Setup Guide - English
Page 32
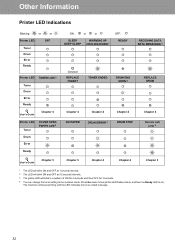
... then the Ready LED is on). Other Information Printer LED Indications Blinking: or or Printer LED OFF Toner Drum Error Ready Printer LED TONER LOW 3 Toner Drum Error Ready User's Guide Chapter 4 Printer LED Toner COVER OPEN PAPER JAM 2 Drum Error Ready ON: or or SLEEP DEEP SLEEP WARMING UP COOLING DOWN 1 OFF: READY RECEIVING DATA DATA...
... then the Ready LED is on). Other Information Printer LED Indications Blinking: or or Printer LED OFF Toner Drum Error Ready Printer LED TONER LOW 3 Toner Drum Error Ready User's Guide Chapter 4 Printer LED Toner COVER OPEN PAPER JAM 2 Drum Error Ready ON: or or SLEEP DEEP SLEEP WARMING UP COOLING DOWN 1 OFF: READY RECEIVING DATA DATA...


