Users Manual - English
Page 3
... envelopes ...15 Duplex printing...20 Guidelines for printing on both sides of the paper 20 Automatic duplex printing (HL-2240D / HL-2242D / HL-2250DN / HL-2270DW only 21 Manual duplex printing ...22 2 Driver and Software 23 Printer driver ...23 Features in the printer driver...a test page ...61 Print a Printer Settings page...62 Print Fonts (HL-2250DN / HL-2270DW only 63 Print a WLAN report (HL-2270DW only 64 Default settings...64 4 Routine Maintenance 66 Replacing consumable items...66 Consumables...66 Before replacing the consumable items 67 Toner cartridge ...70 Drum unit ...76 ii
... envelopes ...15 Duplex printing...20 Guidelines for printing on both sides of the paper 20 Automatic duplex printing (HL-2240D / HL-2242D / HL-2250DN / HL-2270DW only 21 Manual duplex printing ...22 2 Driver and Software 23 Printer driver ...23 Features in the printer driver...a test page ...61 Print a Printer Settings page...62 Print Fonts (HL-2250DN / HL-2270DW only 63 Print a WLAN report (HL-2270DW only 64 Default settings...64 4 Routine Maintenance 66 Replacing consumable items...66 Consumables...66 Before replacing the consumable items 67 Toner cartridge ...70 Drum unit ...76 ii

Users Manual - English
Page 57
... 3 LEDs (Light Emitting Diodes) 3 This section refers to four LEDs Toner, Drum, Error, Ready and Go button on the control panel. 1 Toner LED 3 1 The Toner LED indicates that the Toner is low. 2 Drum LED 2 The Drum LED indicates that the Drum will need to be replaced soon. 3 3 Error LED The Error LED indicates when the...
... 3 LEDs (Light Emitting Diodes) 3 This section refers to four LEDs Toner, Drum, Error, Ready and Go button on the control panel. 1 Toner LED 3 1 The Toner LED indicates that the Toner is low. 2 Drum LED 2 The Drum LED indicates that the Drum will need to be replaced soon. 3 3 Error LED The Error LED indicates when the...

Users Manual - English
Page 59
... will turn on for 2 seconds and off for when REPLACE TONER is not installed correctly. The Toner LED will need to be replaced soon. NO TONER Open the front cover, install the toner cartridge. CARTRIDGE ERROR The drum unit assembly is indicated. TONER ENDED Replace the toner cartridge with a new one . REPLACE TONER (Continue mode) The machine continues printing until the...
... will turn on for 2 seconds and off for when REPLACE TONER is not installed correctly. The Toner LED will need to be replaced soon. NO TONER Open the front cover, install the toner cartridge. CARTRIDGE ERROR The drum unit assembly is indicated. TONER ENDED Replace the toner cartridge with a new one . REPLACE TONER (Continue mode) The machine continues printing until the...

Users Manual - English
Page 70
Order No.DR-420 66 4 Routine Maintenance 4 You will need to clean the machine regularly and replace the consumable items. Replacing consumable items 4 The machine will indicate when it is time to replace the consumable items. (See LEDs (Light Emitting Diodes) on page 53) 4 Consumables 4 Toner cartridge See Toner cartridge on page 70 Order No.TN-420, TN-450 Drum unit See Drum unit on page 76.
Order No.DR-420 66 4 Routine Maintenance 4 You will need to clean the machine regularly and replace the consumable items. Replacing consumable items 4 The machine will indicate when it is time to replace the consumable items. (See LEDs (Light Emitting Diodes) on page 53) 4 Consumables 4 Toner cartridge See Toner cartridge on page 70 Order No.TN-420, TN-450 Drum unit See Drum unit on page 76.
Users Manual - English
Page 71
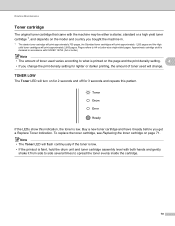
...illustrations. 67 CAUTION HOT SURFACE • After you have just used the printer, some internal parts will be extremely hot. Be careful not to clean the outside or inside of flammable substance to inhale toner. Wait at least 10 minutes for how to the print quality, DO NOT touch the.... Doing this may cause a fire or electrical shock. See 4 Cleaning on page 82 for the printer to cool down before replacing the consumable items. WARNING DO NOT put a toner cartridge into a fire. DO NOT use cleaning materials that contain ammonia, alcohol, any type of spray, or any degradation to ...
...illustrations. 67 CAUTION HOT SURFACE • After you have just used the printer, some internal parts will be extremely hot. Be careful not to clean the outside or inside of flammable substance to inhale toner. Wait at least 10 minutes for how to the print quality, DO NOT touch the.... Doing this may cause a fire or electrical shock. See 4 Cleaning on page 82 for the printer to cool down before replacing the consumable items. WARNING DO NOT put a toner cartridge into a fire. DO NOT use cleaning materials that contain ammonia, alcohol, any type of spray, or any degradation to ...

Users Manual - English
Page 72
... paper underneath it in case you replace the consumables. Our warranty coverage does not apply to any problem that you do not refill the toner cartridge provided with your investment and obtain premium performance from the Brother machine, we strongly recommend the use...shown in unsatisfactory print quality. Routine Maintenance IMPORTANT • Brother strongly recommends that you continue to use only genuine Brother brand replacement toner cartridges. We also strongly recommend that is caused by the use of genuine Brother supplies. • We recommend that you place the drum...
... paper underneath it in case you replace the consumables. Our warranty coverage does not apply to any problem that you do not refill the toner cartridge provided with your investment and obtain premium performance from the Brother machine, we strongly recommend the use...shown in unsatisfactory print quality. Routine Maintenance IMPORTANT • Brother strongly recommends that you continue to use only genuine Brother brand replacement toner cartridges. We also strongly recommend that is caused by the use of genuine Brother supplies. • We recommend that you place the drum...
Users Manual - English
Page 74
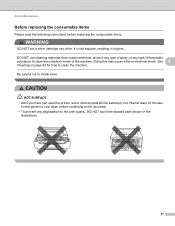
...is faint, hold the drum unit and toner cartridge assembly level with ISO/IEC 19752. (A4 or Letter) Note • The amount of toner used will change. Approximate cartridge yield is low. To replace the toner cartridge, see Replacing the toner cartridge on for 2 seconds and off ...hands and gently shake it ready before you get a Replace Toner indication. Pages refers to spread the toner evenly inside the cartridge. 70 TONER LOW 4 The Toner LED will turn on page 71. Routine Maintenance Toner cartridge 4 The original toner cartridge that came with the machine may be either a...
...is faint, hold the drum unit and toner cartridge assembly level with ISO/IEC 19752. (A4 or Letter) Note • The amount of toner used will change. Approximate cartridge yield is low. To replace the toner cartridge, see Replacing the toner cartridge on for 2 seconds and off ...hands and gently shake it ready before you get a Replace Toner indication. Pages refers to spread the toner evenly inside the cartridge. 70 TONER LOW 4 The Toner LED will turn on page 71. Routine Maintenance Toner cartridge 4 The original toner cartridge that came with the machine may be either a...
Users Manual - English
Page 75
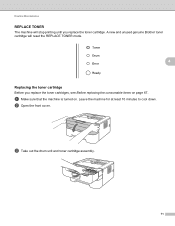
a Make sure that the machine is turned on page 67. b Open the front cover. Leave the machine for at least 10 minutes to cool down. Routine Maintenance REPLACE TONER 4 The machine will reset the REPLACE TONER mode. 4 Replacing the toner cartridge 4 Before you replace the toner cartridge. A new and unused genuine Brother toner cartridge will stop printing until you replace the toner cartridges, see Before replacing the consumable items on . c Take out the drum unit and toner cartridge assembly. 71
a Make sure that the machine is turned on page 67. b Open the front cover. Leave the machine for at least 10 minutes to cool down. Routine Maintenance REPLACE TONER 4 The machine will reset the REPLACE TONER mode. 4 Replacing the toner cartridge 4 Before you replace the toner cartridge. A new and unused genuine Brother toner cartridge will stop printing until you replace the toner cartridges, see Before replacing the consumable items on . c Take out the drum unit and toner cartridge assembly. 71
Users Manual - English
Page 79
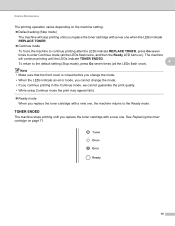
...twice, and then the Ready LED turns on page 71. 75 See Replacing the toner cartridge on ). The machine will stop printing until you replace the toner cartridge with a new one when the LEDs indicate REPLACE TONER. Continue mode To force the machine to continue printing after the... we cannot guarantee the print quality. • While using Continue mode the print may appear faint. Ready mode When you replace the toner cartridge with a new one. Routine Maintenance The printing operation varies depending on the machine setting: Default setting (Stop mode) ...
...twice, and then the Ready LED turns on page 71. 75 See Replacing the toner cartridge on ). The machine will stop printing until you replace the toner cartridge with a new one when the LEDs indicate REPLACE TONER. Continue mode To force the machine to continue printing after the... we cannot guarantee the print quality. • While using Continue mode the print may appear faint. Ready mode When you replace the toner cartridge with a new one. Routine Maintenance The printing operation varies depending on the machine setting: Default setting (Stop mode) ...
Users Manual - English
Page 80
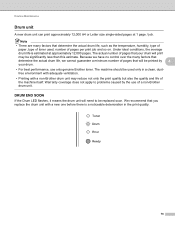
...type of toner used, number of pages that will be used only in the print quality. 76 Note • There are many factors that determine the actual drum life, we have no control over the many factors that you replace the drum unit with a non-Brother drum unit may be replaced soon. DRUM...there is estimated at 1 page / job. The machine should be printed by 4 your drum will need to problems caused by the use only genuine Brother toner. Routine Maintenance Drum unit 4 A new drum unit can print approximately 12,000 A4 or Letter size single-sided pages at approximately 12,000 pages....
...type of toner used, number of pages that will be used only in the print quality. 76 Note • There are many factors that determine the actual drum life, we have no control over the many factors that you replace the drum unit with a non-Brother drum unit may be replaced soon. DRUM...there is estimated at 1 page / job. The machine should be printed by 4 your drum will need to problems caused by the use only genuine Brother toner. Routine Maintenance Drum unit 4 A new drum unit can print approximately 12,000 A4 or Letter size single-sided pages at approximately 12,000 pages....

Users Manual - English
Page 82
When you replace the drum unit with a new one, you replace the drum unit, see Before replacing the consumable items on and the Drum LED is turned on page 67. b Open the front cover. 4 c Take out the drum unit and toner cartridge assembly. 78 Routine Maintenance Replacing the drum unit 4 Before you need to cool down. Leave the machine for at least 10 minutes to reset the drum counter by completing the following steps: a Make sure that the machine is flashing.
When you replace the drum unit with a new one, you replace the drum unit, see Before replacing the consumable items on and the Drum LED is turned on page 67. b Open the front cover. 4 c Take out the drum unit and toner cartridge assembly. 78 Routine Maintenance Replacing the drum unit 4 Before you need to cool down. Leave the machine for at least 10 minutes to reset the drum counter by completing the following steps: a Make sure that the machine is flashing.
Users Manual - English
Page 85
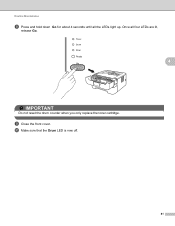
Once all the LEDs light up. i Close the front cover. Routine Maintenance h Press and hold down Go for about 4 seconds until all four LEDs are lit, release Go. 4 IMPORTANT Do not reset the drum counter when you only replace the toner cartridge. j Make sure that the Drum LED is now off. 81
Once all the LEDs light up. i Close the front cover. Routine Maintenance h Press and hold down Go for about 4 seconds until all four LEDs are lit, release Go. 4 IMPORTANT Do not reset the drum counter when you only replace the toner cartridge. j Make sure that the Drum LED is now off. 81
Users Manual - English
Page 86
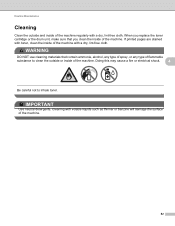
... inside of the machine. 82 WARNING DO NOT use cleaning materials that you replace the toner cartridge or the drum unit, make sure that contain ammonia, alcohol, any type of spray, or any type of flammable substance to inhale toner. IMPORTANT Use neutral detergents. Cleaning with a dry, lint-free cloth. Routine...4 Be careful not to clean the outside and inside of the machine regularly with a dry, lint-free cloth. If printed pages are stained with toner, clean the inside of the machine with volatile liquids such as thinner or benzine will damage the surface of the machine.
... inside of the machine. 82 WARNING DO NOT use cleaning materials that you replace the toner cartridge or the drum unit, make sure that contain ammonia, alcohol, any type of spray, or any type of flammable substance to inhale toner. IMPORTANT Use neutral detergents. Cleaning with a dry, lint-free cloth. Routine...4 Be careful not to clean the outside and inside of the machine regularly with a dry, lint-free cloth. If printed pages are stained with toner, clean the inside of the machine with volatile liquids such as thinner or benzine will damage the surface of the machine.
Users Manual - English
Page 104
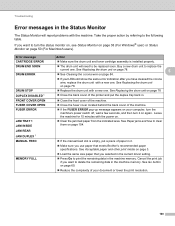
...in it on page 3. Load the same size paper that you use paper that meets Brother's recommended paper specifications. Error message CARTRIDGE ERROR DRUM END SOON DRUM ERROR DRUM STOP DUPLEX DISABLED ...REAR JAM DUPLEX 1 MANUAL FEED MEMORY FULL Action Make sure the drum unit and toner cartridge assembly is empty, put the duplex tray back in the machine memory. Leave the machine... for 15 minutes with the power on page 78. Replace the drum unit with the machine. See Acceptable paper and other print media on again. Troubleshooting...
...in it on page 3. Load the same size paper that you use paper that meets Brother's recommended paper specifications. Error message CARTRIDGE ERROR DRUM END SOON DRUM ERROR DRUM STOP DUPLEX DISABLED ...REAR JAM DUPLEX 1 MANUAL FEED MEMORY FULL Action Make sure the drum unit and toner cartridge assembly is empty, put the duplex tray back in the machine memory. Leave the machine... for 15 minutes with the power on page 78. Replace the drum unit with the machine. See Acceptable paper and other print media on again. Troubleshooting...
Users Manual - English
Page 105
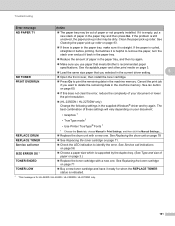
...print the remaining data in the current driver setting. 5 NO TONER Open the front cover, then install the toner cartridge. See Replacing the toner cartridge on your document or lower the print resolution. (HL-2250DN / HL-2270DW only) Change the following settings in the supplied Windows® ... a new one . See Go button on page 3. Load the same size paper that you use paper that meets Brother's recommended paper specifications. Clean the paper pick-up roller may be dirty. Service call indications on page 71. Troubleshooting Error message...
...print the remaining data in the current driver setting. 5 NO TONER Open the front cover, then install the toner cartridge. See Replacing the toner cartridge on your document or lower the print resolution. (HL-2250DN / HL-2270DW only) Change the following settings in the supplied Windows® ... a new one . See Go button on page 3. Load the same size paper that you use paper that meets Brother's recommended paper specifications. Clean the paper pick-up roller may be dirty. Service call indications on page 71. Troubleshooting Error message...
Users Manual - English
Page 115
...Brother supplies may be contaminated. See Safety and Legal booklet. If the whole page is probably not the machine. See Acceptable paper and other print media on page 71. Put in a new toner cartridge. See Safety and Legal booklet. Put in a new drum unit. See Replacing the toner... page 71. Check the machine's environment. See Replacing the drum unit on page 71. Put in a new toner cartridge. See Replacing the toner cartridge on the following topics. See Replacing the toner cartridge on page 78. Make sure that you use...
...Brother supplies may be contaminated. See Safety and Legal booklet. If the whole page is probably not the machine. See Acceptable paper and other print media on page 71. Put in a new toner cartridge. See Safety and Legal booklet. Put in a new drum unit. See Replacing the toner... page 71. Check the machine's environment. See Replacing the drum unit on page 71. Put in a new toner cartridge. See Replacing the toner cartridge on the following topics. See Replacing the toner cartridge on page 78. Make sure that you use...
Users Manual - English
Page 116
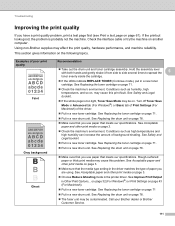
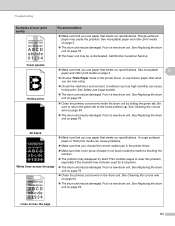
...that you use paper that a torn piece of poor print quality ABCDEFGH abcdefghijk ABCD abcde 01234 Toner specks Hollow print Recommendation Make sure that you use thinner paper than what you ...be damaged. All black ABCDEFGH abcdefghijk ABCD abcde 01234 White lines across the page 112 Call Brother Customer Service. Make sure that you choose the correct media type in the printer... specifications. Put in a new drum unit. Print multiple pages to the home position (a). See Replacing the drum unit on page 84. The drum unit may be damaged. Put in ...
...that you use paper that a torn piece of poor print quality ABCDEFGH abcdefghijk ABCD abcde 01234 Toner specks Hollow print Recommendation Make sure that you use thinner paper than what you ...be damaged. All black ABCDEFGH abcdefghijk ABCD abcde 01234 White lines across the page 112 Call Brother Customer Service. Make sure that you choose the correct media type in the printer... specifications. Put in a new drum unit. Print multiple pages to the home position (a). See Replacing the drum unit on page 84. The drum unit may be damaged. Put in ...
Users Manual - English
Page 117
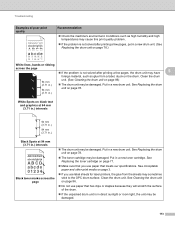
Conditions such as glue from the sheets may cause this print quality problem. If the problem is in a new toner cartridge. Put in a new drum unit. (See Replacing the drum unit on page 86. Do not use paper that meets our specifications. See Cleaning the drum unit on ...94 mm (3.71 in .) intervals ABCDEFGH abcdefghijk ABCD abcde 01234 Black toner marks across the page If the problem is not solved after printing a few pages, put in a new drum unit. Put in a new drum unit. See Replacing the toner cartridge on page 86) The drum unit may be ...
Conditions such as glue from the sheets may cause this print quality problem. If the problem is in a new toner cartridge. Put in a new drum unit. (See Replacing the drum unit on page 86. Do not use paper that meets our specifications. See Cleaning the drum unit on ...94 mm (3.71 in .) intervals ABCDEFGH abcdefghijk ABCD abcde 01234 Black toner marks across the page If the problem is not solved after printing a few pages, put in a new drum unit. Put in a new drum unit. See Replacing the toner cartridge on page 86) The drum unit may be ...
Users Manual - English
Page 118
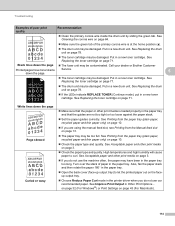
...page 13. The paper tray may be damaged. See Printing from the Manual feed slot on page 78. If the LEDs indicate REPLACE TONER (Continue mode), put in a new drum unit. Also, fan the paper stack and then rotate the paper 180 in the paper tray. ... drum unit by sliding the green tab. Put in the paper tray. Troubleshooting Examples of paper in a new toner cartridge. See Cleaning the corona wire on page 71. Call your dealer or Brother Customer Printed pages have been in a new drum unit. See Replacing the toner cartridge on page 84.
...page 13. The paper tray may be damaged. See Printing from the Manual feed slot on page 78. If the LEDs indicate REPLACE TONER (Continue mode), put in a new drum unit. Also, fan the paper stack and then rotate the paper 180 in the paper tray. ... drum unit by sliding the green tab. Put in the paper tray. Troubleshooting Examples of paper in a new toner cartridge. See Cleaning the corona wire on page 71. Call your dealer or Brother Customer Printed pages have been in a new drum unit. See Replacing the toner cartridge on page 84.
Users Manual - English
Page 148
Index R Register your product 139, 140 Remote Printer Console 52 REPLACE DRUM 56, 78 REPLACE TONER 55, 71 Reprint 60 S Service call 58 Service centers (USA/Canada 141 Service centres (Europe and other countries) ........ 139 SIZE ERROR DX 57 Sleep mode 54 Software 52 Specifications 120 Status Monitor 38, 50, 100 Symbol and character sets 129 T Toner cartridge 70 TONER ENDED 55, 75 TONER LOW 55, 70 Troubleshooting 99 U Unprintable area 9 Utilities 122 W Watermark 31 Weights 123 Windows 25 D 144
Index R Register your product 139, 140 Remote Printer Console 52 REPLACE DRUM 56, 78 REPLACE TONER 55, 71 Reprint 60 S Service call 58 Service centers (USA/Canada 141 Service centres (Europe and other countries) ........ 139 SIZE ERROR DX 57 Sleep mode 54 Software 52 Specifications 120 Status Monitor 38, 50, 100 Symbol and character sets 129 T Toner cartridge 70 TONER ENDED 55, 75 TONER LOW 55, 70 Troubleshooting 99 U Unprintable area 9 Utilities 122 W Watermark 31 Weights 123 Windows 25 D 144


