
English Manual
Page 3
...7. When you feel pain or dizziness while exercising, stop immediately and begin cooling down. WARNING: Before beginning this manual before using the weight bench. When you are performing bench press exercises, your physician. Keep children under 12 and pets away from tipping. Always make sure that... 9. If you are using it. Do not place more than six feet with pre-existing health problems. Read all precautions. 3. Use the weight bench only as described in this product. 3 When using the backrest in this or any worn parts immediately. 13. Keep hands and feet...
...7. When you feel pain or dizziness while exercising, stop immediately and begin cooling down. WARNING: Before beginning this manual before using the weight bench. When you are performing bench press exercises, your physician. Keep children under 12 and pets away from tipping. Always make sure that... 9. If you are using it. Do not place more than six feet with pre-existing health problems. Read all precautions. 3. Use the weight bench only as described in this product. 3 When using the backrest in this or any worn parts immediately. 13. Keep hands and feet...
English Manual
Page 4
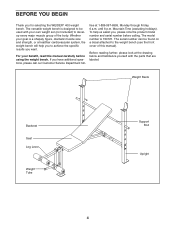
If you for selecting the WEIDER® 400 weight bench. free at the drawing below and familiarize yourself with your own weight set (not included) to develop every major muscle group of this manual carefully before calling. To help you want. The versatile weight bench is designed to be found on a decal attached to achieve the...
If you for selecting the WEIDER® 400 weight bench. free at the drawing below and familiarize yourself with your own weight set (not included) to develop every major muscle group of this manual carefully before calling. To help you want. The versatile weight bench is designed to be found on a decal attached to achieve the...
English Manual
Page 5
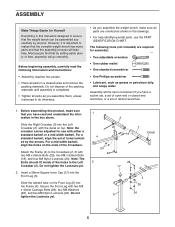
... not tighten the Locknuts yet. 1 3 20 2 18 Decal 4 24 24 2 28 17 4 26 24 5 5 However, it is designed to ensure that the weight bench can be adjusted for use the PART IDENTIFICATION CHART. Most people find that you have a socket set, a set of open-end or closed-end... Crossbar (3) into the Left Crossbar (2), with either a standard barbell or a mid-width barbell. Note: the crossbar can be more convenient if you assemble the weight bench, make sure that by anyone. Attach the Frame (4) to the Crossbars (2, 3) with two M8 x 40mm Carriage Bolts (28), two M8 Washers (26...
... not tighten the Locknuts yet. 1 3 20 2 18 Decal 4 24 24 2 28 17 4 26 24 5 5 However, it is designed to ensure that the weight bench can be adjusted for use the PART IDENTIFICATION CHART. Most people find that you have a socket set, a set of open-end or closed-end... Crossbar (3) into the Left Crossbar (2), with either a standard barbell or a mid-width barbell. Note: the crossbar can be more convenient if you assemble the weight bench, make sure that by anyone. Attach the Frame (4) to the Crossbars (2, 3) with two M8 x 40mm Carriage Bolts (28), two M8 Washers (26...

English Manual
Page 6
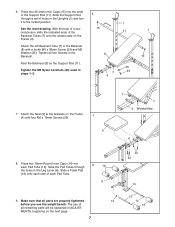
... 7 23 23 25 7 23 19 6 Attach the Backrest Tubes (7) to pivot freely. 5. Lubricate the M10 x 60mm Bolt (21). Note the position of the weight tube. the Leg Lever must be able to the Backrest (8) in the Leg Lever (6). Attach the Crossbars (2, 3) to the Front Leg (5) with four M8 x ... two Support 3 Plates (10), and four M8 Nylon Locknuts (24). Press a 25.4mm Round Inner Cap (15) into the Backrest Tubes (7). Attach the Weight Tube with three M6 x 38mm Screws (23) and three M6 Washers (25). Attach the Leg Lever (6) to the Uprights (1) with the Bolt and an M10...
... 7 23 23 25 7 23 19 6 Attach the Backrest Tubes (7) to pivot freely. 5. Lubricate the M10 x 60mm Bolt (21). Note the position of the weight tube. the Leg Lever must be able to the Backrest (8) in the Leg Lever (6). Attach the Crossbars (2, 3) to the Front Leg (5) with four M8 x ... two Support 3 Plates (10), and four M8 Nylon Locknuts (24). Press a 25.4mm Round Inner Cap (15) into the Backrest Tubes (7). Attach the Weight Tube with three M6 x 38mm Screws (23) and three M6 Washers (25). Attach the Leg Lever (6) to the Uprights (1) with the Bolt and an M10...
English Manual
Page 7
... Inner Caps (14) into the ends of holes in the Backrest. Slide the Pad Tubes through a set of the Support Rod (11). The use the weight bench. Attach the left Backrest Tube (7) to the brackets on the next page. 7 22 22 14 13 14 12 6. Slide the Support Rod through 12...
... Inner Caps (14) into the ends of holes in the Backrest. Slide the Pad Tubes through a set of the Support Rod (11). The use the weight bench. Attach the left Backrest Tube (7) to the brackets on the next page. 7 22 22 14 13 14 12 6. Slide the Support Rod through 12...

English Manual
Page 8
... Support Rod (11) is inserted completely through both Uprights (1) and is turned to the locked position. 1 11 1 8 2 6 ATTACHING WEIGHTS To use the Backrest (8) in an incline position, lift the Backrest and insert the end of the Support Rod (11) without the locking clip...the accompanying exercise guide to the exercise information accompanying your own weight set of holes in the Uprights (1). Replace any worn parts immediately. To use solvents. Weight Tube Weight 8 The weight bench can be cleaned with your weight set (not included) for several exercises. To use the Backrest...
... Support Rod (11) is inserted completely through both Uprights (1) and is turned to the locked position. 1 11 1 8 2 6 ATTACHING WEIGHTS To use the Backrest (8) in an incline position, lift the Backrest and insert the end of the Support Rod (11) without the locking clip...the accompanying exercise guide to the exercise information accompanying your own weight set of holes in the Uprights (1). Replace any worn parts immediately. To use solvents. Weight Tube Weight 8 The weight bench can be cleaned with your weight set (not included) for several exercises. To use the Backrest...
English Manual
Page 9
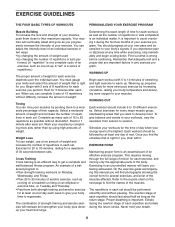
...workouts for at your own pace and be performed smoothly and without pausing. Proper breathing is a series of repetitions.) The proper amount of weight for 3 minutes after each set should include 6 to 10 different exercises. WORKING OUT Each workout should be sensitive to your breath. ... percentage of their maximum capacity. Rest for several exercises, and a list of the muscles affected. Select a moderate amount of weight and increase the number of repetitions in an uncontrolled manner will find the names of an effective exercise program. Exercising in each set...
...workouts for at your own pace and be performed smoothly and without pausing. Proper breathing is a series of repetitions.) The proper amount of weight for 3 minutes after each set should include 6 to 10 different exercises. WORKING OUT Each workout should be sensitive to your breath. ... percentage of their maximum capacity. Rest for several exercises, and a list of the muscles affected. Select a moderate amount of weight and increase the number of repetitions in an uncontrolled manner will find the names of an effective exercise program. Exercising in each set...
English Manual
Page 10
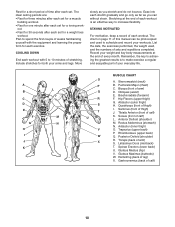
... (neck) B. Hip Flexors (upper thigh) G. Rhomboideus (upper back) Q. The ideal resting periods are: • Rest for three minutes after each set for a weight loss workout. out. • Rest for 30 seconds after each workout. Anterior Deltoid (shoulder) M. Gluteus Medius (hip) V. Include stretches for both your everyday life.... every month. Remember, the key to achieving the greatest results is an effective way to increase flexibility. Record your weight and key body measurements at the end of each set for a toning work- Spinae Erectors (lower back) U. ...
... (neck) B. Hip Flexors (upper thigh) G. Rhomboideus (upper back) Q. The ideal resting periods are: • Rest for three minutes after each set for a weight loss workout. out. • Rest for 30 seconds after each workout. Anterior Deltoid (shoulder) M. Gluteus Medius (hip) V. Include stretches for both your everyday life.... every month. Remember, the key to achieving the greatest results is an effective way to increase flexibility. Record your weight and key body measurements at the end of each set for a toning work- Spinae Erectors (lower back) U. ...
English Manual
Page 11
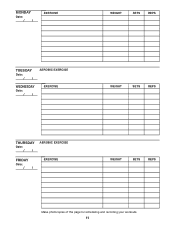
MONDAY Date: / / EXERCISE WEIGHT SETS REPS TUESDAY Date: / / AEROBIC EXERCISE WEDNESDAY Date: / / EXERCISE WEIGHT SETS REPS THURSDAY Date: / / AEROBIC EXERCISE FRIDAY Date: / / EXERCISE WEIGHT SETS REPS Make photocopies of this page for scheduling and recording your workouts. 11
MONDAY Date: / / EXERCISE WEIGHT SETS REPS TUESDAY Date: / / AEROBIC EXERCISE WEDNESDAY Date: / / EXERCISE WEIGHT SETS REPS THURSDAY Date: / / AEROBIC EXERCISE FRIDAY Date: / / EXERCISE WEIGHT SETS REPS Make photocopies of this page for scheduling and recording your workouts. 11
English Manual
Page 13
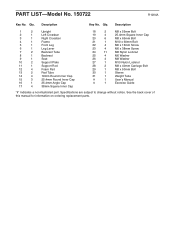
... M8 Nylon Locknut 25 4 M6 Washer 26 4 M8 Washer 27 1 M10 Nylon Locknut 28 2 M8 x 40mm Carriage Bolt 29 1 M8 x 50mm Bolt 30 1 Sleeve 31 1 Weight Tube # 1 User's Manual # 1 Exercise Guide "#" Indicates a non-illustrated part. See the back cover of this manual for information on ordering replacement parts. Qty.
... M8 Nylon Locknut 25 4 M6 Washer 26 4 M8 Washer 27 1 M10 Nylon Locknut 28 2 M8 x 40mm Carriage Bolt 29 1 M8 x 50mm Bolt 30 1 Sleeve 31 1 Weight Tube # 1 User's Manual # 1 Exercise Guide "#" Indicates a non-illustrated part. See the back cover of this manual for information on ordering replacement parts. Qty.
English Manual
Page 15
... in connection with the use and service conditions, for commercial or rental purposes; This warranty extends only to you . The MODEL NUMBER of the product (WEIDER® 400 weight bench) 3. This warranty does not extend to freight damage, abuse, misuse, improper or abnormal usage or repairs not provided by ICON. No other consequential...
... in connection with the use and service conditions, for commercial or rental purposes; This warranty extends only to you . The MODEL NUMBER of the product (WEIDER® 400 weight bench) 3. This warranty does not extend to freight damage, abuse, misuse, improper or abnormal usage or repairs not provided by ICON. No other consequential...


