Weider 110 Support and Manuals
Get Help and Manuals for this Weider item

Popular Weider 110 Manual Pages
User Manual - Page 1
...3756
Mon.-Fri., 6 a.m.-6 p.m. MST
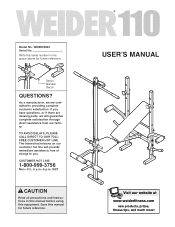
CAUTION
Read all precautions and instructions in the space above for future reference. TO AVOID DELAYS, PLEASE ...through direct assistance from our factory.
Model No. Serial Number Decal
QUESTIONS? Save this equipment. WEBE03820 Serial No. Write the serial number in this manual before using this manual for future reference.
As a ...
User Manual - Page 2
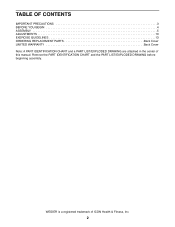
WEIDER is a registered trademark of this manual. TABLE OF CONTENTS
IMPORTANT PRECAUTIONS 3 BEFORE YOU BEGIN 4 ASSEMBLY 5 ADJUSTMENTS 10 EXERCISE GUIDELINES 13 ORDERING REPLACEMENT PARTS Back Cover LIMITED WARRANTY Back Cover Note: A PART IDENTIFICATION CHART and a PART LIST/EXPLODED DRAWING are attached in the center of ICON Health & Fitness, Inc.
2
Remove the PART IDENTIFICATION ...
User Manual - Page 3

... than 30 pounds on the weight rests to ensure that is not legible, please call our Customer Service Department toll-free at 1-800-999-3756, Monday through Friday, 6 a.m. Note: The weight bench does not include a barbell and weights. Do not use a barbell that all instructions in this manual.
12. ICON assumes no responsibility for home use the weight bench. It is...
User Manual - Page 4
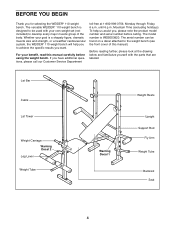
... the specific results you , please note the product model number and serial number before using the weight bench. The serial number can be used with the parts that are labeled. Lat Bar
Cable
Lat Tower
Weight Carriage Warning Decal 2
Leg Lever Weight Tube
Warning Decal 1
Weight Rests
Upright Support Rod
Fly Arm Weight Tube
Backrest Seat
4
Whether your own weight set (not...
User Manual - Page 5
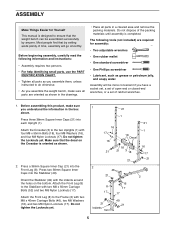
...Inner Caps into the Stabilizer (49). Make sure that by setting aside plenty of time, assembly will be assembled successfully by ...instructions:
• Assembly requires two persons.
• For help identifying small parts, use the PART IDENTIFICATION CHART.
• Tighten all parts are required for Yourself
This manual is designed to do otherwise.
• As you assemble the weight bench...
User Manual - Page 7
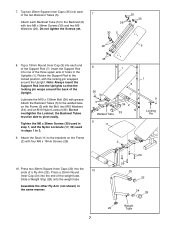
... (33).
Tap a 19mm Round Inner Cap (9) into one of the three upper sets of the Support Rod (7). Note: Always insert the Support Rod into the end of a Fly Arm (25). Attach the Seat (11) ...Upright.
Tap two 25mm Square Inner Caps (35) into the ends of the weight tube. Do not overtighten the Locknut; Rotate the Support Rod to 3.
9.
Press a 25mm Round
10
Inner Cap (24) into ...
User Manual - Page 9
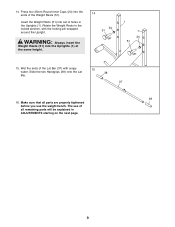
... two Handgrips (38) onto the Lat
38
Bar.
37
38
16. Make sure that all remaining parts will be explained in the Uprights (1). The use the weight bench.
14. WARNING: Always insert the
Weight Rests (51) into set of the Lat Bar (37) with the locking pin wrapped around the Upright.
Press two 25mm Round...
User Manual - Page 10
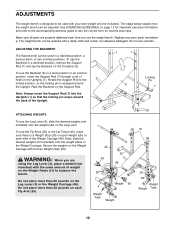
... pounds on the Leg Lever (4) or the Weight Carriage (48). Do not use the weight bench.
To use the Backrest (6) in a level position or an inclined position, insert the Support Rod (7) through a set (not included). To use the Backrest in the Uprights (1). Rest the Backrest on page 13 for important exercise information and refer to the accompanying exercise guide...
User Manual - Page 11
...(31). Tighten the Butterfly Knobs (13) onto the Bolts.
13
25
1
19
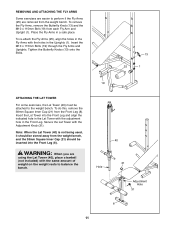
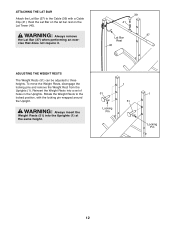
ATTACHING THE LAT TOWER
For some exercises, the Lat Tower (40) must be inserted into the Front Leg and align the indicated hole in the Uprights ... the Lat Tower (40) is not being used, it should be attached to the weight bench. To re-attach the Fly Arms (25), align the holes in a safe place. REMOVING AND ATTACHING THE FLY...
User Manual - Page 12
...
the Lat Bar (37) when performing an exercise that does not require it.
39 41
37 Lat Bar
Rest 40
ADJUSTING THE WEIGHT RESTS
The Weight Rests (51) can be adjusted to the locked position, with a Cable Clip (41). WARNING: Always insert the
Weight Rests (51) into a set of holes in the Uprights. Reinsert the...
User Manual - Page 13
... both weight training and aerobic exercise
for each repetition and inhale during the exertion stage of each exercise, and moving only the appropriate parts of 12 repetitions without pausing. EXERCISE FORM
Maintaining proper form is the highest. This requires moving through the full range of motion for at your exercise program. On the exercise guide accompanying this manual you...
User Manual - Page 14
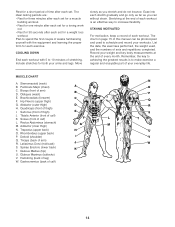
... of this manual can without strain. The chart on page 15 of each set . Record your everyday life. Obliques (waist)
E. Quadriceps (front of sets and repetitions completed. Deltoid (shoulder)
I .
Triceps (back of calf) K. Remember, the key to achieving the greatest results is an effective way to make exercise a regular and enjoyable part of each set for...
User Manual - Page 15

MONDAY
Date: / /
EXERCISE
WEIGHT
SETS
REPS
TUESDAY
Date: / /
AEROBIC EXERCISE
WEDNESDAY
Date: / /
EXERCISE
WEIGHT
SETS
REPS
THURSDAY
Date: / /
AEROBIC EXERCISE
FRIDAY
Date: / /
EXERCISE
WEIGHT
SETS
REPS
Make photocopies of this page for scheduling and recording your workouts.
15
User Manual - Page 16
... give the following information when calling:
• The MODEL NUMBER of the product (WEBE03820)
• The NAME of the product (WEIDER® 110 weight bench)
• The SERIAL NUMBER of the product (see the front cover of this manual)
• The KEY NUMBER and DESCRIPTION of removal, installation or other warranties and any and all freight and...
User Manual - Page 19
...
7
1
Support Rod
8
...Weight Clip
51
2
Weight Rest
52
2
M8 x 50mm Carriage Bolt
#
1
User's Manual
#
1
Exercise Guide
#
1
Grease Packet
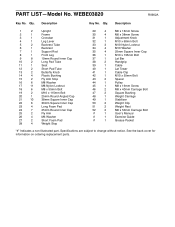
"#" Indicates a non-illustrated part. PART LIST-Model No. Specifications are subject to change without notice. Qty. Description
Key No. WEBE03820
R0902A
Key No. See the back cover for information on ordering replacement parts...
Weider 110 Reviews
We have not received any reviews for Weider yet.