

User Manual
Page 3
... feel pain or dizziness at 1-800-999-3756, Monday through Friday, 6 a.m. Do not place more than 110 pounds, including a barbell and weights, on the weight rests to support a maximum user weight of 35 or persons with the weight bench. Do not place more than 30 pounds on the leg lever or the lat tower. Warning...
... feel pain or dizziness at 1-800-999-3756, Monday through Friday, 6 a.m. Do not place more than 110 pounds, including a barbell and weights, on the weight rests to support a maximum user weight of 35 or persons with the weight bench. Do not place more than 30 pounds on the leg lever or the lat tower. Warning...
User Manual
Page 4
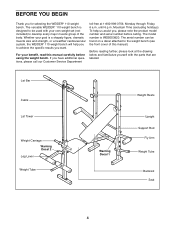
... cover of the body. Before reading further, please look at 1-800-999-3756, Monday through Friday, 6 a.m. The versatile WEIDER® 110 weight bench is designed to be found on a decal attached to develop every major muscle group of this manual carefully before calling....The model number is a shapely figure, dramatic muscle size and strength, or a healthier cardiovascular system, the WEIDER® 110 weight bench will help us assist you for selecting the WEIDER® 110 weight bench. Mountain Time (excluding holidays). For your goal is WEBE03820. Lat Bar Cable Lat Tower...
... cover of the body. Before reading further, please look at 1-800-999-3756, Monday through Friday, 6 a.m. The versatile WEIDER® 110 weight bench is designed to be found on a decal attached to develop every major muscle group of this manual carefully before calling....The model number is a shapely figure, dramatic muscle size and strength, or a healthier cardiovascular system, the WEIDER® 110 weight bench will help us assist you for selecting the WEIDER® 110 weight bench. Mountain Time (excluding holidays). For your goal is WEBE03820. Lat Bar Cable Lat Tower...
User Manual
Page 5
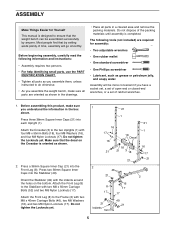
...Carriage Bolts (46), two M8 Washers (16), and two M8 Nylon Locknuts (17). Attach the Crossbar (3) to do otherwise. • As you assemble the weight bench, make sure you have a socket set, a set of open-end or closed-end wrenches, or a set of ratchet wrenches. 1. Assembly will go ...(49) with two M8 x 50mm Carriage Bolts (52) and two M8 Nylon Locknuts (17). Attach the Front Leg (8) to ensure that the weight bench can be more convenient if you understand the information in a cleared area and remove the packing materials. ASSEMBLY Make Things Easier for assembly: •...
...Carriage Bolts (46), two M8 Washers (16), and two M8 Nylon Locknuts (17). Attach the Crossbar (3) to do otherwise. • As you assemble the weight bench, make sure you have a socket set, a set of open-end or closed-end wrenches, or a set of ratchet wrenches. 1. Assembly will go ...(49) with two M8 x 50mm Carriage Bolts (52) and two M8 Nylon Locknuts (17). Attach the Front Leg (8) to ensure that the weight bench can be more convenient if you understand the information in a cleared area and remove the packing materials. ASSEMBLY Make Things Easier for assembly: •...
User Manual
Page 6
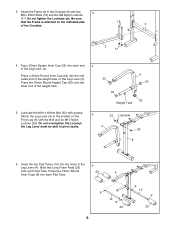
... other end of the Crossbar. 18 3 2 17 4. Insert the two Pad Tubes (10) into the indicated end of the weight tube on the indicated side of the weight tube. 4 22 20 24 22 Weight Tube 5. the Leg Lever must be able to the bracket on the Front Leg (8) with the Bolt and an...
... other end of the Crossbar. 18 3 2 17 4. Insert the two Pad Tubes (10) into the indicated end of the weight tube on the indicated side of the weight tube. 4 22 20 24 22 Weight Tube 5. the Leg Lever must be able to the bracket on the Front Leg (8) with the Bolt and an...
User Manual
Page 7
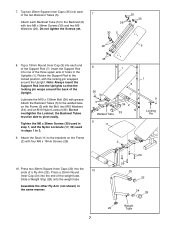
... the Locknut; the Backrest Tubes must be able to the locked position, with the locking pin wrapped around the back of the weight tube. Slide a Weight Stop (28) onto the weight tube. Note: Always insert the Support Rod into the ends of a Fly Arm (25). Lubricate the M10 x 135mm Bolt (36) with two... the M6 x 38mm Screws (30) used in step 7, and the Nylon Locknuts (17, 33) used in the same manner. 29 29 25 22 24 28 Weight 22 Tube 7 Press two 30mm Square Inner Caps (22) into the Uprights so that the locking pin wraps around the Upright. Attach the Seat (11...
... the Locknut; the Backrest Tubes must be able to the locked position, with the locking pin wrapped around the back of the weight tube. Slide a Weight Stop (28) onto the weight tube. Note: Always insert the Support Rod into the ends of a Fly Arm (25). Lubricate the M10 x 135mm Bolt (36) with two... the M6 x 38mm Screws (30) used in step 7, and the Nylon Locknuts (17, 33) used in the same manner. 29 29 25 22 24 28 Weight 22 Tube 7 Press two 30mm Square Inner Caps (22) into the Uprights so that the locking pin wraps around the Upright. Attach the Seat (11...

User Manual
Page 8
... 21 39 33 34 40 45 47 48 24 28 Push a 19mm Round Inner Cap (9) into the bracket on each Upright (1). Slide two Weight Stops (28) onto the weight tube. Slide an M8 x 16mm Screw (45) into the end 12 of the Lat Tower (40). Tap a Fly Arm Stop (15) onto the... welded tube on the Weight Carriage (48). Attach a Fly Arm (25) to pivot easily. 11. Press two Plastic Bushings (14) into the indicated holes in 12 the a Fly Arm (25...
... 21 39 33 34 40 45 47 48 24 28 Push a 19mm Round Inner Cap (9) into the bracket on each Upright (1). Slide two Weight Stops (28) onto the weight tube. Slide an M8 x 16mm Screw (45) into the end 12 of the Lat Tower (40). Tap a Fly Arm Stop (15) onto the... welded tube on the Weight Carriage (48). Attach a Fly Arm (25) to pivot easily. 11. Press two Plastic Bushings (14) into the indicated holes in 12 the a Fly Arm (25...
User Manual
Page 9
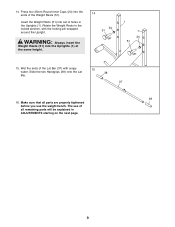
... Make sure that all remaining parts will be explained in the Uprights (1). Insert the Weight Rests (51) into set of the Lat Bar (37) with the locking pin wrapped around the Upright. 14. WARNING: Always insert the Weight Rests (51) into the ends of all parts are properly tightened before you use... the weight bench. Wet the ends of holes in ADJUSTMENTS starting on the next page. 9 Press two 25mm Round Inner...
... Make sure that all remaining parts will be explained in the Uprights (1). Insert the Weight Rests (51) into set of the Lat Bar (37) with the locking pin wrapped around the Upright. 14. WARNING: Always insert the Weight Rests (51) into the ends of all parts are properly tightened before you use... the weight bench. Wet the ends of holes in ADJUSTMENTS starting on the next page. 9 Press two 25mm Round Inner...
User Manual
Page 10
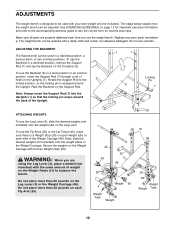
...page 13 for several exercises. Next, slide the desired weights (not included) onto the weight tubes or the Weight Carriage. See EXERCISE GUIDELINES on each weight tube or each Fly Arm (25). 40 50 25 48 28 Weight 50 4 Weight Tube Weight 51 25 28 Weight Weight Tube 10 To use the Backrest (6) in a declined... are properly tightened each time you are using the Leg Lever (4), place a barbell (not included) with your own weight set of the Upright. 1 1 Locking Pin 6 7 3 ATTACHING WEIGHTS To use the Backrest in the Uprights (1). To use the Fly Arms (25) or the Lat Tower (40),...
...page 13 for several exercises. Next, slide the desired weights (not included) onto the weight tubes or the Weight Carriage. See EXERCISE GUIDELINES on each weight tube or each Fly Arm (25). 40 50 25 48 28 Weight 50 4 Weight Tube Weight 51 25 28 Weight Weight Tube 10 To use the Backrest (6) in a declined... are properly tightened each time you are using the Leg Lever (4), place a barbell (not included) with your own weight set of the Upright. 1 1 Locking Pin 6 7 3 ATTACHING WEIGHTS To use the Backrest in the Uprights (1). To use the Fly Arms (25) or the Lat Tower (40),...
User Manual
Page 11
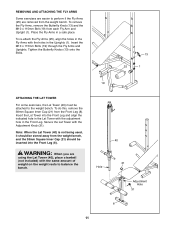
... Arms, remove the Butterfly Knob (13) and the M10 x 115mm Bolt (19) from the Front Leg (8). Secure the Lat Tower with the same amount of weight on the weight rests to balance the bench. 40 Hole 21 Adjustment Hole 31 8 11 WARNING: When you are removed from the... Butterfly Knobs (13) onto the Bolts. 13 25 1 19 ATTACHING THE LAT TOWER For some exercises, the Lat Tower (40) must be attached to the weight bench. REMOVING AND ATTACHING THE FLY ARMS Some exercises are easier to perform if the Fly Arms (25) are using the Lat Tower (40), place...
... Arms, remove the Butterfly Knob (13) and the M10 x 115mm Bolt (19) from the Front Leg (8). Secure the Lat Tower with the same amount of weight on the weight rests to balance the bench. 40 Hole 21 Adjustment Hole 31 8 11 WARNING: When you are removed from the... Butterfly Knobs (13) onto the Bolts. 13 25 1 19 ATTACHING THE LAT TOWER For some exercises, the Lat Tower (40) must be attached to the weight bench. REMOVING AND ATTACHING THE FLY ARMS Some exercises are easier to perform if the Fly Arms (25) are using the Lat Tower (40), place...
User Manual
Page 12
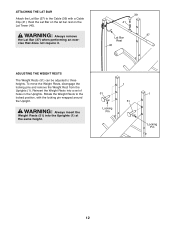
... into the Uprights (1) at the same height. 51 Locking Pin 1 51 1 Locking Pin 12 WARNING: Always insert the Weight Rests (51) into a set of holes in the Uprights. WARNING: Always remove the Lat Bar (37) when performing an exercise that does not require it. ...39 41 37 Lat Bar Rest 40 ADJUSTING THE WEIGHT RESTS The Weight Rests (51) can be adjusted to three heights. To move the Weight Rests, disengage the locking pins and remove the Weight Rest from the Uprights (1). Rest the Lat Bar on the lat bar rest on...
... into the Uprights (1) at the same height. 51 Locking Pin 1 51 1 Locking Pin 12 WARNING: Always insert the Weight Rests (51) into a set of holes in the Uprights. WARNING: Always remove the Lat Bar (37) when performing an exercise that does not require it. ...39 41 37 Lat Bar Rest 40 ADJUSTING THE WEIGHT RESTS The Weight Rests (51) can be adjusted to three heights. To move the Weight Rests, disengage the locking pins and remove the Weight Rest from the Uprights (1). Rest the Lat Bar on the lat bar rest on...
User Manual
Page 13
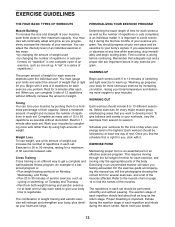
...each set " is right for each set . If you feeling exhausted. The repetitions in two ways: • by changing the amount of weight used • by changing the number of your body's signals. When you can adjust the intensity level of an individual exercise in each ... Each workout should be performed smoothly and without difficulty, increase the amount of the body. This requires moving only the appropriate parts of weight. Rest for more oxygen to warm up prepares your muscles. WARMING UP Begin each set . Select exercises for at least one full day...
...each set " is right for each set . If you feeling exhausted. The repetitions in two ways: • by changing the amount of weight used • by changing the number of your body's signals. When you can adjust the intensity level of an individual exercise in each ... Each workout should be performed smoothly and without difficulty, increase the amount of the body. This requires moving only the appropriate parts of weight. Rest for more oxygen to warm up prepares your muscles. WARMING UP Begin each set . Select exercises for at least one full day...
User Manual
Page 14
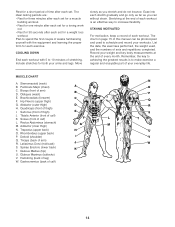
...back) P. Deltoid (shoulder) I . Triceps (back of leg) W. Latissimus Dorsi (mid back) J S. Hamstring (back of arm) R. Include stretches for both your weight and key body measurements at the end of each workout is to 10 minutes of each set for a muscle building workout. • Rest for one... J. Adductor (inner thigh) M N. out. • Rest for 30 seconds after each set. List the date, the exercises performed, the weight used to increase flexibility. Sartorius (front of calf) K. Gluteus Medius (hip) U. Rest for a short period of time after each set for...
...back) P. Deltoid (shoulder) I . Triceps (back of leg) W. Latissimus Dorsi (mid back) J S. Hamstring (back of arm) R. Include stretches for both your weight and key body measurements at the end of each workout is to 10 minutes of each set for a muscle building workout. • Rest for one... J. Adductor (inner thigh) M N. out. • Rest for 30 seconds after each set. List the date, the exercises performed, the weight used to increase flexibility. Sartorius (front of calf) K. Gluteus Medius (hip) U. Rest for a short period of time after each set for...

User Manual
Page 15
MONDAY Date: / / EXERCISE WEIGHT SETS REPS TUESDAY Date: / / AEROBIC EXERCISE WEDNESDAY Date: / / EXERCISE WEIGHT SETS REPS THURSDAY Date: / / AEROBIC EXERCISE FRIDAY Date: / / EXERCISE WEIGHT SETS REPS Make photocopies of this page for scheduling and recording your workouts. 15
MONDAY Date: / / EXERCISE WEIGHT SETS REPS TUESDAY Date: / / AEROBIC EXERCISE WEDNESDAY Date: / / EXERCISE WEIGHT SETS REPS THURSDAY Date: / / AEROBIC EXERCISE FRIDAY Date: / / EXERCISE WEIGHT SETS REPS Make photocopies of this page for scheduling and recording your workouts. 15
User Manual
Page 16
... limitation may not apply to give the following information when calling: • The MODEL NUMBER of the product (WEBE03820) • The NAME of the product (WEIDER® 110 weight bench) • The SERIAL NUMBER of the product (see the front cover of whatsoever nature. To help us assist you . All products for a particular...
... limitation may not apply to give the following information when calling: • The MODEL NUMBER of the product (WEBE03820) • The NAME of the product (WEIDER® 110 weight bench) • The SERIAL NUMBER of the product (see the front cover of whatsoever nature. To help us assist you . All products for a particular...
User Manual
Page 19
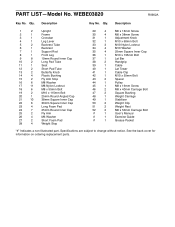
... Inner Cap 23 4 Long Foam Pad 24 7 25mm Round Inner Cap 25 2 Fly Arm 26 4 M6 Washer 27 2 Short Foam Pad 28 4 Weight Stop 29 4 M6 x 16mm Screw 30 4 M6 x 38mm Screw 31 1 Adjustment Knob 32 1 M10 x 60mm Bolt 33 3 M10 Nylon Locknut... 55mm Bolt 43 2 Spacer 44 1 Pulley 45 1 M8 x 16mm Screw 46 2 M8 x 40mm Carriage Bolt 47 2 Square Bushing 48 1 Weight Carriage 49 1 Stabilizer 50 2 Weight Clip 51 2 Weight Rest 52 2 M8 x 50mm Carriage Bolt # 1 User's Manual # 1 Exercise Guide # 1 Grease Packet "#" Indicates a non-illustrated part. ...
... Inner Cap 23 4 Long Foam Pad 24 7 25mm Round Inner Cap 25 2 Fly Arm 26 4 M6 Washer 27 2 Short Foam Pad 28 4 Weight Stop 29 4 M6 x 16mm Screw 30 4 M6 x 38mm Screw 31 1 Adjustment Knob 32 1 M10 x 60mm Bolt 33 3 M10 Nylon Locknut... 55mm Bolt 43 2 Spacer 44 1 Pulley 45 1 M8 x 16mm Screw 46 2 M8 x 40mm Carriage Bolt 47 2 Square Bushing 48 1 Weight Carriage 49 1 Stabilizer 50 2 Weight Clip 51 2 Weight Rest 52 2 M8 x 50mm Carriage Bolt # 1 User's Manual # 1 Exercise Guide # 1 Grease Packet "#" Indicates a non-illustrated part. ...


