

User Manual
Page 3
... use a barbell that all precautions. 3. When you use the weight bench. protect the floor. Keep children under the age of weight on the weight rests. Mountain Time, to the location shown. 9. Do not place more than 110 pounds, including a barbell and weights, on the weight rests to the... locked position. 14. Do not place more than 30 pounds on each fly arm. This is designed to exercising, stop immediately and begin cool- When using the weight bench. 1. Always remove the lat...
... use a barbell that all precautions. 3. When you use the weight bench. protect the floor. Keep children under the age of weight on the weight rests. Mountain Time, to the location shown. 9. Do not place more than 110 pounds, including a barbell and weights, on the weight rests to the... locked position. 14. Do not place more than 30 pounds on each fly arm. This is designed to exercising, stop immediately and begin cool- When using the weight bench. 1. Always remove the lat...
User Manual
Page 4
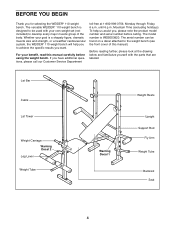
...Weight Tube Backrest Seat 4 BEFORE YOU BEGIN Thank you want. The versatile WEIDER® 110 weight bench is a shapely figure, dramatic muscle size and strength, or a healthier cardiovascular system, the WEIDER® 110 weight bench will help us assist you have additional questions, please call our Customer .... For your goal is designed to be found on a decal attached to achieve the specific results you for selecting the WEIDER® 110 weight bench. The serial number can be used with the parts that are labeled. Mountain Time (excluding holidays). Before reading further, ...
...Weight Tube Backrest Seat 4 BEFORE YOU BEGIN Thank you want. The versatile WEIDER® 110 weight bench is a shapely figure, dramatic muscle size and strength, or a healthier cardiovascular system, the WEIDER® 110 weight bench will help us assist you have additional questions, please call our Customer .... For your goal is designed to be found on a decal attached to achieve the specific results you for selecting the WEIDER® 110 weight bench. The serial number can be used with the parts that are labeled. Mountain Time (excluding holidays). Before reading further, ...
User Manual
Page 5
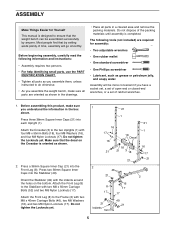
... will go smoothly. Before assembling this product, make sure all parts are required for Yourself This manual is designed to ensure that the weight bench can be more convenient if you understand the information in a cleared area and remove the packing materials. Make sure that by anyone. Most people...Press three 38mm Square Inner Caps (21) into the Stabilizer (49). Attach the Front Leg (8) to do otherwise. • As you assemble the weight bench, make sure you have a socket set, a set of open-end or closed-end wrenches, or a set of time, assembly will be assembled successfully ...
... will go smoothly. Before assembling this product, make sure all parts are required for Yourself This manual is designed to ensure that the weight bench can be more convenient if you understand the information in a cleared area and remove the packing materials. Make sure that by anyone. Most people...Press three 38mm Square Inner Caps (21) into the Stabilizer (49). Attach the Front Leg (8) to do otherwise. • As you assemble the weight bench, make sure you have a socket set, a set of open-end or closed-end wrenches, or a set of time, assembly will be assembled successfully ...
User Manual
Page 9
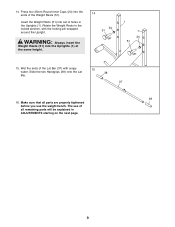
... the Uprights (1). 14. Insert the Weight Rests (51) into the Uprights (1) at the same height. 14 24 51 1 1 24 51 15. The use the weight bench. Wet the ends of the Weight Rests (51). Slide the two Handgrips (38) onto the Lat 38 Bar. 37 38 16. Press two 25mm Round...
... the Uprights (1). 14. Insert the Weight Rests (51) into the Uprights (1) at the same height. 14 24 51 1 1 24 51 15. The use the weight bench. Wet the ends of the Weight Rests (51). Slide the two Handgrips (38) onto the Lat 38 Bar. 37 38 16. Press two 25mm Round...
User Manual
Page 10
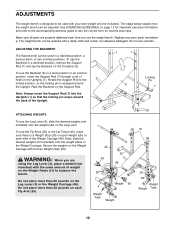
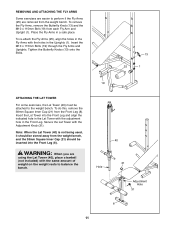
...Uprights (1) so that the locking pin wraps around the Upright. Do not place more than 30 pounds on the Weight Rests (51) to balance the bench. Replace any worn parts immediately. WARNING: When you are properly tightened each side of holes in a declined position, a level position, or two inclined.... Rest the Backrest on the Weight Carriage with the same amount of the Upright. 1 1 Locking Pin 6 7 3 ATTACHING WEIGHTS To use the weight bench. Secure the weights on the Support Rod. Do not use the Fly Arms (25) or the Lat Tower (40), make sure there is a Weight Stop...
...Uprights (1) so that the locking pin wraps around the Upright. Do not place more than 30 pounds on the Weight Rests (51) to balance the bench. Replace any worn parts immediately. WARNING: When you are properly tightened each side of holes in a declined position, a level position, or two inclined.... Rest the Backrest on the Weight Carriage with the same amount of the Upright. 1 1 Locking Pin 6 7 3 ATTACHING WEIGHTS To use the weight bench. Secure the weights on the Support Rod. Do not use the Fly Arms (25) or the Lat Tower (40), make sure there is a Weight Stop...
User Manual
Page 11
... (21) from each Fly Arm and Upright (1). Note: When the Lat Tower (40) is not being used, it should be stored away from the weight bench. To re-attach the Fly Arms (25), align the holes in the Uprights (1). Secure the Lat Tower with the holes in the Fly Arms with... the Lat Tower with the adjustment hole in a safe place. WARNING: When you are removed from the weight bench, and the 38mm Square Inner Cap (21) should be attached to balance the bench. 40 Hole 21 Adjustment Hole 31 8 11 REMOVING AND ATTACHING THE FLY ARMS Some exercises are easier to perform...
... (21) from each Fly Arm and Upright (1). Note: When the Lat Tower (40) is not being used, it should be stored away from the weight bench. To re-attach the Fly Arms (25), align the holes in the Uprights (1). Secure the Lat Tower with the holes in the Fly Arms with... the Lat Tower with the adjustment hole in a safe place. WARNING: When you are removed from the weight bench, and the 38mm Square Inner Cap (21) should be attached to balance the bench. 40 Hole 21 Adjustment Hole 31 8 11 REMOVING AND ATTACHING THE FLY ARMS Some exercises are easier to perform...
User Manual
Page 16
... , please be prepared to give the following information when calling: • The MODEL NUMBER of the product (WEBE03820) • The NAME of the product (WEIDER® 110 weight bench) • The SERIAL NUMBER of the product (see the front cover of this manual) • The KEY NUMBER and DESCRIPTION of the desired part...
... , please be prepared to give the following information when calling: • The MODEL NUMBER of the product (WEBE03820) • The NAME of the product (WEIDER® 110 weight bench) • The SERIAL NUMBER of the product (see the front cover of this manual) • The KEY NUMBER and DESCRIPTION of the desired part...


